During the systematic refueling of a vehicle with low-quality fuel, sediment forms at the bottom of the tank and the line becomes clogged. Passive acceleration dynamics and increased gasoline consumption are the first signs of a decrease in the throughput of the TF.
In cars of the Opel family of modifications Astra N, Astra J, Astra G, fuel filters (hereinafter referred to as TF) are installed in the following order:
- gasoline engines: TF is built into the housing with a fuel pump, non-separable design, must be replaced as an assembly;
- diesel: the TF is autonomous from the power unit. As a rule, it is fixed at a safe distance from the fuel rail and injectors.
For the purpose of prevention, use the inspection channel, roadside overpass, or hydraulic lift.
The process of replacing the filter yourself is not at all difficult, but it requires care on the part of the repairman. Seek help from a car repair shop specialist if you have never had to service your vehicle.
Where is it located, price, originals, analogues, articles
Engineers recommend inspecting the TF every 45,000 km. If your car is systematically filled with low-quality fuel, the filter replacement life will be reduced by several thousand kilometers. Natural sediment forms at the bottom of the tank, clogging the fibers of the cleaner.
The filter has a non-separable design and cannot be prevented or repaired.
| Serial number/item | Price in rubles | |
| Gasoline engines | ||
| H110WK | 21-00083-SX | 800 — 850 |
| E59KP01 D78 | PF3148 | 800 – 850 |
| C10039ECO | PF3134 | 800 – 850 |
| WK 512 (Astra N) | CFF100255 | 800 – 850 |
| P 732x | L225/606 | 800 – 850 |
| PU 8013 z | 50014554 | 800 – 850 |
| 3ECO009 | 50013687 | 800 – 850 |
| FS-2301 | 50013643 | 800 – 850 |
| DE 3115 | 50013268 | 800 – 850 |
| LF-1110 | EFF026 | 800 — 850 |
| Diesel engines | ||
| FC547E | PU 8013 z | From 900 – 1000 |
| EP163 | 3ECO009 | From 900 – 1000 |
| C511 (Astra J) | DE 3115 | From 900 – 1000 |
| FE005z | CFF100255 | From 900 – 1000 |
| ADZ92310 | L225/606 | From 900 – 1000 |
| ADG02325 | 50014554 | From 900 – 1000 |
| KX 78D | 50013687 | From 900 – 1000 |
| KX 231D | EFF026 | From 900 – 1000 |
| 180009510 | C511 (Astra G) | From 900 – 1000 |
| E59KP01 D78 | ADZ92310 | From 900 – 1000 |
| C10039ECO | KX 231D | From 900 – 1000 |
| *check the price with the manager at the time of purchase |
Signs of a clogged fuel filter on an Opel Astra
- unstable start of the power unit at different temperature conditions;
- increased fuel consumption;
- engine detonation at idle speed;
- acceleration is slower than usual;
- lumbago in the exhaust pipe;
- enriched or lean fuel mixture;
- The “Check Engine” light on the instrument panel is on.
Causes of filter clogging on Opel Astra (Opel Astra H)
- operating the vehicle for longer than the recommended period before undergoing a scheduled technical inspection;
- filling the tank with low-quality fuel, low-octane mixture for a long time;
- purchase of non-original consumables;
- the machine was left idle for a long time, in the “preservation” mode, as a result of which natural sediment formed in the circuit.
Fuel cell diagnostics on an Opel Astra
- Stop the engine and open the hood.
- Inspect the fuel circuit for damage.
- Check the serviceability of the fuse (No. 14) of the mounting block, it is located under the dashboard, to the left of the steering wheel;
- Check the tightness of the fuel supply line and make sure there are no fuel leaks.
If there are no comments on the integrity of the circuit, then proceed to replacing the TF.
Replacing the fuel filter on an Opel Astra
Required materials and tools:
- new filter: for gasoline or diesel engines;
- rags;
- flat head screwdriver;
- TORX key to “8”;
- pliers.
Step-by-step guide to replacing the TF with your own hands on an Opel Astra H:
- We place the vehicle above the inspection hole.
- We remove fuse No. 14 from the mounting block.
- We start the engine, the unit runs until it stalls.
- We insert the fuse into its original place again.
- For a “diesel”: from the engine compartment side, unclip the fastenings of the pipes to the TF.
- We remove the TF and install a new one.
- We put on the clamp and fuel supply pipes.
- For a gasoline engine: inside the car, in the back row, unclip the sofa seat.
- We remove the sound insulation layer.
- Unscrew the diagnostic window.
- Remove the fuel pump assembly.
- Let's disassemble the module into its component elements. Replace the fine filter with a new one.
- We assemble the parts in reverse order.
Do-it-yourself fuel filter replacement is complete. Subsequent diagnostics after 40 - 45 thousand km.
The fuel purifier is subject to unscheduled diagnostics if the vehicle has been in storage mode for more than two years.
Replacing the fuel filter in Opel Astra cars yourself requires the car owner to know some of the features of the fuel system. So, in cars with a gasoline engine, the filter is a structural element of the fuel pump and is located in its housing. Because of this, the filter element cannot be changed separately. Replacement is carried out together with the fuel pump. This applies to petrol models Opel Astra A (1.6 l, 1.8 l), Opel Astra H (sedan and station wagon 1.2-1.8 l), H GTC (1.2-1.8 l), H Sport Hatch (1.2-1.8L), H Twin Top (1.6L, 1.8L).
To select a fuel pump and fuel filter for these models, use the table that shows the manufacturers and catalog numbers of suitable spare parts.
| MANUFACTURER | CATALOG NUMBER |
| OPEL | 93188874 |
| Bosch | 0580314195 |
| SAAB | 93188874 |
| FISPA | 22443 |
| KAUTEX | 730362 |
| HOFFER | 7507045 |
| MEAT & DORIA | 77045 |
| SIDAT | 72443 |
Tools you will need:
- screwdriver (flat);
- hammer;
- rust removal liquid VD-40;
- rag;
- automotive sealant
Replacing an element in an Opel Astra J
Tools
To change the element to Astra J you will need:
- pit or overpass;
- Phillips screwdriver;
- new filter;
- container for draining fuel.
Replacement instructions
- We drive onto a pit or overpass and support the front wheels with bricks. You also need to jack up the rear of the car.
- Then you need to crawl under the bottom of the car and loosen the clamp securing your TF.
- Place a pre-prepared container under the filter.
- Next, disconnect the fuel hoses from the TF. Get ready to collect the poured gasoline.
- When the fuel is clear, the filter can be removed.
- We install a new element in place of the old TF and connect all the hoses.
For vehicles with petrol engine
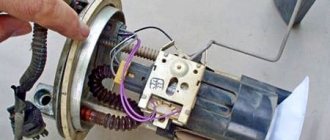
1. The fuel pump with fuel filter is located under the rear seat. We remove the seat cushion, fold back the carpet, and find the fuel pump cover.
Opel Astra fuel filter replacement
2. Use a flat-head screwdriver to pry up the cover and remove it.
3. Disconnect the wiring harness.
4. By pressing the lock with a screwdriver, disconnect the fuel line fitting.
5. Use a rust removal liquid to treat the areas where the pump is secured with a retaining ring.
6. Turn the locking ring counterclockwise and remove it.
7. Pull out the fuel pump.
8. Having sealed the edges from below with sealant, we install a new fuel pump.
9. We assemble in reverse order.
For Opel Astra with diesel engine
For diesel cars (A 1.7 l; G 1.7 l; 2.2 l; H 1.7 l) the filter is located separately from the injection pump. You can select a filter element from the table below.
| KRAFT AUTOMOTIVE | 1721601 |
| BLUE PRINT | ADZ92310 |
| BOSCH | 1457429656 |
| DELPHI | HDF513 |
| COMLINE | EFF026 |
| FILTRON | PM936 |
| HOFFER | 4229 |
| JAPKO | 3ECO009 |
| KNECHT | KX 231D |
| KOLBENSCHMIDT | 50013687 |
| MANN-FILTER | P 732x |
| MASTER-SPORT | 732X-KF-PCS-MS |
| MISFAT | F689 |
| PURFLUX | C511 |
| NPS | S133I02 |
| OPTIMAL | FF-01218 |
| VALEO | 587902 |
The only tool we need is a screwdriver with an asterisk head.
1. The fuel filter is located under the hood on the driver's side closer to the windshield. Remove the ground terminal on the battery.
2. Use a screwdriver to unscrew the central bolt. Disconnect the connectors.
3. Remove the cover and take out the filter element.
4. Install a new one.
5. Close the lid, tighten the bolt, and connect the electrical connectors.
This is how we learned how to change the fuel filter on an Opel Astra with diesel and gasoline engines.
We have a diesel Opel Astra H under maintenance, on which the fuel filter needs to be replaced. We will show you clear photos and video instructions on how to do this yourself.
The fuel filter in this car is located under the hood, in a glass behind the engine. Disconnect all sensors:
It is convenient to remove the top tube with round pliers:
Unscrew the lid of the glass. It is often difficult to do this with your hands; you can take a small block, rest it against one of the edges and do not tap too hard with a hammer. A plumbing wrench would be ideal for replacing water filters.
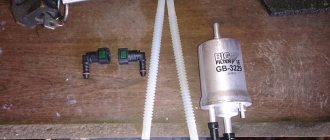
We take out the old filter element, be prepared for diesel fuel to pour out of it, so prepare some kind of container or cloth in advance, do not forget to remove the old rubber seal:
The new one will come complete with a new filter, do not forget to replace it. Insert a new filter element:
And we reassemble in reverse order. Before starting the engine for the first time after replacing the fuel filter, turn the key several times partially so that the diesel fuel is pumped through the system and only then start the engine.
Video of replacing the fuel filter in Opel Astra H:
Backup video on how to replace the fuel filter in an Opel Astra N:
AutoPro experts know additional configurations:
- LPG fuel filter (propane-butane): 6R0201511, 71753479, 881068, 3183600, MPG6009, S1836B, 253409110117, 10GAS2S, 2100693SX, PM99920, 7245262, FOGAS2S
- Coarse fuel fine filter; Assembled: 813046, 818001, FC547E
- Coarse fuel sediment filter insert, Coarse: 5818083, 013058180083A, 5818084, 5818083, 0818005, KX231D, SFPF7069, PE9361, F026402093, 013008180005A, 14574 31721, 818027, 0818027, KX231D, WF8405, 95516131, PU8013Z, 3058180083, 818005, P732X , 818531, 5818509, MD381, 30ECO009, 1457429656, L255606, MG1600, FA5762ECO, HDF513, A120019, 23305, PM936, C10039ECO, E59KPD78, E59KP01D78, FCE CO009, 110023, F300401, KX78D, 50013687, 1721601, KX78D, 63232, 260075, ELG5245 , 6148180000, DE3115, F689, C511, S6689N and others.
- Standard equipment: 77362340, 0813035, 0813036, 0813569, 813035, 813036, 813569, 77362341, 77363600, 1345984080, 190697, PE982, 4807214, 2 6336, 1906C4, 013008130569A, 4708795, 93193621, 96816473, 93181377, 93179236, 60H2O00, 30ECO016, 1457070001 , C10026, KX208D, PU723X, 96816473, 110390, FCECO016, KX208D, S6H2ONE, C507, 70926336, 77365902, FG102, 93181377, PF1609, 260033, 818012 , 0818012, 15302543, 5514300, E148145, L409606, 50014136, SF9960, HDF608, BSG70130002 , J1338027 and others.
This spare part depends on the Opel Astra engine and its modifications
- 1.4 Z14XEP: 6R0201511, 71753479, 881068, 3183600, MPG6009, S1836B, 253409110117, 10GAS2S, 2100693SX, PM99920, 7245262, FOGAS2S
- 1.7 CDTI [Z17DTL, Z17DTH]: 813046, 818001, FC547E
- 1.7 CDTI [Z17DTL, A17DTR, Z17DTR, Z17DTH]: 5818083, 013058180083A, 5818084, 5818083, 0818005, KX231D, SFPF7069, PE9361, F026402093, 0130081 80005A, 1457431721, 818027, 0818027, KX231D, WF8405, 95516131, PU8013Z, 3058180083, 818005, P732X, 818531, 5818509, MD381, 30ECO009, 1457429656, L255606, MG1600, FA5762ECO, HDF513, A120019, 23305, PM936, C10039ECO, E59KPD78, E59KP01D7 8, FCECO009, 110023, F300401, KX78D, 50013687, 1721601, KX78D, 63232, 260075, ELG5245, 6148180000, DE3115, F689, C511, S6689N
- 1.9 CDTI [Z19DTH, Z19DT], 1.3 CDTI Z13DTH, 1.9 CDTI 16V Z19DTH, 1.9 CDTI Z19DTJ: 77362340, 0813035, 0813036, 0813569, 813035, 813036, 813569, 7736 2341, 77363600, 1345984080, 190697, PE982, 4807214, 26336, 1906C4 , 013008130569A, 4708795, 93193621, 96816473, 93181377, 93179236, 60H2O00, 30ECO016, 1457070001, C10026, KX208D, PU723X, 968164 73, 110390, FCECO016, KX208D, S6H2ONE, C507, 70926336, 77365902, FG102, 93181377, PF1609, 260033, 818012 , 0818012, 15302543, 5514300, E148145, L409606, 50014136, SF9960, HDF608, BSG70130002, J1338027
Spare part Fuel filter suitable for cars:
- Fiat: Doblo minivan (119) , Doblo van (223) , Strada pickup (178E) , Panda hatchback (169A) , Idea minivan (350) , Ducato bus (244, Z) , Ducato van (244) , Ducato flatbed ( 244) , Croma station wagon (194) , Albea sedan (172) , Sedici SUV (189) , Punto hatchback (199) , Ducato van (250) , 500 hatchback (312) , Idea minivan (350)
- Opel: Agila hatchback (H00) , Combo van , Corsa hatchback (F08, F68) , Vectra hatchback , Vectra sedan , Meriva minivan , Signum hatchback , Vectra station wagon , Combo minivan , Astra sedan (L69) , Astra station wagon (L35) , Tigra convertible (twin top) , Agila hatchback (H08) , Antara SUV (L07) , Zafira minivan (A05) , Astra hatchback (L48, L08)
- Suzuki: Wagon R minivan (MM) , Ignis hatchback (FH) , SX4 hatchback (GY) , Swift hatchback (RS) , Splash hatchback , Swift hatchback (MZ, EZ) , SX4 hatchback , Vitara SUV (LY)
- Citroen: Jumper flatbed (244) , Jumper bus (244, Z) , Jumper van (244) , Jumper flatbed (250) , Jumper bus (250) , Jumper van (250)
- Subaru: Justy hatchback (G3X)
- Lancia: Ypsilon hatchback (843) , Musa minivan , Musa minivan
- Peugeot: Boxer bus (244, Z) , Boxer van (244) , Boxer flatbed (244) , Boxer bus (250)
Buy a fuel filter for Opel Astra H diesel or gasoline
Price for Opel Astra H fuel filter and cost of analogues
© 2022 Autopro Spare parts without intermediaries
By using Autopro, you accept the Terms of Use of the site
The fuel filter is responsible for cleaning the fuel before it enters the combustion chambers of the engine. For both types of engines (Astra has both gasoline and diesel power units), this element is very important. Especially considering the low quality of domestic fuel.
Opel Astra H: replacing the fuel filter on a gasoline engine
If we talk about Opel Astra H cars, the fuel filter on a gasoline engine should be replaced every 90 thousand km.
vehicle mileage. The Opel manufacturer insists on this. It is believed that by this point it is so clogged that its patency begins to suffer. However, Russian experts recommend performing this procedure with greater regularity - at least every 60-70 thousand km. This is explained, again, by the low quality of Russian gasoline.
The gasoline filter consists of two elements:
- a coarse filter, which is a fine-mesh steel mesh that is designed to trap relatively large solid particles contained in the fuel;
- a fine cleaning element or, as it is often called, a final filter. In most units, this is special micro-perforated paper that is capable of retaining the smallest foreign particles that get into gasoline either during production or during storage and transportation.
It is not difficult to guess that it is the last component that fails first. One of two things happens. It either becomes clogged, making the device completely impassable, and the engine, not receiving gasoline (or receiving it in insufficient quantities), stalls or operates with less power. Either the paper breaks and the filter stops performing its functions: the fuel enters the combustion chambers unpurified, simultaneously reducing both the engine power and its service life.
Theoretically, it would be possible to replace only the filters without resorting to installing a new unit. But in practice this, unfortunately, is impossible. The fact is that almost all modern automobile fuel filters are non-separable structures that cannot be repaired or restored.
Fortunately, the cost of this device is low, even if you use original Opel spare parts for replacement. However, this is not at all necessary - the principle of operation and design of all devices for purifying gasoline in cars are the same. They differ only in throughput, depending on the engine displacement of each specific car. So, you can use universal Russian and even Chinese spare parts for replacement - the main thing is that they are suitable for your car.
What is a fuel filter
In any car, TF is an integral element of cleaning the fuel system. As stated above, this small, inconspicuous part determines the operation of the car as a whole, since it is responsible for the most important process. Namely, for purifying fuel from foreign impurities and moisture (pure gasoline can hardly be found at domestic gas stations).
Today we will tell you about the cleaning fuel cell in Opel Zafira cars. These cars are available in two versions: with gasoline and diesel engines. Cars with gasoline engines require careful and high-quality fuel filtration. This is necessary so that the injector nozzles do not become clogged for a long time, otherwise the car is guaranteed to have abnormal engine operation.
Used TF Opel Zafira with a gasoline engine
As for diesel modifications, these engines are no less sensitive to the quality of the fuel they fill. Diesel cleaning elements filter fuel in three stages:
- pre-cleaning;
- rough cleaning (continuation of preliminary);
- fine fuel cleaning.
Diesel cars require a triple level of filtration due to the fact that D/T (diesel fuel) contains an order of magnitude more condensate or moisture than traditional gasoline. And since the mass of water is higher than the weight of the fuel, it settles at the bottom of the filter, but, thanks to its design, is optimally removed.
But if the filter component becomes clogged over time, then the water in it, accordingly, becomes more. When the humidity reaches a critical level, it must be drained from the filter. At this moment, a special sensor located at the very bottom of the diesel cleaning element housing will signal the driver about the problem via a light on the instrument panel. To the inconvenience of owners of diesel Opel Zafira, the fuel purifier is located in such a place that even if you want to drain the water from it, you still have to remove the filter housing.
New diesel TF for Opel Zafira
Where is the filter located
Now let's figure out where Opel Zafira diesel cars are installed. In vehicles with a gasoline engine, the TF is located under the bottom of the car, on the same level as the rear passenger seat, not far from the gas tank.
As for diesel modifications, the element is located behind a plastic shelf in the engine compartment, opposite the driver’s seat. If you cannot find this element in your car yourself, read about it in the operating instructions or contact your dealer for help.
Opel Astra H: replacing the fuel filter on a diesel engine
The device for purifying diesel fuel has a much more complex design than for gasoline. This is because it performs several functions at once:
- cleaning fuel from insoluble solid contaminants;
- retention of excess water contained in diesel fuel;
- heating the fuel before it is supplied to the combustion chambers.
The latter is necessary so that paraffin crystallization does not occur in diesel fuel, which occurs at its low temperature. If the diesel fuel enters the cylinders cold, the paraffin will significantly reduce the efficiency of the engine and will cause it to fail in a fairly short time.
The diesel fuel filter performs the first function in exactly the same way as a gasoline filter - in two stages. Next, the already purified fuel is heated, as a result of which paraffin crystals melt in it (if they manage to form) and excess water evaporates.
Given the more complex design, replacing the Opel Astra Ash fuel filter on a diesel engine will cost the car owner slightly more than on a gasoline engine. This applies to both the cost of the unit itself and the cost of the operation to replace it. Moreover, given the versatility of this unit and the low quality of diesel fuel in Russia, it has to be changed more often than gasoline - no less than every 50 thousand km. vehicle mileage.
Main filter brands, or who to trust?
Today, several hundred manufacturers of auto filters are officially registered in the world. If we discard those who specialize only in air or hydraulic filters, then there will be 5-6 dozen of them left.
At the same time, there are only a few manufacturers of high-quality filter paper around the world. Most of them are in Europe. So it turns out that supporters of quality are forced to bring raw materials thousands of kilometers away, and those who strive to conquer the market with low prices use what is closer, cheaper, and of low quality.
Of course, the best choice is to install filters recommended by the car manufacturer.
Each part of the car has its own catalog number (you can find it out from the owner's manual).
Through it you can access the filter number recommended by the manufacturer. There is an even simpler option: contact specialists who, based on the car’s VIN code, will offer the number of the original filter or put you before choosing an alternative from several manufacturers.
Why is it necessary to replace the fuel pump on the Opel Astra H?
Simultaneously with the described procedure, it is advisable to replace the fuel pump for efficient operation of the Opel Astra H fuel system. Firstly, he, as a rule, by this moment also manages to develop a good part of his resource. Secondly, it becomes no less clogged than the filter, because gasoline enters it unpurified.
When you need to replace a fuel pump on an Opel Astra H, you should use either a similar unit or an analogue with the same technical characteristics. Of course, we are talking about products approved by the Opel manufacturer.
Although replacing all these components is not particularly difficult, it involves draining some of the fuel and oil, and therefore it is a very troublesome task. By entrusting it to car service professionals, you will save yourself from unnecessary complications and save time.
Tools needed to replace the fuel pump in a car
When replacing the fuel pump of a Ford Focus or any other car, you must adhere to fire safety rules:
- Smoking is prohibited during work.
- It is advisable to carry out repairs outdoors.
- Open flame sources must not be used.
- It is prohibited to check the operation of the fuel pump when it is located in the tank.
Very often it is impractical to repair a pump; it is much easier to purchase a new one and install it.
Tools can be divided into several categories: for the replacement process itself, as aids, additional materials.
- keys of different sizes;
- flat and Phillips screwdrivers;
- pliers;
- extendable tongs.
- universal-purpose technical aerosol (Vedashka, or WD-40) or other similar liquid;
- wheel inflation pump;
- rags.
- mesh and pump;
- fuel supply hose. Useful in cases where the fuel pump has not been replaced for a long time;
- rubber sealing ring.
The first step is to put on gloves. Keep in mind that the vehicle's fuel pump consists of a complex assembly with a fuel consumption indicator and is located in the car's tank, at the top.
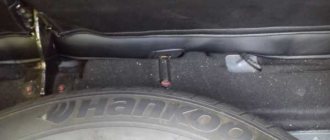
- Remove the hatch cover located in the trunk compartment of the car.
It is recommended that you perform the steps to replace the fuel pump in a room with good ventilation. The vehicle must be kept away from heating devices and sources of fire.
- Residual pressure must be removed from the power system.
In order to do this, you must remove the negative cable from the battery, but the car must be on level ground.
- Lower or remove the rear seatback and remove the floor cover.
- On the top of the package, find the area where the wires connect and disconnect them.
- Unscrew the plastic ring in the gas tank hole using sliding pliers.
So, the steps taken above have been completed, now the last thing left for you is to remove the fuel pump and replace it with a new unit.
- After the remaining gasoline has drained, you can remove the pump from the car tank and then remove the gasket.
We take out the VAZ fuel pump. It is necessary to remove the assembly in this way so as not to injure the float located on the sensor. If damage to the float cannot be avoided or there are signs of fuel getting into it, then it should be replaced with a new one. When this is not done, the sensor readings are displayed incorrectly.
- Now you need to disconnect the lower glass, it snaps off.
Usually a large layer of dirt accumulates in it. You can remove it with a rag. If it is not possible to pull the glass out through the pump holes because it falls into the gas tank, then it can be removed by manually removing the seal.
- The next step is removing the filter (mesh).
- Using pliers, remove the locking pin from the guide.
- Disconnect the hose from the fuel pump.
In this case, it should be remembered that the rubber may lose elasticity if the replacement was made a long time ago, so it is recommended to change the hose. To do this, cut it off from the fitting in the upper area.
- Unscrew the fuel consumption indicator and remove it from the fuel pump housing, then remove the terminal.
The entire process of assembling a new fuel pump consists of the reverse order of manipulations. After replacing the fuel pump, you should connect the car’s battery and start it for a short period of time, then check whether fuel flows from all connections, if everything is fine, then you can close the lid and put the back seat in place .
Attention!
Gasoline in a gas tank is explosive. Therefore, auto mechanics strongly advise being very careful when replacing the fuel pump. By following this rule, you will protect yourself from trouble. Good luck!
Car selection
Brand
Model
Model type
Modification
Brand
Model
Model type
Modification
- Brake fluids
- Antifreeze
- Power steering fluids
- Hydraulic fluid
- Oil additives
- Lubricants
- Motor oils
- Car carpets
- Crankcase and gearbox protection
Online store of spare parts for foreign cars. Auto parts in stock and on order.
© 2022 AUTO3N.RU - All rights reserved.
AUTO3N.RU
- Stock
- Documentation
- Confidentiality
- Delivery
- Contacts
- Reviews
- About Store
- Payment
- Return Policy
- Spare parts for foreign cars
- Franchise
- Site updates
- Articles
- The educational center
Catalog
- Auto parts
- Auto chemical goods
- Car cosmetics
- Oils
- Batteries
- Autolight
- Car accessories
- Autoelectronics
- Tool
- Sports and recreation
- Original catalogs
- Maintenance catalog
Personal Area
- To come in
- Registration
Join us:
Rate our store
Online store of spare parts for foreign cars. Auto parts in stock and on order.
How to change the fuel filter correctly?
to d-110:
It is located under the rear row of seats and can be replaced together with the fuel pump.
d-110:
How to change the fuel filter correctly? #
What kind of engine do you have?
Look under the car, if the filter is not there, then it is assembled in the fuel pump module and can only be changed as a whole with the pump.
to d-110:
Depends on the engine type. excerpt from manual
And after what mileage is replacement recommended so as not to get stuck somewhere on the road?
to sergik72:
If you change everything that could cause you to get stuck somewhere on the road, then I think it’s cheaper to change the car..
to sergik72:
Change regularly every 10-15 thousand. At the same time, clean the fuel pump mesh.
to sergik72:
I support Raina. Replace every 10t or clean.
So it turns out I need to remove the pump and disassemble it every 10-15000? Is there a filter element? I have a gasoline engine.
sergik72:
So it turns out I need to remove the pump and disassemble it every 10-15000? Is there a filter element? I have a gasoline engine. #
The fuel filter built into the pump is designed to last the entire service life of the pump.
The mesh – the coarse filter – needs to be changed or cleaned.
Timely replacement of internal cleaners allows you to extend the life of your Opel passenger car. It is not advisable to carry out these manipulations yourself. It is more advisable to contact the experts of the Moscow auto service center “Autopilot”.
Features of replacing car fuel filters
Regular technical inspections allow you to identify the slightest malfunctions in the operation of the machine. Experts independently determine when it is necessary to replace the fuel filter on an Opel Astra N. Typically, such activities are carried out simultaneously with filling the engine oil. Consumables can be purchased from Autopilot representatives. They will select everything necessary, taking into account the specifics of transport, the wishes of the client, and the level of his solvency. Adequate prices for the services of replacing fuel filters on the Opel Astra N allow everyone to take advantage of such professional help.
Replacing the fuel filter Opel Astra H in Moscow
Cars that are no longer under dealer warranty are serviced here. Autopilot employs highly qualified auto mechanics. They constantly confirm their professional level, improve knowledge and skills. On the Opel Astra H, the fuel filter requires replacement, because without it the car will not function normally. To avoid serious damage in the future, think about this need now. In the Opel Astra H, the fuel filter is replaced quickly, thanks to the advanced equipment installed in the Autopilot workshops. Here you can undergo a complete vehicle diagnostic to make sure it is in good technical condition.
Replacing the fuel filter on an Opel Astra of the H and J generations, popular in Russia, usually does not cause much difficulty. But first, you must clearly understand where this filter is located. For example, diesel versions of the Opel Astra have a fuel filter under the hood. For the gasoline Astra J, the filter is located under the bottom, next to the gas tank; for the Astra H, the fuel filter is located inside the gas tank in a single module with the gas pump. Therefore, we will consider each case separately.
Let's start with the simplest thing, replacing the filter element in diesel versions of the Opel Astra. The poor quality of Russian diesel fuel is legendary, so you may need to replace the filter at almost any time and you need to be prepared for this.
Possible faults
Like any other component, the control panel on an Opel Astra J, H or another model can fail.
Malfunctions may be the following:
- Damage to the control panel. In this case, all devices or only some of them may not work. It is necessary to diagnose the condition of the unit and repair it, if possible. If not, then the shield will need to be changed. It is impossible to check the tidy on your own at home without the appropriate equipment and knowledge. Therefore, if you encounter a similar problem, it is best to immediately contact a specialist.
- The engine temperature level sensor or fuel level sensor in the tank does not function. The reason may be damage to the control panel, failure of the controller itself, or damage to the wiring. If the sensor is faulty, then it will have to be replaced - the fuel level sensor is located in the gas tank, and the antifreeze temperature sensor is located in the engine compartment. If the problem is in the wiring, then it will need to be called. In some cases, the cause of the problem is oxidation of the tips, in which case you can try to clean them. If this procedure does not produce results, then the tips will have to be changed.
- Indicator lights do not function. If the light bulb itself burns out or its controller fails, then these elements must be replaced. As in the previous case, the problem may also be poor wiring - damaged wires need to be replaced, and acidified contacts need to be cleaned. Alternatively, the problem may lie in insufficient contact between the indicator socket contacts and the microcircuit itself. If this is the case, then the contacts need to be bent or the cartridge replaced.
- The tachometer or speedometer does not work. Such malfunctions occur quite rarely and, as a rule, the reason lies directly in the breakdown of the device. It is necessary to diagnose and replace elements if necessary.
- The backlight has stopped working, but all devices are working normally. The reason may be that the control panel backlight cable is damaged. You need to check it and, if necessary, change it (the author of the video is the UFO Tuning channel).
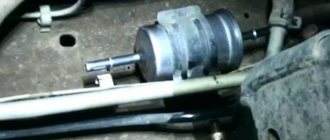
Diesel Opel Astra fuel filter replacement
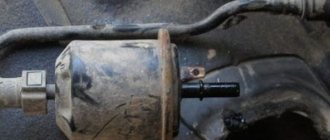
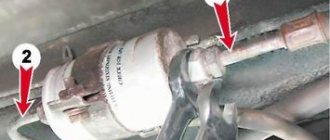
Finding the fuel filter housing for the diesel version of Astra is not difficult. We open the hood and next to the vacuum brake booster we see a black cylindrical flask. Photo for clarity below.
In order to remove the old filter, you need to do a minimum of actions. We disconnect the electrical sensor (it is advisable to remove the terminals from the battery before doing this) and unscrew the cover of the fuel filter housing. There is no need to disconnect the fuel hoses; they will not interfere with us in any way. The central bolt is an asterisk, but you can unscrew it with a regular slotted screwdriver. The main thing is that the width of the slot allows you to turn the bolt. After removing the cover, take out the old filter and install a new one. The new filter is installed on the rod. You can pour some diesel fuel into the fuel filter housing. When installing the fuel filter cap, it is advisable to replace the gaskets (usually they come with the new filter.)
The fuel filter is replaced every 30 thousand kilometers, or every two years, whichever comes first. Experienced car enthusiasts change the filter a little more often, for example, once every 15-20 thousand kilometers. In addition, it is recommended to replace the fuel filter of the diesel Opel Astra before the cold season, so that there are fewer problems with starting the engine.
Z18xer oil check valve
This entry will talk about the check valve that is located in the block behind the generator.
As most people know, it is needed so that the oil does not drain from the phase regulators into the sump when the engine is turned off. I already mentioned this check valve in the previous entry: The beginning of my fight against the disease Z18XER, it was installed on September 20, 2017 and drove 20k km, and I am making an entry only today (12/05/2018). All this time I was “listening” to his work and did not make a recording. I repeat, it is located behind the generator, and to get to it you need to remove the drive belt, tilt the generator to the side, unscrew the plug, and spend a certain amount of time removing the factory valve. I extracted this devil for a long time and painfully, I picked out his insides without any problems, but it was still the Kama Sutra to extract the body. I selected a construction self-tapping screw with a turnkey head according to the diameter, and adjusted a washer under the head so that the head of the self-tapping screw would have something to rest against. I screwed a self-tapping screw into the valve body and tried to press it in by turning the self-tapping screw, which rested against the block through the washer. I didn’t take any photos, as I was carried away by such a pleasant procedure of extracting this bastard. He even gave up, thinking he would die there. But after an hour or so, the self-tapping screw managed to catch well, and the body was removed. I will try to illustrate the basic operation of this process.
The hardest part is over. The valve was designed based on information received on the forum: Tell me how to remove the check valve of the oil system? , there a user under the nickname djus also made himself a valve. But I went my own way.
This valve is easy to install and also very easy to remove. And this is the most important thing. The ball was used with the same diameter as in the original one (diameter 7 mm), the spring chosen was not very stiff (diameter 6 mm, length 15 mm, wire diameter 0.5 mm). Using a plug that is screwed into the valve body, the degree of pressure of the spring on the ball is adjusted. The most difficult thing was to grind the ball inside the valve, since after turning the contact surface was not ideal, and without grinding it would not close tightly. For lapping, I welded one of the balls to a steel rod, smeared the ball with lapping paste and ground it in. I made a cut in the adjusting screw with a metal hacksaw so that it could be screwed in with a screwdriver. Next, I adjusted the spring so that it lightly presses the ball inside the valve and it does not dangle there, but so that the valve is freely blown in the direction of the oil flow. After the adjustment, I tightened this screw so that it wouldn’t get unscrewed during work and cause trouble. Installing the new valve in its place: I screwed a longer M6 bolt into the valve and carefully pressed it in with a hammer until the characteristic sound of metal pressing against metal was achieved. And tightened the oil channel plugs in the block. Who will find it useful, detailed drawings of the valve components:
I calculated all the passages for oil cross-sectionally, using the factory valve as a basis, and the information that I could find on the Internet. The main thing is not to take a long spring, so that when it is compressed it will not block the passage of oil.
Well, and most importantly, why was it all done? Over the course of just over a year, my valve has never let me down. Even after two days of inactivity, the engine started without diesel, and it was no longer possible to leave the car idle. But there is one drawback to this design, or more precisely to the material from which it is made. At idle, when the oil pressure is low, under the hood you can hear a ball knocking inside the valve. In the factory valve, the ball is in a plastic cage, and its operation at idle cannot be heard. Maybe if this valve was made from some kind of heat-resistant, oil-resistant plastic, then it would be easier to grind in, and the work of the ball would not be heard.
Gasoline Opel Astra H fuel filter replacement
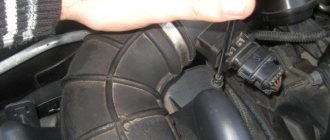
Replacing the fuel filter on the Astra H is not provided at all. But Russian operating conditions quite often baffle German designers. The main problem with the fuel filter on these cars is its location. Like in a nesting doll... Let's not digress from the topic. The filter itself is located in the fuel module (assembled with the fuel pump), and the module is located in the gas tank. You can get this module by removing the rear seat (although in some models you have to remove the gas tank). Below are photographs for clarity. Before the procedure, do not forget to remove the terminals from the battery.
To get to the fuel module you need to remove the plastic cover, for which you can safely use a screwdriver. Next comes a more difficult task - removing the metal ring. The ring is fixed in a certain position. You can take a screwdriver and a hammer, with which we turn the locking ring counterclockwise.
You will need to disconnect the fuel line and connector from the fuel module.
We take out the fuel module.
Only it is sold assembled, so replacing the filter in our case is equivalent to replacing the entire fuel module with the pump. Quite an expensive pleasure. Therefore, some car owners install an additional external fine gasoline filter. But this is a topic for another article.