What are the consequences of incorrect timing belt tension for the VAZ-2114 engine?
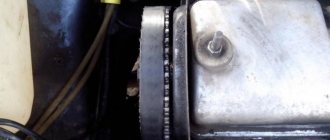
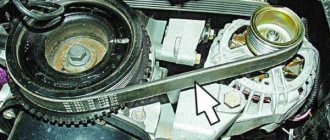
The timing belt has almost slipped. Pay attention to the gap from the belt to the engine, it is uneven
If the belt is significantly displaced, a picture similar to its complete break may be observed. Therefore, it is necessary to pay serious attention to the correct tension of the timing belt, both when replacing it and during operation of the vehicle. You can do this yourself, but be careful and be sure to follow the instructions below.
Proper tension (order and process)
Before you begin tensioning the timing belt, you must turn off the engine after idling in neutral gear. In this case, the engine crankshaft will stop in a position where all the forces acting on it will be balanced. Now let's start tensioning.
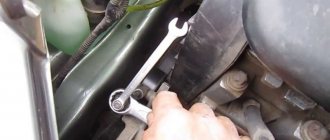
- Remove the belt protective cover.
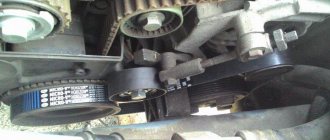
The casing has been removed. We inspect the belt
Here we also combine
Video of replacing and tensioning the timing belt on a VAZ-2114
Belt tension on 16-valve VAZ engines
Tensioning the timing belt on Priora and other cars equipped with 16-valve engines is generally done in the same way.
However, there are slight differences. Thus, the gas distribution mechanism cover of these engines is mounted on 6, and not on 3 bolts, as in the previous case.
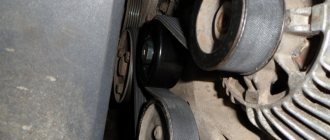
In addition, the timing belt on VAZ-2112 power units (16 valves) is tensioned using two rollers. One of them is movable, used for tension. The second one is the support one. » alt=»»> When tensioning the belt of a “Prior” motor or motor 2112, special care must be taken. After putting it on and tightening it, you must definitely try to crank the engine by hand.
If the crankshaft cannot be turned, you should once again check that the marks are installed correctly. On these engines, an error almost always leads to damage to the valves and piston group.
After replacing the timing belt, it should be properly tensioned. Let's talk about this...
conclusions
Incorrect timing belt tension will lead to accelerated wear.
Accelerated wear of the timing belt due to incorrect tightening.
The engine on a VAZ-2114 does not bend the valve when the timing belt breaks, but still, there is a risk of getting up at night in a dark field in our big country. You will be lucky if the belt breaks at home or at work, and not on a long trip. To prevent this from happening, you need to set the timing belt correctly, as we wrote above!
A specialist at a service station or an experienced car enthusiast who has already performed this procedure several times will be able to replace the timing belt in a few minutes. Another thing is for a car owner who has encountered this for the first time and does not know how to set timing marks on a VAZ 2114. In this case, the process will take much longer.
At the same time, the better a person knows the very operating diagram of the engine and the functions performed by the part being replaced, the easier it will be for him to understand the features and subtleties of the replacement. So let's understand the theory.
What is timing belt?
The timing belt, also known as the gas distribution mechanism, is a part responsible for synchronizing the injection and gas distribution phases in the power unit of the machine. In order for the entire system to work as a single whole, it is necessary to align special marks, which are the point of manual synchronization of the gas distribution.
Most often they go astray when the timing belt is replaced or it breaks while the engine is running. If you do not double-check that the marks match, the engine will not operate correctly, which means you will have to remove the belt again and set everything up.
TAKE INTO ACCOUNT! The timing belt has two pairs of marks, one of which is located on the pulleys, and the second near the block. They must coincide at the highest position of the first or fourth cylinder.
The price of a timing belt and the cost of replacing it
A timing belt can be purchased without any problems at any auto store. Its cost, depending on the manufacturer, ranges from 400 to 1000 rubles. However, when replacing the belt, it is recommended to also change the tension roller, the price of which ranges from 400 to 600 rubles.
The approximate cost of replacing a belt complete with a roller in a car service ranges from 600 to 1000 rubles.
If you do not have the opportunity or desire to go to a service station, you can do the repairs yourself. But first you need to purchase a new timing belt and pulley.
To make it easier to select spare parts, use the table below, which shows the catalog numbers of original parts and their analogues.
Installation process
The timing belt itself is a rubber product closed with teeth inward, which synchronizes the torque between the camshaft and crankshaft. Ignoring its wear will not lead to anything good, because in the best case, your engine will stall while driving, and in the worst case, the entire wheelbase will jam, which can lead to the most unpredictable incidents on the road.
The replacement and debugging itself is carried out in two stages, in the first stage the main repair and debugging work is carried out, and the second stage carries the function of monitoring the work done.
First stage
- The assistant gets into the car and puts 5th gear in the gearbox, and at this time you remove the front belt protection.
- Insert the ratchet into the place allocated for it and begin to turn the crankshaft, you need to do this until you see that the mark located on the camshaft has not moved to remove several teeth from the control antenna of the rear cover. (this action is necessary to reduce the degree of belt tension).
- We dismantle the drive pulley on the crankshaft and return the mounting bolt to its place.
- The assistant switches the gearbox to “neutral”.
- Again, we begin to carefully turn the crankshaft until the mark on the VAZ 2114 flywheel is in the central position.
Second stage (control-final)
- Before checking the timing marks on the VAZ 2114, you need to fix the pulley on the generator and tension the belt with a roller to the maximum.
- Now we check all the matches, if nothing is wrong anywhere, then we install the protection back and clean the workplace.
Looking under the hood of your car, with knowledge of this information, you will understand that there is nothing difficult in this procedure, but its success is quite dependent on the skill of the performer. Therefore, if something doesn’t work out the first time, just repeat the operation, you may even need to do it twice. Don’t be discouraged, because after the difficult first time it will only take you a few minutes, like a seasoned professional.
Belt tension on 8-valve VAZ engines
Before tensioning the timing belt on the VAZ, the following preparatory work should be performed:
After this, the drive marks should be checked. One of them, located on the crankshaft pulley, must coincide with the installation tab of the rear cover. At the same time, check the mark on the flywheel. It should be flush with the alignment mark on the block boss.
IMPORTANT! In reality, it is not always possible to achieve an exact match of marks. Therefore, the mechanism is adjusted with an error of +/- 1-2 mm. This does not have a noticeable effect on the driving performance of the car.
If the marks match, the question of how to tighten the timing belt can be considered resolved. Without removing the belt, it is necessary to move the weakened tension roller to the right so that the necessary tension occurs. After this, the roller is tightened tightly. To adjust the roller, a special “horned” key is used. If it is not available, you can use two Phillips screwdrivers, which are inserted into special holes on the roller.
If the marks do not match, the timing belt on the VAZ-2109 must be removed from the pulleys. After this, the pulleys themselves are individually set according to the marks. It is better to start reinstalling the belt from the rear branch. After installing it, the roller is tightened.
IMPORTANT! When installing the timing belt on a VAZ-2114 and other front-wheel drive models, the pulleys located according to the marks can shift by 1-2 teeth. If this happens, the marks should be set with an error to the left, which allows you to compensate for the offset. After installing the belt, the pulleys themselves will move into the required position.
It is necessary to finish tensioning and fixing the belt, and then manually turn the engine 2-3 turns by the crankshaft pulley. To do this, it is convenient to use a “19” head with an extension. The gearbox must be in neutral. If after turning the marks have not moved relative to each other, the procedure can be considered completed. Assembly is carried out in reverse order. » alt=»»> The question of how to check the consistency of the tension should be answered. To do this, hold the strap between your thumb and index finger and turn it 90°. The technician must be able to do this, otherwise the belt is considered over-tensioned.
How often to change the roller and belt
The recommended replacement rates for VAZ 2114 cars, determined by the manufacturer, define the replacement period as 60 thousand km, but this statement is only true for vehicles under five years old, otherwise this figure should be reduced by approximately 15 thousand km.
The replacement period is also affected by the performance of the liquid pump, with a maximum service life of 90 thousand km. You should not take the original pump under any circumstances, because it will quickly break on its own or “eat” the belt from the outside.
Also, do not forget about the need to replace the crankshaft seals, which also have similar wear measured at 40 thousand.
In conclusion
Correct operation of the timing system is the key to reliable and proper operation of the engine. Therefore, you should be very careful both in caring for this system and the belt, and in protecting it. Many domestic car enthusiasts like to drive without a protective cover, which should not be done under any circumstances if you do not want to reduce the replacement cycle by half.
Afterwards it should be tensioned correctly. Let's talk about this. Timing belt tension VAZ 2110, 2111 (8 cl.) To adjust the belt tension, turn the crankshaft counterclockwise so that the mark on the camshaft pulley moves down from the rear cover antenna by two teeth. Checking the timing belt tension means that the front branch of the belt is twisted 90° with the thumb and index finger of the hand with a small force of 1520 N (1.52.0 kgf). Here the questions arise: how to calculate the force? Everyone's finger strength is different, how to find the appropriate strength? It is necessary to tighten the timing belt so that at the longest section, try to turn it 90 degrees with 2 fingers; if you practically succeed, then the belt is tensioned normally. Try to tighten the timing belt and keep in mind that if the belt is too tight, you won’t be able to turn it 90 degrees with your fingers. if you didn't make it. the belt will dangle and hit the plastic casing (this should not happen). We tighten it until the sound disappears at idle and when accelerating. For this reason, if the timing belt is tensioned correctly, then when the casing is removed, its long part will fluctuate within 1cm. from the axis. Tensioning the timing belt VAZ 2112 (16 cells) Using a special wrench, tension the timing belt with a tension roller. If it is not there, then there is an option to tighten the timing belt using 2 nails and a screwdriver, which will be installed on them. There is also an option to transform a table fork into a suitable tool by breaking off 2.7 central teeth, and shortening and bending the last ones. Having turned the crankshaft two turns in the direction of rotation, we check the alignment of the installation marks. We check the tension of the toothed belt in the middle part of the branch between the camshaft pulleys. The belt deflection should be 5.4–0.2 mm. under a load of 100 N (10 kgf). And how to check the timing belt tension without a special tool? How do you figure out how much pressure you need to put on the timing belt? Method 1. Use 10kg. weights and ruler. Place a ruler on the belt between the pulleys, and a weight on the ruler. We pull so that the deflection from the plane is already 5mm. Method 2.4. Use steel scales. Attach the hook of the scale in the center of the belt between the pulleys and pull them upward until the reading on the scale is 10 kg. Then we measure the distance by which the timing belt has deviated (should be 5.4–0.2 mm). When, the same tool is used to tension the generator belt and nuts: Similarly with 8kl. motors: if you didn’t make it. the belt will dangle and hit the plastic casing.
Execution Sequence
1. We prepare the car for work (see “Preparing the car for maintenance and repair”).
2. 10 mm
Unscrew the three bolts securing the front timing belt cover.
3. Lift the cover vertically upward and then remove it from the engine.
4. Rotating the crankshaft, we check the condition of the belt by external inspection.
Note: The crankshaft can be rotated with a 17 mm socket wrench (19 mm on some cars) by the bolt securing its pulley or with a large slotted screwdriver by the flywheel teeth. To do this, remove the rubber plug from the hole in the clutch housing (see “Timing Belt - Replacement”).
The belt must be clean - without dirt or oil on its surface. A belt with tears, cracks, delaminations, cut or worn teeth, or abrasions down to the cord must be replaced (see below, “Timing belt - replacement”).
5. Using two fingers, we try to rotate the belt 90° in the area between the crankshaft and camshaft pulleys, applying a force of 15-20 Nm (1.5-2.0 kgfm).
If the applied force is not enough to turn the belt to the required angle, then the belt will be overtightened; If the belt can be turned to a greater angle, it is not tensioned enough.
Warning! Belt tension should be adjusted on a cold engine. Excessive belt tension, oil and dirt on it will shorten the service life of the belt, as well as the tension roller bearings and the coolant pump. If the belt tension is weak, it may jump over several teeth of the camshaft pulley.
6. To check the relative position of the camshaft and crankshaft, set the piston of the first cylinder to TDC of the compression stroke. For this:
A. Remove the rubber plug installed in the upper part of the clutch housing.
b. Through the resulting window, use a slotted screwdriver with a wide blade to turn the crankshaft by the teeth of the flywheel ring.
. until the mark on the camshaft pulley and the protrusion of the rear timing belt cover align.
In this case, the mark on the flywheel should align with the center of the scale.
Recommendations: If the relative position of the crankshaft and camshaft is disturbed, then turn the crankshaft until the mark aligns with the center of the scale. Loosen the belt tension and remove it from the camshaft pulley. Turn the camshaft until the mark on its pulley aligns with the protrusion on the rear cover. Without changing the relative position of the shafts, put the belt on the camshaft pulley and adjust the belt tension.
7. 17 mm
loosen the tension roller nut.
8. By turning the roller with a special wrench, we adjust the belt tension and, holding the roller in this position, tighten the nut that secures it.
9. Check the belt tension (see above) and, if necessary, repeat the adjustment.
10. Finally tighten the roller fastening nut to a torque of 33.2-41.2 Nm (3.4-4.2 kgfm).
11. Reinstall the front belt cover and tighten its fastening bolts.