Price list
- Special offers
- European Truck Spare Parts
- DAF truck spare parts
- MAN truck spare parts
- SCANIA truck spare parts
- MERCEDES truck spare parts
- RENAULT truck spare parts
- VOLVO truck spare parts
- IVECO truck spare parts
- BPW truck spare parts
- SAF truck spare parts
- Spare parts SCHMITZ trucks
- KAMAZ spare parts
- Spare parts KAMAZ-5490
- Spare parts MAZ, YaMZ
- ZIL spare parts
- GAZ spare parts
- Spare parts for Volzhanki cars
- Spare parts for Gazelists
- Spare parts for trucks Lawns
- Spare parts for GAZ-71 caterpillar
- UAZ spare parts
- Spare parts KrAZ, BelAZ
- Spare parts URAL
- Spare parts BUSES
- AMAZ spare parts
- IKARUS spare parts
- KAVZ spare parts
- LAZ spare parts
- LIAZ spare parts
- NEFAZ spare parts
- PAZ spare parts
- Other buses
- Tractors, computer equipment, attachments
- Tractors and walk-behind tractors
- Municipal vehicles
- Attachments and trailed equipment
- Spare parts for TRACTORS and SPECIAL EQUIPMENT
- JCB – spare parts for special equipment
- Truck crane (KS-3577, KS-4517, etc.)
- AMZ (A-01, A-41, D-440, D-442, D-447, D-461, D-467)
- Amkodor (TO-18, TO-28, TO-30, etc.)
- ATZ (T-4A, TT-4M)
- VgTZ (DT-75)
- VMTZ (D-120, D-144, D-130, D-145T)
- VTZ (T-25, T30A-80, VTZ-2048)
- LTZ (T-40, LTZ-55, LTZ-60)
- MKSM, UNC, DETVAN
- MTZ – spare parts for tractors
- OTZ (TDT-55)
- PTZ (K-700/701/702/703/704)
- KhTZ (T-150, MT-LB)
- ChTZ (T-130, T-170, B-10, B-12, B-170, T-10M, DET-250)
- YuMZ – spare parts for tractors
- Other special equipment and tractors
- RVD – high pressure hoses and hoses
- MMZ spare parts and engines
- Spare parts for MMZ engines
- MMZ engines: D-242, D-243, D-245, D-246, D-260
- VAZ spare parts
- Spare parts OKA VAZ 1111
- Spare parts VAZ classic 2101 – 2107
- Spare parts VAZ front wheel drive
- Spare parts VAZ Granta and Largus
- NIVA spare parts and all-wheel drive
- Spare parts Moskvich, IZH
- Spare parts for Korean trucks
- Spare parts for Starex, H-1
- Spare parts for Porter, H-100
- Spare parts for HD65,72,78, County
- Spare parts for HD120, AeroTown
- Spare parts for HD160,170, . ,700,1000
- Spare parts for HYUNDAI, KIA buses
- Spare parts for Korean passenger cars
- Spare parts DAEWOO, CHEVROLET
- FOREIGN CAR spare parts more
- ALFA ROMEO spare parts
- BMW spare parts
- CHRYSLER spare parts
- DATSUN spare parts
- FIAT spare parts
- FORD spare parts
- Spare parts HONDA, ACURA
- ISUZU spare parts
- MAZDA parts
- MERCEDES spare parts
- MITSUBISHI spare parts
- Spare parts NISSAN, INFINITI
- OPEL spare parts
- Spare parts PEUGEOT, CITROEN
- RENAULT spare parts
- ROVER spare parts
- SAAB parts
- SSANGYONG spare parts
- SUBARU spare parts
- SUZUKI parts
- Spare parts TOYOTA, LEXUS
- VAG spare parts: VW, AUDI, SEAT, SKODA
- VOLVO spare parts
- Spare parts for Chinese cars
- Spare parts for other foreign cars
- Trailers and semi-trailers
Checking the tension of the alternator belt on a Priora
Owners of a Priora car can know how to tension the alternator belt from numerous sources on the Internet and by reading the relevant literature. After all, any car enthusiast will learn how to properly tighten the alternator belt on a Priora from these sources, and not through the transfer of experience from other car enthusiasts. But some “tricks” associated with checking tension cannot be found even in the above sources. Let's take a closer look at them.
If you press on the belt at the longest interval directly between the pulleys, then its deflection should be within 8-12 mm, but this rule is only suitable for a very modest car configuration. After all, if the car is equipped with power steering or air conditioning, the belt then has a different trajectory, which helps reduce the area of interaction between the belt and the pulleys.
To make up for the lack of contact, you will need to tighten the belt on the Priora a little more. If it is not possible to use the services of a specialist, then you can try adjusting the tension of the Priora generator belt “by ear”. If the tension is insufficient, the belt will definitely slip, making a wild “whistle”, and if the tension is too strong, the generator bearings will hum.
Tensioning the timing belt on a Priora: user instructions
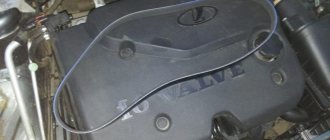
In addition to the alternator belt in a Priora car, another important component is the timing belt. For this reason, many car enthusiasts are wondering how to tighten the timing belt on a Priora? It is not difficult to carry out this procedure; it is enough to prepare a tool: a “5” hexagon, a “17” and “15” head.
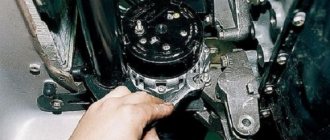
Before tightening the Priora timing belt, you should:
— unscrew the two screws securing the cover;
— remove the bottom cover covering the timing drive;
— insert the tips of the pliers into the grooves of the outer race of the tension roller in order to remove the locking rings.
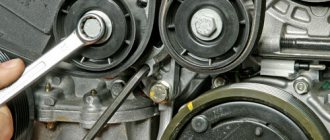
- tighten the belt by turning the tension roller directly with pliers, counterclockwise.
— these actions are performed until the cutout of the outer race is aligned with the rectangular protrusion of its inner sleeve;
— after the above steps, the roller mounting bolt is tightened with a wrench;
— we check that the marks on the camshafts and crankshaft are aligned, as well as the cutout matches the mark on the tension roller. If the marks do not match, you should repeat the operation to tension the timing belt.
The importance of belt tension
The degree of belt tension in a given belt drive is a critical parameter that it is advisable for car owners to regularly monitor. With significant weakening, there is a risk of slipping along the pulley profile, because rotation is transmitted due to friction. Due to the low interference, the friction coefficient decreases, and the voltage generation is lower than the standard established by the car manufacturer. Due to low voltage, negative factors arise:
- lack of battery charging;
- the on-board electrical system experiences a voltage shortage;
- electrical appliances included in the circuit operate with increased load, which negatively affects their service life.
Important! Weak tension on the alternator belt causes it to slip, heat up due to friction, and lead to rapid failure due to loss of its performance characteristics.
Motorists should also not tighten the strap too much. Such actions will also not bring positive results. Great effort results in rapid wear and also often leads to the transmission breaking at an unexpected moment. A high tension force negatively affects the operation of the bearings, which must be installed on the generator output shaft and on the crankshaft output shaft. Exceeding the optimal load accelerates their production. Long-term operation in extreme conditions reduces their service life.
Finally
Regardless of which method you used to adjust the position of the generator, after the procedure you need to turn the crankshaft 2-3 times using a wrench, and then make sure that the tension level of the hanging belt has not changed. We also recommend driving a short distance (1…2 km), and then checking again .
If you have not found information about the tension level of the alternator belt or cannot perform this procedure yourself, contact a service station for help. If the adjusting mechanisms are set to the extreme position and the belt tension is insufficient, this indicates that it needs to be replaced. As a rule, the mileage of a car between belt replacements is 50...80 thousand kilometers, depending on the model and brand of the car, as well as on the material from which the belt is made.
What is a timing belt
This is the connecting part that ensures the synchronization of two vehicle components - the camshaft and crankshaft. However, the belt not only combines these two mechanisms, it is also connected to other parts, as a result of which a huge load is placed on it.
Due to this load, it is subject to wear and therefore must be replaced after the expiration date. If you neglect the recommendations specified in the Priora instructions regarding regular replacement, the belt will break and all the mechanisms associated with it will fail.
Untimely replacement will cost the car owner too much; it is advisable to constantly check the mechanism for damage and the first signs of wear.
It is made of high-quality and durable rubber, smooth on top and serrated on the inside. The teeth provide the strongest grip on the gears. If, due to a long period of use, parts of the teeth fall off, the car may not even start due to the fact that the automobile oil is untimely or incorrectly supplied to the cylinders located in the engine.
A simple rubber component plays an important role in the entire mechanism of the machine. Try not to forget about checking it, because a problem detected in time will save money spent on repairs.
Tension with adjuster bar
Securing the generator using a strip
This method is used for older cars (for example, “classic” VAZs). It is based on the fact that the generator is attached to the engine using a special arc-shaped strip , as well as a bolt and nut. By loosening the fastening, you can move the bar with the generator relative to the engine to the required distance, thereby adjusting the tension level.
Actions are performed according to the following algorithm:
- unscrew the fastening nut on the arc-shaped bar;
- Using a pry bar, we adjust the position (move) of the generator relative to the engine;
- tighten the nut, fixing the new position of the generator.
The procedure is simple, it can be repeated if you were unable to achieve the required level of tension the first time.
Tension using adjusting bolt
Adjustment with a bolt on a VAZ-2110
This method is more progressive and is used in most modern machines. It is based on the use of a special adjusting bolt , by turning which you can adjust the position of the generator relative to the engine. The algorithm of actions in this case will be as follows:
- loosen the generator, its upper and lower fastenings;
- Using the adjusting bolt, we change the position of the generator;
- fix and tighten the generator mount.
The belt tension level in this case can be determined during the adjustment process.
Signs of weak generator drive tension
The motorist will be able to determine the insufficient level of tension by indirect signs that quickly appear in any brand of car. Most often you should be wary in the following cases:
- whistling sounds are heard from under the hood during engine operation, so it’s worth looking into this area and confirm/refute doubts;
- some (or all) electrical appliances function intermittently or abnormally;
- The battery charge level light on the instrument panel continuously lights up during travel.
The indicator on the dashboard can be in the form of a battery icon or a corresponding abbreviation. It is worth paying attention to her behavior.
Drive belt tension options
Depending on the design features of the car, manufacturers install various tensioner options under the hood. Such units are in demand if drivers detect sagging belts or excessive overtightening, which may have been allowed at the station after maintenance. Most often, you can adjust the load on the belt connecting the generator and the crankshaft using regulators, in which the force is transmitted through one of the types of element:
- bar;
- bolt;
- video clip.
All designs have their positive and negative characteristics.
Tension with adjuster bar
The technique is more relevant for older generation cars, for example, “classics” from VAZ. The method is to fix the generator on the housing using an arc-shaped strip clamped with a bolted connection through a groove. By loosening the thread, you can move the generator to adjust the force. The following algorithm is used:
- unscrew the fastening nut one turn or half a turn to loosen the bar that acts as a belt tensioner;
- we use a pry bar to pry up the body of the electrical appliance, which must be tensioned by the generator belt to an acceptable level to ensure the required tension;
- tighten the fasteners, fixing the generator in the new position.
Since the process is relatively labor-intensive, it can be repeated as needed.
Tension using adjusting bolt
A more progressive method is to adjust and fix the tension of the generator belt using an adjusting bolt. By moving it along the thread, you will be able to achieve the desired result. The step-by-step algorithm includes the following positions:
- First of all, we loosen the mount of the generator;
- then use a wrench to unscrew/tighten the adjusting bolt;
- tighten the upper and lower bolts securing the generator.
The advantage of this method is that the car owner has the opportunity to control the degree of force directly during the adjustment process. It is important to take into account the error that occurs when tightening fasteners.
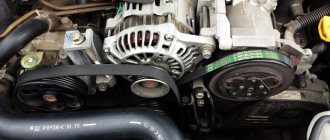
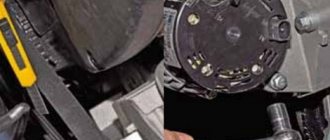
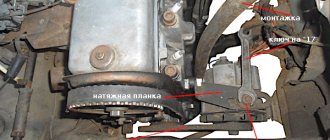
Optimal tension adjustment via roller
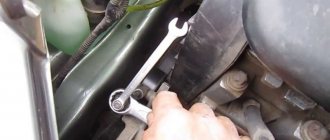
On certain models of modern cars, a structure with a roller is installed to comfortably loosen the belt. For example, this is how the generator at Priora is weakened. It should be taken into account that the installed belt is also used to ensure rotation of the air conditioner and power steering. A special roller is an integral part of the design. To work with Priora, an auto mechanic will need a 17-size open-end wrench. It will help loosen and tighten the threaded system. In addition, you will need a special key used to rotate the roller. The special device looks like a key with a handle, the working end of which has two rods with a diameter of 4 mm, a length of 25 mm, located at a distance of 18 mm perpendicular to the handle.
Important! It is not recommended to use tools not intended for this operation for adjustment, for example, bent pliers or other homemade products, since with their help you can not only loosen the belt, but also damage the tensioner on the generator.
The cost of a special key usually does not exceed 80-100 rubles. They search for it using the encoding 67.7812-9573. Having selected the optimal force, use a 17 wrench to tighten the adjusting rollers. Access to the settings is simple; it opens from the top from under the hood. You can check the degree of tension after starting the engine and turning on electrical appliances. They should work as normal. While the engine crankshaft is rotating, the “Battery” dashboard light should not light up, and the belt whistle should not appear. Manufacturers recommend monitoring the force on the belt at least every 15 thousand km. Mandatory replacement of consumables is carried out no later than 60 thousand km. Since the product can stretch over time, we recommend periodically checking its performance several times a season.
It is important after all the adjustment work, after driving a couple of kilometers, to check that the strap is not too tight or sagging again. Such control will give complete confidence in the correctness of the operations performed.
What you need to replace the belt
Next, let's look at how to replace the timing drive on a Lada Granta car. The complete sequence of work will be described for an 8-valve engine. For the 16-valve engine, we will indicate only the nuances.
So, to perform the work you will need the following tools and devices:
- A set of open-end and ring wrenches of the most common sizes;
- Set of hexagons;
- Powerful screwdriver or mounting blade, pry bar;
- A special wrench for tightening the tension roller or at least pliers for removing the locking rings;
- Marker;
- Rags.
Naturally, you will need a new belt of the appropriate size, as well as a new tension pulley, since it must be replaced along with the belt. Having prepared all this, you can start disassembling.
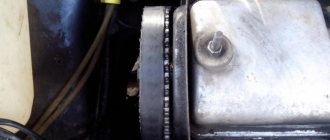
Checking the condition of the belt
The inspection regulations for this unit require an inspection in a cold engine state. Remove the outer protective casing to allow visual contact with the surface of the gas distribution unit parts. Having gained access directly to the timing belt, rotating its drive, inspect both sides of the consumable in detail for the presence of any kind of defects (wear, broken teeth, protruding cord, rubber delamination, etc.). Tensioner rollers are subject to careful inspection; in the presence of mechanical damage and large play, they contribute to increased wear of the consumables. The presence of oil stains on the surface of a rubber technical part, which contribute to the destruction of its structure, is not allowed. If found, immediately remove from surface.
Any auto mechanic will explain to the motorist that the timing belt must be changed regularly, otherwise its rupture during operation will damage the vehicle. All motorists will be able to replace the part if they carry out the preparatory stage correctly, remove interfering components for a while, and set the timing marks on the Priora.
Experts advise checking the condition of this component of the mechanism every 105 thousand kilometers traveled. It will be useful for motorists to learn how to disassemble the mechanism and check for damage to the belt.