04.12.2018
Replacing the crankshaft oil seal: everyone will have to go through this Are you tired of the Internet yet? Of course not, we understand that today this powerful source of information is almost the only source of knowledge... However, everyone is tired of this chaos in advice and instructions! On one resource they say that you first need to remove the cylinder head, and on another they say that there is no point in this, and so on. There are many opinions and everyone wants to push their own methodology.
We are convinced that despite the diversity of opinions, there is one correct solution that should be used. That is why we decided to write this article, which contains certified methods of licensed mechanics who worked at reputable official service stations.
We'll consider:
- replacement and purpose of crankshaft seals in most engines;
- replacing crankshaft seals on the popular Opel Astra;
- replacing oil seals on Renault Logan;
- replacement of oil seals on one of the most popular cars in the CIS countries - VAZ 2107.
Go.
What functions do crankshaft oil seals perform?
For best engine performance, constant lubrication is necessary. To solve this issue, the developers installed a lubrication mechanism in the internal combustion engine, where the oil fluid circulates under pressure.
Lubrication goes to various components and elements inside the engine. The oil literally splashes out under the pressure. It happens that the lubrication comes on its own. In most internal combustion engines, a mixed mechanism operates: some dissipate under pressure, some spontaneously.
The main goal is to reduce contact as much as possible, remove recycled waste, and protect the internal combustion engine from breakdowns and overheating. At the same time, it is necessary to separate the crankshaft. It goes from the engine frame to the outer surface, and to prevent oil leakage, the hole where the crankshaft rotates must be closed.
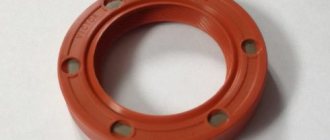
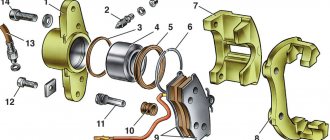
A crankshaft oil seal device is used for sealing. Use 2 of these parts:
- Front: Located near the crankshaft gear;
- Rear: Next to the gear.
When do you need to change seals?
A direct indication for replacing the crankshaft seals on the VAZ-2114, VAZ-2106 and other domestically produced cars is their destruction and oil leakage in the area of the AC pulley or in the area of the rear part holder. The procedure is also carried out during related work, which includes replacing the flywheel, replacing the crankshaft, replacing the clutch, and the like.
It is worth noting that cuff repair itself does not take much time. Almost the entire scope of work is represented by the disassembly and dismantling of units that hide the necessary parts underneath. On average, the work of removing and reassembling the front element takes 1-2 hours, the rear element takes 5-8 hours if the work is done in a garage. Car service specialists perform it within 2-3 hours.
Features of replacing the crankshaft oil seal
Of course, the main reason for replacement is oil leakage. At the same time, it can be both global and insignificant. However, in both options it is worth replacing the used spare part.
Operating a vehicle with a leaking oil seal is not recommended. Firstly, this problem significantly increases the cost of oil fluid, and secondly, it is quite dangerous.
- Based on the above, there are 2 types of seals in the engine: rear and front.
- If the front crankshaft oil seal is being replaced, then it is worth changing the rear one as well.
- But if you have to choose, it’s important not to forget that the front one plays a huge role.
This is explained by the fact that it is located next to the timing belt - if oil fluid gets on the belt, then there is a high probability of the belt jumping a tooth or several. In addition, the belt material may lose its properties and it may break.
The rear oil seal device is installed at the interface between the internal combustion engine and the gearbox. If oil leakage occurs in this area, this leads to a decrease in the amount of lubricant and to contamination in the lower area of the power unit. Oil can get into the clutch and it will start to slip.
Why should you contact a car service?
If you decide to change the oil seal on the engine yourself or contact a garage technician, you should weigh the pros and cons. Incorrect installation or damage to a part during the process not only reduces its service life by half, but can also cause side effects in engine operation. Most often, the spare part is damaged during the installation process when, instead of special equipment, auxiliary tools are used to fit the seal into the socket. In the latter case, it is important to have experience and correctly calculate the effort.
Also, during amateur repairs, the edge of the sealing ring often bends when placed in the seat. The engine continues to leak and the new part must be replaced again.
Contacting the service will save you from the risk of misdiagnosing the problem and additional expenses. An oil seal leak is often confused with a failure of the oil filter, oil pressure sensor, or worn oil pump gasket. The car owner changes the oil seal, but the problem does not go away - because the cause is determined incorrectly. Only an experienced technician can quickly determine the real cause of the breakdown.
Replacing the crankshaft oil seal is a labor-intensive, but technically not very difficult task, which any car owner who has basic skills in repairing his vehicle can cope with.
To perform the manipulation you will need a garage, pit or lift, as well as several hours of free time. The least difficult part is replacing the front crankshaft oil seal. The rear element, located behind the gearbox, clutch basket and flywheel, requires much more time and labor.
DIY crankshaft oil seal replacement
Experts recommend starting with the front seal. Since this procedure is much easier compared to the rear oil seal device.
- This is explained by the structural placement of the motor.
- The passage to the rear seal is usually blocked by the housing and gearbox.
- The front oil seal is easy to get to.
- Replacing one of them without dismantling the second one is not recommended.
Therefore, before repair work, it is advised to purchase both parts. Visually they are not similar to each other. The diameter of the front one is much smaller. In retail outlets they can be found both in pairs and separately.
Replacing the front crankshaft oil seal
Entry for changing the front component in the oil pump frame or the front wall of the block. It can be removed without the concomitant removal of other components, but the best solution is the one recommended by the manufacturer.
- Diagnosis of oil leakage.
- Disabling the battery drive.
- Removing the drive gear.
- Providing travel to the crankshaft flywheel.
- Removing the gears.
- Visual inspection of an unsuitable stuffing box seal.
- Setting up for belt installation.
- Assembly in reverse order from disassembly.
Principles for repairing the most popular Russian VAZs:
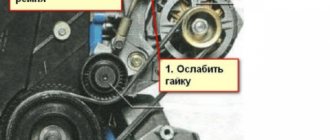
- The tension of the battery belt is reduced and removed from the cogs;
- The nut compressing the gear is unscrewed, then the pulley is removed from the shaft;
- Unscrew the cover fasteners (the last 3 screws) covering the stuffing box;
- For transversely mounted engines, such as the VAZ 2110, it is necessary to remove the oil pump frame;
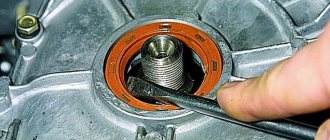
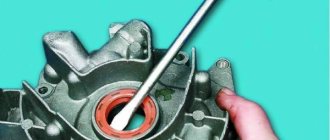
- A screwdriver is placed in the open entrance and pryed to remove it, move it from its place;
- Using a mandrel, the new part is mounted in place;
- Assembly is carried out in the reverse order, starting with the installation of the oil pump cover.
It is recommended to treat the outer part of the crankshaft and the outlet hole of the stuffing box seal with oil.
Interesting Facts
The material for the manufacture of oil seals is fluorine rubber FPM (in Russia it is called SKF - fluorinated synthetic rubber). The material has become widespread due to its unique characteristics:
- highest mechanical stability;
- wide range of operating temperatures;
- non-flammable and resistant to chemicals.
During operation of the car's power unit, its parts and mechanisms are lubricated with engine oil. The lubricant significantly reduces the level of negative effects of friction force, thereby increasing the service life of structural elements. As you know, the crankshaft extends outward for subsequent connection with the flywheel. It is precisely to ensure that engine oil does not leak out of the system through the holes of the rotating shafts that a special sealant made of silicone or rubber was developed - the crankshaft oil seal. Replacing the crankshaft oil seal is an emergency job. Why is it important to respond to a problem with the seal in a timely manner, and how to fix the breakdown yourself? Next we will look at this issue in detail.
Example: replacing crankshaft oil seals on a Volkswagen Passat
Repair is carried out after dismantling the holder in which the oil seal is built.
The sequence is as follows:
- The clutch block is removed;
- The screws are unscrewed to remove the gear and the casing located behind it;
- Remove the fasteners from the cover that secure the stuffing box;
- A new part is installed and treated with lubricant along the outer hole.
Assembly is carried out in reverse order. With the rear seals, the gaskets are changed under the mounting caps. Old gaskets may lose their integrity after installation.
Tools and materials
Replacing the crankshaft oil seal on VAZ-2109 vehicles, as well as all other vehicles produced by VAZ, regardless of the type of power unit, will require the following set of tools:
- Pit, lift or jack;
- Car stands (if a jack is used);
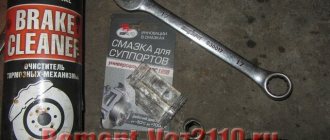
- A set of wrenches, including spanners;
- Hammer;
- Slotted screwdriver;
- Crosshead screwdriver;
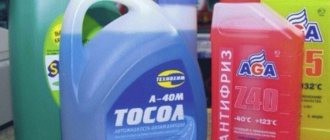
- Gasoline, kerosene or other solvent;
- Engine oil;
- New spare parts;
- Silicone sealant.
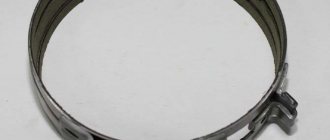
Note: when buying new rubber bands, you need to make sure that there are springs inside them - metal rings located on the inner surface of the element. Car dealerships often come across defective products without springs. Some car owners shorten the spring before installation, claiming that this improves the characteristics of the oil seal.
Checking the seals after replacement
It is almost impossible to assess the effectiveness of changing crankshaft elements due to their limited visibility during visual examination.
Its implementation is advisable only when there is a significant consumption of oil fluid in the absence of obvious leaks.