Share:
Fuse and relay block VAZ 2114, 2113, 2115 injector 8 valves is the topic of this article. Here is an electrical diagram of the VAZ 2114, 2113, 2115 fuse box with explanations. The location of the fuse and relay box on the VAZ 2114, 2113, 2115 is indicated. A breakdown of the fuse and relay box for each element is given. The pinout of the fuse and relay block for VAZ 2114, 2113, 2115 injector 8 valves with decoding of the connecting plugs is presented. It is explained how to remove the fuse and relay box on the VAZ 2114, 2113, 2115. A complete description of the fuse and relay box is given. An additional fuse and relay block for the VAZ 2114 injector 8 valves is laid out, in which fuses and relays are located that protect the electrical circuits of the engine control system.
On a VAZ 2114, 2113, 2115, with an 8-valve injection engine, the main and additional fuse and relay blocks are mounted..
The main fuse and relay block of the VAZ 2114, 2113, 2115 protects electrical wiring, devices, and lamps installed on the car body. An additional fuse and relay box protects the electrical engine control system.
Fuse and relay block diagram for VAZ 2114, 2113, 2115 models 2114-3722.010
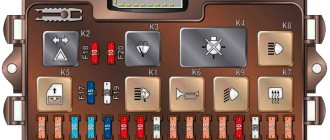
The electrical diagram of the fuse and relay box for VAZ 2114, 2113, 2115, model 2114-3722.010, is shown below in the figure.
The outer number in the plug designation is the number of the block, the inner number is the conventional number of the tip.
- K1 - relay for turning on the headlight wipers;
- K2 — relay-interrupter for direction indicators and emergency lights;
- K3 - windshield wiper relay;
- K4 - relay for monitoring the health of light bulbs;
- K5 - power window relay;
- K6 - relay for turning on the sound signal;
- K7 — relay for turning on the heated rear window;
- K8 - headlight high beam relay;
- K9 - relay for low beam headlights;
- F1 - F16 - blade fuses.
Important ! Various diagrams of the VAZ 2114 car
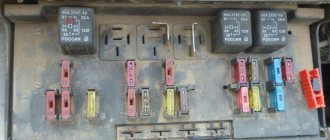
Fuse Location
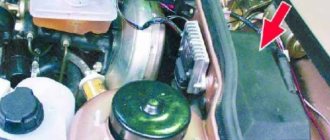
For ease of maintenance, most fuses are installed in a special mounting block, and here the VAZ-2115 injector is no exception. You just need to know that this model has two of them installed.
The first one in the VAZ-2115 (equipped with an 8-valve engine) is located directly in the cabin, under the dashboard, at the steering wheel. The other one is installed near the engine, that is, under the hood, next to the left glass.
Any of the fuses located in the mounting block has its own specific designation, based on this, it is not difficult to find out which circuit it is responsible for. So the fuse is marked:
- K1 – protects the relay that turns on the headlight cleaning from overvoltage;
- K2 – for emergency signaling and switching of turn signals;
- K3 – power supply for the “janitors”;
- K4 – lighting;
- K5 – window regulators;
- K6 – horn;
- K7 – rear window heating element;
- K8 – high beam headlights;
- K9 – close;
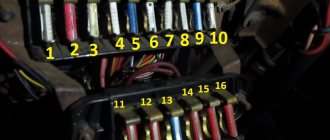
Below are fuses with fuse links, which are designated F and have a serial number. Each of them is designed for a specific current.
The amperage is indicated at the top. They are placed in groups under the main fuse, and protect the individual circuits controlled by it.
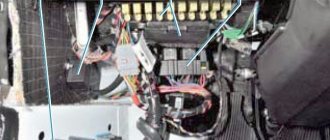
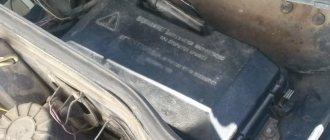
The unit installed in the cabin is slightly different from the one described above. It contains, in particular:
- relays (3 pieces);
- ECU;
- fuses (3).
Each of the latter is designed to protect a specific circuit from overvoltage and short circuit.
Down up:
- on-board computer power supply (7.5 A);
- radiator cooling fan, and in addition an adsorber valve, mass air flow sensors, DC and DC sensors (7.5A);
- fuel pump (15 A).
As noted earlier, this block also contains three relays. Down up:
- Basics.
- Radiator fan control.
- Responsible for the operation of the fuel pump.
Complete set of fuse and relay box VAZ 2114, 2113, 2115
| Fuse and relay box configuration table for VAZ 2114, 2113, 2115 | |||
| Designation | Name of elements | Item type | Catalog number |
| K1 | Headlight wiper relay | 90.3747-01 | 2105-3747210-02; 2107-3747210-02 |
| K2 | Relay-breaker for direction indicators and hazard warning lights | 495.3747 | 2108-3747010-02 |
| K3 | Windshield wiper relay | 526.3747 | 2114-3747710 |
| K4 | Lamp integrity monitoring relay | 4412.3747 | 2110-3747410 |
| K5 | Relay for power windows VAZ 2114 | 90.3747-11 | 2105-3747210-12; 2107-3747210-12 |
| K6 | Horn relay | 90.3747-11 | 2105-3747210-12; 2107-3747210-12 |
| K7 | Heated rear window relay | 90.3747-11 | 2105-3747210-12; 2107-3747210-12 |
| K8 | Relay for turning on high beam headlights VAZ 2114 | 90.3747-11 | 2105-3747210-12; 2107-3747210-12 |
| K9 | Low beam relay | 90.3747-11 | 2105-3747210-12; 2107-3747210-12 |
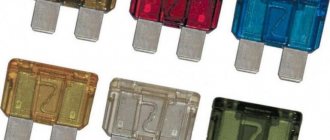
| F1, F2 | Fuse 10 A (red) | 352.3722 | 2110-3722110 |
| F3, F17 F8…F15 | Fuse 7.5 A (brown) | 351.3722 | 2110-3722107 |
| F4,F5,F16 | Fuse 20 A (yellow) | 354.3722 | 2110-3722120 |
| F6, F7 | Fuse 30 A (light green) | 356.3722 | 2110-3722130 |
| VD1, VD3, W7 | Semiconductor diode | KD226V | |
| VD2, Vm, VD5 | Semiconductor diode | KD213A | |
| VD6 | Semiconductor diode | KD 209A | |
| R1,R2 | Resistor | MLT-2-68 Ohm | |
Important ! DMRV VAZ 2114
How to remove the fuse and relay box for VAZ 2114, 2113, 2115 models 2114-3722.010
Removal of the mounting block of fuses and relays of the VAZ 2114 - 3722.010 model is carried out in the following sequence:
- First, remove the minus terminal from the battery;
- Then inside the cabin, on the left side, under the instrument panel, we remove 5 wiring harness blocks from the bottom side of the fuse and relay box;
- After this, remove the cover of the mounting block. To do this, press the 2 latches of the lid.
- Next, disconnect the wiring harness block from the top plane of the fuse and relay box
- After this, use a 10mm socket wrench to unscrew the bolts securing the mounting block of the blade fuses
- Raise the block and remove 4 more connecting blocks of wires
- Then we remove the VAZ 2114-3722.010 fuse and relay block from its socket
- After this, remove the gasket of the fuse and relay mounting block
- We replace or repair the VAZ 2114-3722.010 fuse and relay box;
- We install the block in the reverse order of removal.
Important ! Tightening torques for VAZ 2114
Fog lights do not light up: causes and solutions
Fog lights are car lighting devices, the difference of which is the light they emit (it can be white or yellow). The peculiarity of the lanterns is that the outgoing beam does not rest on the fog, but spreads along the road, providing sufficient visibility to the car owner. How to adjust these headlights? Why don't the fog lights light up? How to fix the problem? Let's consider these points in detail.
Basic Rules
To ensure good visibility in heavy fog, it is important to follow the following rules:
- Adjust the edge of the light beam so that the light beam is above the horizontal plane.
- Install the lamp at a minimum distance from the road. This is necessary in order to simplify the adjustment of the light beam boundary.
If the headlights are well adjusted, they guarantee excellent visibility on the road, even in difficult road conditions.
To prevent deterioration in the quality of the glow, it is important to monitor the condition of the lampshade. If necessary, polish the surface and remove scratches, as they impair the performance of the flashlight
Adjusting the fog lights
Causes of breakdowns and solutions
Now let's look at why fog lights don't work, and what are the possible causes of such problems. As a rule, malfunctions of fog lights are caused by corrosive and oxidative processes. In addition, the reasons for PTF failure include:
- Fuse blown.
- No contact in the relay.
- Deterioration of contact to the “minus” of the body.
- Burnout of lamps.
- Oxidation of contacts.
- Incorrect connection.
- Deterioration of contact on fog lights.
To diagnose and fix the problem, you need a set of tools and a multimeter. The first thing to check is the integrity of the fuses that power the fog lights. If they are burnt out, replace them.
If the circuit fuses are good, check that the headlight bulbs are working. The simplest reason why the fog lights do not light up is that the lamps have burned out due to a short circuit or natural wear and tear. To check lamp integrity, use a known good light source
It is important that the lamp base is of the same type and dimensions as the failed part. After purchasing the required light bulb, replace it (this can be done without removing the headlight)
If all the work considered is completed, but there is no result, pay attention to the power button. Perhaps the reason why the fog lights do not work is hidden in it
If the button is defective, replace it. If the contacts become oxidized, clean them. In a situation where problems with the PTF appeared after self-connection, the causes of the malfunction may lie in incorrect connection of the circuit.
To repair the fog lamp, you may need to perform the following work:
- Glass replacement.
- Installing a new light bulb.
- Replacing the fog lamp frame after removing the bracket. Such work may be required if the cladding is damaged.
Wiring diagram for fog lights on VAZ 2110, 2111, 2112
Before carrying out repairs, it is advisable to remove the fog lamp, for which you need to unscrew the screws securing it to the bracket. After this, disassemble the PTF to repair or install a new lamp.
An extreme case is to replace the fog lamp. It has to be resorted to in a situation where the unit does not work completely or the quality of the light beam has significantly deteriorated. During the replacement process, it may be necessary to remove the car's bumper, because it is in it that the headlight plug is located. As soon as you have access to the place where the light is installed on the bracket, use a special tool to unscrew the fastener, and then discard the plug and remove the headlight. If the fog lights do not light up and the unit is completely faulty, then install a new part.
Video: How to find and replace a burnt out fog light on a VAZ 2110, 2111, 2112
Decoding the fuse and relay block VAZ 2114-3722.010
| Decoding the fuse and relay block VAZ 2114, 2113, 2115 | ||
| Fuse designation | Current strength, A | Protected circuits |
| F1 | 10 | Rear fog lamps. Indicator lamp for turning on the rear fog lights. Brushes and headlight washers (At the moment of switching on). |
| F2 | 10 | Direction indicators, direction indicator and hazard warning relays (in hazard warning mode). Alarm monitoring. |
| F3 | 100 | Brake light. Interior light lamp. Individual backlight lamp. Ignition switch illumination lamp. Route computer. Check (Check) for malfunction of the engine control system. Trunk light. |
| F4 | 20 | Rear window heating element. Relay (contacts) for heated rear window. Portable socket. |
| F5 | 20 | Signaling. Signal relay. Engine cooling fan electric motor. |
| F6 | 30 | Electric door window motors. Relay (contacts) for door power windows |
| F7 | 30 | Electric stove motor. Windshield washer motor. Cigarette lighter. Light bulb board. Relay (coil) for heated rear window |
| F8 | 7,5 | Right fog lamp |
| F9 | 7,5 | Left fog lamp |
| F10 | 7,5 | Left side indicator lights. Control for turning on the side light. License plate lights. Engine compartment lamp. Illumination lamps for instruments, switches, cigarette lighter. ashtrays, heater control knobs. |
| F11 | 7,5 | Left side marker lamps |
| F12 | 7,5 | Right headlight, (low beam) |
| F13 | 7,5 | Left headlight (low beam) |
| F14 | 7,5 | Left headlight (high beam). Control for turning on the high beam headlights. |
| F15 | 7,5 | Right headlight (high beam) |
| F16 | 15 | Direction indicators with controls, direction indicator and hazard warning relays. Dashboard. Indicator light for insufficient brake fluid level. Emergency oil pressure control. Indicator lamp for turning on the handbrake. Relay for monitoring the health of lamps. On-board control system display unit. Reversing lights. Generator excitation winding. |
To change fuses in the mounting block, under the hood, there are tweezers.
A blown fuse cannot always be identified by a broken thread. When viewed through the lens, the thread may be intact, but inside the fuse, at the connection points, it may be torn. In this case, the fuse can be checked with a multimeter.
Before replacing the fuse, the cause of the blown fuse must be determined and eliminated. To avoid failure of elements of the engine control system, you cannot install fuses with an increased rating or homemade ones.
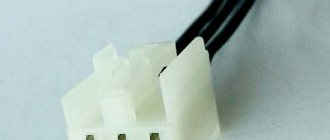
Mounting block pinout
Here is a new type mounting block. The old-style block generally has the same circuit, but some contacts (less than 5%) may not match.
Schematic electrical diagram of the LADA Samara mounting block (VAZ-21099 with VAZ-2114 panel).
Numbering of terminals in connecting blocks, color of wires and electrical circuits connected to them.
| Connector | Contact | Wire color | Purpose |
| X1 (Ш1) | 1 | B | window lifters |
| 2 | G | ignition switch (cl. 15/2) | |
| 3 | GP | ignition switch (terminal 15) | |
| 4 | ZhG | heater motor switch | |
| 5 | R | ignition switch (cl. 30/1) | |
| 6 | KR | ignition switch (terminal 30) | |
| 7 | door lock | ||
| 8 | P | ignition switch (terminal 50) | |
| X2 (Ш2) | 1 | BG | rear window wiper switch |
| 2 | G | Turn signal switch (right) | |
| 3 | RP | brake light switch | |
| 4 | B | lamp continuity indicator | |
| 5 | IF | hazard warning switch | |
| 6 | GB | left front door | |
| 7 | ABOUT | rear fog light switch | |
| 8 | 34 | high beam warning lamp | |
| 9 | — | ||
| 10 | 4 | rear fog light switch | |
| 11 | sch | fuel reserve warning lamp | |
| 12 | IF | fuel level warning lamp | |
| 13 | Warhead | interior lamp | |
| 14 | KG | hand brake warning lamp | |
| 15 | hh | Turn signal switch (left) | |
| 16 | electric motor for headlight cleaner | ||
| 17 | — | ||
| X3 (Ш3) | 1 | and | speed sensor |
| 2 | emergency | hazard warning switch | |
| 3 | GP | direction indicator switch | |
| 4 | SB | oil level warning lamp | |
| 5 | H | weight | |
| 6 | RB | washer fluid level warning lamp | |
| 7 | RO | brake lining wear warning lamp | |
| 8 | 3 in | headlight switch | |
| 9 | ZhZ | windshield wiper switch | |
| 10 | PG | portable lamp connection socket | |
| 11 | ignition switch (terminal 15) | ||
| 12 | RF | rear window washer switch | |
| 13 | |||
| 14 | and | fog light warning lamp | |
| 15 | |||
| 16 | SG | oil pressure indicator | |
| 17 | |||
| 18 | R | wiper switch | |
| 19 | CO | wiper switch | |
| 20 | WITH | wiper switch | |
| 21 | ABOUT | rear fog light switch | |
| X4 (Ш4) | 1 | Salary | On and indicator lamp for heated rear window |
| 2 | GB | headlight switch (high beam) | |
| 3 | ABOUT | wiper | |
| 4 | Warhead | outdoor lighting switch | |
| 5 | TO | Instrument lighting rheostat | |
| 6 | R | battery | |
| 7 | BW | windshield wiper and washer switch | |
| 8 | ABOUT | block Ш4 of the mounting block terminal 3 | |
| 9 | midrange | horn switch | |
| 10 | BP | brake light switch | |
| 11 | R | battery | |
| 12 | JV | headlight switch (low beam) | |
| 13 | warning light | ||
| 14 | — | ||
| 15 | — | ||
| 16 | RG | brake fluid level warning lamp | |
| 17 | ZB | coolant temperature gauge | |
| 18 | KB | battery charge indicator lamp | |
| 19 | ZhCh | fog light switch | |
| 20 | RZ | coolant level warning lamp | |
| 21 | AND | tachometer | |
| X5 (W5) | 1 | 3 | high beam (right) |
| 2 | 3H | high beam (left) | |
| 3 | midrange | low beam (left) | |
| 4 | P | starter (cl. 50) | |
| 5 | PB | electric radiator cooling fan | |
| 6 | WITH | low beam (right) | |
| X6 (Ш6) | 1 | — | |
| 2 | 3 | reverse light switch | |
| 3 | MS | Turn signal (left front) | |
| 4 | — | ||
| 5 | — | ||
| 6 | — | ||
| 7 | — | ||
| 8 | ZhCh | side light (right front) | |
| 9 | Warhead | electric fan thermostat | |
| 10 | ZhCh | side light (left front) | |
| 11 | G | Turn signal (right front) | |
| 12 | reverse light switch | ||
| 13 | RG | brake fluid level sensor | |
| X7 (W7) | 1 | — | |
| 2 | ZhG | electric motor for headlight cleaner | |
| 3 | B | electric motor for headlight cleaner | |
| 4 | — | ||
| 5 | SB | oil level sensor | |
| 6 | midrange | sound signals | |
| 7 | WITH | speed sensor | |
| 8 | ZB | coolant temperature sensor | |
| 9 | KB | generator (cl. 61) | |
| 10 | R | windshield washer pump | |
| 11 | Warhead | engine compartment lamp switch | |
| 12 | RB | washer fluid level sensor | |
| 13 | RF | brake linings | |
| 14 | — | ||
| 15 | KP | tachometer | |
| 16 | RZ | coolant level sensor | |
| 17 | reinforced concrete | fog light relay | |
| X8 (W8) | 1 | ZhP | fog light relay |
| 2 | ZhCh | fog lamp (left) | |
| 3 | AND | fog lamp (right) | |
| 4 | GP | ignition coil | |
| 5 | R | generator (cl. 30) | |
| 6 | R | generator (cl. 30) | |
| 7 | — | ||
| S | RF | fog light relay | |
| X9 (W9) | 1 | RF | electric motor rear window wiper |
| 2 | G | Turn signal (right rear) | |
| 3 | BG | electric motor rear window wiper | |
| 4 | VERY | rear fog lights | |
| 5 | midrange | back door | |
| 6 | IF | front right door | |
| 7 | Warhead | interior lamp | |
| 8 | KG | handbrake sensor | |
| 9 | Warhead | open door alarm buttons | |
| 10 | rear window heating elements | ||
| 11 | WITH | license plate light | |
| 12 | GB | front left door | |
| 13 | B | interior lamp | |
| 14 | P | brake lights | |
| 15 | AND | side light (right rear) | |
| 16 | 3 | reversing light | |
| 17 | ZhCh | side light (left rear) | |
| 18 | ZhG | rear window cleaner | |
| 19 | rear window heating elements | ||
| X11 (W11) | 1 | AND | pump |
| 2 | RF | rear window washer valve | |
| 3 | — | ||
| 4 | AND | pump | |
| 5 | Warhead | engine compartment lamp | |
| 6 | — | ||
| 7 | — | ||
| 8 | CC | engine compartment lamp | |
| 9 | B | electric windshield wiper motor | |
| 10 | windshield wiper motor | ||
| 11 | — | ||
| 12 | CO | emergency oil pressure sensor | |
| 13 | — | ||
| 14 | R | windshield washer valve | |
| 15 | CO | electric wiper motor | |
| 16 | WITH | electric windshield wiper motor | |
| 17 | reinforced concrete | electric windshield wiper motor | |
| 18 | — | ||
| 19 | — |
Useful: Pinout and diagram of a fuel pump with a VAZ relay