The VAZ-2107 rear axle gearbox seal prevents lubricant leakage, so if it is displaced or worn out (rubber is not elastic), it is necessary to fix the problem as soon as possible. Replacing the oil seal suitable for the rear axle is a serious procedure, but if you want, you can learn everything.
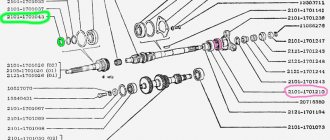
Sometimes it is even difficult to find an oil seal of the required size for a VAZ-2107, then to replace it you should take a regular oil seal from a similar engine. For example, if the new oil seal is larger than the old one, it will not be possible to put it on, so it is better to buy a smaller sample.
Make sure that the oil seal has an oblique cutting format, and a boot is also required. A traditional new oil seal is enough for 40,000 - 50,000 km. The boot prevents dirt and moisture from getting inside the part, which is especially valuable on Russian highways. The side thread, playing the role of a pump, prevents the oil from leaking and throws the solution back into the crankcase.
Purpose of the gearbox oil seal
The gearbox increases torque and transmits it from the driveshaft to the rear wheels of the car. This increases the force transmitted from the secondary shaft of the gearbox. All rotating gearbox parts located in the differential and final drive unit operate in an oil environment to reduce wear and reduce friction when the parts rotate. To prevent oil from leaking, a VAZ 2107 rear axle gearbox seal is installed on each of the axles coming out of it. If the seals are worn or damaged, oil leaks from the rear axle of the car are observed. In this case, damaged seals need to be replaced.
Important nuances in work
- When driving the oil seal using a mandrel, do not overdo it. Apply gentle blows and control the depth of the oil seal. If you hit it hard, you can easily damage the oil seal;
- Before installing the oil seal, lubricate the rim and sealing edge with fresh oil;
- Before installation, inspect the flange for wear in the area where the sealing lip of the oil seal meets. If there is a “groove”, the flange must be replaced.
As you can see, the process of replacing the VAZ 2107 gearbox seal is quite simple and does not take much time. The most important thing in this job is to properly tighten the rear axle flange nut.
Instructions for replacing the gearbox seal of the rear axle VAZ 2107
Before starting work, you should hang the rear axle and remove the rear wheels. After this, you need to drain the oil from the gearbox by unscrewing the oil drain plug.
Important: the oil drain plug should be screwed back in immediately after draining the oil. This way it won’t get lost and you won’t forget to tighten it after repairs before adding oil.
The further procedure is as follows:
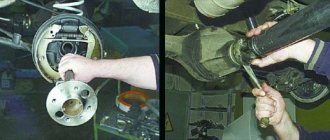
- Remove the two axle shafts from the rear axle.
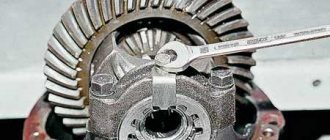
- Unscrew the nuts and remove the 4 bolts connecting the flanges of the gear and universal joint. When unscrewing the nuts, it is necessary to prevent the propeller shaft from turning with the help of a mounting blade.
- Separate the cardan and gearbox flanges using a strong screwdriver.
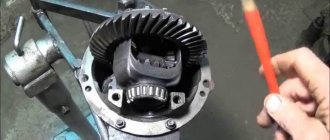
- Measure the rotation resistance of the gear. To do this, wind a strong cord around the flange of the gearbox gear, attach its end to the dynamometer and, pulling the cord, rotate the gear. Remember the dynamometer readings - they will be useful in determining the correct tightening torque for the rear axle nut. A simpler, but not as reliable option is to remember the number of turns of the bridge nut so that when reassembling it, tighten it as it was.
- Unscrew the nut that secures the flange and remove the washer.
- Remove the flange.
- Using a screwdriver or open-end wrench, remove the VAZ 2107 rear axle oil seal from the crankcase neck.
- Clear
Protect the oil seal seat from corrosion and dirt.- Lubricate the surface of the cuff with Litol lubricant.
- Place the oil seal in place and press it in using a hammer and mandrel.
Note: the oil seal must not be skewed when pressed. The end of the oil seal should be recessed relative to the end of the crankcase by 1.7-2 mm.
The mandrel can be made from an old bearing ring or a pipe of suitable diameter.
Nut tightening
Now the most important point is tightening the nut. To properly tighten the nut, you need to do the following preparatory work:
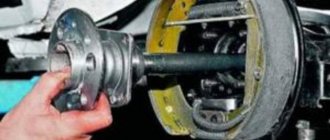
- hang up the rear of the car;
Remove the rear wheels and brake drums.
Tighten the nut until you feel a slight stop. Thus, we brought the bearings to the new spacer, but we had some play in the flange. He must be. This is normal with a new spacer. We tighten the nut 10-20 degrees and check the play. Tighten the nut until there is no play. Next, we check the force to break the flange using a digital scale. We insert the “ear” of the scale into the hole on the flange and pull it at a right angle. The breaking force should be within 1.5 kg. If the force is less than 1.5 kg, tighten the nut literally by degree and control the force.
The tightening torque of the nut should be from 12 to 26 kg/m when the required force is achieved. If, after eliminating the flange play, the force is significantly more than 1.5 kg, then you have received a defective spacer sleeve.
Next we reassemble:
- We fasten the cardan according to the marks;
- Fill in new oil (you need to pour oil with API GL-4/GL-5 approvals, volume 1.5 liters);
- We install brake drums and wheels.
Assembly
- Install the drive gear flange and washer.
- Tighten the nut to a torque of 117-254 Nm. It can be determined more accurately by measuring the force of rotation of the gear. It should correspond to the value measured before removing the flange. When tightening the nut, it is necessary to hold the flange using a wrench, which can be made from a pipe with a pair of bolts and nuts attached to it.
- Install axle shafts and wheels.
- Fill the rear axle gearbox with new oil.
Any component of a car can become unusable for a variety of reasons. This can also happen with oil seals in the rear axle gearbox of a VAZ 2107. The vast majority of car enthusiasts consider replacing these oil seals to be extremely difficult and immediately send the car to a service center. In this article we will try to prove to the reader that you can change such an oil seal with your own hands.
A little anatomy
In the last years of its life on the AvtoVAZ assembly line, the classic Zhiguli remained perhaps the only passenger car in the world with a rigid drive axle. This design is simple and technologically advanced in production, but has serious disadvantages in operation:
- large unsprung mass of the bridge, which negatively affects the smoothness of the vehicle;
- tendency to steer when one of the wheels hits an obstacle - at this time, due to the misalignment of the bridge, both wheels tilt from the vertical and tend to roll in the direction of the tilt;
- reduction in the useful volume of the trunk, because there must be free space between the axle and the car body for the axle to move during the compression of the suspension.
The advantage of a rigid axle, in addition to manufacturability, is its better adaptability to bad roads: the ground clearance under the axle practically does not change depending on the load, and the wheel drive is reliably protected from external influences by the axle housing.
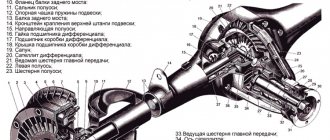
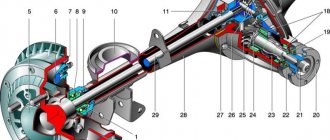
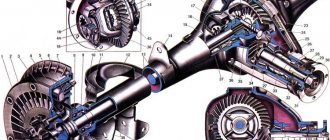
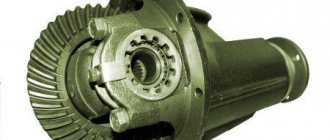
The Zhiguli bridge consists of a stamped-welded bridge beam (such beams are called “Banjo” for their characteristic shape), a main gearbox with a differential, and axle shafts. The gearbox is made in a separate open housing, the flange of which is bolted to the crankcase. A drive gear with a driveshaft mounting flange and a differential with a driven wheel are mounted in the housing on bevel bearings. The main gears are hypoid, that is, their axes are located at an angle of 90 degrees to each other, but do not intersect (they are crossed). The amount by which the axis of the drive gear is offset relative to the axis of the driven gear is called hypoid offset. Such a transmission, if it is precisely manufactured and well adjusted, operates smoothly and with the least noise, but due to the intense sliding of the curved teeth, it is very sensitive to the quality and quantity of oil in the bridge.
The design of the bridge is relatively simple and technologically advanced, although it is not without its drawbacks
Can't you spoil the porridge with oil?
Oil is poured into the axle housing up to the lower edge of the filler hole, in the position when the axle is installed and secured to the vehicle. You should not fill oil above this level, since a larger volume significantly increases power loss when the gears rotate and provokes leaks.
Lubrication of gearbox parts occurs as follows. The lower part of the driven wheel and differential are constantly immersed in an oil bath. When the car moves, they rotate, alternately wetting with oil all the teeth of the main gear and differential gears. The differential bearings and the rear pinion bearing are lubricated in the same way. In addition, the teeth of the driven wheel spray oil abundantly, creating “oil mist” in the crankcase. The least amount of oil when splashed goes to the front, most distant, bearing of the drive gear. To lubricate it, a channel is made in the upper part of the crankcase, where, under the influence of centrifugal force, oil is thrown from the outer circumference of the driven wheel. The higher the rotation speed, the more oil enters the channel. This channel leads into the cavity between the bearings of the drive gear, passes through the bearings and returns to the bridge beam. To drain oil from the flange side of the drive gear, there is an oil drain channel in the crankcase. The bearings, due to the conical shape of the rollers, have a pronounced pumping effect, so the flow of oil that flows from the front bearing directly to the oil seal can be quite significant - more than one liter per minute. It is not easy to withstand such pressure, so an oil-removing washer is installed immediately behind the bearing, in front of the oil seal. It slows down the flow rate, but there is still a gap between it and the crankcase through which the oil flows to the oil seal. Therefore, the tightness of the drive gear oil seal is a constant concern for axle designers and manufacturers.
The amount of oil supplied to the oil seal depends on the speed of rotation of the driven wheel of the final drive
But the lack of oil supplied to the oil seal is no less, and perhaps even more harmful to its “health”, because with dry friction against the surface of the flange, no matter how smooth it may be in appearance, the working edge of the oil seal will wear out very quickly, and a gap will form between it and the shaft, through which not only oil can flow out, but also water can flow in if you need to cross a ford or just a deep puddle in a heavy downpour. And water in oil is a very quick “death” for gears and bearings.
Surgery or therapy?
So, our “wounded” axle is leaking oil around the drive gear flange, and we are ready to save it. But first, as is usual with serious doctors, you need to figure out the cause of the “disease.” How does an appointment with a local therapist usually begin? Of course, from measuring temperature and pressure. You may be surprised, but when starting to repair a bridge, we should also remember these physical characteristics. And that's why. During operation, the drive axle gets quite hot - the temperature in the crankcase can reach 80 degrees Celsius. And since, ideally, the axle housing is a sealed container, along with heating in a confined space, the pressure also increases. This is the law of physics. The increased pressure additionally loads all the seals and gaskets of the bridge, breaking out where, for some reason, there is less resistance. This is often the drive gear seal, which is subject to the most intense friction. To reduce pressure, a valve (breather) is installed on the axle housing, which releases excess pressure. Therefore, the first thing you need to start diagnosing a leak is by checking the functionality and cleaning the breather from dirt. The valve cap should rotate freely. When you lightly press the cap from above, it should move freely and return to its original state when the load is removed.
If cleaning the breather does not help, and the leak continues, it’s time to prepare “surgical instruments”. In our case, a regular plumbing kit will be enough, although it would be nice to grab another skein of thread and a hand balance scale (dynamometer) with a good scale.