1. NIVA gearbox seals:
-Oil seal for the input shaft of the gearbox (gearbox) NIVA-2121, -21213, -21214, -2131, -2123:
Catalogue number: 2101-1701043
oil seal dimensions: 28x47x8mm
- Seal of the secondary shaft of the gearbox (shank) VAZ-2121, -21213, -21214, -2131, -2123:
Catalogue number: 2101-1701210
oil seal dimensions: 32x56x11mm
2 . NIVA front axle oil seals:
-Oil seal for the front axle gearbox NIVA- 2121,-21213,-21214,- 2123,-2120
catalog number: 2121-2302052
Dimensions: 35.8 x 68 x 11mm
-Drive seal -2121,-21213,-21214,-2131,-2123, universal (without direction)
Catalog number: 2123-2303120 / 121 2 pcs.
seal dimensions: 57.15 x 40 x 9mm
But it is better to install seals with a notch (left, right):
Left drive oil seal -2121,-21213,-21214,- 2123
Catalog number: 21213-2301035 1 piece.
Oil seal dimensions: 57.15 x 40 x 9mm
Right drive oil seal -2121,-21213,-21214,-2123
Catalog number: 21213-2301034 1 piece.
Oil seal dimensions: 57.15 x 40 x 9mm
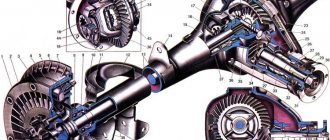
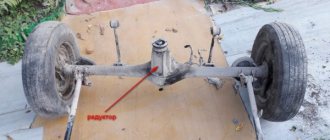
3. Transfer Case Seals 3pcs:
2 identical oil seals are installed on the valve:
catalog number: 2101-2402052-01 (this is the rear axle gearbox seal on the VAZ-2101 and NIVA-2121 of right rotation),
one is installed on the drive shaft of the RK:
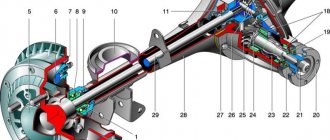
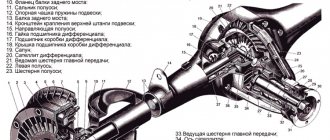
(in the lower diagram), the second is on the front shaft of the RK differential (see the upper diagram - highlighted in red)
Dimensions of these seals in mm: 35.8 x 68 x 10(12) 2 pcs.
An oil seal is installed on the rear shaft of the RK differential - this is the 3rd oil seal (highlighted in blue in the top diagram)
with catalog number: 2121-2302052 left rotation 1 pc.
Dimensions in mm: 35.8 x 68 x 11(12)
4. Rear axle gear oil seal :
catalog number: 2101-2402052-01 (rear axle gearbox VAZ-2101) 1 pc.
5. Axle shaft seals for Chevy NIVA-2123:
Seals for VAZ-2110 drives of right and left rotation are installed
catalog numbers of oil seals: 2110-2301034 right - 1 piece
gland dimensions in mm: 57 x 35 x 9
NIVA oil seals
1. NIVA gearbox seals:
-Oil seal for the input shaft of the gearbox (gearbox) NIVA-2121, -21213, -21214, -2131, -2123:
Catalogue number: 2101-1701043
oil seal dimensions: 28x47x8mm
- Seal of the secondary shaft of the gearbox (shank) VAZ-2121, -21213, -21214, -2131, -2123:
Catalogue number: 2101-1701210
oil seal dimensions: 32x56x11mm
2 . NIVA front axle oil seals:
-Oil seal for the front axle gearbox NIVA- 2121,-21213,-21214,- 2123,-2120
catalog number: 2121-2302052
-Drive seal -2121,-21213,-21214,-2131,-2123, universal (without direction)
Catalog number: 2123-2303120 / 121 2 pcs.
seal dimensions: 57.15 x 40 x 9mm
But it is better to install seals with a notch (left, right):
Left drive oil seal -2121,-21213,-21214,- 2123
Catalog number: 21213-2301035 1 piece.
Oil seal dimensions: 57.15 x 40 x 9mm
Right drive oil seal -2121,-21213,-21214,-2123
Catalog number: 21213-2301034 1 piece.
Oil seal dimensions: 57.15 x 40 x 9mm
3. Transfer Case Seals 3pcs:
2 identical oil seals are installed on the valve:
catalog number: 2101-2402052-01 (this is the rear axle gearbox seal on the VAZ-2101 and NIVA-2121 of right rotation),
one is installed on the drive shaft of the RK:
(in the lower diagram), the second is on the front shaft of the RK differential (see the upper diagram - highlighted in red)
Dimensions of these seals in mm: 35.8 x 68 x 10(12) 2 pcs.
An oil seal is installed on the rear shaft of the RK differential - this is the 3rd oil seal (highlighted in blue in the top diagram)
with catalog number: 2121-2302052 left rotation 1 pc.
Dimensions in mm: 35.8 x 68 x 11(12)
4. Rear axle gear oil seal :
catalog number: 2101-2402052-01 (rear axle gearbox VAZ-2101) 1 pc.
5. Axle shaft seals for Chevy NIVA-2123:
Seals for VAZ-2110 drives of right and left rotation are installed
catalog numbers of oil seals: 2110-2301034 right - 1 piece
gland dimensions in mm: 57 x 35 x 9
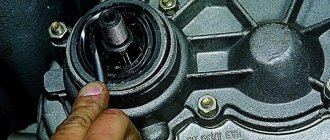
In the photo: VAZ-2123 axle seals (BRT) red-left, black-right.
The arrow on the oil seal indicates the direction of rotation of the shaft (when the vehicle is moving forward).
Source
Alternative Corteco oil seals for LADA 4×4
Everyone knows that one of the most loaded components in a Niva is the transmission, so many owners try to approach the operation of these units with attention and care. An important condition for extending the life of axles, gearboxes and gearboxes is the choice of good gear oil. But even in this case, the oil seals remain the weakest point. Personally, I settled on oil seals from the Italian company Corteco (I had an unpleasant experience with domestically produced products; they leaked again after 5000 km). In order not to look for oil seal numbers on the Internet, I post their numbers here (you can freely order them in Exist, Russian analogues are given in brackets) : Front crankshaft oil seal 12011455
(2101-1005034)
Rear crankshaft oil seal 12011438
(2101-1005160)
Gearbox oil seal, primary shaft 12011445
(21010-1701043)
seal, secondary shaft 12011450
(21010-1701210)
RZM 120 shank oil seal 11293 (RK oil seal for front cardan drive, input shaft seal)
(2101-2402052)
RPM shank oil seal (RK oil seal for rear cardan drive) 19034615
(2121-2302052)
Rear axle shaft oil seal (st/o) 12011493
(2101-2401034)
Rear axle shaft oil seal (n/o) (reversible) 12015250 reversible ny
( 2110-2301034/5)
Front drive reversible oil seal 12019142
(21213-2301034/5.)
Hub oil seal 12016929
(2121-3103038)
Oil scraper cap 19018251
(2101-1007026)
Packaging of seals can be of 2 types: cardboard boxes, on the end of which there is a Corteco catalog number or a plastic bag, also with a catalog number.
Source
How to determine when it's time to change?
Under the influence of temperature and aggressive substances contained in the oil, the elastic cuffs become rigid. Rotating shafts gradually wear out rubber or silicone. As a result, the connection loses its tightness. This manifests itself in the form of oil leaks. If there is severe wear after parking, you can find oil drops under the car in the area of the gearbox.
If the input shaft seal is damaged, lubricant leaks onto the clutch disc. As a result, the oil begins to burn, as evidenced by a characteristic odor. In this case, the clutch may slip under heavy load.
Important! Seal wear is also indicated by a drop in oil level. In this case, the parts must be replaced with new ones.
Advice on how to remove drives without dismantling the Niva front gearbox
- To dismantle the drives, it is necessary to unscrew the fastenings of the gearbox (in this case, some kind of stop is placed under it).
- Then the steering knuckles are released. To do this, simply unscrew the shock absorber mount from the lower arm and the lower ball joint.
- To relieve the load, jack up the lower suspension arm.
- Unscrew the hub nut and remove the centering ring. The nut is too tight, so we use a wrench extension (for example, a metal pipe).
- We move the steering knuckle to the side. The drive can then move freely.
- To ensure free movement of the drive during removal, the gearbox must be moved back slightly.
- We remove the drive, being careful not to damage the anthers. If the boot is torn, it must be replaced.
- The procedure for removing the right and left CV joint drives is similar.
Before dismantling, it is necessary to mechanically remove dirt from the inside of the steering knuckles and from the bottom of the car above the work area. The best option is to wash the bottom with a high-pressure apparatus one day before carrying out work.
Replacing the secondary shaft oil seal
To work, you will need a standard set of wrenches, a hammer, a mandrel and a screwdriver. The materials you will need are sealant and kerosene for washing spare parts.
Replacing the secondary shaft oil seal of the Niva Chevrolet gearbox requires preliminary dismantling of the oil seal. After this you need to do the following:
- Remove the centering ring seal.
- Unscrew the nut holding the shank flange.
- Remove the centering ring.
- Pull out the lock washer.
- Remove the flange.
Using a screwdriver, remove the oil seal from the mounting hole.Apply a thin layer of sealant to the outer surface of the body of the new part.
Using a mandrel, press the part into the gearbox cover.
After this, all that remains is to check the oil level and install the flush valve in place.
To replace the input shaft seal of the Niva Chevrolet gearbox, it is necessary to dismantle the gearbox. After this, all that remains is to wipe its body with a rag and get to work. To replace a worn part, you must:
Using a 13mm wrench, unscrew the nuts and remove the clutch housing cover.
When the replacement is complete, you need to put the box back in place.
Replacement Tips
Most people, along with replacing the oil seal, also change the transmission oil. If you are one of them, you should find out which lubricant you need to use, since mixing different types of oil is not recommended. This may lead to operational problems. Therefore, if you are not sure what fluid to fill in, flush the system before replacing.
Before replacing the fluid, it is better to drain it; if this is not possible, then raise the side where the replacement will take place higher, this way you can avoid lubricant leakage. In any case, after the work is done, you need to add oil.
To summarize, we can conclude that the problem occurs sooner or later for all owners of this car, since the rear axle of this model is weak. As we can see from the material given above, replacing a part is not such a complicated procedure and can be done independently, and it can be done in an hour.
Source
Transfer case device
The Chevrolet Niva transfer case redistributes engine torque between the drive axles and, if necessary, changes the gear ratio and locks the center differential. The parts of this assembly require significant force. Therefore, RK gears and bearings operate in an oil environment.
To prevent oil leakage from the transfer case, oil seals are installed at the joints of the housing and rotating drive shafts. They consist of two parts: a metal body and a rubber cuff, tightened by a spring. The latter ensures sealing of the connection due to the tight fit of the rubber to the shaft.
Required tools for replacement
To work you will need:
- Keys for "13" and "24".
- Screwdriver.
- Hammer.
- Torque wrench.
First of all, it is necessary to determine the cause of the oil leak.
Before starting work on replacing the oil seal, you should make sure that the cause of the leak is not the breather . To do this, you need to check the amount of oil leakage by moving the breather cap in different directions. You should first check the amount of oil in the bridge and add it. After this, the oil filler plug should also be crimped.
If the work will be carried out on a pit, then the bridge must be hung and placed on supports.
Then you need to start the engine and engage 4th gear . The speedometer reading should be within 100 kilometers per hour. In this position, the machine should work for 10–15 minutes (engine temperature 80 degrees ). 5 drops of oil leak out during the test , then the oil seal must be changed.
Article, size and manufacturers of reinforced cuffs
Initially, oil seals with an outer diameter of 68 and an inner diameter of 35.8 mm were installed in the transfer case. two types:
- 2121-2302052 — one oil seal. A similar part is installed on the drive gear of the front axle;
- 2101-2402052-01 — two oil seals in the Republic of Kazakhstan. The same part is located on the drive gear side of the rear axle.
The installation of different seals is explained by the different directions of rotation of the drive shafts.
Useful! Nowadays oil seals with article number 2123-1802120-12 are installed in the RC and axles of the Niva Chevrolet. They are designed for shaft rotation both clockwise and counterclockwise.
Spare parts from the Balakovo plant (Rosteco) are popular. According to reviews from Chevrolet Niva owners, they are characterized by high wear resistance at an affordable price.
Rear axle axle shaft of unloaded type VAZ 21213-2123 modernized 22 splines VolgaAvtoProm
- Description
- Characteristics
- Reviews 4
New! Upgraded design! 22 slots!
We offer you a collapsible rear axle shaft of the unloaded type 24 splines VolgaAvtoProm , developed on the basis of modern hub units for foreign cars (HUB-III), is a collapsible unit, which includes a closed double-row ball bearing.
Now the axle shaft is divided into two separate parts: the hub and the shaft, which allows for a number of significant advantages over the “standard” standard axle shaft.
The factory hub assembly of the rear axle shaft of the VAZ 2121-2123 is created using the so-called “zero” generation bearing.
The disadvantages of the standard design are:
- Low reliability (average mileage under moderate load is about 30,000 km)
- The need to drain the oil when repairing the axle shaft.
- The possibility of the axle shaft retaining ring being pressed out during operation.
- Availability of special tool for repair.
- Possibility of unpressing the retaining ring while moving, which can lead to an emergency.
We offer you the 3rd generation hub Rear wheel drive, developed on the basis of modern hub units for foreign cars (HUB-III):
- The hub is a single and dismountable unit, which integrates a double-row closed-type ball bearing DAC 39720037 (Craft Bearings) from the front hub of DAEWOO Nexia, Lanos, OPEL Vectra. Bearing dimensions 72x39x37 mm ;
- Lightweight design : The axle shaft is now divided into two separate parts - the hub and the shaft , which allows the weight of the vehicle to be distributed over the hub and bearing;
- Increased reliability of the unit due to the use of alloy steel and modern heat treatment methods (at a moderate load of 80,000 km or more);
- Increased resistance to lateral loads;
- High maintainability and ease of replacement. ( when replacing a bearing, it is not necessary to heat the lock ring, which is seated “hot”, which greatly simplifies repairs in a service station);
- No need for maintenance or adjustment during the entire life of the unit.
- The bearing used is widespread and can be purchased at any auto parts store for foreign cars.
The recommended tightening torque for the wheel bearing is 22 kgf*m or 215.7 H*m (in the factory design, the necessary tightening of the wheel bearing has already been made.)
The manufacturer guarantees the operating life of the unit for 6 months, subject to proper installation and operation.
Attention. Before installation, be sure to check the geometry of the rear axle stocking. A “bent” axle will lead to accelerated wear of the axle shaft and bearing failure.
- Includes 2 axle shafts , technical data sheet, packaging - hard cardboard box.
- The weight of one reinforced, unloaded axle shaft for the Niva and Chevrolet Niva assembly is 9.0 kg, the weight of the set is 18.0 kg.
- Two axle models are available: 2123 - for vehicles equipped with a standard axle model 21213-2123,
- 2123ABS - For vehicles with anti-lock brakes,
- 2121 - for old-style 2121 cars with a “short” axle.
Information on standard (factory) axle shafts for Niva and Chevrolet Niva of all modifications (22 splines)
! Wide axle - rear axle beam Niva 213 (21213-2401010) and Chevrolet Niva 2123 (2123-2401010) - are essentially the same, differ in the mounting of shock absorbers (which are like a house in the Niva) and brake pipes. Length 1350 mm. Locking ring 2123 (2123-2403084 regular or with teeth 2123-2403084-10 for ABS), oil seals 2110 left and right (2110-2301034 and 2110-2301035). The oil seal size is 35x57x9.
The axle shaft Niva (21213-2403069) and Chevy Niva (2123-2403069) - it’s long, it’s also a new model - 760 mm. The axle shafts themselves are the same; the assembly differs in the bolts that secure the axle shaft to the axle. (M10x60 for 2123 and M10x50 for 213)
It is possible to send cash on delivery to all regions of Russia.
- Shaft
- Thrust ring
- Bearing shell
- Double row ball bearing DAC 39720037 Size 39x72x37 (Craft Bearings)
- Hub
- Oil seal (2121-3103038)
- Oil seal (2101-2402052)
- Retaining ring
Links to tests of modernized axle shafts in severe conditions:
When and how do you need to change the seals of the VAZ 2123 transfer case?
Reference! Parts must be replaced if transmission oil leaks occur at the interface between the drive shafts and the transmission housing.
If this is not done, the transmission will leak. Without lubrication, transfer case parts will quickly fail.
Step-by-step instructions for replacing the oil seal of the Niva Chevrolet
To work, you need to have free access to the bottom of the car. Therefore, replacement of the oil seals will be carried out on an inspection ditch, overpass or lift.
You will need the following tool:
- hexagon 12;
- open-end or socket wrench 24;
- waste container;
- flat screwdriver;
- hammer;
- mandrel;
- syringe for filling transmission oil;
- new self-locking nuts for fastening the flanges.
The algorithm for replacing the Niva Chevrolet transfer case oil seal is as follows:
- drain the oil from the transfer case into the prepared container;
- unscrew the bolts securing the cardan, the drive shaft oil seal of which is to be replaced;
- engage the gear, lock the differential and put the car on the handbrake;
- Unscrew the nut securing the propeller shaft drive flange.
- remove the washer;
- pull the flange off the shaft;
- use a screwdriver to remove the old oil seal;
- clean the seat and apply sealant;
- lubricate the rubber seal of the new oil seal with oil;
- using a mandrel and a hammer, press the part into place;
- install the flange and washer, tighten them with a self-locking nut;
- secure the cardan.
Important! The self-locking design does not allow for reuse of parts. Therefore, the flange nuts must be replaced with new ones.
After completing the work, it is necessary to fill the transfer case with fresh transmission oil.
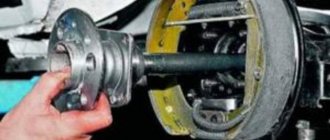
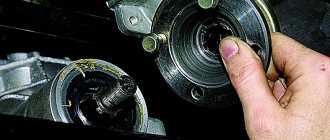
We remove the axle shaft, select tools, consumables and accessories
First of all, you should pay attention that when replacing a bearing, you need to install not only it, but also new axle shaft seals and new retaining rings. For cars with and without ABS, the locking rings are different - on cars without an anti-lock braking system, the axle locking ring has a smooth surface, and on cars with ABS, the locking ring is splined. It is impossible to confuse them. We assemble tools and accessories :
- Bulgarian.
- Standard set of tools and screwdrivers.
- Inertia axle puller.
Inertia axle puller.
New set - oil seal, retaining ring and bearing.
The tool has been selected and the axle shaft can now be removed. This is done in the following sequence :
- We place the car on a flat surface and install wheel chocks under the front wheels.
- We tear off the wheel mount, jack up the car, and install a stand under the rear axle.
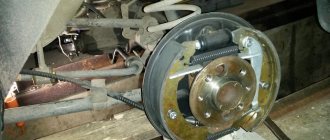
- Remove the wheel and unscrew the brake drum mounting screws.
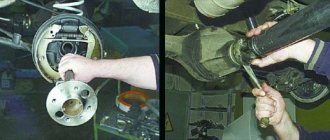
We unscrew the bolts securing the brake drum to the axle shaft.
We knock down the brake drum using a wooden block.
We unscrew the four nuts of the axle bearing mounting plate bolts.
We remove the axle shaft using an inertial puller.
When removing the axle shaft, you need to try not to damage the oil seal if there is no desire or need to change it. After this, the entire brake mechanism is suspended from the spring using a wire.
Transfer case device
The Chevrolet Niva transfer case redistributes engine torque between the drive axles and, if necessary, changes the gear ratio and locks the center differential. The parts of this assembly require significant force. Therefore, RK gears and bearings operate in an oil environment.
To prevent oil leakage from the transfer case, oil seals are installed at the joints of the housing and rotating drive shafts. They consist of two parts: a metal body and a rubber cuff, tightened by a spring. The latter ensures sealing of the connection due to the tight fit of the rubber to the shaft.
Article, size and manufacturers of reinforced cuffs
Initially, oil seals with an outer diameter of 68 and an inner diameter of 35.8 mm were installed in the transfer case. two types:
- 2121-2302052 — one oil seal. A similar part is installed on the drive gear of the front axle;
- 2101-2402052-01 — two oil seals in the Republic of Kazakhstan. The same part is located on the drive gear side of the rear axle.
The installation of different seals is explained by the different directions of rotation of the drive shafts.
Useful! Nowadays oil seals with article number 2123-1802120-12 are installed in the RC and axles of the Niva Chevrolet. They are designed for shaft rotation both clockwise and counterclockwise.
Spare parts from the Balakovo plant (Rosteco) are popular. According to reviews from Chevrolet Niva owners, they are characterized by high wear resistance at an affordable price.
When and how do you need to change the seals of the VAZ 2123 transfer case?
Reference! Parts must be replaced if transmission oil leaks occur at the interface between the drive shafts and the transmission housing.
If this is not done, the transmission will leak. Without lubrication, transfer case parts will quickly fail.
Step-by-step instructions for replacing the oil seal of the Niva Chevrolet
To work, you need to have free access to the bottom of the car. Therefore, replacement of the oil seals will be carried out on an inspection ditch, overpass or lift.
You will need the following tool:
- hexagon 12;
- open-end or socket wrench 24;
- waste container;
- flat screwdriver;
- hammer;
- mandrel;
- syringe for filling transmission oil;
- new self-locking nuts for fastening the flanges.
The algorithm for replacing the Niva Chevrolet transfer case oil seal is as follows:
- drain the oil from the transfer case into the prepared container;
- unscrew the bolts securing the cardan, the drive shaft oil seal of which is to be replaced;
- engage the gear, lock the differential and put the car on the handbrake;
- Unscrew the nut securing the propeller shaft drive flange.
- remove the washer;
- pull the flange off the shaft;
- use a screwdriver to remove the old oil seal;
- clean the seat and apply sealant;
- lubricate the rubber seal of the new oil seal with oil;
- using a mandrel and a hammer, press the part into place;
- install the flange and washer, tighten them with a self-locking nut;
- secure the cardan.
Important! The self-locking design does not allow for reuse of parts. Therefore, the flange nuts must be replaced with new ones.
After completing the work, it is necessary to fill the transfer case with fresh transmission oil.
How to turn on the transfer case on a Niva Chevrolet
The transfer case is controlled using a lever. Features of the device allow you to turn on lowering and locking at the same time. To select a lower gear, you need to pull the lever up. To add a lock you need to pull it to the far left position. To make it easier to navigate, there are special symbols on the handle:
- L-lowered,
- N-neutral,
- H-increased (standard operating mode).
How to use the lowering device correctly. Let's say a car is moving along a dirt road in second or third gear. If you come across a large puddle on the way, it is best to stop and engage a lower gear.
The downshift is only activated when the vehicle comes to a complete stop. This is a feature of the Chevrolet Niva differential. At the same time, it is not necessary to completely stop the car to activate the lock. At the same time, having the lock turned on is not a prerequisite for off-road movement. Usually it is used only if there is a risk of the car hanging diagonally.
But is it possible to turn on the lock not only in diagonal mode? Of course yes. But at the same time, the owner of a Chevrolet Niva may have some problems. Very often the lock jams and it remains on. At the same time, driving like this is not very useful for the car, especially at high speed. There are several basic ways to turn off the lock. To do this, you need to put the car in reverse, accelerate the car a little and try to dislodge the lock. This procedure needs to be done only at speed; this method helps quite often. To check whether the lock is enabled, you need to look at the dashboard, there will be a corresponding icon there.
