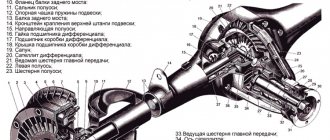
The rear axle gearbox oil seal (REA) is a lip seal located in the mechanism housing on the installation side of the bevel gear bearings. The main function of the oil seal is to ensure the tightness of the gearbox, eliminating the leakage of lubricant located in the rear axle housing.
Causes of wear
The lip seal of any vehicle component wears out over time, losing its properties. One reason is physical wear and tear. But the oil seal can also be damaged by the aggressive influence of oil on it, for example, when using low-quality lubricant. In addition, the oil seal itself may be initially defective.
If the oil has barely come out, then there is no need to rush to replace the cuff, but you need to periodically monitor the condition of the element and, if a leak occurs, make repairs.
Signs of wear
The main sign of a worn VAZ 2121 shank oil seal is the presence of oil leaks on the rear axle in the area where the REM flange is located. To identify a faulty element, it is enough to drive the car into an inspection hole or overpass, or simply crawl under the car. If the cuff is worn heavily, then after a long period of parking an oil puddle will form under the rear axle. If you neglect to timely replace the rear gear oil seal, this will lead to increased wear of the internal elements of the mechanism due to lack of lubrication and their subsequent failure.
Replacing the cuff
If the lip seal has become unusable, it only needs to be replaced, since the element is non-repairable (rubber ages over time and cannot be restored). To replace the oil seal, you need to know the size of the element:
- outer diameter 68 mm;
- internal diameter 35.8 mm;
- height 12 mm.
To carry out repairs, you will need to prepare the following list of tools:
- key to 13;
- 24mm head and knob;
- hexagon 12;
- powerful slotted screwdriver;
- hammer;
- dynamometer and torque wrench;
- container for draining oil.
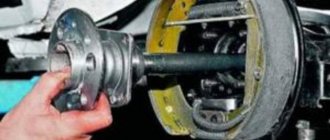
The process of replacing the shank oil seal is carried out with the rear axle hanging and is carried out as follows:
- Unscrew the rear axle housing plug and drain the lubricant into a prepared container.
- We unscrew the fastening bolts of the rear cardan to the RZM flange, move the shaft to the side and secure it with wire to the longitudinal link of the bridge.
- Using a dynamometer, we determine the moment of resistance to gear rotation by turning the flange nut clockwise.
- To hold the flange, insert the cardan bolts into the holes and screw the nuts onto them.
- We place a mounting spatula or screwdriver between the bolts and unscrew the nut with a socket and wrench.
- Remove the nut and washer from the shank.
- We dismantle the flange itself by hitting it with a hammer through a wooden adapter.
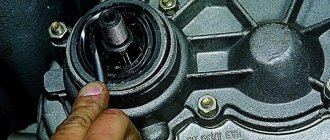
- To remove the oil seal, hook it with a screwdriver and remove it.
- We apply Litol-24 to the working edge of the new cuff, after which we mount the part into the crankcase using a suitable attachment.
- We put the flange and washer in place and tighten the nut with a torque wrench with a torque of 117–255 N*m (12–26 kgf*m), using a dynamometer to control the moment of resistance of the bearings to turning the drive gear. If during the initial measurement of the moment of resistance the value was at least 6 kgf*cm, then when re-tightening it is necessary to increase it by 1-2 kgf*cm. If initially the value was 6 kgf*cm, then we achieve a torque of 6-9 kgf*cm. At the same time, the tightening torque should not exceed 12-26 kgf*m. If, while tightening the nut, the moment of resistance exceeds 9 kgf*cm, the spacer sleeve on the bevel gear will need to be replaced.
- After the adjustment work, we install all the elements in the reverse order.
Replacing the Niva differential lock warning lamp switch
3 differentials, one in the front and rear axle gearbox, one in the transfer case. This is a mechanical device that redistributes torque to all axes depending on the force on these axes.
If the front axle is in a snowdrift and the rear axle is on ice, the two wheels that are on the ice will rotate and you will not be able to get out of the snowdrift. In order to increase cross-country ability, the differential in the transfer case is blocked, the rotational moment is transmitted to the rear and front axles in a ratio of 50 to 50. As a result, the vehicle's cross-country ability increases significantly.
When I turn on the differential lock, sometimes it doesn't engage right away. You don’t need to pull with all your might, you need to start the car and drive back in first gear and a little forward about 2 meters and after that it should turn on. Because the differential locking clutch fits onto the front axle drive sprocket and at this moment the teeth on the gear may not match, so it does not turn on.
Also interesting: Review of the standard Niva Chevrolet alarm system
Drive forward and back and then the clutch will fit. You need to turn it on with the car stopped and lock the differential and shift to a lower gear on the transfer case. Although according to your passport you can turn it off while the car is moving. I recommend doing it while the car is stopped. There will be less wear. Then this transfer case will serve for a long time!
NIVA oil seals
1. NIVA gearbox seals:
-Oil seal for the input shaft of the gearbox (gearbox) NIVA-2121, -21213, -21214, -2131, -2123:
Catalogue number: 2101-1701043
oil seal dimensions: 28x47x8mm
- Seal of the secondary shaft of the gearbox (shank) VAZ-2121, -21213, -21214, -2131, -2123:
Catalogue number: 2101-1701210
oil seal dimensions: 32x56x11mm
2 . NIVA front axle oil seals:
-Oil seal for the front axle gearbox NIVA- 2121,-21213,-21214,- 2123,-2120
catalog number: 2121-2302052
Checking the technical condition and repairing the axle shaft
After dismantling the axle shaft, you need to check its condition and the condition of the parts included in the axle shaft kit. You need to make sure that:
— the ball bearing is not worn out or damaged; if the axial clearance in it exceeds 0.7 mm, replace the bearing;
— the locking ring and bearing have not been displaced relative to the original fit; if the inner ring of the bearing rotates relative to the seat of the axle shaft, replace the locking ring;
— the bearing mounting plate and the oil deflector are not damaged;
— the axle shaft is not deformed and the seating surfaces are not damaged; The runout of the axle shaft, measured at the centers on the journal under the oil seal, should not exceed 0.08 mm.
Before installing into the centers, thoroughly clean the centering holes on the axle shaft from dirt and rust.
If wear or damage to parts installed on the axle shaft is detected, replace them with new ones, following the rules below and using special tools.
Eliminate slight bending of the axle shaft by straightening.
After straightening the axle shaft, the runout of the flange hub, measured at the centers, should not exceed 0.05 mm.
If the runout of the flange end is more than specified, but not more than 0.08 mm, then it is allowed to groove it to eliminate the end runout. Reducing the thickness of the flange due to its groove is allowed by no more than 0.2 mm.
Removing the locking ring
Removing and installing the axle bearing lock ring must only be done using a hydraulic press.
First, bend outward the holders of the bolts securing the plate with the oil deflector and the brake shield, and remove the bolts.
Use the half rings of tool 67.7823.9529 to surround the bearing and install the half shaft vertically so that the half rings rest on the thrust ring.
Place the axle shaft under the press (Fig. 13) and apply gradually increasing force to the splined end of the axle shaft until the bearing lock ring is removed.
Do not reuse the axle bearing lock ring, but replace it with a new one.
Check whether the seating surface of the axle shaft has any marks or damage; if necessary, replace the axle shaft with a new one.
Axle shaft assembly
Place the axle shaft vertically, resting its flange on wheel 7 (Fig. 14) of tool 67.7823.9530.
Install the axle bearing oil deflector and the bearing mounting plate with a gasket on the axle shaft, pre-connected with two screws; Install the axle ball bearing.
Insert the new locking ring into special holder 3, place it in the oven and heat the ring to approximately 300° C so that at the time of pressing onto the axle shaft its temperature is 220 - 240° C.
Press the locking ring onto the axle shaft using mandrel 1 on a press with a force of no more than 58.8 kN (6000 kgf) so that the inner ring of the bearing is clamped between the locking ring and the shoulder of the axle shaft.
After pressing, make sure that the ring does not move under an axial load of 19.6 kN (2000 kgf).
For this purpose, install the axle shaft assembly on a special device (Fig. 15), and clamp the locking ring in a special vice.
Place the indicator leg 1 with a division value of 0.01 mm to the axle shaft flange.
After setting the indicator arrow to “0”, apply the indicated axial load, using a torque wrench to create a tightening torque of 78.5 - 83.3 Nm (8 - 8.5 kgf m) on the device screw.
The screw rests through the ball against the end of the axle shaft. In this case, even the smallest gap should not appear between the lock ring and the inner ring of the bearing.
After removing the load and unscrewing the screw of the device, the indicator arrow should return to the zero position; this proves that no movement has occurred between the lock ring and the axle shaft.
If the indicator needle does not return to the zero position, it means that the locking ring has moved and the axle shaft assembly must be replaced with a new one.
After checking the press-fit of the locking ring, install the bolts securing the plate and oil deflector 6 (Fig. 14) and fix them by bending them inward, the bolt holders.
Measuring the axial free play of the axle shaft on a car
Loosen the rear wheel nuts.
Place chocks under the front wheels and remove the rear axle.
Release the parking brake and move the gearshift lever to neutral.
Remove the wheels and brake drums by screwing fixture 02.7834.9504 to the axle shaft (Fig. 16), pass the indicator leg extension 1 through one of the holes in the axle shaft until it touches the brake shield or the oil deflector and secure the indicator.
Take measurements with an indicator, applying a force of about 49 N (5 kgf) to the axle flange in both directions along the axis of the rear axle. Free play should not exceed 0.7 mm.
When to change the seal
Replacing the axle seal is not tied to a specific mileage, but is done in connection with the following defects:
- Transmission oil leakage from the rear axle of a Chevrolet Niva. It is characterized by the appearance of oil stains on the brake casing and the “stocking” on the side where the axle shaft seal has lost its seal.
- In case of accidental damage to the seal when replacing the axle bearing. Happens when a part is pulled out of its socket.
A distinction should be made between transmission oil leakage from the axle seal on either side of the rear beam and from the gearbox shank where the driveshaft is secured. In the second case, greasy stains and dirt cover the rear axle gear housing, located in the middle.
If for various reasons you need to replace the axle bearing, then you should also change the oil seal at the same time. This will save you from having to disassemble the unit again due to leakage of the old part. The part costs mere pennies, its catalog number for the Chevrolet Niva is 2110-2301034 (right) and 2110-2301035 (left), and the overall dimensions are as follows:
- outer diameter - 57 mm;
- width - 9 mm;
- The diameter of the hole along the protruding rubber (or silicone) edge is 35 mm.
The catalog number and dimensions of the O-ring of the Niva VAZ 21214 axle shaft are identical. In addition to the oil seal itself, transmission oil will be needed to replenish the lost amount in the gearbox. TAD17I brand oil is considered “native” for all types of VAZ gearboxes.
In what situations is it necessary to replace the oil seal?
The sealing element mounted on a Chevrolet axle shaft does not have a service life determined by the mileage. For this reason, replacement is carried out only when certain signs of malfunction of this rubber band are detected. In particular, repairs are definitely necessary when it turns out that transmission oil begins to leak. This is evidenced by characteristic stains found either on the rear axle housing or on the Niva brake housing. Depending on where the leaky axle shaft seal is located, drips will appear on the right or left.
In addition, the seal in question often becomes unusable when the bearing located there is replaced. The elastic usually breaks when this element is pulled out. The problem is that to dismantle the named part it is often necessary to apply a lot of force or use not very delicate methods.
It is important to understand that in a Chevrolet, in the rear axle area, there can also be a leak from the gear shaft that holds the driveshaft. In the latter case, oil drips appear exactly in the middle.
Thus, anyone who intends to replace the bearing located on the Chevrolet Niva axle shaft is recommended to buy a fresh oil seal and, for preventive purposes, install it instead of the old one, regardless of the performance of the latter. The part will cost literally a few rubles, and it is not difficult to find it by article number. So, in the case of the right part of the bridge, take 2110-2301034, for the left - 2110-2301035.
The element dimensions are:
- outer diameter is 57 millimeters;
- internal – 35;
- height – 9.
If a Niva model 21214 requires repairs, then the axle shaft sealing ring is the same.
In addition to the oil seal, before replacement it is necessary to purchase a sufficient amount of transmission oil, because some of the lubricant in the gearbox will probably spill. If you don’t know which one is suitable, then buy what is poured at the Volzhsky Automobile Plant - its brand TAD-17I.
Step-by-step instructions for DIY replacement
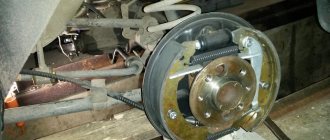
After installing the vehicle on the inspection hole, it is secured using anti-recoil devices. It is recommended to disable the handbrake first. To remove the old seal, you must first disassemble the rear hub assembly and remove the axle shaft.
The unit must be disassembled in strict accordance with the instructions:
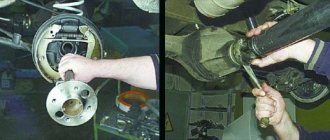
- The wheel nuts are loosening. After this, jack up the car and remove the wheel.
- There may be rust on the rear axle shoulder that extends past the brake drum that needs to be removed. The part is additionally treated with lubricant.
- There are two fastening bolts on the drum, to unscrew them you will need a 12 mm wrench. The drum is gently tapped with a hammer, which allows it to move.
- You can use 2 methods to remove the drum. It is squeezed out using bolts that are provided for fastening. The drum is knocked down with a hammer. The procedure is performed as carefully as possible to avoid damage to the edges.
- The axle shaft seat is cleaned, which will ensure easy removal of the drum in the future.
The next step is to remove the axle shaft. The Chevrolet Niva has 4 bolts designed to secure the axle. The shock absorber is held in place by a bracket located on the other side of the axle shaft. Once all the bolts are removed, the shock absorber will not hold the rear axle, which is pushed down by the spring.
If oil leaks, you need to jack up the vehicle higher and place a container to collect the fluid under the work area. If the rear axle stocking rests in an inclined position in the other direction, this will eliminate the oil leak.
If the shock absorber is attached to the spring cup, there is no need to unscrew it. In this case, do not use a stand. To unscrew the 4 bolts that secure the rear axle shaft, you must use a 17 mm wrench
When performing the procedure, pay attention to the growers, which should not be in the rear mechanism. If the old groover gets lost and the technician installs a new part, it will get caught in the space between the drum and the shoe, causing the wheel to jam in the vehicle.
After unscrewing the bolts, the axle shaft is removed with a sharp movement along with the bearing. If you can’t pull it out of the holder, it is recommended to secure the wheel to the stud with three nuts and pull it firmly. At home, you can tie the wheel to the garage door with a rope. They knock on the gate with a hammer and the axle shaft comes out of the cage.
After dismantling the axle shaft, the technician will have access to the metal shield intended for attaching the brake pads. It is fixed with two upper bolts, which are inserted into the holes. The remaining actions are performed in accordance with the instructions:
- There is a thick rubber lining on the rear axle flange, which is recommended to be removed.
- The old oil seal is pryed off with pliers or a screwdriver and removed from its installation location, which must be cleaned and wiped with a rag.
- Apply a small amount of transmission oil to the new seal. It is installed in a seat in a level position.
- The oil seal is pressed with a round attachment, which is made from a pipe. To avoid damage to the rubber gasket, it is recommended to use the old oil seal during pressing.
After replacing the oil seal, all parts are cleaned of oil - pads, brake cylinder, metal shield and drum. Before assembling the axle shaft, it is recommended to inspect its bearing. If there is no lubrication, the part is processed. If signs of bearing wear are observed, it is replaced with a new part. The need for replacement is determined by sticking or slight noise or difficulty rotating. If malfunctions are observed, then the axle shaft should be taken to a service center, since the bearing can only be replaced with special equipment.
Upon completion of the oil seal replacement work, the oil in the rear axle gearbox is checked. To do this, unscrew the filler plug from the gearbox casing and visually determine the amount of fluid. If there is not enough oil, it is added through a hose that is inserted into the filler neck.
Site about off-road vehicles, SUVs, off-road vehicles
The oil seal of the drive gear (shank) of the gearbox of VAZ and Lada Niva cars works in difficult conditions. So, when driving at a speed of 80-90 km/h, the temperature of the gearbox, and with it the oil seal, reaches 90 degrees after 15 minutes. A large temperature difference (due to heating and cooling of the air inside the gearbox and, accordingly, an increase and decrease in its volume) required the installation of a breather.
Replacement of the drive gear (shank) seal of the VAZ and Lada Niva gearbox, signs of malfunction and diagnostics of the condition.
On the other hand, the driven gear rotates at high speeds at more than 1000 rpm. The presence of teeth on it makes it an effective pump that throws oil into the upper channel and delivers it into the space between the bearings and further to the oil seal. In turn, tapered roller bearings also have a pumping effect.
In this case, the rear bearing throws oil into the crankcase, and the front bearing throws oil to the oil seal. To protect the oil seal, there is an oil deflector and a side channel for draining oil into the crankcase. The difficult operating conditions of the oil seal also explain some assumptions. Oil fogging of the crankcase neck and even the formation of individual drops in quantities not exceeding a certain norm are allowed.
Therefore, if the breather is clogged with dirt or you forgot to install an oil deflector when assembling the gearbox, then the oil seal will no longer hold the oil. To clean the breather, just turn its cap 2-3 turns. The reason oil enters through the oil seal may be an excessively high level in the crankcase. It is possible to fill more oil than necessary if the car is parked on an inclined overpass with the front end down.
The need to replace the oil seal is determined by reducing the oil level in the rear axle housing to a level that disrupts the normal operation of the gearbox during a mileage (after adding oil) of up to 30,000 kilometers.
Determining the condition of the drive gear oil seal (shank) of the VAZ and Lada Niva gearbox.
The condition of the oil seal can be determined as follows. The rear axle is hung up and placed on stands, the engine is started, gear 4 or 5 is engaged, the oil warms up to 80-90 degrees. After which, at a speed of 100 km/h (according to the speedometer), an oil leak is detected within 15 minutes - more than 5 drops is a sign of a seal failure.
But in practice, other signs are usually used. As a rule, if the oil seal is leaking oil, you will find an oil puddle under the car. You have to inspect the car from below at least once every 10,000 kilometers (engine oil change). It is impossible not to notice that the gearbox housing and the underbody above the drive gear flange are all covered in oil.
Removing and replacing the drive gear oil seal (shank) without removing the gearbox.
Next, we will consider replacing the oil seal with minimal labor costs, that is, without removing the gearbox and, accordingly, the wheels, brake drums, unscrewing the nuts securing the brake shield to the bridge beam and removing the axle shafts from the differential box.
How to unscrew the drive gear shank nut and how to tighten it was described in the previous material. The only difference is that when tightening the nut and monitoring the moment of resistance to rotation of the drive gear, in addition to the torque of 4-6 kgfcm (bearing preload), another 1-2 kgfcm (resistance of the new oil seal) is added to the previously measured torque (with the nut loosened).
When purchasing an oil seal, you need to pay attention to the following. Firstly, oil seals 2101-2402052-01 and 2121-2402052 differ little in appearance. The difference is in the screw notches and in the direction of rotation of the shafts, which is indicated by arrows on the seals.
When driving forward, the driveshafts and drive gears rotate clockwise when looking at the vehicle from the front. And if you look at the drive gear of the front axle of the Lada Niva from its flange, the rotation occurs counterclockwise. If instead of the oil seal 2101-2402052-01 we install 2121-2402052, there may be an oil leak and even water getting inside the gearbox. Also pay attention to the working edges - they may be poorly cut.
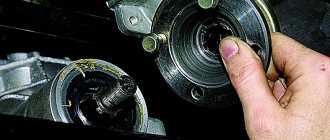
Having disconnected the flanges of the universal joint and the drive gear, move the propeller shaft to the side and unscrew the shank nut. Remove the drive gear flange. Pay attention to the surface (diameter 38 mm) in contact with the oil seal. It must be polished. If the working edge of the oil seal has developed a deep groove, it is better to press the oil seal with an offset of 1-1.5 mm from its previous position.
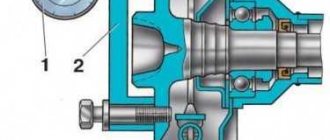
How to remove the oil seal? Of course, you can “rip it out” with a suitable hook, skinning your hands along the way. But you can do this easily by using the device shown in the figure below.
A device for removing and replacing the drive gear oil seal.
We install the legs of the device into the grooves of the splines of the gear shank, as shown in the figure at the top. After the tabs are installed in the grooves, we bring them to the outer diameter of the slots. Next, install the screw with the nut and, by rotating the screw, press out the oil seal. It is necessary to take into account that the screw of the device rests on the drive gear, which, moving inside the gearbox, in turn rests on the differential box.
If the gear “hits” the differential box window, then the screw travel will not be enough. It is necessary to rotate the driven gear approximately 90 degrees. Before pressing in, lubricate the edges of the new oil seal and the seating surface in the crankcase neck with transmission oil. The pressing process itself, especially if this is done for the first time, is a rather delicate matter.
Due to the high interference in the connection, the oil seal is constantly distorted. Therefore, you need to be careful when using the right mandrel (see picture below). The mandrel is quite massive. There should be a hammer to match it. The splined end of the gear shank does not serve as a support, since the bearings are not tightened. The position is uncomfortable, hands up. Therefore, it is convenient to use the mandrel when the gearbox is removed and disassembled (there is no drive gear).
Installing a New Seal
After removing the axle shaft, the metal shield where the brake pads are attached will remain hanging on the copper pipe with the fluid, so it should be fixed by inserting the 2 upper bolts back into the holes. Then follow the instructions:
- Remove the thick rubber gasket from the rear axle flange.
- Pull out the old oil seal by prying it with a screwdriver or pliers. Clean the seat and wipe with a rag.
- Lightly lubricate the new seal with transmission oil and insert it into the socket of the Niva rear axle as evenly as possible.
- Using a round pipe adapter, press the oil seal into the socket with light blows of a hammer. You can use an old seal as an additional attachment.
At the end of the procedure, you must thoroughly wipe all parts free of oil - the brake cylinder, pads, drum and metal shield. Before reassembling, it would be a good idea to check the axle bearing for wear and grease. Wear is indicated by difficulty turning, binding, or slight noise. If you discover a malfunction, take the axle shaft to the nearest car service center; you will not be able to replace the bearing without special equipment.
To check the grease inside the bearing, you need to pry the plastic covering the rollers with an awl and remove it. Then add thick Litol-type lubricant inside and put the plastic in place, and then begin assembly.
At the end, it is important to check the oil level in the rear axle gearbox of the Chevrolet Niva. The test is carried out on a fully assembled car, standing on a level surface.
The filler plug is unscrewed from the gearbox housing, after which the oil level is determined visually or using a thin wooden stick. If there is a shortage, you need to insert a hose of a suitable diameter into the filler neck with a watering can at the end, where the lubricant is poured. It is more convenient to top up with an assistant: you control the level, and the assistant gradually adds oil.
Lada 4×4 3D Ottsovskaya > › Logbook › Redesign of the rear axle in the manner of 21214M
I modernized the rear axle suspension a la 21214M: I reduced the long longitudinal rods, and for this purpose I made new brackets for the original attachment points to the body. Based on the Shniv type, I made the brackets for the lower shock absorber support and modified the wheel arches for the upper shock absorber mount. New shock absorbers from M-ki. The test drive showed that there were no attempts to wag backwards (including on the washing dock). First things first: There are not many completely original parts on the 21214M: - front suspension cross member 21214 (differs in bushings for the lower arm axis - internal diameter 18mm instead of 16mm ); lower arm axle, adjusting washers and axle nuts 21214 - diameter 18 mm; lower arms with silent blocks assembled 21214 - different geometry (it’s the same as on 2123) and new silent blocks; upper ball joint 21214 - forged with an increased swing angle (62 degrees .) looks very similar to 2123; it differs from it in the location of the finger relative to the holes. On 2123, there is a noticeable displacement of the pin relative to the “center of the hole circles”; the front shock absorber 21214 - the stroke in the extended state is longer than 2121 by 9...10 mm), the diameter of the reservoir is increased (as on 2123); the front spring 21214 - increased in length by 7 mm. Visually differs from 2121 only in markings - two colors: orange - class A ("nominal"), blue - class B ("soft") in a free state, length 285 mm (2121 had 278 mm); rear beam 21214 - different from 21213 lower rod brackets and shock absorber brackets (from 2123 also with attachment points for brake hoses); rear shock absorber 21214 - increased travel, increased diameter (as on 2123). But this is not the 2123 shock absorber. In principle, it is possible to replace 21214 with 2123, but you need to be prepared for the fact that if the rear suspension breaks down, the travel (the last 7 mm) will be limited not by the buffer but by the shock absorber, with all the ensuing consequences; driveshafts with improved characteristics 21214 - visually do not differ in any way yet; exterior mirrors 21214; block of warning lamps "RK blocking and glass heating" 21214; instrument panel harness 21214 - visually no different;
1. Front suspension cross member 21214 is original, differs from 2121 by new bushings for the axles of the lower arms (length and diameter of holes) 2. Lower arm 21214 is original, differs from 2123 by a new silent block. 3. Lower arm axis 21214 is original with a larger diameter. 4. Silent block of the lower arm 21214 is original - relative to 2101 - the outer and inner diameters have been increased, the length has been shortened, the manufacturing technology has been changed (the bushings are vulcanized) 5. The upper ball joint 21214 - the original differs from 2101 by an increased swing angle, a forged body (instead of a stamped one). Outwardly it is very similar to 2123, but differs in the position of the finger relative to the centers of the holes. During repairs, it is possible to replace it with 2101 (albeit undesirable), but be prepared for the covers to tear and the finger to be “stuck” into the joint body. 6. Lower ball joint 21237. Knuckle with hub assembly 21238. Swivel lever 21239. Original spring 21214.10. buffer compression 2121 (on the old car it was a rebound buffer) 11. Rebound buffer 21214 - original, reduced length. 12. Shock absorber 21214 original - differs from 2121 in increased stroke by 10 mm and reservoir diameter. Differs from 2123 in height when compressed - 15 mm shorter. It differs from 2121 and 2123 in characteristics during compression and rebound. During repairs, it is possible to replace it with 2121 (although it is extremely undesirable). At the same time, the travel of the front suspension will decrease and the load on the shock absorber during rebound will increase. Replacing with 2123 is not acceptable, because During compression, the shock absorber will begin to break the bracket on the body.
1. Rear axle beam 21214 is original, differs from 21213 in the lower rod brackets (the “cheeks” of the brackets are turned 5 degrees) 2. rear axle beam rods (longitudinal and transverse) 21013. rear spring 21214. lower shock absorber bracket - 21235. The rear shock absorber 21214 is original, differs from 2121 in its length increased by 10 mm and the reservoir size is increased. Differs from 2123 in reduced length by 7 mm. The characteristics of the shock absorber are the same as for 2123. Replacement with 2123 is possible (although not advisable). In this case, the life of the shock absorber will be reduced, because If the rear suspension breaks down, the shock absorber will act as a compression stroke limiter.
Preparatory activities
Before proceeding with the replacement, the owner of a Niva Chevrolet car needs to prepare a number of tools. In the process you will need:
- box and socket wrenches in a set;
- flat screwdriver;
- wheel wrench;
- hammer;
- jack;
- additional wooden support;
- a piece of pipe equal to the diameter of the gland.
Be sure to wear work gloves - they will not only keep your hands clean, but also protect your fingers from injury.
The stand will need to be such that after removing the wheel and dismantling the shock absorber, the rear axle remains at approximately the same height. Otherwise, you risk losing too much transmission oil.
How to remove the rear axle axle shaft of a Niva Chevrolet
The blows should not be strong. Getting to know the structure of the bridge before replacing the axle bearing on a Niva Chevrolet. Before replacing the axle bearing on a Niva Chevrolet, be sure to study the structure of the bridge. We press the wheel to the axle and sharply pull it.
Chevrolet Niva. The rear axle shafts knock loudly when driving. This page is being searched for: Problem with...
That's the whole secret. Requirements for standard axle shafts kgf m, twist angle 0 deg.
This will significantly speed up the process. This will ensure that you avoid problems with the car's electrical system. Then we install a jack under the rear axle and raise the axle a little.
Repair kit for repairing axle shaft bearing, retaining ring, axle shaft seal. New set - oil seal, retaining ring and bearing. A pipe with a diameter of 40-45 mm and a length slightly longer than the axle shaft.
The tool has been selected and the axle shaft can now be removed. This is done in the following sequence: Place the car on a flat surface, install wheel chocks under the front wheels.
We tear off the wheel mount, jack up the car, and install a stand under the rear axle. Remove the wheel and unscrew the brake drum mounting screws. We unscrew the bolts securing the brake drum to the axle shaft. We knock down the brake drum, but not directly with a hammer, but through a wooden spacer, otherwise there is a danger of damaging the brake drum. We knock down the brake drum using a wooden block.
Axle shaft, overview of breakdowns and malfunctions
Unscrew the four bearing spacer nuts from the back. We unscrew the four nuts of the axle bearing mounting plate bolts.
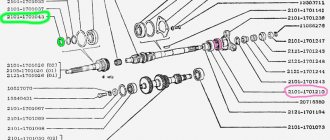
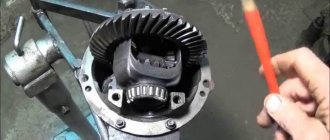
Getting to know the structure of the bridge before replacing the axle bearing on a Niva Chevrolet. Before replacing the axle bearing on a Niva Chevrolet, be sure to study the structure of the bridge. Below is a detailed view of the bridge with bearing assembly.
Pay attention to the locking ring 9, which will need to be compressed before removing the bearing 8. Below is a detailed breakdown of the axle shaft itself, as well as a list of parts with factory part numbers
Signs of malfunction and wear of the rear axle bearing of Niva Chevrolet
For repairs you will need: The differences in the design of the bearing units are only in the locking rings. When replacing, it becomes difficult to remove these washers; in some situations it is simply cut off or knocked down with a hammer.
In any case, when installing a new bearing, it is recommended to also change the retaining ring with the seal. Place the car on a flat surface, place wheel chocks, and lift the wheel with a jack.
When dismantling the axle shaft, you will need to apply quite a bit of force to pull it out, so secure the car securely and install stops.
Dismantling the unit from the axle and removing the bearing. From the faulty side, unscrew and remove the rear wheel. The collapsible design of the Reinforced AVT axle shaft allows without the use of special heating equipment and an angle grinder: The main advantages of the design of the AVT Reinforced axle shaft: The bearing is protected from water!!
For Z, you will need to install differential 4. The price for a pair is about 15 thousand. But then what to do if the bearing falls out?
They write that he is protected there. The original axle shaft costs rubles. They will last about two years, or even more.
Will this reinforced axle shaft last that long? I wrote to them through the website, but no one answered.
The reviews say that this is an indestructible topic. But repair kits are sold for them. This will reduce the risk of the car falling off the jack. It is also recommended to disconnect the battery. This will ensure that you avoid problems with the car's electrical system.
Request a call back
Replacement It is better to carry out the work in a garage with a flat floor. This will allow you to perform all actions with minimal difficulty. Repairs are carried out in the following order: Supports are placed under the body.
This will avoid dangerous situations. If your plans do not include changing the transmission oil, then it makes sense to raise the axle so that the lubricant cannot leak out; The wheel is removed, the nuts are removed in advance; Remove the 2 screws securing the brake drum; Next, with a few soft blows of the hammer, you should pull the drum out of place.
The blows should not be strong. Otherwise, you will simply crack the part; After this, you can safely remove the drum from the machine. But this is not always as simple as it seems.
In some cases it is necessary to knock down the drum.
Replacement
Unscrew the cardan (4 bolts), drain the oil. Individual bolts may not give in; they will have to be cut off with a grinder, and the rods themselves will have to be drilled out for subsequent assembly. Drain the oil from the bridge.
Further actions should follow the following scheme:
1. Using a 17-mm spanner, unscrew the four nuts of the bolts securing the axle shaft to the beam flange.
2. Using a slotted screwdriver, bend the locking plates of the axle shaft mounting bolts and pull out the bolts.
3. Using the back side of the wheel, fix it on the axle shaft. As a rule, a few turns of three nuts are enough for this, since this is not done for travel.
4. We take the wheel and with a moderate-strong jerk, move it from the seat and remove the axle shaft. At the same time, a plate on which the bearing ring is fixed will come out.
How to remove a wheel bearing in a field
Surely every driver has at least once encountered a situation when, while driving, a so-called crackling noise is heard. The sound can appear at speeds of 40 km/h and above. Using a car with such a sign is fraught not only with danger to the life of the driver and passengers, but also with serious consequences for the car itself. Most likely, you will notice a hum in a loaded car when turning.
Finding out which wheel bearing is worn out is quite simple: if there is noise from the wheel when turning to the right, the left bearing should be replaced
Similarly, if a hum occurs when turning left, pay attention to the right bearing
There are several stages of wheel bearing wear:
- hum when turning;
- hum during normal driving with a loaded car;
- hum when driving an empty car;
- constant hum that increases during turns;
- a strong hum, accompanied by crunching, grinding and unregulated movements of the car from side to side.
What could have caused the Niva Chevrolet bearing to fail:
- in 70% of cases, breakdown occurs due to unsuitable lubricant: its quality, excess or shortage may well damage the part;
- it happens that various contaminants and moisture penetrate deep into the bearing;
- this is the cause of failure in 18% of cases;
- There is also a possibility of incorrect assembly of parts, which entails excessive load and overheating.
What are the risks of driving a car with a damaged wheel bearing? There is a considerable possibility of the wheel jamming, which can end in disaster when driving at high speed. It is quite possible to lose control of the car due to the wheel “moving to the side”. Spreading brake pads is also a possible consequence.
Symptoms and identification of a worn wheel bearing
When the life of the hub bearing is running out, a hum is clearly audible when driving, this is the main sign. If you listen, you can understand which direction this hum is coming from. When driving at low speeds, it is not too noticeable, and it can easily be confused with noise from rubber, but as speed increases, the hum increases, which is reminiscent of flying in an airplane. You can’t drive with a humming bearing, because soon it may simply break into pieces, and this implies a lot of other problems.
Necessary tools for work
- Jack and supports. To replace the front bearing, you need to lift both wheels, otherwise the stabilizer will interfere, pinching the suspension elements;
- Wrench for unscrewing wheel nuts;
- Flathead screwdriver. To remove the protective cap;
- Head 27;
- Locksmith's beard. To straighten the collar of the hub nut;
- Hammer;
- Wrenches for 10, 17, 19 and 22;
- Chisel and wooden spacer. To avoid damaging other parts when knocking out;
- Vise;
- A piece of pipe for pressing in bearing retaining rings.
Bearing replacement process
- Loosen the nuts on the wheel where replacement is planned and jack up both wheels of the axle. Remove the desired wheel;
- We dismantle the caliper and guide. To avoid damaging the brake hose, we tie the caliper to the upper arm with wire;
- Having removed the protective cap, use a 27mm head to unscrew the hub bearing nut and remove the conical bushing;
- Using a chisel, unbend the locking plate of the front and rear lever mounting nuts. Using a 19mm wrench, unscrew the front and rear nuts securing the lever. After this, remove the locking plate;
- When the lever is released, it must be moved away from the steering knuckle, freeing the brake hose;
- Disconnect the ball joints (upper and lower) from the lever;
- Now you can remove the entire steering knuckle assembly, along with the ball joints and the brake disc, by removing it from the CV joint splines;
- Separate the steering knuckle from the hub with the brake disc. If the parts do not separate freely, then we clamp the fist in a vice and, using a soft metal drift or chisel, through a spacer from wood, knock out the hub with the brake disc;
- Next, pull out the bolts securing the lever and knock down the protective ring with a chisel;
- Using a 10mm wrench, unscrew the bolt that secures the casing and remove the casing itself;
- We hold the fist in a vice and, using a flat-head screwdriver, pry up and remove the wheel bearing seal. There is a metal ring behind the oil seal, we also remove it;
- The next step is to remove the inner ring of the outer bearing assembly from the well. Next, we also remove the oil seal, metal ring and inner bearing ring assembly;
- Using a punch and a hammer, we knock out the metal rings of the outer and inner bearings. At this point, dismantling is considered complete.
We get rid of vibration and extraneous sounds of the Niva transfer case forever
Let's start by diving into the materiel. Transfer case (TC) is a separate unit of an all-wheel drive vehicle, which provides multi-mode power distribution from the engine to the front and rear axles.
Externally, this is a mechanism located under the bottom of the car, in the body of which a multiplier (divider) is placed in series to obtain an intermediate gear ratio in the transmission and a splitter of one power flow into two. It is with the help of this device and its controls (levers) that go into the vehicle interior that the LADA 4×4 driver selects the all-wheel drive operating mode.
Replacing a Chevrolet Niva bearing axle shaft
The Chevrolet Niva belongs to the class of SUVs with all-wheel drive. This is realized through the installation of a rear axle, through which torque is transmitted to the rear wheels. For this, a system of gears and axle shafts is used, which are located in the bridge.
One of the elements that is subject to excessive load, and therefore the one that most quickly fails, is the rear axle bearing. Therefore, it is necessary to diagnose its condition in a timely manner and, if necessary, replace it.
You can find out how to do this by reading this article.
Purpose of the bearing
This part is located in the rear axle of the Niva Chevrolet, closer to the outside of the car. Like any bearing, its main function is to smooth out the rotation coming from the rear axle.
The axle shaft extends from the gearbox, where it is driven by gears, and ends at a flange on which the brake drums and wheel are located.
In order for it to rotate smoothly inside the structure, a ball bearing is installed on it.
It is mounted in a special seat on the bridge, where an increased load on the axle shaft is provided. To prevent its movement inside the bridge, a special locking sleeve is used, which ensures double fixation of this element. An additionally installed oil seal ensures the tightness of the entire structure.
It is important to remember that if the seal is damaged, lubricant leaks, which leads to increased friction inside the bearing and rapid failure. Therefore, if damage is detected, the oil seal must be replaced. These elements are among the most exposed to loads and therefore require periodic inspection and replacement.
These elements are among the most exposed to loads and therefore require periodic inspection and replacement.
Bearing device
Like most parts in a car, a bearing has several indicators based on which you can select the necessary part:
- number
- internal and external dimensions
- height
Knowing these parameters, you can select a replacement element that will be suitable for a given car and perform its functions correctly.
The number is the value in the catalog - 21212403080. In most cases, this data is enough to purchase a bearing model for a Chevrolet Niva in a store. If the required element is not available, you can find analogues, knowing the technical characteristics:
- internal diameter 40mm
- outer diameter 80mm
- height (meaning product thickness) 23mm
How to notice a malfunction in time
If you fail to pay attention to the failure of this element in time, the rear axle may jam while driving, which can lead to unpredictable consequences at high speed. Therefore, you need to periodically pay attention to the sound of the wheels in order to notice the characteristic hum in time. This usually occurs even at the lowest speed.
This usually occurs even at the lowest speed.
Therefore, you need to periodically pay attention to the sound of the wheels in order to notice the characteristic hum in time. This usually occurs even at the lowest speed. After this, it is necessary to measure the wheel play, which should not exceed 0.7 mm
After this, it is necessary to measure the wheel play, which should not exceed 0.7 mm.
Replacement
To change a worn part, you need to remove the wheel, then unscrew the brake drum and axle shaft. To do this, you need to jack up the rear of the car.
Removal of the axle shaft is carried out in several stages:
- Using a jack, the axle is raised so that when the axle shaft is removed, oil does not leak out of it.
- By unscrewing the nuts to 17, the axle shaft is unscrewed
- If the repair is carried out on time and the axle is not jammed, then it can be knocked out with a hammer and a wooden board.
If an anti-lock braking system is installed on a Chevrolet Niva, then the work is carried out in a slightly different sequence. The difference is in the splined retaining ring, which is clearly visible when compared:
If the vehicle is equipped with an ABS system, the following procedure is necessary:
- checking the condition of the bearing
- the oil seal is removed
- The axle shaft is secured in a vice, after which the retaining ring is knocked out using a hammer.
- The bearing is removed.
- The new bearing is lubricated and replaced with a new one
- For better installation, the retaining ring is heated with a blowtorch and set in place.
- The axle shaft is pressed into place using a tube.
During work, it is necessary to carefully inspect the axle shaft for cracks and chips.
Preparation and disassembly
Now we heat the locking element to a temperature of degrees, put it on the shaft and hammer it in until it stops. We check the ease of rotation of the bearing, then let the parts cool. If necessary, install a new oil seal, after removing excess oil.
Next, we insert the axle shaft back into the bridge; it is advisable to lubricate the surface of the rolling element with oil to simplify installation. We fasten the four bolts and put on the brake drum. Replacement of the Niva Chevrolet axle bearing is completed; video instructions for the process are presented at the end of the article. How to choose a Niva Chevrolet axle bearing: Numbers, dimensions, and product articles are presented in the table.
Shiva Chevrolet rear axle bearing number marking: It is believed that when connecting parts in this way, the stress in the metal should not exceed its strength.
For example, if the metal could withstand this stress without starting to flow, then the interference μm would cause a stress of MPa in the layer adjacent to the axle axis, and it is the most loaded. A study of the original VAZ ring showed that it was not made from St. At this hardness, its temporary tensile strength should be approximately MPa.
If MPa stress is taken as acceptable for this strength, then the maximum VAZ interference will be µm. To do this, disconnect it by prying up the fasteners with a screwdriver; The gap between the flange and the drum is moistened with penetrating lubricant liquid wrench, WD; The brake drum is secured with two screws, they must be unscrewed. But sometimes you have to shoot him down.
To do this, it is necessary to strike the rim of the drum with a hammer from the back side. Just do this through a block, otherwise you can damage the drum; The screws holding the axle shaft and the drum casing are unscrewed; The bridge rises slightly; The shock absorber bracket should be removed from the axle bearing plate; The axle shaft is removed; for this you will need a special puller.
Changing the axle bearing on a Niva Chevrolet: bearing number and articles
The axle shafts in the rear axle of the Niva Chevrolet experience very serious loads. The oil seals and, naturally, the bearings, which we will talk about today, get a fair amount of damage. If there is a conversation about replacing them, the manufacturer modestly advises changing them along with the axle shafts. It’s not cheap, so today we’ll try to replace the axle bearing on a Chevrolet Niva, look at the article numbers and manufacturers, and listen to the advice of experts.
When to change bearings on Chevrolet Niva axle shafts
Since our car is often operated in very difficult conditions, the loads on the bearings are very high. In addition to loads, the bearing may be subject to moisture attack when the axle shaft seal fails. At the same time, oil may begin to leak from the rear axle housing. As a result, the bearing is poorly lubricated and the grease is washed out over time.
A crunching sound from the rear wheel indicates a wheel bearing failure.
The most obvious symptom of bearing failure will be increased noise at any speed. In more severe cases, both radial and axial play may be observed.
At the first symptoms of a bearing failure, you need to start replacing it.
Numbers and articles
Fortunately, the axle bearing is not the most scarce part. It is one of the most popular of the 500 series of single-row bearings and is produced by a huge number of factories in the CIS, as well as in many European countries. Its industrial index is 180508, the index of its foreign analogues is 62208-2RS. Automobile factory article number - 2121-2403080.
Axle bearing - 180508.
The technical parameters of the bearing are as follows:
- inner race diameter - 40 mm;
- outer ring diameter - 80 mm;
- Clip width - 23 mm;
- weight - 440g;
- the bearing has 9 balls with a diameter of 12.7 mm;
- rated speed - 5600 rpm.
The best imported manufacturers are NSK (62208DD), FAG, SKF, SNR. The average price of a domestically produced bearing is 200-250 rubles. It’s not worth buying cheaper, since it will be low-quality China or outright illiquid. Imported analogues can cost up to 800–1000 rubles. Actually, using these parameters it is easy to select a suitable bearing for the Shnivy axle shaft.
Purpose of the Niva rear gearbox oil seal
The rear axle gearbox oil seal (REA) is a lip seal located in the mechanism housing on the installation side of the bevel gear bearings. The main function of the oil seal is to ensure the tightness of the gearbox, eliminating the leakage of lubricant located in the rear axle housing.
Causes of wear
The lip seal of any vehicle component wears out over time, losing its properties. One reason is physical wear and tear. But the oil seal can also be damaged by the aggressive influence of oil on it, for example, when using low-quality lubricant. In addition, the oil seal itself may be initially defective.
If the oil has barely come out, then there is no need to rush to replace the cuff, but you need to periodically monitor the condition of the element and, if a leak occurs, make repairs.
Signs of wear
The main sign of a worn VAZ 2121 shank oil seal is the presence of oil leaks on the rear axle in the area where the REM flange is located. To identify a faulty element, it is enough to drive the car into an inspection hole or overpass, or simply crawl under the car. If the cuff is worn heavily, then after a long period of parking an oil puddle will form under the rear axle. If you neglect to timely replace the rear gear oil seal, this will lead to increased wear of the internal elements of the mechanism due to lack of lubrication and their subsequent failure.