Replacement of the Niva 21213 Axle Shaft Bearing
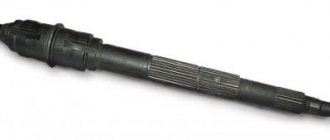
All about the Chevrolet Niva bearing axle
In the jeep class there is a car with four-wheel drive. This mechanism determines the presence of a rear axle
, which is designed to transmit torque from the gearbox to the driving rear wheels. The rotation of the wheel is ensured by the presence of gears and axle shafts in the bridge. The shaft is connected to the wheel and drives it. But why do we need a bearing axis in the bridge? Because the topic of the article is called bearing axis
, this will be discussed further. Let's take a closer look at this mechanism in the design of the rear axle, its purpose, design (size, quantity, etc.), malfunctions and the replacement process. To combine the possibilities, a video was placed at the bottom of the material, which made it possible to clearly study the replacement procedure. ABS car replacement kit
Purpose of the bearing axis
bearing
located in the rear axle
Chevrolet Niva, closer to the outer edge.
Like all bearings, it has the function of supporting and smoothing the torque of the rear
.
One part of the axle (inner) engages with the gears (has slots), and the other comes out of the axle and is attached to it by a flange, brake drums and a Niva Chevrolet wheel. To ensure that the axis rotates smoothly and does not become part of the structure, there is a ball bearing
.
bearing It is placed in a special jack of the bridge structure, where it performs its direct function. To prevent it from moving inside the bridge, there is a special hard lock on the axle, which is a locking sleeve. Thus, it has a double fixation. There is also an oil seal on the shaft, which ensures a tight connection to the rear axle
Important! In case of gland damage or wear, negative impact on the bearing
, causing the latter to fail. Therefore the seal must be replaced.
Niva car frequently
Chevrolet should be monitored for the condition of the bearing box and seals, and if damaged, replaced immediately.
design
Like many parts, the bearing axis
has its own design, which is characterized by important indicators:
- number;
- internal and external size;
- height.
These data are necessary not only so that the bearing can be installed in the shaft seat on the shaft and axle, but also so that it performs its intended functions. But it should be noted that if one of these data is known, then the other cannot be calculated. For example, a bearing
The shaft axis has catalog number 2121-2403080. If the product number is known, then this is enough to buy it at a car dealership. Replacement and bearing width 23. Nivag axle oil seal for 2121, 21213. If you need to know the dimensions, the web has data: height and size.
If the part number is unknown, you can take full product measurements by removing the shaft axle. After the measurement, the following data should be obtained:
When to change the seal
Replacing the axle seal is not tied to a specific mileage, but is done in connection with the following defects:
- Transmission oil leakage from the rear axle of a Chevrolet Niva. It is characterized by the appearance of oil stains on the brake casing and the “stocking” on the side where the axle shaft seal has lost its seal.
- In case of accidental damage to the seal when replacing the axle bearing. Happens when a part is pulled out of its socket.
A distinction should be made between transmission oil leakage from the axle seal on either side of the rear beam and from the gearbox shank where the driveshaft is secured. In the second case, greasy stains and dirt cover the rear axle gear housing, located in the middle.
- outer diameter - 57 mm;
- width - 9 mm;
- The diameter of the hole along the protruding rubber (or silicone) edge is 35 mm.
axle bearing
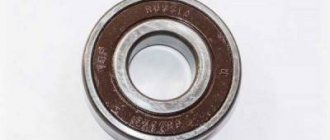
The topic of the article is Niva axle bearing. To further understand the issue, I will say that the bearings for Niva, Niva-M and Shniva are the same. The only difference is in the locking rings, but I’ll talk about that below. There is only one problem with this node - it is a fake. If a factory bearing is installed and the installation is carried out correctly, the service life of this unit is very long.
Niva axle bearing, Russian manufacturer
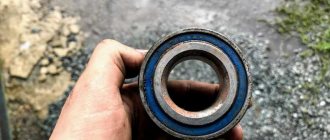
For several years now I have been sending this bearing to services and individuals from a Russian manufacturer. The plant is a gas processing plant, located in the city of Vologda. The only recommendation I give is that before installation, very carefully and gently remove the protective cheeks, wash off the factory grease and fill with something more modern. A sharp toothpick works great if you don't have anything special on hand. It’s a mystery to me why our factories, with the tenacity of maniacs, continue to fill bearings with mineral-based lubricants. Maybe they believe from the old days that a bearing can lie in a warehouse for a long time and use a preservation lubricant? I don't have an answer to this question.
Once again about applicability. All cars of the Niva family have the same axle bearings. Other bearings are installed only on fields with a 1.6l engine, since there is a bridge from the classic there. But we won’t consider this option; I don’t remember when I saw her live. The installation kit may differ only in the locking ring. On a regular Niva - with, on a Shniva - a “wide” ring, on cars with an ABS system - a ring with notches for the sensor. I have never used rings of different widths; I always placed and completed orders with “narrow” rings; when they are placed correctly, everything works great. This bearing was still produced by the Minsk Bearing Plant, but then supplies became less and less frequent. Representatives of the plant said that they are now working for Europe and are not interested in supplies to Russia.
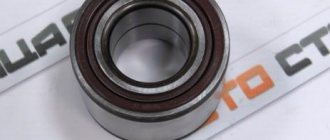
Import manufacturer, FAG (Germany)
The bearing of this standard size is made by the German manufacturer FAG. I circled three symbols on the bearing with red circles. The name of the manufacturer (FAG), at which plant the spare part was produced (Turkey) and the designation of the bearing according to the European classification (62208 2RS). Of course, this bearing is made of higher quality than the domestic one. This is confirmed both purely visually and tactilely when you pick it up, and by the rolling of the car after its installation. The advantage of this bearing is its service life and work with wheels of large diameters and discs of non-standard offset. The disadvantage is its price today. As of November 2018 – 1900 rubles per bearing. However, if you sort through a node based on the “sort through and forget” rule, then this is normal. On cars in which FAG bearings were installed in the hub assemblies and axle shafts, a drop in gasoline consumption of about a liter per hundred kilometers was repeatedly recorded. It is not difficult to calculate the further payback of bearings. Delivery of this item is carried out only upon order, with prepayment. Delivery time 2-3 weeks.
Niva axle bearing - installation
This is the stage at which most bearings are destroyed. Sometimes I saw such barbaric installation methods in Papuan services that after that I stopped supplying spare parts. As they once showed me the installation of bearings of this type. Take an old brake drum from a field and place it on a hard surface. Let there be a concrete floor. Lubricate the seat of the bearing and the locking ring with grease (in this case, any grease). We put the bearing on the axle shaft, push it in a little, 100 grams with a hammer so that it doesn’t warp. Next, we will torment the ring: we take a torch or blowtorch in our hands and heat it red-hot. We take it with pliers and put it on the axle shaft. Now, with a previously prepared pipe, we apply one precise blow from above, along the axle axis. The diameter of the pipe should be several millimeters larger than the fitting size, so as not to spoil the “mirror” under the cuff. And no cooling with cold water, only cooling naturally. The process is over. As mentioned above, orders are always completed with a narrow ring. Both because of ease of use and because of pricing.
Tell me, is the shank bearing from a penny suitable for 21213? | Topic author: Niva
Tell me, is the shank bearing from a penny suitable for 21213?
READ How to change the door handle on a Chevrolet Niva
Egor (Barclay) And there are gearboxes 2106 and 2101
Sergey (Reymundo) there are only two different gears and everything else is the same
Sergey (Reymundo) if it’s really tight, just break it with a chisel _ but be careful, the fragments are sharp and fly well
Egor (Barclay) They are even visually different
Sergey (Reymundo) The VAZ 2121 gearbox differs from the classic ones in the reinforced satellite support washers, oil seal, and yoke nuts, everything else is of the 2101 type.
Sergey (Reymundo) 1. Variable gearbox bearings for VAZ cars 156704 (2101-1701068) – intermediate shaft (front support) 464904 (2101-1701108) – secondary shaft (front support) 92705 (2107-1701073) – intermediate and secondary shafts 50706 (2101-1701033) – primary shaft 50306 (2107-1701190) – secondary shaft 42205 (2108-1701031) – fifth stage gear block 180502 (2101-1701031) – primary shaft (front support) 2. Generator bearings for VAZ 180201 cars (24940220) – support on the rectifier side 180302 (24940230) – support on the drive side 3. Transfer case bearings for VAZ 50706 cars (2101-1701033) – drive shaft 50306 (2107-1701190) – intermediate and drive shaft 12507 ( 21213 -1 802092 ) – intermediate shaft (front support) 50209 (2121-1802168) – differential (front support) 209 (21213-1802189) – differential (rear support) 4. Rear axle bearings for VAZ cars 180508 (2121-2403080) – axle shaft 7707 ( 2101-2403036) – differential 7705 (2101-2402025) – drive gear (front support) 7807 (2101-2402041) – drive gear (rear support) 305 (21213-1802208) – drive shaft 5. Front axle bearings for VAZ 50 cars 306 (2107-1701190) – internal joint housing 7707 (2101-2403036) – differential 7705 (2101-2402025) – drive gear (front support) 7807 (2101-2402041) – drive gear (rear support) 305 (21213-180220 8) – drive shaft 6. shaft support bearing for VAZ 180505 cars (2105-2202094) 7. Front hub for VAZ 2007108 cars (2121-3103020) 8. Steering gear bearings for VAZ 996805 cars (2101-3401123 part number; 2101-340 1129 с-р) – lower support
Egor (Barclay) From the left of the penny, from the right which I had
Sergey (Reymundo) one front the other rear and between them a bushing
Vladimir (Kisha) 7705 (2101-2402025) – drive gear (front support)
7807 (2101-2402041) – drive gear (rear support)
Re: Axle bearings.
Do this: 1. Remove the axle shaft . 2. Use a grinder to cut the outer ring of the bearing and break it (you want only the inner ring to remain). This is done so that it does not interfere with cutting the locking ring. 3. We cut the locking ring, being careful not to damage the place under the oil seal. 4. Using a chisel we knock down the locking ring, then the remains of the bearing. 5. Wipe everything with a cloth and install a new bearing. 6. Heat with a blowtorch, on a gas burner, and in the fire, the locking ring. According to the manual, you need to heat it to 300 degrees, but without an oven it’s difficult to control. Therefore, if it’s heated to red, it’s not very scary. 7. Prepare a large hammer of 1 kg, a pipe slightly longer than the diameter of the axle shaft, and pliers. 8. Using pliers, take the locking ring, put it on the axle shaft, take the pipe and use it to hammer the ring into place. If suddenly the force of blowing the pipe is not enough, we finish it off with a sledgehammer. 9. I usually water the bearing with Movil from a can. I do this so that it does not overheat, Movil removes heat from it. Still, the ring is heated to 500-600 degrees, and the lubricant in it is not designed for this. 10. Let the axle shaft cool so that you can hold the ring. At one time we install a new axle shaft seal. We put the axle shaft in place.
Re: Coordinates of craftsmen and service stations for Niv repairs in Kyiv
Replacing axle bearings
I recently worked on the rear axle. Puller
On the left there are 2 rings, the same as from the factory, size 34.9mm on the bar. All the rest apparently look more liquid and are processed much worse. Relatives (or the same as “relatives”) have some kind of clever inscription of letters and numbers, painted with black paint. The worn bearings and locking ring were cut off with a grinder without hemorrhoids, you can touch the polished surface under the oil seal. The new bearing was hammered with a cut beam from a Zhiguli trailer. He heated the bushing to the point where the internal surface was blue, opened the gas key and bang! The bushing itself fell to the bearing. Tools: medium grinder, chisel, large hammer, reverse hammer, if possible, a meter pipe with an internal diameter
40mm, gas-gasoline-kerosene burner, gas wrench to hold the ring, wrench for 17 and 19. Lubricate the bearing after purchase.
Replacing the rear axle oil seal Niva 2121
Reg.: 02/04/2009 Messages: 225 From: planet Norilsk. Age: 38 Car: 21213 95 Reg.: 04/30/2010 Threads / Messages: 3 / 1802 From: Moscow, TiNAO Age: 31 Car: MMC Pajero Sport 05
Reg.: 07/25/2009 Messages: 15 From: Yakutia Age: 35 Car: VAZ 21214 2008, VAZ 21101 2006
Reg.: 06/27/2007 Messages: 1765 From: Moscow Age: 51 Car: 21213, 1999
Name: Alexey Reg.: 03/05/2005 Threads / Messages: 62 / 4065 From: Moscow, Northern Administrative Okrug Age: 39 Car: Shniva 2022 70 tkm
Sever18
Wash the semi-axial bearing as a preventative measure (you need to remove one of the cheeks) and fill it with new grease. At least lithol. Anybody will be better than it was.
There is no need to buy any additional rings, etc.
Reg.: 06/03/2011 Messages: 68 From: Omsk Age: 62 Car: 2131 2001
Reg.: 06/17/2011 Messages: 95 From: Ukraine, Alchevsk Age: 34 Car: VAZ 2121 1982
But I also decided to change the bearings on the axle shafts and the seals. I bought 2121 for the Niva. I brought it to the garage and started putting the oil seal on the axle shaft, but it reached halfway and that’s it. Next comes the thickening of the axle shaft. The store said that the axle shafts on the VAZ 2101 and 2121 are the same. It turns out I have a VAZ 21213 rear axle? I think the bearing will fit. The numbers match 62208r
Added after 8 minutes 26 seconds:
Also in the store the seller said that the seals are installed on the VAZ 21213, I don’t remember anymore, I think it’s from the VAZ 2110
Name: Nikolay Reg.: 11/12/2008 Threads / Messages: 4 / 1073 From: Ruza.Moscow region. Age: 49 Car: VAZ21214. 2001, MP 7.0
Reg.: 02/27/2011 Messages: 1474 From: Biysk Age: 43 Car: VAZ-2131 1.8 carb 2002 (Was: 2121 84 2121 93 21213 01 2123 2007)
Maintenance of the axle shaft 21213. The bearings on the axle shafts 2121.21213, 2123, 21214 are the same. Only the seals are different: On 2121, the oil seals are 2101. On all other axle shafts, the drive seals are 2108-2110. Locking bushings for 2121 are their own. All the others have their own 21213. etc. The only difference is the presence or absence of ABC on the car. If there is ABC, then the bushing is appropriate. Bottom left 2121. Right 2123 under ABC, top - 2123-21213 (without ABC):
Reg.: 11/07/2010 Messages: 30 From: Bratsk Age: 37 Car: VAZ-21213 '96
Reg.: 12/02/2010 Posts: 37 From: Maloyaroslavets Age: 59 Car: VAZ 21213 1999
I'll write down how I removed the axle shaft. Maybe it will be useful to someone. We begin removing the axle shaft as in the manual, and end by screwing the wheel on with the reverse side. It was not possible to “pull” the axle shaft with manual effort. My weight is too low. Next, I proceeded as follows: 1. Attach a chain (about 2.5 m long) to the holes of the disk (symmetrically). It turned out to be a loop that I was going to hit (emphasis on the “U”) with a sledgehammer. 2. I placed a log at the end of the loop, on which I placed a chain, and placed a heavy piece of iron (a counterweight from a washing machine) into the resulting loop so that the loop would not fall off the log. 3. I was about to take a sledgehammer, but the log fell, and when I picked it up and lightly hit the loop with a piece of iron to tighten the chain, a miracle happened: the AXLE MOVED. No problem further.
Added after 1 minute 24 seconds:
In point No. 1, the emphasis is on the first “U”, otherwise not everyone will understand.
Disassembly
To get to the failed seal, you will need to remove from your Chevrolet Niva all the parts that make up the right or left rear hub assembly. Only then will it be possible to remove the axle shaft.
Disassembly is carried out in this order:
- park the car on a level place;
- secure the front wheels with stoppers;
- turn off the handbrake;
- slightly loosen the nuts securing the wheel;
- lift the car with a jack;
- remove the wheel;
- clean the end of the axle shaft, which protrudes slightly beyond the dimensions of the brake disc, from dirt and rust;
- spray it with WD-40;
- unscrew a couple of bolts holding the drum (you need a 12 mm wrench);
- Move the above brake element with light hammer blows.
Please note that there are two main methods used to remove the drum. In the first case, it is squeezed out of place by screwing the above-mentioned bolts into the free holes
In the second, they use the same hammer, but using a stump of a block as a protective pad. Without this preventative measure, it is easy to damage the edge of the brake disc.
Results
Car owners with minimal auto repair skills can replace the rear axle bearing on a Chevrolet Niva. These operations do not require special tools; replacement can be done on a suitable level area near the garage. This way you will not only save on service costs, but will also be confident in the quality of the work performed. It is recommended to combine bearing replacement with other maintenance work on the rear axle: repair of brakes, suspension, replacement of current seals.
Source
Procedure for replacing the front wheel bearing
The owner of a Chevy Niva will need to acquire several types of tools, including:
- Press;
- Suitable type of lubricant;
- Puller;
- Retaining ring remover;
- Mandrel for pressing;
- Hammer;
- Torque wrench;
- Hex head size 30;
- Screwdriver with a flat surface “minus”;
- Wrenches with standard sizes 17 and 19.
Front wheel bearing replacement process
- In the first step, the car is placed on a level surface. It is best if it is a lift or a pit.
The wheel rim needs to loosen the nuts and bolts that secure it. Hanging is done first for the front part.
Replacing the wheel bearing of a Niva Chevrolet is very simple. The wheel rim along with the hub nut cover must be removed.
The next step is to install the opposite wheel in its place. The car is lowered using a jack until the second wheel is firmly hooked onto the support.
The main advice is to protect yourself from accidental rotations.
- Using an increased lever, you need to break off the hub nut. Next comes the re-removal of the wheel. Using a jack, we re-position the Niva in a suspended position, suitable for repairs.
- Removing the brake caliper is the next step. Using flat-head screwdrivers, spread the brake system pads, then unscrew the bolts securing the bar. The caliper and suspension element are connected to each other with wire. This will protect the brake hose and will not place increased stress on it. The non-adjustable bearing will also be protected.
- Next, the brake disc is removed. The main effect on it is gentle tapping with a hammer. It's good if the tool is a rubber hammer.
- Then the pin from the steering tip is pressed out of the eye near the steering knuckle. After disconnecting, it is recommended to retract the tip and secure it at a certain distance so that it does not interfere.
It is recommended to make a special mark on the surface of the two mating parts in advance. Then it will be easier to maintain the recommended position.
- Then, when replacing the bearings, they proceed to using a 17-mm wrench. The main thing is to correctly remove from their place the bolts that secure the shock absorber strut and the steering axle to each other. The two bolts that connect the knuckle and the ball joint are unscrewed using another 19mm wrench.
- The drive axle shaft is freed from the hub nut. Then the same is done with the thrust washer.
- The press will become an indispensable assistant when removing the hub from the steering knuckle. If a classic instrument is not nearby, you can use other available options. Then you need to compress the part with a puller. The emphasis is on the holes provided for this.
- Several operations are carried out using a lift: removing two locking rings from the knuckle and dismantling the bearing. The small washer of the puller rests against the outer race, and the larger part rests against the trunnion body.
- Before reassembling, clean the hub and rotary washer. The next step involves installing the retaining ring on the outside. A suitable type of lubricant is used before processing. The bearing is pressed into the fist. Then the inner wheel is installed, to which the hub is attached. Wheel bearings work the same way.
The main thing during screwing is to ensure that there are no excessive loads. Otherwise, the spare part will become deformed and become unusable ahead of time.
Below watch a video on how to replace the front wheel bearing on a Niva.
Self-replacement of a damaged element
Do-it-yourself hub repair will require an inspection hole or a lift. You need to hang the front of the car to provide full access to the components. Further dismantling after removing the wheel occurs exclusively in strict sequence. Repair diagram for dismantling the front hub of Niva 2121:
- Remove the guide block and caliper. Secure it with something under the bottom of the car so as not to completely dismantle the brake.
- Remove the wheel bearing nut and take out the tapered bushing.
- Using a chisel, bend the locking nut of the front knuckle arm.
- Repeat the procedure on the rear fastener.
- Remove both nuts and the stopper plate (you will need a 19 mm wrench).
- Move the lever away from the knuckle and disconnect the brake hoses.
- Remove the fasteners and the entire fist.
- Disconnect the hub base (brake disc) from the knuckle.
- Pull out the oil seal using a screwdriver.
- Remove the lower ring, the inner sector of the outer bearing and the cage
- Repeat the procedure with the second bearing.
- The outer ring of the second element is removed in a similar way.
Next, the destroyed element is removed and the used lubricant is completely removed. The cavity for the new part is treated with a new compound and assembly is carried out in the reverse order. To press in parts, it is worth choosing a pipe section of suitable diameter.
5.7.4 Removing and installing the axle shaft
You screw an M10 nut onto the stud, and put a bushing between the nut and the fixed frame of the rear axle. You insert the protruding end of the stud from the nut side into the hole where the thread of the original bolt used to stick out.
As a result, one end of the stud rested against the body of the original bolt, and the head of the bolt rested against the flange of the axle shaft. There are 4 of them in total; Using a puller, the axle shaft is removed.
If you don’t have a puller at hand, you can use a wheel. To do this, the wheel is put in place, but only 3 nuts are used, which are not fully tightened. There must be space between the wheel and the axle shaft. We press the wheel against the axle and pull it sharply towards us. By repeating the procedure several times, you will be able to remove this bridge part.
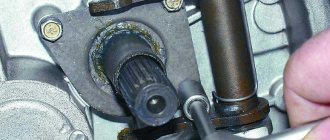
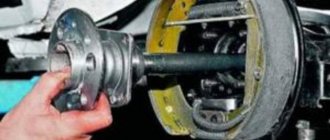
If you do not plan to change the oil seal, then you should remove the axle shaft very carefully. So as not to spoil it. The brake mechanism is tied with wire, otherwise it may be damaged; The condition of the sealing ring is checked; To remove the bearing, clamp the axle shaft in a vice; First you need to knock out the retaining ring that holds the bearing in place.
This is done using a chisel. Carefully knock down the ring, trying not to damage the nearby parts; After this, the bearing itself is removed, this is also done with a hammer and chisel. After removing the bearing, you should carefully inspect the axle shaft.
It should not be bent, and there should be no cracks or burrs.
Signs of malfunction and wear of the rear axle bearing of Niva Chevrolet
The main sign of malfunction and wear of the axle bearing is noise when driving from the wheel, and sometimes shearing, knocking, vibration at low speed. What are the axle shaft malfunctions: Getting to know the axle structure before replacing the Niva Chevrolet axle bearing, Before changing the axle bearing on a Chevrolet Niva, be sure to study the axle structure. Below is a detailed view of the bridge with bearing assembly.
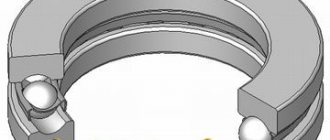
Pay attention to the locking ring 9, which will need to be compressed before removing the bearing 8. Below is a detailed breakdown of the axle shaft itself, as well as a list of parts with factory part numbers
For repairs you will need: The differences in the design of the bearing units are only in the locking rings. When replacing, it becomes difficult to remove these washers; in some situations it is simply cut off or knocked down with a hammer. In any case, when installing a new bearing, it is recommended to also change the retaining ring with the seal.
Place the car on a flat surface, place wheel chocks, and lift the wheel with a jack. Standard set of tools and screwdrivers.
Niva Urban rear axle bearing replacement
Muffle furnace or gas burner or gasoline blowtorch. Repair kit for repairing axle shaft bearing, retaining ring, axle shaft seal. New set - oil seal, retaining ring and bearing.
A pipe with a diameter of 40-45 mm and a length slightly longer than the axle shaft. The tool has been selected and the axle shaft can now be removed. This is done in the following sequence: Place the car on a flat surface, install wheel chocks under the front wheels. We tear off the wheel mount, jack up the car, and install a stand under the rear axle.
Remove the wheel and unscrew the brake drum mounting screws. We unscrew the bolts securing the brake drum to the axle shaft. We knock down the brake drum, but not directly with a hammer, but through a wooden spacer, otherwise there is a danger of damaging the brake drum. We knock down the brake drum using a wooden block
If you are not going to change the oil seal, be careful not to damage its working edge. If the seal is damaged or requires replacement, replace the seal as described here
Secure the brake mechanism with wire. Inspect the axle shaft; if it is bent or cracked, replace it.
Removing and replacing a Lanos taillight - How to repair a VAZ
Reviews of Mitsubishi Carisma: advantages and disadvantages of the car - AVTO.RU
Disassembling the unit and removing the ball bearing
We place the car on a level surface or hang it on a lift . Be sure to install wheel chocks, and the raised side of the machine is additionally supported on a reliable base, for example, several thick bars or a special tripod. Great efforts are applied during dismantling, and there is a risk of dropping the car from an unstable support.
Procedure for removing the rear axle shaft:
We inspect the axle shaft for mechanical damage , whether it is bent and the condition of the spline joints, then it is better to replace the axle shaft with a new one. In other cases, simply replace the bearing and seal.
Is it possible to replace the front wheel bearing of a Niva Chevrolet with your own hands?
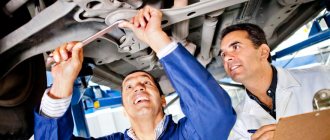
It is recommended to entrust installation to professionals. However, if you have a set of tools and free time, it is quite possible to perform the replacement yourself. Before starting repairs, you need to visit a car wash and wash the front suspension especially thoroughly. The second important step is the correct dismantling of the part. To do this, you need to block the wheel and remove the bolts that secure the wheels. Further:
- first, use a jack to suspend and secure the front part of the car;
- then remove the wheel along with the brake pads;
- unscrew the piston pin of the swing arm;
- we take out the bolts that secure the ball joints;
- screw the hub together with the hinges.
The fact that the wheels on a Chevrolet Niva rotate smoothly is determined by the presence of bearings in the hubs. They can stand on both the front and rear wheels. Bearings are designed to reduce friction.
If such bearings fail, the wheel warps and the rubber begins to wear unevenly and quickly.
If the bearing is damaged while the car is moving, the wheel will simply lock and stop rotating.
For this reason, it is important to pay timely attention to bearings, especially on the Chevrolet Niva, since the car is an SUV and therefore experiences heavy loads on the chassis
We identify a malfunction on the VAZ 2123
As garage mechanics say, “The knock will always come out.” You should not wait for this, otherwise you will have to call a tow truck or repair the unit in the field. In fact, it is easy to diagnose the problem yourself . The first sign of bearing failure is increased noise, unpleasant metallic sounds from the hub, and increased heating of the metal at the place where it is installed.
Attention! In addition to the bearings on the axle shafts in the rear axle of the VAZ2121 and Niva Chevrolet, there are also bearings in the differential and gearbox. The noise may come from them or from a worn main pair.
The following steps will help you accurately determine the source of the noise::
You should not delay repairs if at least one of these signs appears . The savings in this case are questionable, and a bearing that fails in motion can result in expensive repairs with the replacement of the entire axle shaft assembly.
Generator bearing: replacement recommendations
The following recommendations are given for replacing the Niva Chevrolet generator bearing:
The first step is to remove the generator itself. First, the generator mounts are loosened, then the adjustment bolt is released. The next steps are to remove the belt and disconnect the ground from the battery. We are talking about the negative terminal. It is also necessary to disconnect the wires from the generator itself. The structure is removed through the lower part. Why does the mount itself unscrew?
- After this, the master begins to disassemble the generator. The first step is to remove the pulley. The owner will need a screwdriver to lock the rotor. The main thing is a careful approach to work. The pulley is unscrewed with the appropriate key. You will need to pull back the latches to remove the cover. The part is pulled towards itself. All connections with bolts are additionally processed. Then it will be easier to unscrew them.
- The next steps are to unscrew the screws and remove the voltage regulator unit. You also need to get rid of brushes for a while. The generator cover is disconnected from the starter, otherwise it will not be possible to gain access to the bearings themselves. The main thing is not to damage the winding during such work.
- After complete disassembly of the generator, access to the bearings becomes available. It remains to check the parts for any defects that have appeared, including cracks and chips. Do the parts rotate easily? Is there any play between them? The seats may suffer from wear, so they also need to be inspected.
- Next, you need to knock the bearing out of its seat. To do this, tap the surface with a small hammer. The blows must be strong, but careful, otherwise the result will not be achieved. A piece of pipe of the appropriate size will make an excellent stand. Removing the rear bearings is impossible unless a special puller is used.
- The properties of old and new parts must remain similar. The same attachment is used when pressing into the body. The anchor is where the rear bearing is installed.
- When reassembling, proceed in reverse order.
Below watch a video on how to disassemble and repair a Niva generator.
Source
Procedure for installing a new bearing
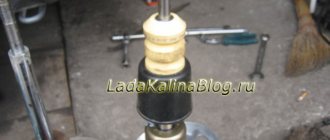
Domestic manufacturers do not pay special attention to the lubrication of bearings and rings, so the car enthusiast must monitor this independently. If there is no hydraulic press or special puller, the replacement will have to be done using a regular hammer and mandrel, namely:
- through a wooden spacer it is necessary to drive the cage into the hub socket;
- to plant it completely, you need to use a pipe of the required diameter or a mandrel;
- then the separator is placed inside and the assembly itself is assembled in the reverse order.
Bearing device.
Like most parts in a car, a bearing has several indicators based on which you can select the necessary part:
- number
- internal and external dimensions
- height
Knowing these parameters, you can select a replacement element that will be suitable for a given car and perform its functions correctly.
The number is the value in the catalog - 21212403080. In most cases, this data is enough to purchase a bearing model for a Chevrolet Niva in a store. If the required element is not available, you can find analogues, knowing the technical characteristics:
- internal diameter 40mm
- outer diameter 80mm
- height (meaning product thickness) 23mm
Replacing the NIVA wheel bearing
We will show you how to replace a wheel bearing in a NIVA car. To work, we will need new wheel bearings, two wheel seals, and a standard set of car enthusiast tools. The entire repair process is shown from start to finish, with detailed comments from the author along the way.
Owners of this car very often encounter the problem of a humming wheel bearing. It is recommended to remake the bearing for 108, after that there is no need for any adjustments or tightening it once a month. If for some reason you do not want to change the wheel bearing, then you must change the hub seals during disassembly.
Checking the hub and wheel bearing
If, while driving, you hear a sound whose frequency gradually decreases or increases depending on the speed. To diagnose the problem, you can use this method. We hang the wheel, place a stump under the lower arm and lower the car onto it. Next, we grab the bottom and top of the wheel with our hands and start pumping. If you feel any play, you can simply tighten the bearing. If this does not help you, there is still play, then most likely the hub has become unusable and needs to be replaced. If there is no play, there is a high probability that the bearings have failed.
The sound of a faulty wheel bearing is dull; it can be clearly heard at an average speed of 60-80 km if the car is rolling in neutral gear.
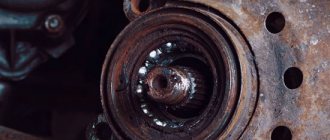
Case from practice
The owner of Niva came to the car service center with a complaint about bad brakes. When the brake pedal was pressed, it sank to the floor and only when pressed again did it work as it should. Everything indicated that there was air in the brake system, but bleeding did nothing. In the end, it turned out that the fault was with failed wheel bearings and the hub itself. The inner race of the bearing rotated on the hub.
Arrows indicate production and pitting. For comparison, this is what the new hub looks like.
But what happened to the bearing.