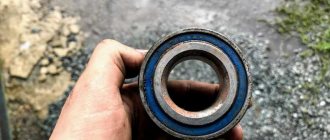
The support bearing is the main element of the upper support of the front shock absorber strut, which serves for its movable connection with the body. While the car is moving, it experiences enormous shock loads, a significant part of which is taken by the “support”, absorbing and distributing them.
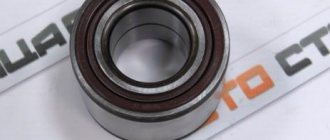
The support bearing itself is a rubber cage of a certain diameter with steel balls placed around its circumference. It is protected from above and below by thick rubber gaskets.
Malfunctions
The main sign of a failed support bearing is a knocking sound (dull knocks) in the area of the shock absorber strut. It may indicate that:
- the rubber gasket is damaged or deformed;
- The bearing itself is damaged.
Failure of the support bearing may occur due to:
- resource spent;
- penetration of dirt and moisture;
- exceeding permissible loads;
- mechanical damage due to shock absorber malfunctions.
How to identify a malfunction
To diagnose a support bearing failure, open the hood and remove the “cup” cover. Place your palm on the shock absorber housing and rock the front of the car. If you hear a knock and feel the corresponding vibration with your hand, the bearing is clearly faulty.
When to change
The service life of the “supports” is on average 50-100 thousand km, depending on the conditions in which the car is operated. After this resource has expired, it is recommended to change them. Replacement is also necessary if any malfunctions are detected.
Late diagnosis, as well as ignoring bearing failure, threatens to destroy the shock absorber structure and other suspension elements.
Prices for support bearings for Lada Kalina start from 300 rubles. The shock absorber support assembly costs from 1200 to 3000 rubles. When choosing a support bearing or the entire support, give preference to either the original part or such proven brands as FENOX, TRACK, ASOMI or SS-20.
For the work of replacing one bearing at a service station, you will be asked for an average of 500 rubles. You will have to pay the same amount for adjusting the wheel alignment angle (wheel alignment).
Guide to assembling new parts into a suspension element
At the very beginning, you need to put a bump stop on the suspension rod, which comes with the boot.
If you are going to install new springs, then initially they need to be tightened in the same way as the old ones. After the springs are tightened, we put them in place. In this case, you need to make sure that the spring falls into a special recess.
Having installed the spring, you need to prepare the support with the bearing. To do this, insert a bearing into the support.
A special flange is installed on top of the bearing and a rubber seal is installed on top of the flange.
We mount the assembled element onto the suspension rod and tighten the fixing nut.
When tightening the nut, you should control the rod so that it does not turn. It should turn out that the upper coil of the springs fits completely onto the sealing rubber. Thus, the front suspension of the Lada Kalina is assembled.
After completing the assembly, the tie elements should be removed from the spring. It is important to find the marking arrows on the spacer that indicate the direction of movement of the machine. Now we insert the entire stand assembly into the glass. After three bolts fall into the holes, screw the nuts on top. Next comes the most painstaking process of getting the strut into the steering knuckle. After that, we twist everything and tighten it to the end. Replacing Kalina front struts is not a very difficult process if you do everything correctly and in the right sequence. When you take on the suspension bulkhead from the second side, everything will work out much faster. And finally, after completion of work with the replacement of front suspension elements, it is necessary to carry out a procedure to regulate the alignment. This procedure will be carried out very quickly and efficiently in a car service center. Doing this yourself without skills is quite difficult and can only make things worse. It is best to go to a car service immediately after completing work on replacing the suspension elements. If you delay this, you will most likely have to change the tires as well. Tire wear is not the worst thing, but since all corners are broken when reinstalling the suspension strut, you can get into an accident when turning.
Replacement
- jack;
- wheel wrench;
- open-end wrench 19;
- open-end wrench 17;
- socket wrench 13;
- pliers;
- ring wrench 22 and open-end wrench 9;
- special puller for tie rod ends;
- 2 special spring ties.
Execution order
- We park the car on a level surface and put it in gear.
- We jack up its front part on the desired side and remove the wheel.
- Using pliers, unscrew the nut securing the steering tip to the strut and unscrew it with a 19 mm wrench.
- Using a tip remover, remove the tip pin from the shock absorber strut. As a last resort, the finger can be knocked out by prying it up with a small pry bar and carefully tapping it from below.
- Using a 19mm wrench, unscrew the 2 nuts securing the strut to the steering knuckle. If necessary, hold the bolt heads with a 17 wrench.
- Using a 13 mm socket wrench, unscrew the 3 nuts securing the support to the body.
- We remove the entire shock absorber.
- We install two ties on the shock absorber spring and compress it until the upper part of the shock absorber is released.
- Using wrenches 22 and 9, unscrew the upper support nut on the upper side of the shock absorber.
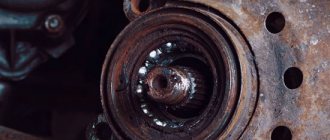
- We remove the support, disassemble it, and remove the worn support bearing.
- We install a new one in its place.
- We install the shock absorber in the reverse order.
How to replace support brackets on Kalina yourself
Lada Kalina Hatchback RED LABEL Logbook We are going through the suspension. Replacing daisies, silent blocks and grant crabs
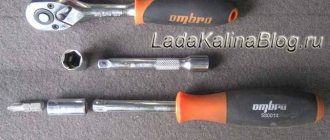
To replace the bearing, in addition to a standard set of keys, you will need special pullers to remove the support and spring tensioner.
Unscrew the support and remove the stand
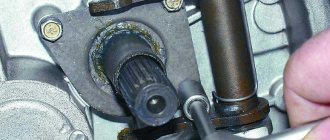
So, in order to unscrew the support we need a special key. With its help, we can easily unscrew the fastening nut as shown in the photo below.
We put a special wrench on the support nut; for ease of unscrewing, we will need a larger lever (a regular one with a diameter will do). We begin to unscrew the support as shown in the photo.
If you don’t have a special wrench at hand, then take a regular 22mm socket wrench and put it on the nut, use a 9mm wrench to hold the rod from turning and unscrew the fastening nut. After we have unscrewed the nut, we proceed to remove the shock absorber strut.
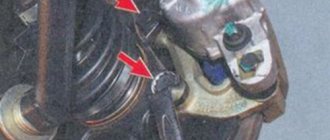
Disconnect the brake hoses that are attached to the strut. Next, unscrew the two bolts securing the strut to the steering knuckle. To easily unscrew them, we recommend spraying them with penetrating lubricant or WD40 and letting them sit for a couple of minutes. After this, you can easily unscrew the bolts without fear of stripping the threads.
Next, unscrew the nut securing the steering end to the strut. This can be done either using a special puller as shown in the photo, or knocking the tip out of the rack with a hammer. Now all that remains is to unscrew the 3 upper bolts securing the strut with the support to the body and pull out the strut.
Removing the old and installing a new support bearing
After we have removed the strut, we take two spring ties, put them on the spring and begin to tighten them until we can unscrew the nut. After unscrewing the top fastening nut, you can easily remove the support along with the bearing, cup and rubber band. If the anther is intact, you can leave it alone.
We take a new support bearing, put it on the stand and assemble the stand in the reverse order. Instead of factory rubber bands, you can install sound insulators from SS20, which are said to prevent squeaking. After we have assembled the rack with the new support, we remove the spring ties and install the rack in place.
Purpose of the front strut support bearing
Let's take a specific technique - the VAZ-2110 car. This model has independent front suspension with hydraulic struts.
The main purpose of the strut is to dampen vibrations that occur when the spring moves.
How does this happen? For example, a wheel of your car falls into a hole. This, in turn, causes one side of the vehicle to sway. In the absence of a stand, such vibrations could continue for a long time.
Fastening is of particular importance. In the upper part the rack is fixed directly to the body, and in the lower part - to the rotary cam.
To ensure a movable connection between the body and the shock absorber, a special transition element is provided - a support bearing.
The name “support” reveals the essence of this unit and its location - at the junction with the car body.
Structurally, the device must withstand maximum radial and axial loads.
Further disassembly of the front suspension into elements
To replace, for example, the front strut support bearing, the entire module must be disassembled. Initially, you need to compress the springs of the suspension element. To compress the springs, you need a tension device.
These devices can be purchased at almost any auto store. We install the tie elements on different sides of the spring onto the coils and then, using a wrench, begin to screw the bolt into the elements. The springs must be compressed symmetrically by turning the bolt on one side and performing the same operation on the other side.
After the spring releases the support, you can completely unscrew the nut from above.
Now you can remove the strut support together with the support bearing. It is best to remove the bearing and support in one piece, since the bearing balls may fly apart in different directions, and then you will have to do unnecessary work.
By removing the support and bearing, you can easily dismantle the spring.
And at the very final stage, it is necessary to remove the bump stop boot from the rod. This is done by simply applying force and pulling upward.
Thus, the front suspension element is completely disassembled.
Types and features of support bearings
Today, VAZ-2110 cars use several main types of bearings:
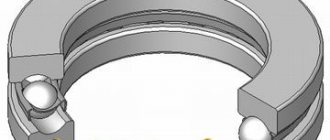
1. With built-in ring (can be internal or external). In such products, the manufacturer provides special holes for installation. Therefore, there is no need to use additional flanges.
The peculiarity of such a bearing is that it ensures rotation of any units when using different rings (internal or external).
2. With detachable ring (installed inside).
3. With detachable ring (installed externally). The peculiarity of this option is that the inner ring seems to “merge” with the body, and the outer ring can be separated if desired.
4. Single split bearing. In principle, its features are not very different from the nodes described above. The only difference is the greater rigidity of the ring.
Selection of manufacturer
Below I will describe in more detail the agony of choice, since before purchasing I had to read probably more than 1000 posts on this topic on various forums and blogs, including lkforum and DRIVE2.
- SAAZ is a passed stage, to which you never want to return again. Of course, I understand that you need to save on the components that go on the assembly line, but not to the same extent? Take the same suspension, only on a VAZ 2110-2112, and I have never heard such symptoms there, including on my “twelfth”, which I drove for more than 3 years. I simply don’t understand why they couldn’t make a similar design on Kalina.
- Kayaba (KYB) is originally a Japanese brand that has a good position in this industry. But there is one important BUT - you will never get Japanese quality, since the lion's share of the goods that go to the domestic market from this manufacturer are produced in China. I'm not saying that the Chinese do their job poorly, but with a flow like theirs, the defect rate can be quite high. And the reviews online are quite mixed, so this confused me.
- ASOMI is our manufacturer that develops suspension parts for VAZ and GAZ cars. They make some pretty good components, but there is one significant drawback that put me off buying their parts. The fact is that this manufacturer provides a 12-month warranty, but only on the condition that you install the parts at a specialized service station. I don’t need this, I’ll do everything myself, and if something is wrong with the suspension, who will I complain to then?
- SS20 is a domestic manufacturer of suspension and steering parts. I think that 99% of all Kalina owners have heard about this company and a considerable part have experience in using components of this brand! Even here on the blog there are many positive reviews from many owners. As for personal experience, I rode on the SS20 suspension on some of my friends’ Kalinas, and compared to my car, this is heaven and earth! No knocks on the rebound, moderately stiff and at the same time excellent road holding, even with quite strong maneuvers at a decent speed (Comfort-Optima). In general, I was hooked on this particular suspension, especially since no manufacturer provides such a huge guarantee. For struts it is 2 years, for springs and supports 4 years. And the most important point is that you can install it yourself without fear of warranty problems! And one more thing - even if you don’t have a receipt or warranty card in your hands, the guarantee is still valid according to the number that is stamped on the parts!
How to check the strut support bearing yourself
Please note that it is advisable to check the support not only when it fails, but also as a preventive measure.
For example, manufacturers recommend doing simple diagnostics every 15-20 thousand kilometers. But how to check the strut support bearing?
Proceed in the following sequence:
- Turn off the car (if it was started), put the handbrake on or put the wheel chocks on.
- Open the hood.
- Remove the “cup” cover, which is located on the hub bearing.
- Touch the support with the palm of your hand and ask your assistant to swing the car to the sides. It is very important here that the stand does not “play” during such vibrations.
If during the swinging process you hear strong creaks, crunching or knocking noises, then there is a high probability of bearing failure. In such a situation, replacement is required.
What is the danger of a breakdown and when is replacement needed?
Many car enthusiasts underestimate the importance of this unit and ignore the knocking noise of the support bearing. This, in turn, can end very badly.
For example, during the next collision with a hole, the support may break. As a result, the car pillar breaks through the hood. If this happened at low speed, then the only costs are material.
It will be necessary to straighten or change the hood, paint it, and so on. It is much worse if such a situation occurs while moving. In this case, the consequences can be more tragic.
If the support gear malfunctions, many motorists do not know what to do correctly and what to do in such a situation. Here the answer is clear - the front strut supports need to be replaced.
If there is an obvious knock, there can be no talk of any repairs (more expensive). Many beginners are afraid of such work, considering replacement to be too complicated a process.
In fact, all manipulations take a minimum of time. The main thing is to know exactly the sequence of actions.
Be careful and do not ignore the appearance of suspicious knocking noises. Remember that such problems can not only lead to additional costs, but also pose certain health hazards. Good luck on the roads.