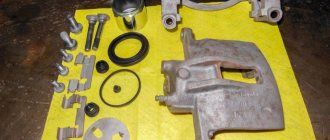
Why do they remove the LADA Kalina bumper?
- While driving, and even in an open parking lot, parts of the car are exposed to constant physical and chemical attack. Therefore, the decorative paintwork of the bumper loses its attractive appearance and requires restoration, which is carried out by removing the bumper.
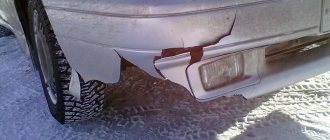
- The tough and brittle carbon fiber of the bumper can crack even during a minor accident and require repairs. This is especially true in winter, when at low temperatures carbon fiber becomes especially fragile and can burst even with relatively light contact with a snowdrift. Restoring the paintwork and soldering the bumper material requires dismantling this part from the car.
- If the LADA “Kalina” bumper is severely damaged, it needs to be replaced with a new one, which also requires dismantling the old part.
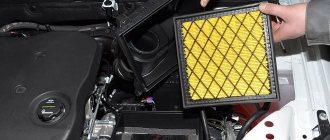
- You have to remove the bumper to replace the Kalina headlight units.
- Tuning a car's front body kit usually requires dismantling the bumper in order to modify it, paint it, or replace it with a finished tuned product.
Reasons for removing the bumper
There are several reasons why you will need to remove the front bumper from Kalina. This is mainly due to physical destruction of both the part itself and the elements underneath it. Let's consider what factors push the owner to begin this difficult task:
- Road accident. Typically, damage to the front bumper due to a collision is the fault of the driver himself. A simple failure to maintain distance can cause disaster.
- Painting work associated with paint fading will also require dismantling the bumper.
We'll paint the bumper
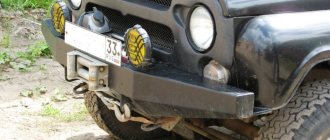
- Tuning . Installing a new body kit will require dismantling the front buffer.
Exclusive tuned bumper
- A separate case may be dismantling the radiator .
- Damage to body parts when the bumper is not damaged. Hitting an obstacle when the radiator frame is damaged from below.
All these reasons push the owner to dismantle the front bumper. Many of them, not wanting to pay for removal at a car service, do this procedure with their own hands.
Radiator grille "Priora"
Replacing an element such as a grille
The “Priora” radiator often appears in the minds of the LADA car of this model. This car's grille doesn't have the most attractive appearance. To improve the appearance of the car, car owners often resort to tuning. Designers of automobile corporations never cease to amaze us with new forms and models of vehicles. Small details play an important role in the overall appearance. The radiator grille is no exception.
There are always large holes on the bumper. They serve to keep the engine cool and the engine compartment to be freely blown and ventilated. A mesh is placed behind the radiator grille. It is designed to protect the insides of the car from various debris, insects, and small birds that can get under the hood while driving. The mesh performs a protective function. In tandem with the radiator grille, the mesh also plays a decorative role. This is why craftsmen love to experiment with this part of the body and make the car unique.
If you install a new grille on the LADA Priora, you can significantly change its appearance. Before you begin work on improving the design, you need to know how to remove the grille
. Consultation with a specialist will not be superfluous. An experienced master will give advice, make recommendations and share the secrets of performing the work.
Replacing the Priora radiator grille is a simple process that you can do yourself. The process will depend on which grille you plan to replace the old one with. Before starting work, disconnect the wires from the battery and remove the engine splash guard.
There are two ways, with and without removing the bumper. To remove the grille on a Priora, you need to press on the washer that secures the bumper, and then remove the washers that hold the grille directly.
The LADA Priora se radiator grille is attached with nine self-tapping screws, so there is no need to remove the bumper. Just open the hood and pull it out.
Features of dismantling
Before moving on to the question of how to remove the front bumper of the Lada Kalina, you need to do some preparatory work. The dismantling procedure is carried out in a viewing hole or using a lift, since many of the fixing elements are located below. If this is not possible, you will need to unscrew the bolts blindly. An alternative is to position yourself on the ground to visualize the fastening points.
We recommend performing the activities with a partner. An assistant will be able to hold one part while you unscrew the fasteners from the Kalina front bumper. Independent actions do not guarantee the quality and safety of the process.
For the procedure you will need:
- Extension.
- Screwdrivers - Phillips head and standard version.
- Special head for 8.
- Key for 10.
- Drive with an additional ratchet.
Today, the manufacturer supplies the market with two modifications of Kalina vehicles. They differ from each other in clamps. Therefore, there are some differences in the order of dismantling the part.
Regardless of the modification features, before removing the front bumper of the Lada Kalina, we recommend disconnecting the battery. This helps prevent short circuits when turning off electronic devices.
Are additional headlights allowed by law?
Of course they are prohibited. This is not allowed according to several regulatory documents:
- Appendix to the Traffic Rules. Clause 3.1 of the Basic Provisions for the approval of vehicles for operation states that you cannot drive a car if the number of lighting devices does not correspond to the factory design.
Therefore, it is impossible to equip the car with additional headlights.
It does not matter what kind of light bulbs will be installed in them: xenon, halogen or LED. All of them are prohibited
Is it possible to change the design in agreement with the traffic police?
Some modernization of a vehicle can be officially registered with the traffic police by obtaining the appropriate permission. For example, it is allowed to install gas equipment or a tow hitch on a passenger car. Is it also possible to install additional headlights as light sources and obtain permission from the State Traffic Inspectorate? No, this is prohibited.
The question is that this modernization is not allowed, since the Technical Regulations directly prohibit equipping a vehicle with additional light sources. This includes fog lights, as well as high and low beams.
But in the Technical Regulations there is the concept of “optional lighting source”. It must satisfy certain conditions. But no auxiliary headlights for cars are specified in this document.
Additional headlights can only be installed on trucks that belong to category N3 and weigh more than 12 tons. Passenger cars are included in the M and M1 categories.
Therefore, if you decide to register the modernization of your car by installing optional light sources other than standard ones, you will have to go through a lengthy registration procedure. This will include safety tests and additional examinations. You will have to pay a lot of money for them, but as a result you will probably be denied registration.
In this case, we mean standard headlights, which are usually installed on the bumper or in the radiator grill of a car. However, in the Technical Regulations there is another concept - “spotlight”.
Installing a floodlight on the roof
It is permissible to install a spotlight on a vehicle if this device is provided by the vehicle manufacturer. The same requirements are specified for optional lighting sources.
Fog lights
If your stock car was produced without fog lights, but you wanted to install them additionally, then there may be 2 options for resolving the issue:
- If your car does have a configuration that is equipped with fog lights, then this will not be a change in the device. Moreover, if you install the factory fog lights in the standard places that were plugged, the inspector will not pay attention to this.
- If PTFs are not installed on any version of a car from the factory, then if installed independently, this will be regarded as an illegal design change. After all, the manufacturer did not provide fog lights, which means that appropriate measures will follow from the State Traffic Inspectorate.
This issue is worth considering in more detail.
Step-by-step removal procedure for a 1st generation car
If you are the owner of a first generation Lada vehicle, to dismantle the Kalina front bumper you will need to perform the following steps:
- lift the hood lid;
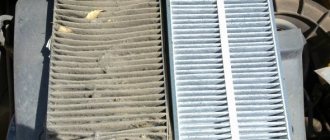
- unscrew the three screws that are responsible for fastening the plastic radiator grille;
- remove the radiator mesh;
- unscrew the 2 screws located on the bottom mesh and remove it;
- disconnect the fog lamp connectors;
- behind the grille there are two screws that secure the bumper, unscrew them;
- lift the car on a lift or move to a special viewing hole. In this position, you need to remove 3 central and 2 side screws, as well as 2 screws located in front of the wheel arch;
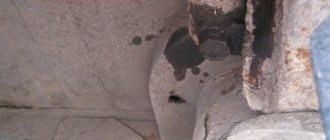
Placement of lower clamps on viburnum
- with careful movements, pry up and snap off the plastic clips holding the part to the body;
- slowly move the bumper towards you, forward. This way the latches are removed from the grooves on the body. Then you can completely remove the front bumper of the Kalina.
Adjusting headlights yourself
After installation, you need to adjust the direction and brightness of the fog lights. To do this, the car is placed on a flat surface at a distance of 5 meters from the wall. Next, one headlight is covered, for example, with cardboard or a tin. By rotating the adjustment screw, you need to make sure that the boundary of the outgoing light is 0.5 m below the luminous flux level of the main headlights.
For the most precise adjustment, a special regloscope device is used, but you can do without it. This completes the process of installing new fog lights. If all steps were completed correctly, the new PTFs will serve for a long time and reliably.
We recommend reading:
- Step-by-step installation of fog lights on Kalina
- Headlights on Kalina: adjustment as needed
- The benefits of moldings on Kalina
- Installation guide for Lada Kalina standard alarm system
- Soundproofing in Lada Kalina
- Features of racks for the Lada Kalina car
How to choose a front bumper for LADA “Kalina”
If you do not take into account tuning parts, there are two types of standard front bumpers for Kalina on sale: painted and unpainted. The first ones must be carefully selected by color so that they do not differ from neighboring body elements. The paintwork changes color slightly as a result of exposure to the sun, so selection by catalog number is not always effective and it is better to choose the appropriate color “on the spot.” Unpainted bumpers are suitable when painting adjacent parts of the car (fenders, hood) is required, for example, after an accident. When purchasing a new bumper, you should pay attention to the following points:
- the paintwork of the part should not have chips or cracks (they especially often appear near the fasteners);
- the plastic of the bumper must be elastic, because excessive rigidity causes cracks even with mild impacts, for example, on snow or sand;
- when purchasing a tuned bumper, you should make sure that it has holes for fog lights;
- There must be stiffening ribs inside the bumper, otherwise it may “lead” and lose its original shape.
What is needed to remove the front bumper of LADA “Kalina”
It is better to carry out work on dismantling the bumper in the inspection hole, because part of the fastenings for this part are located at the bottom of the car. If there is no hole or lift, the job will not be impossible, but you will have to unscrew some nuts by feel or lie on the ground to see the attachment points. It is better to remove and install the bumper with an assistant who can hold one side while you unscrew the fastenings of the other. If you perform the operation yourself, you may not be able to hold the part, which as a result will fall and be damaged. To remove the front bumper of LADA “Kalina” you need:
- crosshead screwdriver;
- socket or socket wrench 10;
- extension;
- wrench (preferably with a ratchet, which will make the work much easier).
Currently, two generations of Kalina have been produced, differing in the way the bumper is mounted. Accordingly, the procedure for removing this part is slightly different.
Advice: before removing the bumper from the Kalina (regardless of the modification), you should remove the ground from the battery to avoid a short circuit when disconnecting electrical appliances.
Sports model
If you tune the bumper, the car takes on a completely different look. Kalina brand cars have been produced for quite a long time, so in stores there is a large selection of different bumpers to suit every taste of the car owner. Often a new product is bought in the color of the car body. If you can’t find the perfect color, you can paint the structure yourself. Moreover, both completely in the color of the entire car, and with an insert of a different color.
The Lada Kalina Sport design consists of several components: grille, amplifier, spoiler. A bumper cover is also added here.
The spectacular rear bumper of a car of this brand includes a beautiful and original element - a diffuser located in the central part.
The front bumper has an air intake located in the center, as well as two located on the sides. They cool the radiator and brake discs. When tuning the entire structure, you can install several stiffeners.
In order to tune the bumper on Kalina Sport, you first need to remove the standard structure. After this, installation of the tuned part is carried out in the following order:
- install bumper amplifier Kalina Sport;
- install the main element with a grill.
As a rule, there are no problems with installing this element of the car’s design, although there may be minor difficulties with replacing a regular bumper with a tuned version. For example, the “I am a robot” bumper is several centimeters lower than the factory one, so there is an increased risk of breaking it during installation. If such a bumper is attached to the wings only with the upper screw, when the lower part touches obstacles, the bumper will bend inward. For the “I am a robot” design, it is also recommended to stick a protective film on the bottom of the part so that the paintwork is not damaged.
When installing this structural element, you must remember that it is made of plastic, and it is very easy to damage it, so it is better to install large bulky bumpers using assistants, and if difficulties arise, immediately contact a car service center
In addition, you should be prepared for the fact that any tuning bumper will have to be adjusted during installation, and this should be done with caution.. Today I decided to make a few more topics on repairing the Lada Kalina and stopped at the rear bumper, I decided to prepare material on the removal and installation of this body parts. It took me personally at least one hour to complete this work, although at first I thought that I could do it faster
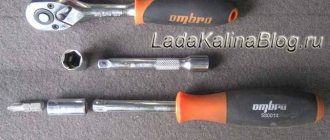
So, consider below the tool that you will need for this procedure:
It took me personally at least one hour to complete this work, although at first I thought that I could do it faster. So, consider below the tool that you will need for this procedure:
Today I decided to make a few more topics on repairing the Lada Kalina and stopped at the rear bumper, I decided to prepare material on the removal and installation of this body part. It took me personally at least one hour to complete this work, although at first I thought that I could do it faster. So, consider below the tool that you will need for this procedure:
- Ratchet or wrench with 10mm head
- Extension
- crosshead screwdriver
Instructions for the second generation machine
For owners of second-generation vehicles, the procedure has minor differences. We bring to your attention detailed instructions on how to remove the bumper on a viburnum, taking into account changes in the modification:
- Unscrew the 3 bolts located at the bottom.
Central lower screws for Lada Kalina
- Unscrew the two pairs of side screws.
- Remove 2 pairs of screws that secure the fender liners.
- Unscrew the 6 screws located on top.
- Using gentle and smooth movements, release the plastic clips.
- Next, we advise you to use help - carefully pull the part forward, while the latches are removed from the grooves.
- Completely dismantle the element.
Which ones are better?
Typically, standard optics have halogen elements; replacing them with the same ones, but more powerful, makes no sense. It is better to install LED lamps in fog lights; a good option is to replace the fog lamp with xenon (author of the video - Learning to drive a car. All the secrets for beginners.).
LEDs can be installed in PTF without restrictions, unlike xenon. Replacing a light bulb in a fog lamp does not require special equipment or specific knowledge, so you can replace it yourself. It is better to buy products from trusted brands, since cheap Chinese samples are often of poor quality and quickly fail.
Removing the front bumper: step-by-step instructions
How to remove the front bumper on Kalina is described in the car's operating instructions. Typically, this procedure does not cause any difficulties for an experienced car owner, so if you do not know how to remove the front bumper, you can study the technical manual, and also consult a more experienced friend. If we talk about step-by-step instructions, it will be as follows:
- First you will need to unscrew the three screws holding the upper radiator trim.
- The second stage of the work is removing the radiator trim. To do this, the front bumper fastenings in the form of two latches located in the corner of the right wheel arch must be disengaged from the brackets.
- Using a Phillips screwdriver, unscrew the three self-tapping screws of the upper fender liner fastening.
- With the “tenth” wrench, remove the three bolts securing the shock absorber to the body.
- The two screws holding the grilles can be unscrewed using a Phillips screwdriver, after which the radiator grille is removed.
- the attachment to the beam is removed in the same way.
- a “10” wrench is used to unscrew the two outer bolts, and a screwdriver is used to unscrew the two middle screws of the upper shock absorber mounting.
- The ampere sidewall flange located on the body bracket is removed. The same operation is performed on the other side of the car.
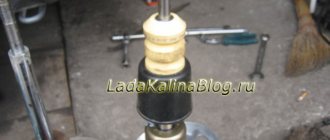
- The front shock absorber is removed.
- move on to the four bolts that hold the energy-absorbing beam and remove the beam.
Types of punishment
In practice, for the unauthorized installation of additional headlights, 3 types of punishment are possible:
- A fine of 500 rubles for upgrading a car in the form of additional headlights without approval from the traffic police.
- Deprivation of the right to drive a car for a period of 6 months to 1 year for violating the operation of lighting devices.
- Deregistration of a vehicle.
Of the listed penalties, only 2 comply with the law. Let's take a closer look at them.
Deprivation of rights
In this case, this measure would be illegal. The issue is that drivers driving cars with factory-installed halogen headlights that have xenon or LED bulbs are similarly illegally penalized. This is considered a violation of the operating mode of lighting devices.
In a similar way, the court can make a decision with auxiliary headlights, because they are not provided by the factory, and therefore violate the operating mode. Many car owners consider this a contradictory proposition. But the same contradiction can be attributed to xenon, since according to the Technical Regulations the operating mode can be constant or flashing. This does not apply to the type of light source. Therefore, in practice it happens differently.
The Supreme Court of the Russian Federation recently prohibited the deprivation of the rights of drivers who installed xenon under this regulatory act. Therefore, it is hardly possible to apply such a punishment for additional headlights.
Flashing lights
The situation is different if not ordinary headlights are installed, but those that flash. Then the traffic police inspector can file documents against you in court to deprive you of your license. But this issue is controversial, and the court may consider it illegal. Let's figure out what the question is here.
In this case, the law provides for punishment for violating the operating conditions of lighting devices, as well as their color. If you carefully read the text of the sanction, these conditions are also connected by the conjunction “and”. This means that both conditions must be met simultaneously. If additional headlights emit orange, yellow or white light, then this is not prohibited by the Road Traffic Regulations. Only the operating mode is disrupted.
But in this case, the norm of Part 4 of the same Article 12.5 of the Code of Administrative Offenses can also be used. It indicates a possible penalty in the form of deprivation of rights for a period of 1 year to 1 year 6 months. Plus, your additional headlights that are installed on the car may be confiscated. If such headlights are used while driving on the road, your license may be revoked for up to 2 years.
Deregistration of a car
In 2022, this punishment is quite realistic and complies with the law. Many car owners know that if design changes are detected without registration, such a vehicle will be impossible to register with the State Traffic Inspectorate. The inspector will simply refuse you and he will be right.
However, not all drivers know that if a car is already registered with the traffic police, and unregistered additional headlights are found on it, it will be deregistered.
In practice, in real life it goes like this:
- You are driving along the road, a traffic police inspector stops and checks the documents for the car.
- He sees additional lighting devices that are not provided by the manufacturer.
- Checks the registration certificate and finds that the change has not been registered.
- Draws up a resolution imposing a fine of 500 rubles.
- Submits a report to a superior.
- The authorities review the documents and make a decision to deregister the car.
- You will receive a letter by mail about the decision of the traffic police to terminate the registration of the car.
- The issue can only be resolved by removing the additional headlights and presenting the car to a traffic police inspector.
If, after deregistration, you continue to drive your car (even without additional headlights), then when a traffic police inspector stops you on the road, he will take away the registration numbers, STS and put the car in a impound lot. To pick it up, you will have to go through all the procedures again, and also pay for new license plates. Therefore, it is worth thinking before installing illegal lighting devices.
How to replace the front bumper on a VAZ 1117-VAZ 1119?
Note! When you go to the auto store, think about what else you need to buy for the new bumper, for example, as we already said, there is a beam under the bumper, it can be different depending on your car (That is, it can be plastic or metal, it will be metal if you have a viburnum Sport or a new model Kalina), and also if your bumper is equipped with fog lights but the linings into which they are inserted broke upon impact, then you will need to stock up on new linings (These are the mounts where the fog lights are inserted)!
Removal: 1) To remove the bumper, you must first remove the radiator grille; to do this, use a screwdriver to unscrew the three top screws (see photo 1) and then lift the grille a little and disengage its brackets as shown in photo 2 below.
2) Let's move on, now if you have fender liners installed on your car, then unscrew three screws on both fender liners and exactly in those places where the fender liners are attached to the front bumper of the car (see photo 1), then move to the lower part and there on the sides unscrew the two screws securing the bottom trim (see photo 2) and then remove it from the car bumper (see photo 3), then unscrew two more bottom screws (see photo 4) but this time these screws secure the bumper itself to plastic beam that is located under it.
Should I change the radiator grille on the Priora?
Lattice
The radiator on Priora is easy to tune. First you need to figure out how to remove the radiator grille.
Sequential steps for replacement
For the work you will need a screwdriver and an awl. Auto mechanics distinguish 2 methods for dismantling the grille.
- The bumper is removed.
- The bumper cannot be removed.
At the first stage, the ground wires are disconnected from the battery. Then the engine mudguard is removed. To do this, you will need to unscrew the 3 bolts from below that attach the bumper to the protective covers. The next step involves removing:
- screws securing the bumper to the front of the body;
- 2 screws for fixing the left and right headlight housings;
- 2 screws on the right and left side of the arches, they attach the bumper to the front fenders.
Kalina 1. Removing the bumper grille (top and bottom).
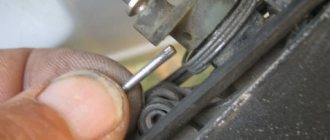
Removing the grille is completed by removing the bumper. If you remove the Priora se grille using the second method, then you will need to press the locking washer located near the bumper. Then the washers securing the grille are removed. Otherwise, the hood is raised and secured with a stop. After this, the screws securing the combination lights to the front panel are removed. The lights themselves are removed, the electrical wiring is disconnected from them. Using a screwdriver, turn the locking washers 1/4 turn. Then the old grate
The radiator is tilted forward, pulled up and removed.
Replacing and tuning the grille on Priora se are processes that require attention, since this unit provides maximum air flow to the radiator. The procedure will not take much time if you install a branded radiator grille. To secure it, you will need special parts. To do this, it is recommended to determine in advance the location on the bumper where this unit will be installed. In this case, a sealant is used.
Making a part with your own hands
The radiator grille from Priora se is easy to make yourself. To do this you will need the following materials:
- putty;
- fiberglass;
- net;
- dye.
First, the old unit is dismantled. The middle of the part is cut out with a jigsaw. To carry out tuning, holes are drilled in the mounting points. Then you will need a thin and bendable material - plastic or cardboard. It goes around the internal contour of the future unit. It is recommended to note how many centimeters the part will go inside. Based on the obtained dimensions, cardboard or plastic is cut.
Lattice
The radiator is well cleaned with sandpaper and degreased. A solvent is used for this. It is applied to the place where there is contact with the epoxy resin. Otherwise the connection will be loose. To obtain reliable contact and the desired thickness, you will need to repeat this process. As each layer dries, the cardboard or plastic comes off the product. This will allow you to find out whether the material is tightly glued. The next step is to level the Niva surface. For this, putty is used.
Installation of bumpers on Lada Kalina
Installing the bumper on the Lada Kalina, both front and rear, is performed in the reverse order.
Before starting work, it is imperative to clean the places where the bumper is attached to the body from dirt and rust. The same applies to the attachment points of the lower grille.
When reassembling the lower grille, as well as the bumper device itself, it is necessary to pay attention to the exact fit of all parts, so if it is done poorly and does not get “in place,” you can only spoil very expensive parts.
The instructions for the car will help you put the front or rear shock absorber back correctly, which you should always have with you. So, for example, if the front bumper mounts cause problems, you can always find answers to the most difficult questions in it. In especially difficult cases, you can ask for help from a more experienced car owner who has already changed this element several times.
Conclusions and recommendations
Replacing a bumper on a LADA Kalina is not a very complicated operation, which is why some experienced LADA drivers claim that doing this is no more difficult than installing a new mudguard. In this case, it is necessary to be very careful and assembled so that it is dismantled and installed back so that its main parts are not damaged. If you meet this requirement, your car will be used for a long time without any major breakdowns.
Sources:
https://site-car.ru/kak-snyat-i-ustanovit-radiator-na-kaline/ https://nadouchest.ru/kak-snjat-nizhnjuju-reshetku-radiatora-kalina/ https://avto- idea.ru/sovety/kak-snyat-peredniy-bamper-lada-kalina/ https://maxmot.ru/kak-snyat-reshetku-radiatora-na-priore/ https://infokuzov.ru/kuzov/zamena- bampera-lada-kalina
Necessary tool for work:
- Phillips screwdriver (long and short for easier repair)
- Small ratchet
- Heads for 8 and 10
- A 13mm wrench and socket - useful for unscrewing the bumper reinforcement beam (this is only necessary to remove the headlight)
This is interesting: Replacing coolant on VAZ 11183, VAZ 21116 and VAZ 11186 Lada Granta engines