It is known that locks for VAZ-1118 car doors have an interesting property - you can replace their cylinder without removing the mechanism from the door itself. On previous models, dismantling is more difficult: you need to press the bracket holding the cylinder with a paper clip or an awl, getting into the hole on a mechanical drive. In the Kalina model, that is, VAZ-1118, this bracket is pressed out by pressing with a ruler or a screwdriver. Which, in turn, is done on the installed lock (there is no point in removing it). Next, the replacement operation is discussed in more detail.
Design of VAZ-2109 locks and disadvantages
The lock cylinder is a cylinder that is equipped with a secret mechanism. In all locks with a flat key, the cylinder is replaceable. For example, on VAZ-2109 cars it is replaced like this.
The rotating part that is connected to the rod is called the “drive”. As we can see, this drive has a hole for removing the cylinder. By applying pressure with a thin axle or an awl, the larva is pulled out.
There is only one drawback - it is hardly possible to complete the steps indicated here without first removing the lock completely.
It should be noted that even when the mechanism is removed, it will not be easy to pull the larva out of it.
Therefore, before dismantling, be sure to insert a key into the cylinder and turn it left or right 90 degrees. The purpose of this action is to be able to dismantle the larva. This action is performed effortlessly, and the key is then simply pulled towards you.
How is the activator installed?
The only way to get inside the trunk of a Lada Kalina is this manipulation - turn the key and press the button. This action is not always associated with convenience. For example, in bad weather or when your hands are full, this is not easy to do.
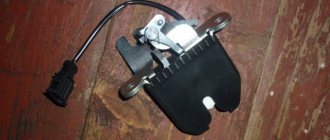
This circumstance prompts owners to consider purchasing and installing an activator. Installing this useful element is quite simple. Here you will need a self-tapping screw, which will secure the device we are considering. To check the functionality of the activator, you should connect it with the standard connector from the on-board network.
After the current supply to the activator is stopped, the door is locked with the first latch, but remains not completely closed. To get back inside the luggage compartment you will need to use the key.
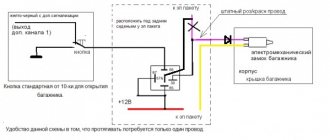
Installing a push-button lock is not a very difficult task. To implement it, you will need to assemble a circuit, which requires wiring. Here you will need to “attract” the programmable channel present in the alarm.
You can connect the device using two options.
- We connect the button with the positive output of the activator (12 V), bypassing the relay. The advantage of this scheme is the absence of unnecessary components and simple connection. As a negative aspect, it should be noted the need to lay additional wire lines.
- The second method is more labor-intensive. Here you will need to use additional components (diodes). You also need to find the ground connection point. The main advantage is the need for a minimum number of wire lines.
Experts prefer the first method because it is simpler. For switching, you can use copper wire type PV-3, the cross-section of which is 1 mm2. Laying should be done on the left side along the thresholds. You can connect by means of a clamp and subsequent wrapping with electrical tape.
The control wire of the activator may be a standard red-pink cable. It is subject to commutation with the relay, followed by winding the contact and placing it under the BUS fixation frame. The entire list of manipulations is performed with the battery disconnected.
Replacing the larva in Kalina
First of all, replacing the lock elements means that the door trim will be completely missing. Therefore, first we will figure out how to dismantle the trim on Lada Kalina cars. The second chapter is devoted to how to remove the larva and install a new one in its place. The last step will actually be the simplest.
Removing the door trim yourself
The casing is attached not only to screws, but also to plastic pistons. The number of screws holding the part in question is four:
Numbers here indicate all fastening elements. But to get to them, you need to remove the screw cap “3”, as well as the inner door handle. The pawl handle also needs to be unscrewed.
Lada Kalina door lock repair
Lada Kalina Station wagon PORT WINE NOT LIKE EVERYONE Logbook Rear door lock
We disassemble Kalina locks
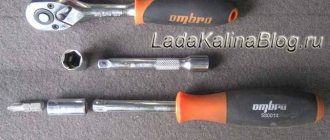
Tools and materials: (for torture and attempts to restore the castle) - grinder
- set of screwdrivers - soldering iron - welding
1) One of the experimental samples on the operating stool. Let's start disassembling. You will need a set of “stars”.
Unscrew
2) We gradually disassemble it into details. And we remember what and where it was installed. This is an important point. Otherwise, you'll get tired later.
And here is the first bummer. Rivet installed. Many people stop at this point and do not dare to further dismantle the non-removable lock. What a tautology
3) The lock is already faulty, there is nothing to lose. We grind the rivet with a grinder.
The rivet was removed with a grinder. We continue to disassemble
4) We get to the insides. The plastic parts (gray and black) are sealed together in several places around the perimeter, approximately 10 points. Either pick them out with a knife, or, as I did later, use a soldering iron.
5) remove the power contacts and limit switches, simply pull them up.
6) Between the covers there is a rubber gasket for sealing.
7) A copper (and most likely brass) ribbed tip is rigidly fixed to the motor shaft. From the factory it has a plastic tip sealed on top. Due to frequent use, the connection was destroyed and the motor did not open or close the lock.
 Using a soldering iron, I carefully soldered the plastic tip as best I could. The motor power contacts are simply inserted into the motor from above. There are two limit switches inside
9) I disassembled the front and rear locks and compared the internal actuating part. Inside the plastic box, the only difference is the limiter. When opening the front door, it does not allow closing the door “latch” (door lock lock)
10) I also disassembled the mechanical part of the lock. We carefully remember what and where it came from. I didn't do this and had to lose a lot of time during assembly. I had to select parts using intuition and direct poke. I noted the location of the spring, which you can’t just install, it still gets in the way of slipping out.
Lock assembly
11) The locking tab is pushed back by this tension spring. When disassembled, it flies out and can be installed back through a special hole that the designers have provided.
the spring is simply inserted into the hole and fixed at the end in the seat.
12) We clamp the metal clips to fix the structure on the plastic case. There are only four of them, one from each corner
13) Put the plastic white lever in place.
14) We try on the actuator levers, the clamps of which were previously ground off with a grinder. There is nothing left to rivet there, so nothing else came to mind other than welding it. perform
15) There is no semi-automatic machine, so we cook with an electric arc. There was a syringe with water for cooling.
16) I’m not much of a welder, it turned out what happened. The plastic got a little hot, but not scary.
17) I made another “rivet”. The spring is marked - the one that is installed from inside the mechanical part. If you forget her
installing and welding rivets will turn out very funny...
18) Lock assembly. Can be installed in place.
The design of the rear lock is different from the front one. This also made me look for the missing parts that were right under my nose.
And now some conclusions:
1) One new lock costs about 1500-1660 rubles. The savings are obvious. 2) It is quite possible to disassemble something that is not collapsible, if it is really necessary. 3) Assembling what has been disassembled and making it work is also possible, you just need to be very careful.
next article:
Changing the secret code yourself
Removing the trunk lock
To remove the lock, remove the four clips by prying them off with a screwdriver.
Remove the protective cover of the lock drive.
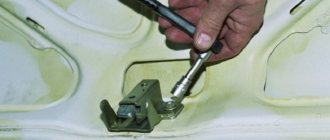
Using a screwdriver, press the rod away from the latch
Disconnect the rod from the lock drive
Squeezing the clamps with your hand, disconnect the lock wire chip from the rear wiring harness block.
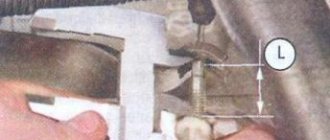
We use a marker to mark the position of the lock relative to the trunk lid.
Using a 10mm wrench or socket, unscrew the three nuts securing the lock.
Carefully remove the trunk lock along with the wires and rod
How to remove the lock and replace the cylinder
To gain access to the trunk lock of the Kalina sedan, it is necessary to dismantle the internal plastic trim. It is held on by two bolts, which makes it easy to remove. They are located in the places where the handle is installed, in the so-called latching pistons. You can pry them off using an ordinary screwdriver.
The design of the trunk lock of the Kalina hatchback consists of two parts. This is the larva and the mechanism itself responsible for blocking the door. Elements must be disconnected individually. Below you will find information about such deletion.
If you need to replace the larva, everything can be done in a couple of movements. All you need is a deep socket and a flathead screwdriver. Then you should unscrew the bolts and release the desired part of the housing. When the work is done, you need to use a plastic screwdriver to remove the clamp, which is attached to the body of the larva. Next, it is carefully removed, holding the spring. Then the replacement is made, but in the reverse order.
Replacing a trunk lock or disassembling the entire mechanism requires a lot of effort. You need to unscrew the door lock using a screwdriver. There are only two bolts, so the job is quick. You can remove the mechanism using a Phillips screwdriver. When everything is done, just pull the lock and it will come out easily.
To summarize, it is necessary to note what tools are needed for the job. These include:
- plastic screwdriver;
- deep head;
- Phillips screwdriver.
The work is not at all difficult, the main thing is to purchase an electric trunk lock and perform all the steps described.
Removing the trunk lock drive
To remove the lock drive, you need to disconnect the lock rod from the drive (see above)
Using a marker or felt-tip pen, outline the position of the lock drive relative to the trunk lid
Using a wrench or a socket 8, unscrew the two nuts securing the lock drive to the trunk lid
Removing the lock drive
Use a screwdriver to pry it off and remove the retaining ring.
Removing the pressure lever
And remove the fixing plate
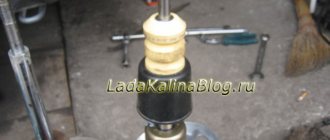
Remove the pusher with washer and spring
We take out the cylinder lock mechanism
Installation of the activator: preparatory work
Since there is space for a trunk lock activator in Kalina, it makes sense to use it. Absolutely any activator will do. Of course, for those who are interested in the quality and long service life of the entire device, it is better not to stop at extremely cheap options. Experienced car owners still advise choosing domestic Kalina electric lock drives, regardless of body type. They are somewhat more expensive than similar products made in China or Taiwan, but still more reliable. Main parameters of the activator:
- 12 volts;
- two-pin;
- lock-unlock functions.
In order for the system to open doors by pressing a button to work fully, one activator will not be enough. You will also need such a thing as a rotary washer. According to many car owners, the easiest way is to grind it yourself. You will need a steel plate and a machine. There are quite enough drawings with dimensions that will show what kind of rotary washer for the Kalina activator should be on various auto forums.
It is possible that after the washer is manufactured, it will have to be modified when installing the activator. The activator installation technique itself will require some tricks. For example, the first step is to remove the trunk trim. It is secured with pistons, which immediately became unusable for most car owners. Conclusion: pre-purchase of “hedgehogs” for subsequent installation of the trunk trim in place is mandatory.
Another nuance lies in the types of locks on the Lada Kalina. Firstly, locks on cars produced before 2010 and after differ in their design. Accordingly, the types of activators will differ slightly. This issue is resolved upon purchase. Secondly, most of those who independently installed the lock activator for Kalina station wagon either modified the lock itself or replaced it with another one. It remains to figure out why this is needed and how it is done.
The bottom line is that the trunk lock is equipped with two “tongues”. After modifying the lock to open it with a button on the key, the existing problems were partially solved, but a new one arose. If, when opening the trunk with the key button, someone did not support the trunk lid in time, it would lower, as a result the trunk would close again. And only on one “tongue”. And this meant that the key fob certainly became useless. Now it was possible to open the trunk again only with the key. This is where two options for solving the problem appeared.
Trunk won't close on Kalina
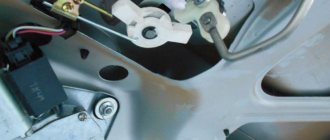
From the moment I bought the Swallow, I was tormented by its trunk. The fact that it closed very poorly - it had to be closed literally on a grand scale. I read on the Internet that many people experience this. And I also found a simple recipe: unscrew the screws and adjust the position of the lock mate (it should move up and down).
However, when I looked at what I had with the response part, I was upset - it was already, as it seemed to me, in the most extreme position and there was nowhere to adjust it. In any case, that’s what I thought... Look at this: It would seem that there is nowhere to adjust downwards, since the piece of iron rests on the plastic. But!
Now I can close the trunk simply by lightly pushing it down with the same force as Kalina's door.
I think I'm not the only one who has trouble closing the trunk. Who is fighting this? I've already sunk in the rubber plugs, but it doesn't help.
Source
How to get to the door mechanism
According to the recommendation of the magazine "Behind the Wheel", in the absence of casing, access to the lock is always available. Simply put, there will be no need to remove the inner lining made of metal. The steel sheet is simply bent to the side.
The rotating part with the protrusion is called the “drive”, and this is what you will need next.
Replacing the larva will be easy:
- The key in the cylinder currently fixed in the door is turned 90 degrees;
- Using a steel ruler, knife or thin screwdriver, you need to press the locking tongue located opposite the slot in the body of the cylinder. You need to place a screwdriver between the rotating and stationary parts of the mechanism. Know that in the driver's door the slot is made from the bottom (looks “to the floor”), in the passenger doors - from the top!
- By pulling the key towards you, the larva is pulled out;
- The new cylinder is installed like this: with the key inserted, it is pushed into the lock until it stops. The locking tab will need to be pushed inward.
The following photo illustrates the “second step”.
The slot itself, when the mechanism is assembled, is located between the drive and the lock body (at least that is how it is designed). You need to manage to squeeze a screwdriver into the space between these parts. Sometimes this action does not lead to a positive result, and then the lock has to be removed as an assembly.
Installation of the locking device drive
Removing the fifth door opening button is the easiest thing. It is more difficult to seal the remaining hole. This can be done using a special putty. One of the tricks is to process the hole cavity so that the surface becomes as rough as possible. This will create optimal adhesion to the putty. Next comes sanding, priming and painting. The work can be done independently without special training and practical skills. After that, you don't have to worry about aesthetics.
Of course, all dismantling work can be carried out only after the installation of the electric drive is completed, as well as the installation of the trunk opening button in the cabin. The trunk lock drive and how to install it are all relatively clear. Both the location and the connector of the wires in Kalina are determined in advance for this.
But where to install the button will have to be decided by the owner himself. The two most popular places are the dashboard in front of the gear shift and the driver's door. The first method is convenient because the button can be reached from almost anywhere in the cabin. The button on the driver's door is primarily a convenience for him.
Once the location for installing the button has been selected, it is time to install the electrical wiring. About 4 m of wire will be required. The connection point is located under the rear seat. The connection is made to connector 13, it is signed, so searching will not cause any difficulties. The work can easily be done independently. Thus, it became clear how to make a trunk lock drive.
Egnition lock
The ignition switch is a complex device designed to control the supply of power to vehicle systems, prevent battery discharge and ensure that the engine starts from the starter system. The castle includes two components:
- mechanical, represented by a lock cylinder;
- electrical, which is a set of contacts that close electrical impulses when the key is turned in one way or another.
The ignition switch on the Lada Kalina has three modes:
- Mode "0". In this position, the key can be easily removed, and the lighting, emergency lights, and audio system work.
- Mode "1", fixed. It is no longer possible to remove the key from this position; when it turns on, the ignition system is turned on and power is supplied to all systems except the starter. But it is worth considering that keeping the key in mode “1” for a long time can lead to battery discharge. This position is used when turning on the starter, so that the running fuel pump pumps up the required pressure to ensure further ideal operation of the starter.
- Mode “2”—activation of the starter system.
The Lada Kalina ignition switch kit contains a key for the lock, which serves not only in its straight profile, but also as a key for the doors and trunk.
Adjusting a door with a large gap at the top
Failure to correctly position the door is not always due to a manufacturing defect. The appearance of an enlarged gap in the upper part of the doorway is often associated with natural processes. Poor quality roads, driving on rough terrain, and heavy weight of the structure lead to the door sagging relative to its original position.
Restoring the position of the element relative to the body is carried out by a similar physical impact in a state of incomplete closure. The glass goes down completely. The door closes with one click. In this state, the size of the gap is regulated by moving the door toward or away from you, depending on the force applied.
Alignment is considered successful if the gaps are the same on all sides. The front doors are calibrated in the same way.
With heavy trunk doors of Lada Kalina hatchbacks and station wagons, the procedure is more complex and technological. The design is designed in such a way that when slammed, the lock tongue snaps into a metal bracket. The specific fastening of the lock with bolts creates additional instability.
The bolts should be found and tightened with a screwdriver. The lock is coated with silicone grease. Checking for opening and closing will indicate further actions. If the defect has not been eliminated, rubber stops are used to strengthen the drive traction of the luggage lock. However, you should not overuse force to install them, as this may have the opposite effect.
New Lada: Generator Lada Kalina: which one is installed, operating principle and signs of malfunction, choice of original and analogues, step-by-step instructions for self-replacement
Door adjustment process
To eliminate defects in the operation of door elements, it is necessary to find out the cause of its occurrence. In some cases, treating moving parts of the mechanism with lubricants helps. The seals between the trim and the body are subject to wear and tear, and they also require replacement periodically.
- the gap in the extreme part of the structure causes the door on the Kalina car to not close tightly;
- The problem is caused by a faulty door lock.
Violation of the geometry of the structure in the doorway is the most common cause of the defect. Gaps can appear in any part of the joint with the body. Most often this happens from above and below. The adjustment in these cases is similar, but has minor differences.