Repair and operation manual - Body - Replacing and adjusting the trunk lid lock VAZ-21099
The trunk lid lock is non-removable. If the trunk lid lock is faulty, replace the lock.
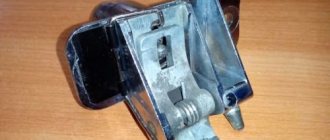
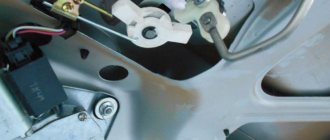
1. To replace the trunk lid lock, unscrew the two fastening nuts and remove the lock.
2. Reinstall the trunk lid lock in the reverse order. After installation, adjust the trunk lid lock.
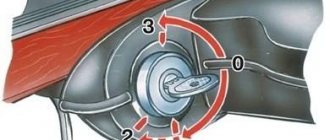
3. If, when closing the trunk lid, the lock latch does not fit into the hole in the latch (a blow is heard and the trunk lid closes with great force), loosen the two fastening bolts and move the latch in the desired direction. After this, tighten the fastening bolts of the clamp.
Adjusting the latch and replacing the trunk lock on a VAZ 21099:
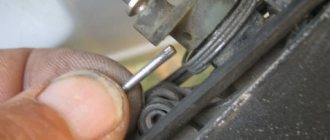
- First, to remove the lock from the trunk lid, use a wrench or an extension with a head cap to unscrew the two nuts that secure the lock to the trunk lid.
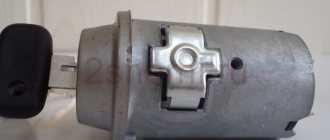
- Once the retaining nuts are removed, remove the inner lock from the cover by hand.
- Next, remove the small spring from the same place and check its condition.
Note! If the spring suddenly becomes too compressed or skewed, replace it with a new one!
- And then, from the inside of the trunk lid, remove the button with the cylinder and check the condition of the button in the same way.
Replace the lock button that is not working and also slows down when pressed with a new one!
Installation:
The trunk lid lock of the VAZ 21099 car is not dismountable, so do not try to repair it or do anything with it. If the lock is in a defective condition and is faulty, then it must be replaced with a new one!
- First, put the entire system back together. That is, if you previously removed the button with the cylinder and a small spring, then install them in their places in the reverse order of removal.
- Next, take the new lock in your hands and install it in its place, still tightening it with the same fastening nuts.
- After installation, try closing and opening the trunk lid. If, when closing the lid, the trunk lock suddenly does not fit into the hole in the latch, usually in this case a distinct knock is heard in the area of the lock, and the lid closes very poorly, in this case:
Adjusting and removing the latch, as well as replacing the trunk lock on a VAZ 2108, VAZ 2109:
Removal:
- At the beginning of the operation, remove the trim from the trunk lid, to do this:
First, use a screwdriver to pry up the “10” pistons and then remove them.
And after removal, remove the trim from the trunk lid of the car.
- When the casing is removed, use a wrench or socket wrench to remove the two nuts that secure the lock to the cover.
When unscrewing the nuts, be careful, because immediately behind one of this nuts there are two “negative” terminals, which can be very easily damaged!
- Next, when the nuts are unscrewed, disconnect these two “negative” terminals from the metal stud.
- And then remove the lock from the trunk lid.
Now let's move on to removing and adjusting the latch.
If you do not want to remove it and know that it is well adjusted, then continue reading below, in the “Installation” section!
- To remove the clamp, first unscrew the two bolts that secure the clamp using a wrench.
If the trunk lid does not close well, or when closing the lid there is an impact in the area of the lock, then in this case, adjust the position of the latch by moving it in the desired direction!
- Then use a screwdriver or hand to pry up the fastener and then remove it from the car body.
If the trunk lid again does not close well and has vertical play, then in this case, adjust the position of the lock exclusively in height!
- Finally, remove all adjusting washers.
If necessary, increase or decrease the number of shims. This will make the trunk lid easier to close!
- To install the lock and door trim in place, follow the steps below:
- First, attach the new lock to the place where the old one was installed.
- Then put two “negative” terminals on one of the studs and then tighten both nuts securing the lock.
- And finally, install the casing in its place, securing it with ten pistons.
- To install the latch, do the same but in reverse order, that is:
- Increase or decrease the number of shims.
- After this, install the lock retainer on top of these washers and subsequently adjust and tighten it with two bolts.
Removing the old trunk closure and installing a new lock
The easiest part of the replacement process is removing the faulty mechanism.
| Operations | Fasteners |
| First you need to pry off the fasteners using a screwdriver. | Their number is ten. |
| Remove the casing. | The pistons hold the luggage compartment lid trim, which must be removed immediately after this. |
| The next step is to unscrew the two nuts. | They attach the structure directly to the trunk. |
| Remove two terminals. | Immediately behind the nuts there are two terminals attached to the bolts, which also need to be carefully removed so as not to be damaged. |
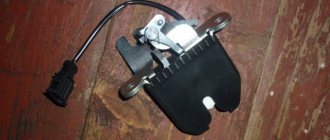
| After these steps, the old structure can be easily and simply removed. | It is no longer held in place by any fasteners. |
The lock from the Lada Kalina is not completely similar to the device for closing the trunk door of the VAZ 2109, so it needs to be slightly modified. Repair does not require special skills, since you only need to saw off the upper protruding part of the metal and shorten the lever slightly. The counter part of the structure from Kalina is made in the form of a U-shape, so it can be easily installed on the remaining part of the previous closing device and its cylinder, which was left without its working mechanism.
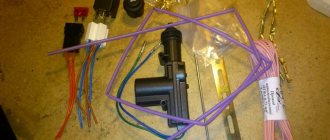
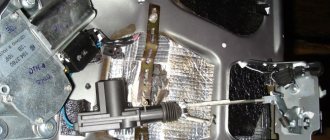
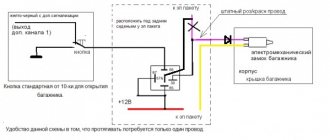
You can install the electric drive in the place you need, not forgetting that the possibility of regulation and its rigid connection directly with the opener lever are a prerequisite. The wiring can be routed directly inside the trunk door, leading into the vehicle interior. In the cabin, it can be put under the trim, and laid along the rear pillar to the bottom. From below it can be hidden under sound insulation and rugs. The button should be placed in the interior of the VAZ 2109 in a convenient place so that it does not interfere and is easy to reach. You need to connect the button via a relay. It will supply “plus” to its winding, and it will redirect it directly to the gear motor, which is connected to the rod of the closing device.
We must not forget that the terminals that are used to connect the button to the new mechanism should be carefully insulated and crimped. Repairs must be carried out with confidence in your capabilities and with an understanding of how not only the mechanical, but also the electrical part of the new lock works. Replacing a mechanical locking device with an electric drive can take from an hour to three, depending on skills and experience.
The new electric lock will serve for quite a long time, since it is less susceptible to the same mechanical influences as the factory mechanism of the VAZ 2109.
Adjusting the latch and replacing the trunk lock on a VAZ 21099:
Removal: 1) First, to remove the lock from the trunk lid, use a wrench or an extension with a head cap to unscrew the two nuts that secure the lock to the trunk lid.
2) Once the retaining nuts are removed, remove the inner lock from the cover by hand.
3) Next, remove the small spring from the same place and check its condition.
Note! If the spring suddenly becomes too compressed or skewed, replace it with a new one!
4) And then from the inside of the trunk lid, remove the button with the cylinder and check the condition of the button in the same way.
Note! Replace the lock button that is not working and also slows down when pressed with a new one!
Note! The trunk lid lock of the VAZ 21099 car is not dismountable, so do not try to repair it or do anything with it. If the lock is in a defective condition and is faulty, then it must be replaced with a new one!
1) First, put the entire system back together. That is, if you previously removed the button with the cylinder and a small spring, then install them in their places in the reverse order of removal.
2) Next, take the new lock in your hands and install it in its place, still tightening it with the same fastening nuts.
3) After installation, try closing and opening the trunk lid. If, when closing the lid, the trunk lock suddenly does not fit into the hole in the latch, usually in this case a distinct knock is heard in the area of the lock, and the lid closes very poorly, in this case:
• First, pick up the extension cord with the union head and use it to remove the two bolts that secure the clamp.
Replacing the hood lock of a VAZ-2109 with your own hands
Replacing a faulty trunk lock on a “nine” is certainly necessary. After all, a broken lock will not protect your personal belongings from theft. However, it is much worse if the lock on the hood of your car fails. In such cases, the entire car will be at risk of theft. Therefore, anyone who discovers the slightest problem with the hood lock must act immediately.
Experts advise changing the hood lock elements in the following cases:
- If there are problems with the hood lid handles. If you find deformation of these parts, you should start replacing them without waiting until the moment when the cover cannot be opened;
- The lock drive cable has broken. In this case, it is no longer possible to open the hood lid;
- The spring or hood latch has become deformed. It is not difficult to understand that a breakdown has occurred - the hood lid opens spontaneously.
The design of the VAZ-2109 hood lock consists of two lid opening handles, a spring, a hood latch, a drive and a safety cable. Most often, VAZ-2109 drivers are forced to change the lock spring. To install a new part, you first need to disconnect the drive cable from it. Next, insert a screwdriver under the spring and carefully pull it out. After this, we take a new part, insert it into place and assemble all the elements of the lock in the reverse order.
Another part that is a cause for concern if it fails is the hood lock drive cable. To replace a part, remove it from the mounting lock. Then we go into the car interior and unscrew the bolt securing the handle. Remove the handle and use pliers to straighten the end of the cable. Then we move the metal sleeve up and remove the cable loop from the handle. Next, we bring the drive cable into the engine compartment of the car. At the final stage, insert a new cable and assemble everything in the reverse order.
To replace the hood latch, place a wrench on the locknut and loosen it. Next, use a screwdriver to remove the lock retainer. We insert a new part and assemble the structure in reverse order.
If there is a need to install a new safety rope, then we proceed according to the following algorithm. First, pry off the lock washer with a screwdriver. Next, using pliers, remove it from the safety cable. Then we pull out the axle and remove the spring. We install the new cable in the reverse order.
As you can see, repairing the hood lock is not so difficult. And each of us has the necessary tools.