Sometimes, even minor breakdowns in a car lead to the impossibility of movement. Due to some problems, you even have to switch to public transport. A number of such breakdowns include damage to the ignition switch. To repair the ignition switch, you first need to consider the most common types of faults and know the reasons for their occurrence.
Types of ignition switch malfunctions
The most common faults are:
- combustion of the contact group due to mechanical wear;
- lock cylinder malfunction;
- failure of the larvae;
- breakdown of the locking mechanism;
- turning/blocking the lock core.
The reasons for all of these problems may vary. Approximate signs of burnout of the contact group are the simultaneous inoperability of many devices powered by electricity, since the contact group of the ignition switch powers many objects: low beam, high beam, turn signals, lights. All these components of the car, at first glance, are not interconnected. But if they stop working at the same time, you should look for problems in the ignition switch.
If the first variant of the malfunction can be attributed to the electrical part, then the second - to the mechanical part. This part may be subject to premature wear due to poor quality workmanship by the manufacturer. Another malfunction may occur due to strong heating of part of the housing. With such problems, the key may turn around the axis for no apparent reason, but the car will not start. In electronic locks, the cause of this turn of events may be faulty sensors that affect the start.
Failure of the ignition lock cylinder means that the car can be started with any key or even a foreign object. Such a breakdown does not affect the performance of the equipment. However, the car loses its anti-theft qualities.
A malfunction of the ignition switch may cause the steering column locking mechanism to not work. Although this is a primitive protection, it creates some difficulties for the hijacker. A malfunctioning ignition switch sometimes results in the key itself being blocked. With this breakdown, it cannot be turned in the lock, and after persistent attempts, the key may even break.
Experts identify the following main reasons for this problem: the main unit froze due to low temperatures, contamination, and deformation of the key. All these breakdowns can be fixed with your own hands. Let's take a closer look at the process of removing and installing the part yourself.
This is interesting: Why you shouldn’t save on car repairs
Troubleshooting
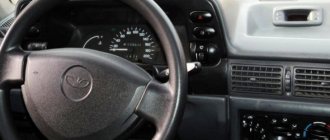
Replacing the ignition switch on a VAZ 2110 is not an easy task. And, first of all, you should figure out what caused the problem. Our guide below shows you how to do it correctly.
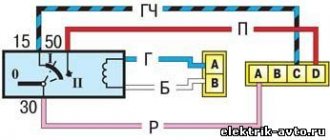
Note! Before reading the instructions, please read the image and symbols carefully. After all, to carry out work on repairing and replacing the ignition switch on a VAZ 2110, you must have at least minimal theoretical knowledge. And we decided to help you with this.
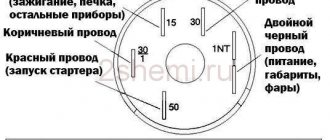
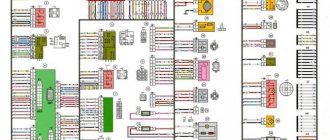
Explanation of the marks on the image: 1-reservoir; 2-negative backlight charge; 3-starting mechanism; 4 - positive charge following the ignition switch; 5-reservoir; 6- positive backlight charge; 7-constant positive charge; 8-constant positive charge.
Table 1. Replacing the ignition switch of a VAZ 2110 with your own hands: we study the structure and purpose of the main components in order to identify defects
| Item No. | Explanation (what it is used for, what it is responsible for) |
| 1, 5 | Used for anti-theft device. |
| 1-6 | Responsible for illuminating the lock. |
| INT | Light, washing device, wipers (permanent plus) |
| 50 | Starting mechanism (starter) |
| 30/1 | Permanent positive charge. |
| 15 | The positive charge created when the system starts up. |
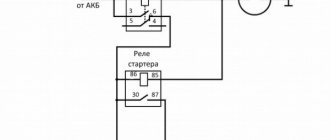
Now take a close look at the photo below:
What do we observe on it and what are the elements designated by numbers responsible for?
1. Energy goes through this element, going to the electric switch of the key inserted sensor (+12 V);
2. Incoming weight when opening the doors on the driver's side;
3. So, staying in the starter and subsequently going to the ignition switch (+12 V);
4. A charge begins to flow from this element immediately after the key hits connection 5 in the rib device responsible for control (+12V);
5. Here the ignition switch socket is illuminated, powered by the potential that passes through the device (+12V);
6. This comes with +12V power from a reusable current source, which is a battery;
7 and 8. Do not use.
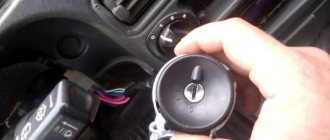
And now - step-by-step instructions for identifying defects and malfunctions in the ignition switch:
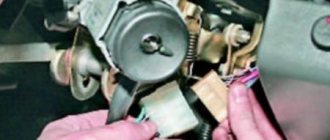
- Disconnect the battery;
- Remove the screws from the steering wheel, as well as the cover;
- Remove the ignition switch connector.
Next, arm yourself with a multimeter, which is necessary to check the voltage on the contact groups.
Note! When working with the device, the key must be located in the socket and switched in different positions.
When diagnosing, pay attention to the following:
- The unchanged state should be maintained only on pins 8 and 30, but only when the key is in zero position;
- Equipment responsible for servicing (turning on headlights, heated glass, operation of turn signals, etc.) must come into operation when the key is in state 1;
- The force coming from location II (see image above) must be directed to the propulsion devices;
- In position 3, the trigger mechanism must be activated. After this, the key must be returned to its original position.
If something clearly goes wrong and problems are noted, the ignition switch should be disassembled and tried to be repaired.
Automotive experts note several types of main failures during the operation of a component that turns the ignition on or off on a VAZ 2110 car:
- Mechanics. A malfunction of this type is directly related to the breakdown of the larva, which is one of the most common problems. The fact is that the elements of the lock, like the keys, are often made of relatively soft material, so many simply break off and/or become deformed.
- Electronics. Such a malfunction consists mainly of worn contacts.
Note! Regardless of the nature of the breakdown, dismantling the lock cannot be avoided.
Removing and installing the ignition switch yourself
So, it is clear that in order to remove the ignition switch there must be significant reasons, a number of which are mentioned above. Replacing the entire lock may be necessary not only if the mechanisms break down, but also if the keys are lost. To get the ignition, you need to proceed according to the following sequence:
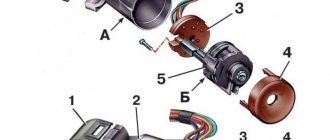
- Remove the casing from the steering shaft and unscrew the screws securing the ignition switch.
- To disable the anti-theft device, leave the key in the zero position.
- Using a screwdriver, press the special lock through the hole in the bracket.
- Then remove the core from the bracket and the keys from the lock.
Memorize or write down the location of all connected wires. Only then disconnect them from the connection point.
Check the operation of the contacts by placing the key in different positions. Determine the functionality of the anti-theft device. The locking rod can be extended or retracted.
After the analysis and inspection, decide whether the device can be repaired. Sometimes you can do without completely replacing the ignition switch.
Before installing the device, turn the key inside to position I. This will secure the steering shaft lock, which will not interfere with installation. After installing a new device, do not tighten all the bolts at once. Make sure that the mechanism is in the right place and position and is operational.
Connect the wires through the old removed connector from the old lock.
Choosing a new lock
When choosing a new ignition switch for a VAZ 2110, it is worth remembering the prevalence of fakes, which are unlikely to last long. Therefore, the product must be carefully inspected before purchasing.
In addition, it is worth paying attention to the integrity of the special holographic label (sticker), as well as to: the casting of the case, the good “fit” of the key into the lock socket, the strength of the manufacturing material, the tongue of the product and some other parameters.
On a note! When purchasing an ignition switch, look at the article number. It’s better if it’s like this: “VAZ 2110-3704005-30.”
Self-repair instructions
Let's consider the option of repair due to poor contacts, as well as due to breakage of the cylinder. Repair of the ignition switch is most often needed for this reason.
First, check the battery by disconnecting the negative terminal. At the same time, remove the lower casing from the steering column.
Disconnect the contact group and test the wires using an ohmmeter. Entire contacts show zero resistance; otherwise, the device must be replaced. If the damage is minor, you do not need to completely change the device; just change the cylinder or contact group. The kit is sold in the form of a box with terminals.
The cylinder is sold together with a new set of keys that are needed to turn it. When replacing the ignition lock cylinder, you should remember that you will have to use the old key for the trunk of the car. If this is unacceptable, purchase an additional set of larvae for the luggage compartment.
Replacing the ignition lock cylinder will require more time from the technician, but will allow you to save on purchasing a whole part. To replace the device, unscrew the screw connecting the two parts of the lock body. The body will split, and in one of the parts there will be a larva that can be taken out.
This is interesting: Fuse box on Octavia-TOUR cars 2001 and A5
Keep in mind that the new cylinder will not contain such things as a return spring and a locking element. Transfer these parts from your old device. The return spring may not be immediately noticed, since it is located at the bottom of the part, be careful!
Fix the new cylinder in the lock shell in the same way as the old one. Screw the device part. Check the functionality of the ignition switch assembly.
When to replace
It is quite easy to identify mechanical problems. You just need to externally inspect the part for cracks or deformation. If jamming or sudden jumps occur when the key rotates, the mechanism requires replacement.
Diagnostics of the contact group requires a control device that will show the presence of voltage on the starter when the ignition is turned on. If there is no such device, you can use a regular “control” - a light bulb with two outgoing wires. If when you turn the key all the way, the lamp does not light up, it means that the signal is not being received and the contact group is not working. Therefore, the mechanism needs to be changed.
Tip: If one of the ignition switch parts breaks down, it is better to purchase the entire set at once, since some manufacturers may have different connecting connectors for the components.
Replacing the ignition switch
When replacing the ignition switch, there is one nuance that will allow you to easily disconnect the device connector connecting the wires. This nuance lies in the loosening of the bolts that tighten the brackets with the lock on the steering column. These bolts sometimes serve as some kind of guarantee against theft, as they are equipped with a round head without edges. They are not easy to unscrew. Craftsmen have learned to use cunning.
A reliable grip will be provided by a chisel inserted at an angle into the bolt head. A sharp chisel is inserted so that the bolt rotates against the clock. The installed chisel must be hit with a hammer.
Illumination of the instrument panel - how is the panel arranged?
Any modern car must have lighting for both the instrument panel and other buttons and switches located on the car’s dashboard. Illumination of the ignition switch is a very common occurrence in imported cars. Our manufacturers have not thought of this, so many drivers improve their iron horse on their own. Such lighting will give your car a special charm at night, and it’s convenient to see where to insert the key.
Photo of the ignition switch illumination
It is not difficult to install, and its service life is very long. The most important thing is that when choosing such lighting you don’t need to invent anything. Car dealerships, as a rule, sell standard types of backlights that have only one bulb and can only shine at a point. For VAZ cars, they began to produce ready-made elements for illuminating the ignition switch, which are conveniently mounted and do not require alterations or cutouts in the plastic of the car’s steering column.
Important points
Carry out repair work in a dry room, preventing moisture from entering the device. Otherwise, you will then have to disassemble the system again to clean the oxides. Install a new or repaired lock according to the old electrical diagram. To make wiring easier, transfer the markings to the new device.
Be careful when unscrewing the bolts. There is not enough space under the steering column; swinging it is not enough to strike. It's easier to use a heavy hammer. However, if you work carelessly, an impact can damage the plastic.
In order for a repaired or replaced lock to work for a long time, you need to follow all the details of the work. A guarantee of uninterrupted and safe operation of the device will be the choice of a modern and high-quality model.
Repair of generator on VAZ 2104
In fact, repairing a car generator is not the most difficult task.
It is important to properly remove and disassemble the device, and replacing burnt out or worn parts is done intuitively. That’s why car enthusiasts say that repair work on the G-222 is quite feasible even for a driver who has never disassembled generators
Removing the generator from the car
To work, you will need to prepare a minimum set of tools in advance:
- open-end wrench 10;
- open-end wrench 17;
- open-end wrench 19.
After the car has cooled down, you can begin dismantling work. The procedure is relatively simple and does not require specific knowledge in the field of electrical equipment:
- Remove the wheel from the right front side of the vehicle.
- Make sure the car is securely on the jack.
- Climb up on the right side and find the generator housing.
- Loosen the lower mounting nut, but do not unscrew it yet.
- Loosen the nut on the stud from the top side, also without unscrewing it yet.
- After this, you can slide the generator housing onto the engine - this way the belt is loosened and can be removed from the pulley without damage.
- Disconnect the wire coming from the generator terminal.
- Disconnect the wiring from the winding.
- Remove the wire from the brushes.
- Unscrew the lower and upper nuts.
- Pull the generator towards you and remove it from the engine bracket.
Video: dismantling instructions
The device can be very dirty, so it is recommended to wipe the case before disassembling it. After all, during disassembly, dust can get on internal parts and lead to a short circuit.
How to disassemble a generator
The next stage of work requires changing tools:
- open-end wrench 19;
- socket wrench 19;
- ratchet (you can add an extension);
- head at 8;
- head at 10;
- small hammer.
Before disassembling the generator housing, you must also prepare containers in which you will put small parts (nuts, washers, screws). You can even sign from which mechanism certain parts were removed, so that later it will be easier to put the generator back together:
- The first step is to unscrew the four nuts on the back cover.
- Next, remove the pulley; to do this, you will need to unscrew the nut securing it.
- Afterwards the body can be divided into two parts. One part comes out easily from the other. As a result, the generator breaks up into a stator with a winding and a rotor.
- Remove the pulley from the rotor - it usually comes out easily. If you have any difficulties, you can tap it with a hammer.
- Remove the rotor and bearings from the housing.
- Disassemble the stator into parts, being careful not to touch the winding.
Video: instructions for disassembling the device
How to repair a generator
After disassembling the device, you will need to carefully inspect every part. The part needs to be replaced if:
- it is covered with a coating of burning and soot;
- heavy wear is visible;
- there are cracks and nicks on the surface;
- There is a deformation in appearance.
Accordingly, in order to carry out a full repair, it is necessary to replace the failed generator mechanisms with new ones. It is now quite difficult to find suitable elements on the VAZ 2104, so it is worth immediately assessing the feasibility of repair work. Maybe it’s easier to buy an original generator than to waste time searching for the necessary spare parts?
In most cases, it is advisable to replace rather than repair the generator.
If you have chosen to repair the device, you will need to make sure that all components are identical to the standard elements. Even a slight difference between a part and the original one can lead to incorrect operation of the generator and even to its breakdown.
Replace the mechanisms while assembling the device in the reverse order.