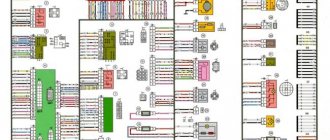
Connection diagram of the ignition switch to the electrical wiring of a VAZ-2114 car
In the technical documentation for the VAZ-2114 there is a separate section that specifically describes the design of the vehicle’s electrical equipment. So, all the elements are described in full. But, in this particular case, the issue of independently connecting the ignition wires will be considered.
So, let's look at the diagram to see how the contact connections of the ignition switch are connected.
Ignition switch pinout diagram
Regardless of the ignition being turned on, the following devices can operate: high beam, interior and instrument panel lighting, hazard lights, brake light, sound signal, as well as exterior lighting.
A separate item worth highlighting is additional equipment: a car radio (of any format), speakers, additional lighting devices are powered directly into the battery or on-board network, and much more.
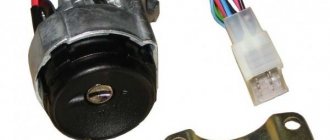
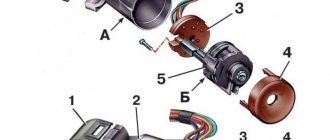
Ignition switch device
Next, we will consider the switched circuits of various key positions in the ignition switch:
| Key position | Live contacts | Switched circuits |
| 0 (Disabled) | 30 | _ |
| 1 (Ignition) | 30-15 | Ignition system, generator excitation, headlights, turn signal, control devices, windshield and headlight cleaners and washers, heater fan motor, rear window defroster, cigarette lighter |
| II (Starter) | 30-15 | See Regulation I |
| 30-50 | Starter |
Ignition switch pinout
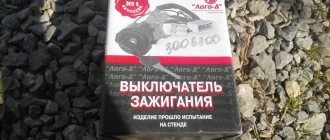
Product selection
There are several options for the ignition switch on the VAZ-2114. Let's look at each one separately:
- 2110-3704005 or KZ-881 – original catalog numbers of the ignition switch manufactured by AvtoVAZ. The wiring diagram is standard, that is, factory. Installation is quite easy. The average cost is 1000 rubles .
conclusions
The pinout or connection diagram of the VAZ-2114 ignition switch wires is quite simple and understandable, so every car enthusiast can carry out repairs or replace a spare part without resorting to the help of car service employees.
1200 rub. for the photo report
We pay for photo reports on car repairs. Earnings from 10,000 rubles/month.
Write:
The ignition switch in a VAZ 2110 car , like on any other, is designed to switch electrical circuits and turn on the starter. Therefore, if it fails, then you will no longer be able to start the car.
It should be noted that the ignition switch is a tool for starting / stopping the engine, it can open or close certain groups of contacts, so when the lock is broken, the engine will not be powered. So if you have problems with it, then you will definitely need an electrical circuit diagram and a wiring diagram for the lock on the VAZ 2110 in order to check and repair it.
Design Features
Before carrying out repair work, it is necessary to take into account basic factors related to the performance of the starting mechanism. They will help to minimize possible errors and correctly understand the principle of its operation:
- The ignition switch in a car is a basic module that helps the driver start the engine from the passenger compartment;
- the designers have provided an anti-theft system inside, without which the car will become an easy prey for criminals;
- the mechanism of the unit provides for blocking the restart of the starter, but does not turn off the running ignition;
- removal of the key from the outside is possible only when the secret moves to the “zero” position, in which the security pin moves into the working position, blocking the car from theft;
- when turning to the “first” position from “zero”, the locking pin is hidden, and at the same time the primary contacts are closed;
- a running car powers electrical consumers from the on-board network, which allows the driver to start headlights, interior heating, turn signals, power windows, dashboard, etc. in a timely manner;
- after moving to the “second” position, another group of contacts is closed, which makes it possible to supply voltage to the starter relay to start the internal combustion engine.
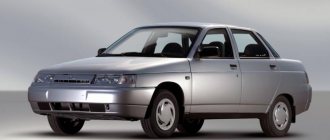
The VAZ-2110 ignition switch installed in the cabin, the wiring diagram of which is presented on the page, is used on several models of VAZ cars. This makes it universal and in demand among motorists, so it can be easily purchased at almost any auto store.
VAZ 2110 ignition switch diagram
Below is a visual diagram of the device itself and an electrical diagram for connecting the ignition switch; it is suitable for both the VAZ 2110 and its modifications - 2111 and 2112.
Wiring diagram for the ignition switch VAZ 2110
Electrical diagram of the ignition switch VAZ 2110
VAZ 2110 ignition switch pinout:
- Power +12 volts, which must be supplied to the inserted key sensor microswitch;
- The mass should come when the doors are opened on the driver's side;
- Source +12 volts, current must flow to the starter (with pin 50);
- The +12 volt source goes away after the ignition is turned on, for example, additional equipment: watch, DVR, etc. (contact is 15);
- There is also +12 volts when you insert the key into pin 5 of the on-board control system;
- The power supply is +12 volts, with the help of which the illumination of the ignition switch cylinder works;
- Power comes from +12 volts from the battery (pin 30);
- Do not use.
Ignition switch malfunctions
The ignition switch on a VAZ 2110 must be replaced if its operation cannot be restored in any way or the key is broken/lost. In other cases, they are usually repaired.
There are two groups of main breakdowns:
- The mechanics are faulty . The most common problem is the breakage of the larva. The keys are made of soft metal, so they are unreliable and can often simply break off. There is also a problem with the steering wheel locking or the key may simply get stuck when in the on position.
- Wear of the contact group . No matter what kind of damage you have, you will still have to dismantle the lock. If the tongue of the blocker is jammed, you will have to work hard to correct the situation. The contact group or larva is quite easy to repair.
In order to check the ignition switch on a VAZ 2110, there are many instructions and methods, we will consider some of them.
Detailed instructions for checking faults in the ignition switch:
- The first thing to do is disconnect the wire from the negative terminal of the battery.
- Remove the plastic cover of the steering column to get to the contacts of the pads, because it is with their help that power is connected to the car's electrical wiring. Next, disconnect the connector of the harness itself from the on-board network and pull it out.
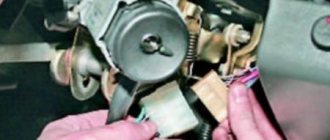
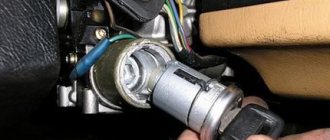
Dismantling
If previous activities have shown that intervention in the design of the ignition switch is required, work in any case will begin with dismantling the device.
We have special step-by-step instructions for this.
- To begin, disconnect the negative terminal from the battery of your VAZ 2110. This way you will ensure your safety and the safety of all wiring. You know what the consequences of a short circuit are.
- Next, remove the casing on the steering column. This is how you gain access to the castle.
- If you feel that the rotary switches will interfere with your work, it is better to remove them immediately. The work does not last for a couple of minutes, so all irritants should be put aside.
- Armed with a chisel and hammer, unscrew the mounting bolts with round heads. Don't get confused, they are the only ones there. Try to perform this operation as carefully as possible so as not to knock off the bolt head.
- Now take the pliers and remove the bolts.
- Insert the key into the ignition and turn it to position zero. This will disable the anti-theft system.
- Next in line is the bracket that held the previously removed bolts and the ignition switch itself.
- Mark the contact wires using different colored markers. Otherwise, you can easily mix them up during reassembly.
- Often it is not necessary to completely replace the lock, but only partial repairs. For example, change the backlight bulb, or fix a microswitch problem.
- Disconnect the connectors that used to operate the ignition switch.
- To replace the backlight bulb, disconnect the corresponding connectors, and then use pliers to remove the bulb.
- To replace the contacts, use a screwdriver to press out the special latches.
- Using a shaped screwdriver, unscrew three screws, after which you can remove the rod.
- Use a regular flathead screwdriver to pry out the clips and remove the microswitch.
- Next, new ones are inserted in place of the dismantled elements.
Checking status
Repair of ignition switch VAZ 2110
The entire lock as a whole is not very expensive, although most of the breakdowns can be fixed quite easily; to do this you will need to dismantle it, disassemble it and then replace the parts that are faulty.
To replace the contact group of the VAZ 2110 ignition switch, you will first need to release the latches so that some of the parts can be freely removed from the body. After this you can easily install a new group. You will not be able to mix up the sides for installation, because the part simply will not fit on the other side.
Instructions for replacing the contact group:
- First you need to disconnect the plug that goes into the backlight. Using a screwdriver, you need to bend the 3 latches that are fixed by the plastic cover, then you can remove it from the lock.
- To gain access to the contact group, you need to bend 2 more latches.
- Then you need to inspect the light guide plate and check if there is a black coating and other deposits. If you find any, you can remove these defects with fine sandpaper. If after this there is no result, then you can replace it.
- Under the light guide plate there are 3 more plates, which are also prone to oxidation, as a result of which the contact group may malfunction. They can also be cleaned with sandpaper.
Installation of a new larva
To replace the lock core due to mechanical failure, remove it from the vehicle as described above. Then follow this algorithm:
- Insert the key into the slot and use a Phillips screwdriver to unscrew the 3 screws holding the 2 halves of the lock body together.
- Separate the housing while holding it with the key facing up. If you hold the lock in a different position during disassembly and do not insert the key, the insides will spill out and you will not understand how to put them back together. In this case, the ball with springs may get lost.
- Remove the locking mechanism, which consists of two spring-loaded parts, and pull out the spring itself.
- After removing the key, carefully remove the core so that the ball with the spring (located on the side of the cylinder) is not lost.
To disassemble the body, you need to unscrew 3 screws.
Before replacing, you need to remove the return spring from the old cylinder, since it is not sold complete with the new core. The spring is inside the part on the back side in a cocked state; it must be installed in the same form on the new cylinder. Also, do not forget to remove the thin spring from the hole where the ball is inserted.
The locking mechanism tongue peeks out from the bottom of the case
The larva must be pulled out so as not to lose the details
When installing the core, you need to move the spring for the ball into the hole and insert the part into the body. Then push the larva all the way, while simultaneously inserting the ball into the socket. After that, all that remains is to assemble the locking mechanism and tighten the housing with screws. When finished, check the operation of the ignition switch by turning the key to different positions.
The ejection spring from the old core needs to be moved to the new one
Replacing the ignition switch of a VAZ 2110
Replacing the lock with a new one is only necessary if it has already stopped working altogether or if a fairly serious breakdown has occurred; in all other cases, you can get by by replacing the failed parts.
The most common reasons for replacement:
- if the car has been stolen;
- if the key is lost;
- breakdown of the contact group.
Instructions for replacing the ignition switch:
- To carry out this procedure, you need to use special bolts with tear-off heads ; some motorists recommend replacing them with twenty-millimeter M6 bolts , which can be removed more quickly during repeated repairs;
- To loosen the bolts you will need a chisel; during use you need to be extremely careful not to break the bolt head;
- Immediately before replacing the ignition switch, you need to insert the key into it and turn it to position “I” so that the latch, which blocks the steering shaft mechanism, is in the lock body.
- Then you can put the ignition switch on the steering column and secure it with a bracket, also tighten it with bolts for fastening.
- After removing the key from the keyhole, you need to check whether the steering shaft locking mechanism works. If the shaft lock does not work, you will need to adjust the position of the ignition switch on the steering column until the latch fits into the groove on the steering shaft.
- When the locking mechanism is working normally, then using a spanner wrench “10” you finally need to tighten the fastening bolts.
Ultimately, I would like to note that repairing the ignition switch of a VAZ 2110 is not very difficult to perform; you just need to try, and everyone will be able to follow a simple algorithm of actions in order to cope with the task.
Instructions for removing the element
For disassembly you need to prepare a simple set of tools:
- 10 mm head and ratchet drive;
- Phillips screwdriver;
- narrow chisel (width 5-8 mm);
- hammer;
- round nose pliers with tapered, curved ends.
Ignition switch replacement tool
To successfully install a new or repaired lock in place, it is advisable to purchase 4 special fastening bolts with M6 threads with a head size of 10 mm and a length of 20 mm. Their feature is the heads that come off with a key at a certain tightening torque. After tearing off the heads, semicircular caps remain on the surface, which are much more difficult to unscrew for an untrained person. But you will have to do this during disassembly.
The battery must be disconnected before starting work.
Like any event related to tampering with the electrical part of the car, dismantling the ignition switch begins with disconnecting the negative terminal of the battery. Then proceed in this order:
- Using a Phillips screwdriver, remove the screws holding the two halves of the plastic frame of the steering column together.
- Lower the handle that fixes the position of the steering wheel during adjustment all the way down and remove the plastic panels. Disconnect the ignition switch block and carefully cut the tape connecting your bundle of wires to the common harness. In order not to cling to the steering column switch during operation, it can also be pulled out of the connector.
- On the metal casing of the steering column you will see a lock mount consisting of two clamps. They are held together by 4 bolts with the heads torn off (visible on the left side). Pointing the chisel at the semicircular caps, use a hammer to loosen the tightening of these bolts one by one.
- Using pliers and then your hands, unscrew all 4 bolts and remove the ignition switch.
Unscrewing the plastic steering column cover
Bolts with intact heads can be unscrewed with a wrench
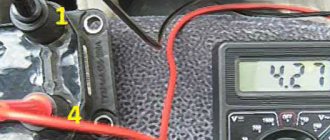
At the stage of disconnecting the connectors, it becomes possible to check the functionality of the contact group by measuring resistance, as described in the previous section. If you remove the lock due to the loss of the keys and want to move on, then after dismantling you need to do the following:
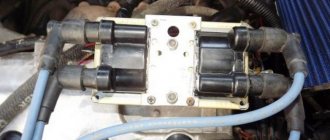
- On the “mother” block, which remains hanging after the lock is turned off, find contacts with thick wires of purple and blue color (the latter with a black stripe).
- Connect these terminals with any conductor, after which the ignition will turn on.
- The thick red wire leads to the starter. To start, its contact must be temporarily connected to the installed jumper. When the engine starts, the red wire must be disconnected.
This is how jumpers are inserted into the block to start the engine without a key.
After unscrewing the fasteners and disconnecting the wires, the lock can be easily removed from the car
Assembly is carried out in the reverse order, but taking into account the following precautions:
- do not tighten the fastening bolts until you have accurately aligned the position of the lock on the casing so that the facing plastic panel fits smoothly into place;
- before final tightening the bolts, make sure that the lock snaps into place when turning the steering wheel, otherwise adjust the position of the lock;
- The tightening torque should be such that the heads of the new bolts come off and the round heads remain.
When installing and tightening the bolts, their heads should come off
If you think that special fasteners are not an obstacle for car thieves, then you can screw in regular bolts with M6 threads and carefully tighten them.