Useful tips
Author: Anastasia Safonova12/27/201612/27/2016
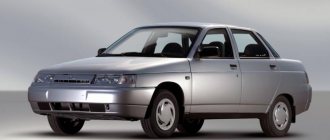
The VAZ 2110 ignition switch cannot be called a reliable part, especially when you compare its service life with the same devices on cars of foreign origin. Therefore, owners of the tenth - twelfth model, who use the car for a long time, sooner or later encounter problems with the lock and its repair. On the other hand, the element can be easily removed from the car and every skilled motorist can replace it. But first you should figure out whether the entire part needs to be replaced, since in most cases it can be repaired.
- Instructions for removing the element
Dismantling the VAZ 2110 lock in the photo - Training video on replacing the ignition switch
Stages of checking the operation of the VAZ 2110 ignition switch
In circumstances where the lock in the car gets stuck or the starter does not start, new car enthusiasts have a question about what kind of malfunction needs to be fixed.
To resolve this issue, you need to carry out a number of manipulations:
- Remove the wire from the negative terminal of the battery.
- Remove the plastic protection from the steering wheel. The easiest way to do this is with a Phillips screwdriver.
- Pull out the lock connector.
- Use a multimeter to measure the current in the wires at different key positions.
- When the key is at the “Off” marking, current is present only on the eighth and thirtieth contacts.
- The “ignition” operates the headlights, turns and other auxiliary mechanisms.
- The “starter” directs current to devices connected to the engine.
- “Blocking” puts the self-starter into operation.
- To check the operation of the backlight, you need to apply a current of twelve volts to the second and sixth contacts. If the lamp lights up, then everything is in order; if there is no light, the electrical circuit has broken. In addition, it is worth checking the lamp, it may need to be replaced, as it has burned out.
- Replacement of all contacts occurs if contacts 50, 30 and 15 are faulty. When checking this process, if difficulties arise in operation, then the lock needs to be repaired or the socket replaced.
Troubleshooting
Before tackling the question of how to change the ignition switch on a VAZ 2110, you need to find out the nature of the malfunctions. How to check the ignition switch of a VAZ 2110 is described in the instructions.
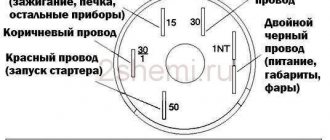
1-reserve; 2-minus backlight; 3-starter; 4-plus after the ignition switch; 5-reserve; 6-plus backlight; 7-constant plus; 8 is a constant plus.
| 1-5 | On the VAZ 2110 it is used for the immobilizer. You can connect any device you wish. |
| 1-6 | Castle lighting. |
| INT | On the VAZ 2107, these are lighting, wipers, and washer - a constant plus. |
| 50 | Starter. |
| 30/1 | A constant plus. |
| 15 | A plus appears when the ignition switch is turned on. |
Troubleshooting the ignition switch on a VAZ 2110 is carried out in the following steps:
- The battery will be disconnected.
- The casing is removed from the steering wheel shaft column. To do this, unscrew several screws.
- The lock connector is removed from the back.
- Using a multimeter, the voltages in the contact groups are checked. The installed key switches in different positions.
- Voltage on pins 8 and 30 is present only when the key is in zero position.
- In position 1, the servicing devices are turned on: turns, headlights and heated glass.
- In position 2, voltage is supplied to devices related to engine operation.
- In position 3, the starter is activated. The key then returns to its original position.
If there are interruptions during the verification process, then the ignition switch on the VAZ 2110 requires disassembly and repair.
About the ignition switch on the VAZ-2110
This lock has been changed twice already. Auto editions.
The ignition switch is not the most complex unit and consists of a housing, a lock cylinder, a locking device and a contact group.
Any of the structural elements may fail for one reason or another, either from improper operation or due to poor workmanship
Articles
By the way, the most reliable locks are those made in Togliatti with catalog number 21100-3704005-30 (set)
The price of the complete lock with lighting is about 1,100 rubles, which, you see, is not that much, given the importance of the unit. The assembled Dimitrovgrad lock with the same article number DAAZ 2110-3704005-30 will cost a little less. They are asking 800-900 rubles for it.
Lock diagram
The anti-theft properties of a ten-key lock are far from perfect, so the car uses an immobilizer that prevents the engine from starting with a key other than the original one.
There is also an option to bypass the immobilizer lock to install an abnormal alarm. The connection diagram for the ignition switch is practically no different from all VAZ locks. Here she is.
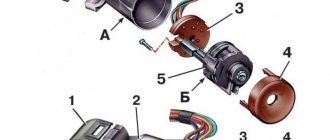
A harness of eight wires comes out of the ignition switch housing, each of which corresponds to its own terminal. This is necessary to know in order to diagnose the contact group and not waste extra time and money on troubleshooting.
- Microswitch terminal that opens power to the circuit when the key is inserted.
- Negative contact of the lock light bulb.
- An important terminal for supplying power to the starter contacts. This contact only closes when the key is turned to the engine start position.
- Supply of general 12 volts to the contacts.
- Microswitch power supply.
- Power (plus) backlight.
- An important contact responsible for supplying 12 Volts from the battery.
- The terminal is usually empty and is intended for connecting additional equipment.
The electrical circuits of the ignition switch can be checked with a multimeter, measuring the resistance between the contacts when switching modes.
Typical breakdowns
Typical ignition switch failures are well known to experienced drivers - failure of the contact group and failure of the return device.
If the ignition key stops returning to its original position, the lock's return spring is most likely broken.
The last trouble is quite serious, since after starting the engine the key must return to the second position. If it does not return, power continues to be supplied to the starter while the engine is running.
- At best, this may result in the Bendix contacts burning out and breaking.
- If you're less lucky, you'll have to replace the starter completely.
This is why it is so important to identify the fault in time and replace the lock, preferably as an assembly.
Choosing a new lock
It’s not enough to know how to change the ignition switch on a VAZ 2110 with your own hands; you also need to make the right choice of a new product. Existing fake options that do not survive for a long time.
During the selection process, attention is paid to the following criteria:
- impossibility of tearing off the characteristic holographic sticker;
- the correct shape of the casting of the body;
- the key must enter without visible resistance;
- high density packaging;
- the protruding tongue is distinguished by a light shade.
Existing articles of ignition switches for the VAZ 2110, which are distinguished by their reliability, for example: lock VAZ 2110-3704005-30.
Repair of ignition switch VAZ 2110
Repairing a lock depends on what exactly needs to be fixed and is divided into:
- Replacing contacts. To do this, you need to disconnect the plug from the lamp, bend the three latches and remove the cover. After inspecting the light guide plate and eliminating defects on it, such as black deposits, there are no results, then the plate needs to be replaced. Do the same procedure with the remaining plates.
- Prevention for contacts. To do this, you need to treat it once every six months with special products such as WD-40 or graphite lubricant. It's not worth saving on them.
- The microswitch has failed. You need to unscrew the screws and remove the rod, and then press the lock. Insert a new one and put everything back together.
But it’s worth noting that repairing the ignition switch yourself is not safe. If possible, it is better to contact highly qualified car service technicians.
The result of the work done
From all of the above, we can conclude that all these operations are quite simple and, with a minimum amount of tools, anyone who knows how to use a screwdriver and wrenches can do this. And if you do everything yourself, you can save time and money on a trip to the service center.
Our VAZ-2112 is unlikely to have any value if it is impossible to move it. Moreover, for such a banal reason as a malfunction of the ignition switch. An essentially trivial breakdown can lead to loss of time, and sometimes even to the loss of the car itself if the ignition switch is faulty.
What if the spark is lost?
If the engine does not start, but sounds are made indicating that the fuel pump is working, you should pay attention to the operation of the ignition. First of all, you should check whether the spark has disappeared on the wires with high resistance
To do this, it is necessary to use a spark gap, as well as a Hall sensor, which checks the presence of a magnetic field.
Hall sensor The possibility of breaking high resistance wires is not worth it either. To do this, you can use a Hall sensor, which helps measure the current in conductors, as well as their resistance
To check the operation of the ignition coils, you should pay attention to whether there are any error codes on the controller. If there is no spark after replacing the coil, then the controller is faulty
Checking for a spark
This method is most suitable for testing the module in “field” conditions. However, it requires having at least one new spark plug on hand in your car's inventory:
- One by one, remove the spark plug caps from the cylinder head cover, insert a new spark plug, which we ground to ground or to the body
- We rotate the starter, if there is no spark, then the problem does not lie in the spark plugs, and we should continue to study the ignition system
- Let's try to replace the armor wire on the cap on which there is a lack of spark.
- All wires are numbered on the module cover, so remove the wire from the non-working contact and put it on the working one (let's swap them)
- Thus, we will check the condition of the connecting contacts themselves and the integrity of the core
- If a spark appears after changing a non-working wire to a working one, then the problem was in the wire
- If the problem remains, it means that for the VAZ 2110, repair of the ignition module is inevitable, or replacement if repair is impossible
- If there is a complete absence of spark on all spark plugs, it means failure of the module or its high-voltage coil
- In cars with fuel injection, the electronic system that controls the ignition and fuel distribution may be damaged, signs of such a failure as if the ignition module breaks down
- To repair the module you will need a screwdriver, a soldering iron and spare parts, if you have nowhere to rush, then you can sit at home and calmly disassemble it and re-solder it, after watching a video on this issue
- It is often much faster to replace the ignition module or high-voltage armor wires with similar ones purchased or temporarily removed from a car of the same brand
- Replacement does not take long, the module can be removed easier than a distributor, the cylinder numbers are always marked on it
- This operation allows you to determine general faults of the entire system without unnecessary effort in some cases
That's all, we wish you success in self-repair and troubleshooting.
Replacing the ignition switch on a VAZ-2110, 2111, 2112
- If the key is lost or the lock fails, the engine cannot be started.
- In addition, the lock also blocks the steering column, and if your car breaks down far from a service center or a car store, and you have no one to ask for help, the car can only be taken away by a tow truck.
- But if you have the opportunity to buy a lock and have a minimum number of tools, you can replace it yourself.
Malfunctions of the ignition switch VAZ 2110
Malfunctions of the ignition switch of the VAZ 2110 and its family are as follows:
- Mechanical destruction - failure of the lock cylinder, steering column locking mechanism, deformation of the key, jamming of the lock in the on position (the engine is running, the car does not stall when you turn the key);
- Electrical circuit failure is excessive wear of the lock contacts and, as a consequence, failure of its electrical part.
Replacing the ignition switch on a VAZ 2110 car
All cars of the VAZ 2110 family have the same ignition switch. It changes in the same way. To remove and install it you will need the following tool:
- crosshead screwdriver;
- pliers;
- thin, sharp chisel;
- hammer;
- key to 10.
The procedure for removing the lock is as follows:
Remove the plastic steering column casings by first unscrewing their fastening screws (they are located below, on the side of the lower casing);
Remove the left steering column switch (turn indicators);
Disconnect the ignition switch connector;
Using a chisel and hammer, unscrew the bolts holding the lock on the steering column; to do this, it is necessary to place the sharp edge of the chisel on the head of the bolt at such an angle that when it is hit with a hammer, it turns the bolt counterclockwise;
After breaking the tightening, completely unscrew the bolts with your fingers or pliers.
So, you have the old lock in your hands, you can install a new one.
Installation is carried out in the reverse order, but with one feature: the new bolts are supplied complete with a lock with tear-off caps, this is a kind of alternative to a torque wrench.
The manufacturer recommends tightening the new bolt until its head comes off. This tightening is considered quite strong.
Replacing door and trunk cylinders
To replace the door cylinder, you must remove the interior door panel. It is held on by two screws and pistons located around its perimeter.
Procedure for removing the casing:
Unscrew the “soldier” of the lock from the interior.
Remove the decorative trim of the door open/close handle block from the inside.
Unscrew the screws hidden under it. After releasing the handle, remove it from the rod.
- Unscrew the screws of the decorative speaker trim and remove it.
- Use a flat-head screwdriver to pry the lock of the window lifter handle and remove it.
- Use a special plastic mounting spatula, or something similar, to carefully remove the panel pistons from the door.
It is recommended to pre-purchase several pistons, because... they often break.
Replacing lock cylinders
- Once the panel is removed, you can begin replacing the door lock cylinder.
- It is necessary to disconnect the rod going from the cylinder to the lock by prying it with a screwdriver from the drive side of the cylinder.
- Next, use pliers or a screwdriver to pry the cylinder lock and remove it from the door, then insert a new cylinder and assemble everything in the reverse order.
- All that remains is to pull out the larva.
- Replacing the trunk lock cylinder is somewhat simpler.
- To do this, remove the trunk lid trim, after which full access to the entire lock mechanism opens.
- We unscrew the bolt securing the button with the cylinder to the trunk lid, and remove the mechanism assembly, disconnecting it from the rod going to the lock itself, and replace it with a new one.
- We install and assemble the trunk lid in the reverse order.
The result of the work done
From all of the above, we can conclude that all these operations are quite simple and, with a minimum amount of tools, anyone who knows how to use a screwdriver and wrenches can do this. And if you do everything yourself, you can save time and money on a trip to the service center.
Diagnostic measures
Checking the condition of electrical components and mechanisms can be effective only after disassembling the decor that hides the insides. Plastic elements are located around the steering column, capturing parts and components partially located on it.
After opening access to the electrical part, you will need an ohmmeter to test the operation of the unit and the absence of failures when supplying current from the battery. Checks are carried out in different key positions. This is due to the fact that for each position certain contact closures are provided.
It is important to know that the resistance at the contacts of a working system must be zero.
The driver can start the car independently even if the lock is faulty. A similar situation happens on the road, when it is still far from the garage or the nearest car service station. The launch method is described in the presented video.
Motorists need to know exactly the basic steps of all operations. We carry out dismantling work according to the following scheme:
- First, we de-energize the on-board electrical network. To do this, simply disconnect the negative terminal from the battery. At the next stage, you will need to fold down the steering column switches, which poses some difficulties. The lock mounting bolts are structurally protected by car manufacturing engineers to minimize the possibility of theft. To screw them together you will have to use a chisel and a hammer. This is inconvenient in limited cabin space conditions. We turn the heads with a chisel, and carry out further screwing with pliers.
- The removed assembly will show obvious damage or defects. The backlight often burns out. We tilt it away from the connector and remove it from the socket. We insert the new one into the vacated slot.
- When the functionality of a unit is lost due to poor performance of its duties by the contact group, we repair it, for example, soldering contacts or completely replacing the unit. It is necessary to decide what to do based on economic feasibility, because the group is not so expensive that much attention should be paid to it. If you need to replace it, just use a flat-head screwdriver to press the lock to release the part for repair or replacement. Assembly or installation is carried out in the reverse order, using the latch.
- When replacing the key controller switch, you will need a Phillips head screwdriver, with which we unscrew three bolts. Next, remove the axial rod and hold the latch. This will allow you to release the switch and install a new one in its place.
- Installation operations must be carried out sequentially, returning each part to its place. Before starting work, you must insert the key into the well and turn it to the first position. This will unlock the steering wheel rotation and remove the mechanical anti-theft protection. The special pin will come out of its holding position. Only after it is completely hidden in the nest will it be possible to begin work.
After completing the work, we recommend testing for blocking. Only when performing the algorithm is it worth covering the steering wheel axis with plastic decor.
The VAZ 2110 ignition switch cannot be called a reliable part, especially when you compare its service life with the same devices on cars of foreign origin. Therefore, owners of the tenth - twelfth model, who use the car for a long time, sooner or later encounter problems with the lock and its repair. On the other hand, the element can be easily removed from the car and every skilled motorist can replace it. But first you should figure out whether the entire part needs to be replaced, since in most cases it can be repaired.
Instructions for removing the element
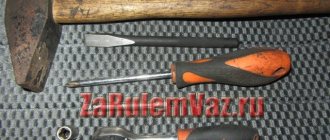
For disassembly you need to prepare a simple set of tools:
- 10 mm head and ratchet drive;
- Phillips screwdriver;
- narrow chisel (width 5-8 mm);
- hammer;
- round nose pliers with tapered, curved ends.
Ignition switch replacement tool
To successfully install a new or repaired lock in place, it is advisable to purchase 4 special fastening bolts with M6 threads with a head size of 10 mm and a length of 20 mm. Their feature is the heads that come off with a key at a certain tightening torque. After tearing off the heads, semicircular caps remain on the surface, which are much more difficult to unscrew for an untrained person. But you will have to do this during disassembly.
The battery must be disconnected before starting work.
Like any event related to tampering with the electrical part of the car, dismantling the ignition switch begins with disconnecting the negative terminal of the battery. Then proceed in this order:
- Using a Phillips screwdriver, remove the screws holding the two halves of the plastic frame of the steering column together.
- Lower the handle that fixes the position of the steering wheel during adjustment all the way down and remove the plastic panels. Disconnect the ignition switch block and carefully cut the tape connecting your bundle of wires to the common harness. In order not to cling to the steering column switch during operation, it can also be pulled out of the connector.
- On the metal casing of the steering column you will see a lock mount consisting of two clamps. They are held together by 4 bolts with the heads torn off (visible on the left side). Pointing the chisel at the semicircular caps, use a hammer to loosen the tightening of these bolts one by one.
- Using pliers and then your hands, unscrew all 4 bolts and remove the ignition switch.
Unscrewing the plastic steering column cover
Bolts with intact heads can be unscrewed with a wrench
At the stage of disconnecting the connectors, it becomes possible to check the functionality of the contact group by measuring resistance, as described in the previous section. If you remove the lock due to the loss of the keys and want to move on, then after dismantling you need to do the following:
- On the “mother” block, which remains hanging after the lock is turned off, find contacts with thick wires of purple and blue color (the latter with a black stripe).
- Connect these terminals with any conductor, after which the ignition will turn on.
- The thick red wire leads to the starter. To start, its contact must be temporarily connected to the installed jumper. When the engine starts, the red wire must be disconnected.
This is how jumpers are inserted into the block to start the engine without a key.
After unscrewing the fasteners and disconnecting the wires, the lock can be easily removed from the car
Assembly is carried out in the reverse order, but taking into account the following precautions:
- do not tighten the fastening bolts until you have accurately aligned the position of the lock on the casing so that the facing plastic panel fits smoothly into place;
- before final tightening the bolts, make sure that the lock snaps into place when turning the steering wheel, otherwise adjust the position of the lock;
- The tightening torque should be such that the heads of the new bolts come off and the round heads remain.
When installing and tightening the bolts, their heads should come off
If you think that special fasteners are not an obstacle for car thieves, then you can screw in regular bolts with M6 threads and carefully tighten them.
Diagnostics and repair
If the ignition switch is broken and the key does not turn, you can try to repair the unit without replacing it. Of course, if this is possible (the author of the video is the Auto Electrician HF channel).
Solving the problem without replacement
First of all, you should diagnose the condition of the node; for this you will need a multimeter. Removing the ignition switch is an individual procedure for each car. Before removing the ignition switch, you need to familiarize yourself with the technical features of this unit specifically in your car in order to prevent possible problems during repairs:
- First you need to level the steering wheel and disconnect the battery, while the key in the 3Z is turned to position 0.
- Under the steering wheel there are several bolts that secure the decorative trim of the steering column.
- Next, the 3Z fixing bolts are unscrewed, after which the key should remain in the installed position. Depending on the vehicle, there may be more fixing bolts, and the overall fastening system may be different. In any case, you need to dismantle the 3Z and disconnect all wires from it. When disconnecting wires, they must be marked so that later during installation there will be no installation problems.
- After this, when the wire blocks are disconnected, using a tester, you will need to diagnose the serviceability of the terminals in the block.
- As for repairs, after completing the steps, the ignition switch is disassembled. A device can break down for various reasons, but troubleshooting is always the same. To replace failed elements, the structure must be disassembled; to do this, one of the component parts of the housing is disconnected. By doing this, you will be able to see the failed system components and repair or replace them. When assembling, we must not forget about lubrication - all moving components of the system must be lubricated.
1. Disconnect the wires from the device.
2. Unscrew the screws and dismantle it.
Replacement
Replacing the ignition switch is carried out in the same way - first the unit is removed, then a new one is installed.
How to change the ignition switch yourself:
- After dismantling, a new device must be installed in place of the old one. If you have marked the wiring, then there will be no problems during installation.
- There should be markings on the terminal harness so that you can connect the block correctly even if you have not marked it.
- Once all the cables are connected to the appropriate connectors, the 3Z can be installed in place. In general, there is nothing complicated in installation - you simply repeat all the steps you did during removal, only in reverse order. The ZZ is mounted in the installation location until it stops until a characteristic click is heard, after which the fixing bolts can be tightened. Next, the decorative steering column trim, consisting of two casings, is put in place. At this point, the repair can be considered complete; all you have to do is check the functionality of the protection device.
As a rule, one key is used for the rear lock, trunk and doors. This is because all locks use the same cylinders. So, if the ignition switch is replaced, then in order for the key to work with the trunk and doors, the cylinders in them will also have to be changed. Therefore, repairing a device is always preferable to replacing it. Accordingly, if you change only the ZZ, then the new key will be able to work in tandem with it, and to open the driver's door and trunk you will have to use the old key.
Why does the ignition switch fail?
Jamming of the device is possible due to wear of the cylinder or due to problems with the contact group. When faced with such a problem, do not use force to turn the key in the desired direction! The steering wheel, if it cannot be unlocked, does not need to be torn. It is better to carefully disassemble the lock and find out what the reason is. But more on that later.
If you notice that the ignition
the car can be turned on with any key or foreign object, hurry to replace the cylinder or the entire device. This will protect your car from possible theft.
If the ignition switch on a VAZ-2114 car works normally, but when it is turned on, the instrument panel does not light up, the starter does not start, and electrical appliances do not work, then most likely the contact group has failed. This problem may occur due to normal wear and tear. Over time, the contacts wear out, causing the circuit to break. It is also possible for them to catch fire due to power surges, constant overloads due to the use of additional electrical appliances and their incorrect connection.
Important: if you want to install additional electrical equipment in your car, connect it to the on-board network only through a relay!
Problems with the ignition module
The ignition module is an electronic analogue of a distributor (see VAZ distributor design: the difference between contact and non-contact ignition systems and ignition timing adjustment) and an ignition coil. A faulty module can fail at the wrong moment, according to the famous law of meanness. Checking it and identifying malfunctions will take no more than an hour, but it will allow you to determine the approach of serious problems in time.
VAZ2110 ignition module
So:
- The main symptom of a module malfunction is the absence of a spark in one or several cylinders at once.
- In this case, the engine stalls or does not start at all.
- The second common phenomenon is a failure in the timing of the ignition cycle, due to which it is impossible to coordinate the interaction of the piston and gas distribution system with the module
- There are several methods for identifying module malfunctions
Repair of ignition switch VAZ 2110
The entire lock as a whole is not very expensive, although most of the breakdowns can be fixed quite easily; to do this you will need to dismantle it, disassemble it and then replace the parts that are faulty.
To replace the contact group of the VAZ 2110 ignition switch, you will first need to release the latches so that some of the parts can be freely removed from the body. After this you can easily install a new group. You will not be able to mix up the sides for installation, because the part simply will not fit on the other side.
Instructions for replacing the contact group:
- First you need to disconnect the plug that goes into the backlight. Using a screwdriver, you need to bend the 3 latches that are fixed by the plastic cover, then you can remove it from the lock.
- To gain access to the contact group, you need to bend 2 more latches.
- Then you need to inspect the light guide plate and check if there is a black coating and other deposits. If you find any, you can remove these defects with fine sandpaper. If after this there is no result, then you can replace it.
- Under the light guide plate there are 3 more plates, which are also prone to oxidation, as a result of which the contact group may malfunction. They can also be cleaned with sandpaper.
If you just want to do preventive maintenance for the contact group, then once every six months it is enough to lubricate the contacts with penetrating or graphite lubricant, which would effectively counteract oxide. Choosing a lubricant is a very serious and complex procedure. When buying, you should not take the cheapest one. I would like to note that there are several types of lubricants: light (not thick) and heavy (thick). Some car enthusiasts use aerosol penetrating lubricant “liquid key” or WD-40.
A replacement of the lock cylinder is carried out only if the car has been stolen or the key simply does not turn well in the lock. To change it, you will have to remove the protective plate from the outside of the part using a special slotted screwdriver. After dismantling, all you have to do is install a new part and periodically lubricate it with lubricant to extend the service life of the part (it is recommended to lubricate 2 times a year, before and after the autumn-winter season).
If the microswitch is broken, then you need to unscrew the screws from the housing, remove the rod and press the lock. After this, the switch can be easily removed and a new one installed in its place. Everything is put back into place, respectively, in the reverse order.
The backlight lamp is generally the easiest to replace; to do this, you need to remove the power connector, then you can carefully remove it using pliers.
To replace the ignition switch, you need to know some nuances.
Professional advice
Such advice is as follows:
- Even having an understanding of the rules for replacing larvae and contact groups, it is better to refrain from this work. The repair process is complex and time-consuming. If you have an idea of how to change the ignition switch on a VAZ 2110, then it is better to replace the entire assembly.
- Graphite grease is used as a lubricant for the cylinder. It reduces the risk of biting the part.
- Even knowing how to change the ignition switch on a VAZ 2110, as well as how to change the door lock on a VAZ 2110, in the process of work you should give preference to branded products.
The procedure for replacing the ignition switch on a VAZ 2110 is a simple type of repair work. Even a beginner will not experience big problems. The main thing is to have the necessary equipment and tools on hand, and also to read the instructions well.
Installation of a new larva
To replace the lock core due to mechanical failure, remove it from the vehicle as described above. Then follow this algorithm:
- Insert the key into the slot and use a Phillips screwdriver to unscrew the 3 screws holding the 2 halves of the lock body together.
- Separate the housing while holding it with the key facing up. If you hold the lock in a different position during disassembly and do not insert the key, the insides will spill out and you will not understand how to put them back together. In this case, the ball with springs may get lost.
- Remove the locking mechanism, which consists of two spring-loaded parts, and pull out the spring itself.
- After removing the key, carefully remove the core so that the ball with the spring (located on the side of the cylinder) is not lost.
To disassemble the body, you need to unscrew 3 screws.
Before replacing, you need to remove the return spring from the old cylinder, since it is not sold complete with the new core. The spring is inside the part on the back side in a cocked state; it must be installed in the same form on the new cylinder. Also, do not forget to remove the thin spring from the hole where the ball is inserted.
The locking mechanism tongue peeks out from the bottom of the case
The larva must be pulled out so as not to lose the details
When installing the core, you need to move the spring for the ball into the hole and insert the part into the body. Then push the larva all the way, while simultaneously inserting the ball into the socket. After that, all that remains is to assemble the locking mechanism and tighten the housing with screws. When finished, check the operation of the ignition switch by turning the key to different positions.
The ejection spring from the old core needs to be moved to the new one
The engine won't start?
If, as a result of the check, it became clear that the spark hits the spark plugs, but the VAZ 2110 injector engine still does not start, then it is also necessary to diagnose it. The faults that cause this problem can be serious or not very serious.
At the same time, it is sometimes possible to cope with their solution without anyone’s help:
- It is necessary to purchase a spark gap and a Hall Sensor, which is inexpensive, but has an irreplaceable purpose. With their help, you can find out about the presence of a spark in the candles;
- Check the spark plugs to see if they are OK. A spark gap can be used for this purpose. However, you need to remember that the controller will be broken if candles are placed on its body;
- Perform fuel pump diagnostics. When you try to start a VAZ 2110 car, a characteristic sound will appear from under the rear seat. If there is no sound, then you need to check the fuses and the main relay. In a VAZ 2110 car they are located behind the side cover of the driver's seat.
If, after diagnostics, problems were identified with one of these elements, then you can fix them yourself. Usually the spark plugs begin to work after proper wiping, although this does not always happen, so they have to be replaced.
Basic principles
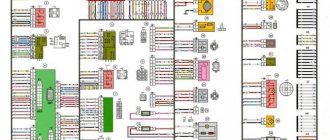
Regardless of the type of engine used, the basis of the wiring used in the VAZ 2110 car is the same. It's easy to find a diagram, but not so easy to understand.
Let's look at the basic principles of wiring.
- All equipment and devices powered by electricity in the VAZ 2110 are based on a single-wire connection. VAZ designers specially provided for wires of certain colors to each be responsible for their own functions. Therefore, certain equipment is connected using wires of their own color. This allows you to independently understand the wiring, make it easier to carry out repair work and not spend money on car repair services.
- The downside to the VAZ 2110 is that the mass is the car body itself.
- The positive wire of the batteries on the top ten always comes only in red. Therefore, when making repairs, try not to change the color of the wire, so as not to confuse yourself.
- For each system that is connected to the electrical system, it is equipped with its own separate wiring harness.
- The VAZ 2110 is designed in such a way that when the battery is turned on, all electrics and electrical equipment are energized. This is related to the most common recommendation, which you have seen more than once in our materials, where we described the repair or replacement of certain components - disconnecting the negative terminal from the battery.
- Do not forget about the existence of the so-called contactless system. This system is required to create a high-quality spark, which is simply necessary to ensure combustion of the air-fuel mixture. In order for a contactless system to function, high voltages are indispensable.
Carburetor models
The first versions of the VAZ 2110 model, which the domestic plant began to produce, were equipped exclusively with carburetor engines. Only after some time more modern injection versions appeared. They are objectively better. But this does not take away the fact that many have dozens of them under the hood with a carburetor.
Are there any significant differences in terms of electrical circuitry between a carburetor and an injector? We can say no. The carburetor systems used are almost entirely the same as on the more modern version.
Part of interior wiring
Also, you will not encounter serious problems in the form of electrical wiring if you suddenly want to replace a carburetor engine with an injection engine or equip the car with additional electrical equipment. You will even find identical plugs in the engine compartment.
The only nuance of switching from a carurator to an injector is the need to install additional wiring from the fuel pump to the on-board computer.
Injector
In addition to the wiring, which is identical for the carburetor and injector, the latter is additionally equipped with fuses and sensors.
In practice, due to the large number of regulators that ensure the operation of an electronic engine control unit of an injection type with 8 or 16 valves (there is none on the carburetor), the system turns out to be more complex. To repair it, you need to carefully understand all the components and their location.
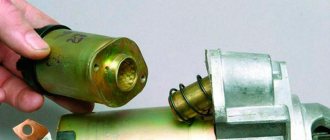
Starter malfunctions and reasons for their occurrence
The unit does not spin the flywheel due to many factors. Below we will discuss defects in the immobilizer, pull-out relay, injector, as well as in the car wiring. Sometimes repairs are not enough, in which case the device needs to be replaced.
Faulty injector
The standard version of the VAZ 2110 is not equipped with injectors, but they can be supplied separately. Drivers choose these devices for many reasons: reduced fuel consumption, no need to warm up the engine in cold weather, increased power characteristics.
The arrow points to the starter relay
If the starter is not working well, then you need to check the injector, which may be acting up due to bad gasoline. This is the only drawback of the injector - it requires high-quality fuel. It is also worth checking whether the connection diagram is followed.
Overrunning clutch failure
If the overrunning clutch breaks, the engine starts and runs perfectly. But when the car stops, the engine cannot be restarted; it clicks but does not start. In this case, you need to wait until the power plant has cooled down, and only then try to start it.
Also in this case, it is worth inspecting the wiring that comes from the coupling. Sometimes replacing damaged wires can solve a problem where the engine clicks but won't start. Another sign of a faulty clutch is the radio turning on spontaneously.
Solenoid relay
Once behind the wheel, the driver inserts the key and turns it, the fuel pump starts working, the dashboard lights up, but when turning further, the pump and the panel turn off, and the starter does not turn. In such a situation, the solenoid relay is most likely to blame.
Removing the solenoid relay
First of all, you need to check whether there is voltage going to it. If it does, then it’s worth checking the lock itself or the alarm system, which may close the circuit. If all the elements work separately and do not start together, then the starter does not turn due to the solenoid relay.
Poor contact
In this case, the starter starts after several attempts, but it still clicks. This problem occurs due to damaged contacts. The inspection should begin with the battery. If the terminals are oxidized, you need to clean them.
If this does not help, then you should check the starter contacts, because when they are oxidized, the device turns poorly or does not start the crankshaft at all. If the starter refuses to work, but the immobilizer is running, then there is a malfunction in it. Here you won’t be able to remove the defect yourself - you need to go to a car service center. Now readers know how much it costs and why the starter does not work; it is worth doing the work yourself only if you have experience working with wiring.
Replacing the ignition switch on a VAZ-2112
Replacing the entire assembly will take at most an hour and a half, and the price of a new ignition switch on a VAZ-2112 is within 1,000 rubles.
Sometimes you can save money and change only the contact group. Then replacing it yourself and purchasing a separate contact group will cost three hundred rubles at most.
Removal
We can talk about the reasons for the lock breakdown and possible malfunctions for a long time, but if the task is to remove the lock, then this can be done in half an hour if you follow a fairly simple algorithm of actions, but first you should listen to simple advice:
Any work with electricity requires disconnecting the battery. The first safety rule is to remove the negative terminal from the battery or turn off the ground switch, if there is one.
Only after this can you start working. And yet, it wouldn’t hurt to organize decent lighting. Working in the area of the steering column is always associated with cramped conditions and lack of light. By spending a few minutes organizing good lighting, we will save a lot of time and nerves during work.
In addition to the standard set of keys and screwdrivers, a hammer and chisel will be useful. It’s better to find two hammers to compensate for the impact force, but for now we remove the lock in this order:
- To access the ignition switch, it will be necessary to remove the decorative plastic casing, and it is more convenient to do this with the steering column lowered all the way. The adjustment mechanism lever is located directly under the steering wheel.
- Now you can remove the casing, and for this you need a Phillips screwdriver. We unscrew all the screws and carefully remove the plastic casing.
- After removing the casing, access to the wiring becomes available. First of all, you need to disconnect the contact block of the ignition switch contact group.
- To protect against theft, the lock body itself is attached to the steering shaft with a steel clamp. During installation, as a rule, the bolts break off, so it is impossible to unscrew them humanly. This is why we need a hammer and chisel. The lock is fastened not with bolts, but with studs. Most likely this was done for anti-theft purposes. And, if your new lock is equipped with bolts, then do not be alarmed, modern car thieves simply turn the cylinder.
- Now you will have to hit the bolt heads with a sharp chisel, and you need to strike in a counterclockwise direction. It is better if at this moment an assistant supports the second hammer on the opposite side of the steering shaft. In this way, it will be possible to avoid unnecessary vibrations and unnecessary unnecessary load on the steering column.
- After several blows with a chisel, the bolts should give way and begin to unscrew. Now they can be picked up with pliers, round nose pliers or a similar tool.
- Once the bolts are removed, the ignition switch assembly can be removed from the steering column for repair, diagnosis, or complete replacement.
Installing a new ignition switch
Regardless of whether we install a new lock or a repaired old one, we will have to buy four tricky bolts with heads that break off.
Of course, you can install simple bolts, but this way we will make life much easier for the thief if he sets his sights on our car. If we install the correct disposable bolts, then it will not be possible to unscrew the lock just like that, remember how much noise we made while knocking out the bolts.
Otherwise, the process of installing a new ignition switch on VAZ cars of the tenth family is quite simple:
- We install the lock body with the contact group assembly on the steering shaft and press it with a bar. We tighten the bolts.
- Use a spanner wrench or a socket wrench to tighten the bolts until they stop.
- Before breaking off the heads, it is necessary to adjust the position of the steering wheel so that the steering shaft is fixed in the position of the key in the lock against the “I” mark. If this does not happen, the steering wheel rotates freely and the shaft is not blocked, it is necessary to set the lock so that the latch fits into the groove on the shaft.
- After final fastening to the shaft, the heads should break off. At the very least, this is what needs to be achieved from them.
- Once again we check the functionality of the locking mechanism, connect the terminal block, connect the negative terminal of the battery and check the functionality of the ignition switch assembly. If everything is in order, you can install the decorative casing.
Do we replace the entire lock, or just the contact group?
The issue is purely economic in nature. It is clear that replacing the complete lock will cost three times more, so before replacing the ignition switch completely, it is worth understanding the causes of the malfunction. It is possible that it will be enough to simply replace the contact group if everything is in order with the cylinder and the mechanical part of the lock.
Appearance of the contact group
Ideally, it is better to replace oxidized, and even more so burnt, contacts, however, they can simply be cleaned with very fine sandpaper. Diagnostics of the contact group is carried out using a multimeter in ohmmeter mode. Each pair of contacts on the terminal block is checked using the probes of a multimeter - we turn the key in the ignition switch and test each pair of contacts on the terminal block for a short circuit; if the multimeter shows zero resistance, everything is in order with the contacts.
We check each pair of contacts on the terminal block
There may be problems with the mechanical part of the lock, and in this case, experts do not recommend changing the cylinder yourself - firstly, it is quite difficult to find it on sale, and secondly, replacing the cylinder may be carried out incorrectly and, as a result, the entire lock will not work incorrect. In this case, it is more rational to buy a complete lock and replace it completely. It's more reliable and safer. Good luck to everyone and good travels!
Source
Replacement
To remove the ignition switch you will need the following tools:
- Phillips and slotted screwdriver;
- Chisel. You will need something thin and sharp;
- Hammer;
- Pliers;
- Key for 10.
This is quite enough. Sometimes, something else may be required. But this is quite rare.
Before work, remove the terminal from the battery. This will avoid short circuit. After which you can begin dismantling work:
- Remove the steering wheel covers. The manufacturer also recommends removing the steering wheel. This is not required, but is advisable;
- The steering column turn switch is removed. To do this, the latches securing it are released and the switch is removed from the column;
- Disconnect the wiring block;
- The bolts holding the lock to the steering column are quite tricky. Their caps break off when twisted. Therefore, it will not be possible to unscrew this fastener with a regular key. To do this, take a chisel and set it at a certain angle. Then, with gentle blows, we tear the bolt out of place, and then you can unscrew it using pliers. The same applies to other bolts, there are 4 in total;
- After this, you can remove the old lock;
- When installing the lock, please note that bolts are supplied with it. According to the manufacturer's idea, their heads break off when tightened to a certain point. Instead, you can use M6 bolts of suitable length. This work has no other special features.
Tools you will need for your work
To perform the work you may need the following tools:
- chisel;
- hammer
- socket wrench 10;
- a set of standard screwdrivers and wrenches;
- pliers or round nose pliers;
- sandpaper.
An experienced master will spend about an hour on the job, a beginner will have to tinker twice as long. But this is a completely justified time investment, since it allows you to save money - as of January 10, 2019, the average price for replacing the ignition switch of VAZ 2112, 2110 and 2111 in car services costs 800 rubles. In addition, the car owner will be charged another 500 rubles for adjusting the system. While the complete unit itself costs about 1 thousand rubles. Replacing a contact group will cost the car owner about the same money, when the element itself costs an average of 300 rubles.
How does the ignition switch of a VAZ 2110 work?
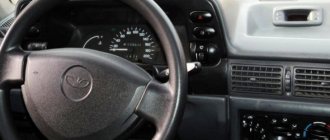
The lock is located on the left of the steering column. The lock body is hidden by a plastic casing, only the key slot is visible, and the wires are located at the bottom.
When the key is turned, the contact disk also turns, which activates the electrical circuits.
The ignition switches have the following positions:
- "Switched off". Marking "0".
- "Ignition". Marking "I".
- "Starter". Marking "II".
- "Blocking". Marking "III"
The key must be inserted and removed from the “I” or “III” position.
From the “Blocked” state to the “Off” marking, the electric field is short-circuited in the structure of the machine (additional devices, light, stove)
The “Starter” position is self-starting and the engine is brought into working condition. When the engine starts, you need to switch to the “Ignition” marking.
To turn off the engine, you need to turn the key to the left, marked “Off”.
analysis of the ignition switch VAZ 2110
There is a misconception among most car owners that the main thing in a car is the engine, transmission, and chassis. Someone will ask, why is it wrong? It is necessary to consider the machine as a single, whole organism. And all components and assemblies are exclusively components.
For example, a breakdown of the starting system will lead to the fact that the vehicle will stop and will not be able to continue moving. Requires prompt repair. How well the example was chosen is the topic of today’s article. However, whether or not the reader agrees with my statement is up to him to decide individually.
Board layout and layout
For the entire Lada line, the lock is located on the right side of the steering wheel, sewn into a plastic box, presented in the form of a complete block made of duralumin alloy. On the back side there is a board with contact connectors (8 in total). The contact group of wires has strictly its purpose, the diagram (pinout) is as follows:
- Key microswitch;
- Voltage directly from the battery;
- Reserve socket for connecting other devices at the driver’s discretion.
Despite the fact that old and new locks are sold, with and without backlighting, the structure of the core and contact board is absolutely identical. When the wire connection diagram does not match, carefully refer to the operating instructions.
Symptoms of a problem
- After starting the engine, the car key does not return to position “II”. This indicates that the ignition switch cylinder is already very worn, the return spring is weak, and the resistance has decreased. At this moment, the starter and motor work simultaneously, which is detrimental to both components of the car. Systematic such “starts” will lead to the fact that the owner will have to buy new “brushes” for the starter, worse when the starter is entirely. And this is not a cheap pleasure. The spring cannot be repaired, so purchasing a new one is required.
- Mechanical damage due to an attempt to steal a vehicle by intruders;
- The entire system does not work: due to careless handling by the driver himself. It's no secret that each of us has our own manners and driving style. Some treat their “favorites” with care, others change them like gloves.
Solutions
Drivers without experience, as practice shows, at the first breakdown, run to service stations or car markets to buy a new ignition switch, giving away their hard-earned money. My advice is, don't rush to do this. Perhaps the reason is completely trivial, not worth such waste. Do-it-yourself replacement will take no more than 5 minutes. If you are not sure, contact a highly qualified electrician at a service station to carry out diagnostics and identify the fault. Having the skills, disassemble the lock and repair the damage. The lock from Priora is similar in design to the younger and older models, for example, the VAZ 2107, and the VAZ 2114 has a similar structure.
Board layout and layout
For the entire Lada line, the lock is located on the right side of the steering wheel, sewn into a plastic box, presented in the form of a complete block made of duralumin alloy. On the back side there is a board with contact connectors (8 in total). The contact group of wires has strictly its purpose, the diagram (pinout) is as follows:
- Key microswitch;
- Driver's door weight;
- Circuit for starter to supply “plus”;
- 12 W. for supply to the starting system;
- Zero on the key when it is in the keyhole;
- Illuminated lock slot;
- Voltage directly from the battery;
- Reserve socket for connecting other devices at the driver’s discretion.