Many car owners of the well-known “ten” are plagued by problems with the ignition switch. At the same time, inexperienced car enthusiasts immediately go to buy a new one.
However, you should not rush to do this, because sometimes malfunctions can be eliminated. Moreover, the reasons can be so simple that it is permissible to correct them yourself, without resorting to the help of specialists. Therefore, we decided to prepare for you a comprehensive guide to troubleshooting, as well as repairing and replacing the ignition switch on a VAZ 2110.
It’s worth noting right away that to identify faults, you need to use one important device called a multimeter. It can be very helpful in diagnosing ignition switch problems.
How does the ignition switch work?
Locks, whether they have a key or not, are made up of two parts:
Diagram of the VAZ 2110 ignition switch: 1-Bracket, 2-Housing, 3-Contact part, 4-Facing, 5-Lock, A - hole for the fixing pin, B - fixing pin.
• Larva . Only the original key is suitable. With the help of a cylindrical lock, two problems are solved - jamming of the steering wheel and turning of the contact unit. Jamming is done using a lever pin. When the key is turned in the socket, it falls into a groove located in the steering column.
• The contact unit is connected to the lock with a special lead. It is located in a cylindrical spiral, one side is soldered to the lock, and the other to the cylinder. Due to the spring, the lock automatically returns after the motor starts running.
Necessary tool
The first thing you need to do is turn off the negative voltage on the battery, and then remove the steering column cover. To make it easier to replace the cylinder, you need to completely remove the ignition switch. After this, replace the cylinder and install the lock in place.
Replacing the ignition switch contact group is perhaps the most profitable from a financial point of view. The disassembly sequence is not similar to the previous one, remove the casing and dismantle the lock. When disconnecting a contact group, I recommend marking all the wires being removed in order to avoid getting them mixed up; upon completion of the repair, this will save you from unnecessary headaches. By the way, some models have a locking ring, which requires an awl to remove; after replacing the contact group, do not forget to install the locking ring back.
Replacing the ignition switch on a VAZ 2110 is not the most difficult procedure, although, like many others, it is not without its own characteristics and nuances, without knowing which you can suffer quite a lot. Replacing the ignition switch on a VAZ 2110 should be done as follows:
- It is imperative to use special bolts with tear-off heads; some recommend replacing them with regular twenty-millimeter M6 ones, but remember that in this way you are reducing the level of anti-theft protection of your car with your own hands;
- To loosen the bolts, you must use a chisel, but be careful not to accidentally cut the bolt head;
- Before installing a new ignition switch, you must insert the key into it and set it to position “I”. Crankshaft oil seal for VAZ 2110. Do-it-yourself replacement of the ignition switch for Ford Focus 2 with photo. VAZ 2110 8 valves oil seal replacement. This must be done so that the latch, which blocks the steering shaft mechanism, enters the lock body.
- Now you can install the ignition switch with mounting bracket on the steering column and tighten the new mounting bolts.
- After removing the key from the ignition switch, it is necessary to check the functioning of the steering shaft locking mechanism. If the shaft is not locked through a full rotation of the steering wheel, it is necessary to adjust the position of the ignition switch on the steering column so that the lock latch fits into the groove on the steering shaft.
- When the adjustment has been made and the locking mechanism has been checked, using a 10 mm spanner, slowly tighten the bolts until their heads come off.
How does the ignition switch of a VAZ 2110 work?
The lock is located on the left of the steering column. The lock body is hidden by a plastic casing, only the key slot is visible, and the wires are located at the bottom.
When the key is turned, the contact disk also turns, which activates the electrical circuits.
The ignition switches have the following positions:
- "Switched off". Marking "0".
- "Ignition". Marking "I".
- "Starter". Marking "II".
- "Blocking". Marking "III"
The key must be inserted and removed from the “I” or “III” position.
From the “Blocked” state to the “Off” marking, the electric field is short-circuited in the structure of the machine (additional devices, light, stove)
The “Starter” position is self-starting and the engine is brought into working condition. When the engine starts, you need to switch to the “Ignition” marking.
To turn off the engine, you need to turn the key to the left, marked “Off”.
Key position
- The main position is “0” when the system is completely de-energized;
- O will indicate that the system is active and turned on. It is possible to turn on the dimensions, headlights, direction indicators, windshield wipers, the informative instrument panel lights up, the stove heater is activated, the heated filaments of the rear window of the car glow, a lamp on the console shows the status of the units;
- Key on: the car's power unit is started. But to start the engine itself, moving the key to position “II” is not enough. You need to turn it a little further until it stops. Voltage will be supplied to the car starter, which will start the engine. After a successful start, the key will return to position “II”, the starter will turn off, and the internal combustion engine will continue to operate. Sometimes the engine does not start the first time.
Rules for operating the ignition switch VAZ 2110
By adhering to the operating rules, problems such as repairing the ignition switch 2110 do not arise, and the car itself will last for quite a long time.
Experienced auto mechanics have identified several mandatory points for proper operation of the lock:
- Gradual turn of the key.
- To avoid damage to the starter, do not switch to the “Starter” marking with the engine running.
- To activate a jammed steering wheel, you need to turn the steering wheel to the side as far as it will go without the key being in the socket.
- To avoid rapid battery discharge, do not leave the key in the slot.
Ford Focus wiring diagram - your own auto electrician
Focus block with designation of components Purpose of block parts
The electrical circuit of Ford Focus 1, 2, 3, 4, Ford Transit, Ford Scorpio cars includes many different components.
The main components that power the electrical network are, as is known, the battery and the generator device.
The ignition system is designed in such a way that the spark to ignite the combustible mixture is transmitted through high-voltage wires. Below you can find diagrams and designations of the main components.
Electrical diagram of a block with a relayRelay designation
It will not be possible to start the engine without the ignition system, so we suggest that you familiarize yourself with the diagram of its connection and the designation of the main components.
Ignition system Ford Focus 1,2 3, 4
Also worth mentioning is the ECM - the electronic engine control system.
Engine control system and designation of main components and elements
An equally important point that any focus guide should be familiar with is the connection diagram for the generator device. As stated above, a lot depends on the functioning of this device, so you need to know about its connection in any case.
Generator connection diagram and element designation
Common faults
Below are the main malfunctions that appear in the operation of the electronics of Ford Focus 3, 4, 2, 1:
- On these cars, the cables in the tailgate lid often break off. The problem is solved by removing the plastic trim and replacing the electric lock.
- Models 1, 2, 3, 4 suffer from the “disease” of failure of license plate lamps. As a rule, the main reason for the appearance of a defect lies in the rather poor sealing of the lighting sources, so when installing the lamps, everything must be done correctly. In addition, when purchasing, you should give preference to higher quality devices. Today you can find five types of light bulbs on sale from different manufacturers.
- Both the first and second Focuses, as well as other models, often suffer from such a problem as failure of the electric windows, especially in difficult climatic conditions. If this happens, the only way out is to remove the fuses from the installation socket for 10-20 minutes and then install them back. After installation, the window regulators must be raised all the way up, while the control button must be held for several seconds. If such actions do not solve the problem, you can try to dismantle the gear with the Hall sensor and rotate it 180 degrees (video author - SPN).
Prevention measures
What you need to know about the electrical network:
- If you carry out wiring repairs, it should be carried out exclusively with the on-board network de-energized.
- Connecting and disconnecting the battery is only possible with the ignition off.
- If you diagnose electrical circuits, any short circuits are excluded, since this can contribute to the failure of the equipment as a whole.
- When replacing fuses, use only parts specified by the vehicle manufacturer. If the elements are designed for higher current, they should not be used, like any other homemade fuses.
- To prevent a short circuit when replacing a fuse, it is prohibited to use any metal tools to dismantle and install them.
- When the power unit is running, the battery cannot be disconnected, as this will damage the voltage regulator and other components of the electrical circuit.
- When diagnosing a generator diode bridge, you cannot use a megohmmeter that is powered by more than 12 volts. In principle, increased voltage is not recommended for diagnosing system components.
- If you are welding elements of a vehicle body, then to do this you need to disconnect the battery, as well as the generator device. In addition, if welding is carried out without dismantling the body element, it would not be superfluous to turn off the power to the electronic control unit. If the ECU and alternator fail, it will result in large financial losses.
- When the engine is running, do not touch the wiring of the ignition system under any circumstances.
- Clean the battery terminals and terminals from time to time.
Loading …
Stages of checking the operation of the VAZ 2110 ignition switch
In circumstances where the lock in the car gets stuck or the starter does not start, new car enthusiasts have a question about what kind of malfunction needs to be fixed.
To resolve this issue, you need to carry out a number of manipulations:
- Remove the wire from the negative terminal of the battery.
- Remove the plastic protection from the steering wheel. The easiest way to do this is with a Phillips screwdriver.
- Pull out the lock connector.
- Use a multimeter to measure the current in the wires at different key positions.
- When the key is at the “Off” marking, current is present only on the eighth and thirtieth contacts.
- The “ignition” operates the headlights, turns and other auxiliary mechanisms.
- The “starter” directs current to devices connected to the engine.
- “Blocking” puts the self-starter into operation.
- To check the operation of the backlight, you need to apply a current of twelve volts to the second and sixth contacts. If the lamp lights up, then everything is in order; if there is no light, the electrical circuit has broken. In addition, it is worth checking the lamp, it may need to be replaced, as it has burned out.
- Replacement of all contacts occurs if contacts 50, 30 and 15 are faulty. When checking this process, if difficulties arise in operation, then the lock needs to be repaired or the socket replaced.
“Classics”, as well as the “Ninth” family
Fiat engineers, when developing the ignition switch for their 124 model, used two supply lines (“30” and “30/1”). The ignition line was the only one.
Another ignition circuit containing contact “15/2” was added during the transition to the “2109” family. It, in turn, is switched using a relay. In different families, only the diagram differs, but not the “behavior” of the car when the key is installed opposite the marks:
- Position 0: everything is off;
- Label 1: ignition and engine operation;
- Mark 2: starting the starter;
- Label 3: “Parking” mode.
To turn off the engine, turn the key to position “0”. The spark plugs lose spark and the engine stops.
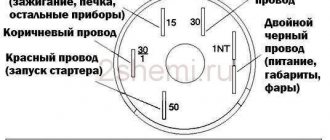
The ignition switch module, if we talk about the “classic family”, is equipped with 5 terminals (see Fig. 2). Starting from the “2109” family, this solution is not used. Several wires come out of the lock cylinder and are connected to a remote connector.
The connector layout can be easily identified using the color coding (see diagram above). When carrying out any installation work, remember the following: you must turn off the engine, open the hood and disconnect one of the battery terminals. Usually the negative one is turned off.
Replacing the ignition lock cylinder of a VAZ 2110
You need to remove the pin, which is located on the side. To help you need a hammer and a screwdriver with a small diameter. Then the old larva is dismantled and a new one is inserted. To check the jamming, turn the steering wheel. There are no difficulties; even a novice driver can replace the cylinder in a home workshop.
How to remove the ignition switch on a VAZ 2110
The ignition switch mechanism is durable, but it can also lose its functionality. A more common problem is sticking and wear of the cylinder, destruction and damage to contacts.
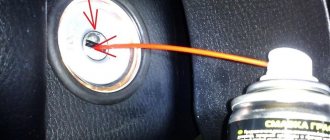
You can fix these malfunctions yourself without contacting a car service. But first you need to familiarize yourself with the electrical diagram of the operation and connection of the lock in order to know what exactly needs to be repaired. After studying, you can begin the process of removing the lock on the VAZ 2110. However, if the problem is jamming of the lock socket, then graphite lubricant will solve this. For other repair work, the lock will have to be dismantled.
To remove the lock on a VAZ car of various types (injection or carburetor), you only need two screwdrivers: a Phillips and a flathead.
Stages of dismantling the ignition switch VAZ 2110
- Disconnect the battery.
- Remove the plastic steering column protection by unscrewing the five bolts.
- Pull out the union nut and all wires.
- Unscrew the two screws from the bracket, using a flat screwdriver to help you press in the stopper; it is located under the stand on the lock frame. From the “Starter” marking, pull the lock out of the bracket.
Replacing the ignition switch on a VAZ 2110
Replacing the ignition switch on a VAZ 2110
Replacing a lock is much simpler than all the steps before. But its complete replacement is rare, only when the key is lost or defective, and the function of the lock cannot be restored.
After completing all the processes described above, after removing the old lock from the stand, insert a new one. This completes the replacement of the ignition switch on the VAZ 2110. Assembling the mechanism to its original form proceeds in the reverse order.
But, in order to replace the lock, you first need to purchase a new one. And since this is the most important part of the car, you need to carefully choose it so as not to buy a fake. When inspecting the part, you need to focus your attention on the protruding “tongue”, it should be lighter than the entire part, the key fits in without problems, the presence of a holographic sticker that cannot be torn off, the molding of the case must be correct. In addition, it is better to buy high-quality parts, since not only the operation of the car, but also safety depends on it.
Dismantling
If previous activities have shown that intervention in the design of the ignition switch is required, work in any case will begin with dismantling the device.
We have special step-by-step instructions for this.
- To begin, disconnect the negative terminal from the battery of your VAZ 2110. This way you will ensure your safety and the safety of all wiring. You know what the consequences of a short circuit are.
- Next, remove the casing on the steering column. This is how you gain access to the castle.
- If you feel that the rotary switches will interfere with your work, it is better to remove them immediately. The work does not last for a couple of minutes, so all irritants should be put aside.
- Armed with a chisel and hammer, unscrew the mounting bolts with round heads. Don't get confused, they are the only ones there. Try to perform this operation as carefully as possible so as not to knock off the bolt head.
- Now take the pliers and remove the bolts.
- Insert the key into the ignition and turn it to position zero. This will disable the anti-theft system.
- Next in line is the bracket that held the previously removed bolts and the ignition switch itself.
- Mark the contact wires using different colored markers. Otherwise, you can easily mix them up during reassembly.
- Often it is not necessary to completely replace the lock, but only partial repairs. For example, change the backlight bulb, or fix a microswitch problem.
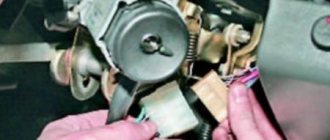
- Disconnect the connectors that used to operate the ignition switch.
- To replace the backlight bulb, disconnect the corresponding connectors, and then use pliers to remove the bulb.
- To replace the contacts, use a screwdriver to press out the special latches.
- Using a shaped screwdriver, unscrew three screws, after which you can remove the rod.
- Use a regular flathead screwdriver to pry out the clips and remove the microswitch.
- Next, new ones are inserted in place of the dismantled elements.
Checking status
Installation
Now that all preliminary repair work has been carried out, there are two options:
- Install a completely new ignition switch with wires and contacts, since the old one is unsuitable for further use;
- Return the old lock to its place, since the repairs have borne fruit.
Before installation, be sure to purchase special bolts equipped with break-away heads. They are designed to prevent your vehicle from being stolen.
Regardless of the option, the lock installation sequence is identical.
- Insert the key into the ignition, then turn it to position one.
- Secure the bracket to the steering column, and then replace the mounting bolts.
- Remove the key from the lock and check that the shaft lock works properly. If it's a new lock, there shouldn't be any problems. If we are talking about a refurbished old one, troubles may arise, since in reality it is better not to skimp and immediately replace the spare parts with a device of good quality.
- If everything works as it should, then you can complete the installation of the lock by tightening special bolts that are equipped with tear-off heads.
Buy only high-quality locks from trusted suppliers. Today there is an impressive number of fakes on the market, which use materials and components of dubious quality. Because of them, you can be seriously injured and even lose your car.
At the moment, the cost of a new ignition switch is about 20-25 dollars. These are small expenses, but sometimes simply necessary. Whether to do the repairs yourself or trust the car to a service station is a personal choice for everyone.
What was the reason for replacing the ignition switch on your VAZ 2110?
- Tried to steal a car, had to change the lock
- The device has worn out during operation, a necessary measure
- I wanted to install a more modern lock
Repair of ignition switch VAZ 2110
Repairing a lock depends on what exactly needs to be fixed and is divided into:
- Replacing contacts. To do this, you need to disconnect the plug from the lamp, bend the three latches and remove the cover. After inspecting the light guide plate and eliminating defects on it, such as black deposits, there are no results, then the plate needs to be replaced. Do the same procedure with the remaining plates.
- Prevention for contacts. To do this, you need to treat it once every six months with special products such as WD-40 or graphite lubricant. It's not worth saving on them.
- The microswitch has failed. You need to unscrew the screws and remove the rod, and then press the lock. Insert a new one and put everything back together.
But it’s worth noting that repairing the ignition switch yourself is not safe. If possible, it is better to contact highly qualified car service technicians.
