You can use a radio to pass the time on the road. Typically, drivers prefer to listen to music that is unobtrusive, so that it plays in the background and does not interfere with steering. An autoradio is most suitable for this, which first needs to be configured. But many people don’t know how to properly set up the radio on their car stereo.
Setting up the radio
Basically, setting up the radio consists of several simple steps. The broadcast range is selected and radio channels are searched and stored in the tuner’s memory. The search for radio stations occurs either automatically or manually. In the first case, radio channels are stored in descending order of broadcast quality.
Let's take a closer look at how to configure the radio on common car radios.
External ports
- In addition to the radio, the radio can play music from external devices or CDs (older versions).
- To be able to connect external devices, you will need the same “System” menu described earlier in setting the time.
- Go to the menu as described above.
- Scrolling through the menu, select the AUX, USB or Bluetooth option (if this feature is supported).
- Use the arrows on the sides (or tilt the handle itself) to switch the position. There are two options available - enabled (On) or disabled (Off).
- Choose to enable the desired port.
- Press the joystick once to confirm.
- In the same way as in setting the time, exit the menu.
- Further connection depends on the models of the radio and the connected device.
Bluetooth connection
It should be remembered that for the connection via Bluetooth to work correctly, like most other devices that support this function, pairing will be required. The PIN code is entered on the radio and repeated on the device (sometimes, especially if the device has already been connected via Bluetooth, you will only need to enter it on the radio).
To enter the pin code on the radio, take the following steps:
- They turn it off.
- Hold down the power key and go to the initial menu.
- Rotate the joystick to find the PIN CODE INPUT function (will appear if BT is enabled).
- Move the joystick up and down to enter the code. If you need to move between symbols, do it by swinging the handle left and right.
- Confirm by pressing the knob once.
- Exit the menu.
Now you can activate the mode on the device and try to find the radio. Those who like to assign clear names to devices can use the above method, but they must select EDIT DEVICE NAME rather than PIN CODE INPUT. The remaining steps are identical.
Important!!! Pressing to confirm must be done once. Clicking on the same menu again will reset the code and require you to enter it again.
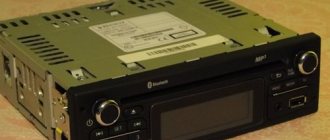
In the radio, the photo of which is presented below, the 3.5 AUX jack socket is located to the right of the radio control buttons, and the USB is behind a plug with the USB brand logo.
Radio "Pioneer" without CD, but with USB and AUX support
Possible reasons for a bad signal
It’s not difficult to figure out why the radio doesn’t pick up the radio. First of all, the problem is explained by malfunctions in the antenna. If the cable shield is damaged, the signal will be of low quality with a lot of interference. If the wire has been deformed or broken, the connector has become loose, or the plug that is inserted into the radio has come off, the radio may stop functioning altogether.
When using an active antenna, poor signal reception quality will be due to the lack of power connection to the amplifier. Another problem is explained by poor contact between the receiving dipoles and the amplifier module, which occurs as a result of oxidation processes or deformations.
The next reason why radio reception is poor is a large distance between the repeater or radio tower and the receiver or strong interference of artificial and natural origin, which prevents the normal movement of the signal.
Sometimes motorists notice that the signal deteriorates after starting the windshield wiper, heating system or washer.
This defect is explained by sparking between the motor brushes.
Budget radio models made in China begin to malfunction and experience interference due to the presence of other electronic systems in the cabin. This often happens after starting the DVR.
Well, one of the most common causes of interference is problems with the tuner itself. Also, as the system is actively used, damage to the speakers occurs. As a result, they produce wheezing and crackling noises that interfere with the normal setup of the radio.
Video: an easy way to make AUX on any car radio with your own hands
Important: entering the function menu can be done by holding down another button, for example, SRC or SOURCE.
Turn on Bluetooth
In order to activate Bluetooth, you need to go to the main settings menu and find the BT AUDIO sub-item there and select ON. After that, turn on Bluetooth on your smartphone/tablet and look for the radio.
After the radio is found, we connect to it, which may require entering the security key - by default “0000”.
How to set the clock
To set the clock, you need to enter the main settings menu, which can be done by turning on the turned off radio by holding down the SRC button or holding down the center button of the joystick. After which we find the CLOCK SET block, where you can set the format and the time itself. There is also a CLOCK OFF block in the menu, by changing the indicator you can enable or disable the time display on the device.
Subwoofer doesn't work
In standard installed stereo systems with a Pioneer head unit, the sound from the subwoofer sometimes disappears. The problem is an unsuccessful output to the low-frequency speaker. The problem is treated in 2 ways. If the radio is new and under warranty, you can try to exchange it. But this does not always happen; more often it is repaired and returned.
Another option is to re-solder the output yourself. Perhaps the second option is the most optimal. Self-made repairs are much more reliable than warranty repairs. Moreover, no difficulties should arise there.
Conclusion
. Acoustics in a car often require quite a lot of attention. It needs to be configured correctly, this will allow you to make the most of its technical characteristics. How to turn off a Pioneer radio is a question often asked by owners of such equipment. In fact, this is done so simply that the manufacturers didn’t even mention it in the instructions.
The Pioneer company produces car players and acoustics in various price categories. The products are intended for additional equipment of vehicles. The connection diagram for the Pioneer radio included in the operating instructions allows you to connect and configure the equipment yourself.
Total
The FM modulator is mainly for owners of one-year-old foreign cars with good standard acoustics that are not equipped with USB and Bluetooth. This device is quite capricious: the transmitter is sensitive to interference from the car’s electrical equipment and the congestion of the metropolitan radio network.
We do not recommend using this gadget to play your own music collection not only for these reasons. The audio quality is frankly poor, and is significantly inferior in this parameter to the AUX channel. The rule “the best means the highest quality”, noted in the material on how to wash tar from a car body without damaging the paint, does not work here. In practical terms, even the best FM transmitter sounds worse than a city radio station with a good signal. There are several explanations for this fact:
- The conversion of “digits” into a radio signal and the reverse conversion of information by the on-board audio system unit into sound are different stages, each of which has its own losses.
- Large radio broadcasting stations use special post-processors to ensure that on-air music sounds high quality through the receiver.
In short, we recommend purchasing an FM modulator only as a means of implementing Hands-free technology. Otherwise, it’s better to buy a player or connect your phone via a mini-jack to the AUX connector so as not to be disappointed with the sound quality.
Why the radio doesn’t pick up well in the car - what’s the matter?
Possible mechanical or technical damage may result from a breakdown of the antenna, contacts or the radio itself. Diagnostics of these elements will help identify the cause of the signal malfunction.
If the car has an external antenna, it is likely that it is damaged. Another reason related to the antenna is its poor connection to the radio. If the accessory has visually visible signs of damage, the receiver must be replaced with a new one.
Sometimes drivers install an additional radio signal amplifier on their vehicle.
Among the most common reasons for poor radio performance is a faulty, or more often outdated, radio tape recorder. Therefore, when buying a car, we recommend replacing this equipment first.
J.V.S.
When tuning stations, it is possible to leave 30 FM radio channels and 15 AM channels in the tuner.
- Setting up a gamepad on Android - a practical guide
Installing stations manually:
- Select a broadcast band by pressing the TUNER BAND key.
- Click on button 4 to set the station.
- Hold down the key with any selected number on the panel to memorize the station in the radio's memory. The selected number will start blinking, after which you will see the station stored under the selected number. For example: To tune to station number 14, press the +10 key, followed by the 4 key for approximately three seconds or more.
- To store other radio stations in the device’s memory, you need to repeat steps one through three. And to change the settings of the entire station, you need to repeat the entire process from the beginning.
Tuning stations in automatic mode:
Stations will be given numbers by increasing the frequency range.
- Select the range by pressing the TUNER BAND key.
- Press and hold the AUTO PRESET button on the panel.
- To set a different range, you need to go through steps one through two again.
To replace selected stations in automatic mode, you must use manual installation.
Kenwood
Kenwood radios offer three types of autoradio settings: automatic (AUTO), local (LO.S.) and manual.
- Press SRC until “TUnE” appears.
- Press FM or AM to select a band.
For automatic setup, click >>| or |.
In case of manual tuning, after all the above steps, ST will light up, indicating the found station.
An article about how to properly configure a Pioneer car radio. Features of setup, step-by-step algorithm. At the end of the article there is an interesting video about setting up radio stations on Pioneer radios.
Contents of the article: The name of the car radio “Pioneer” for modern Russian people may sound somewhat archaic for obvious reasons, but, nevertheless, this name speaks for itself - the first of the first. And this is true: the international corporation Pioneer Corporation has been around for many years has been providing its products to the world market for decades with a guarantee of high quality. Therefore, you will not have to regret the money spent after purchasing this magnificent radio. And now, it is already displayed on the front panel of your car, you turn it on... But what is it? Instead of high-quality music, you hear some kind of wheezing, which does not please your ears at all, but rather the opposite. So what is it? Marriage? Deception? First of all, pull yourself together and don’t rush to blame suppliers and manufacturers. The casket opens simply: your radio needs tuning. Yes, that's the whole point. And since setting up a Pioneer radio is a very difficult task, we will now tell you step by step how this is done. To begin with, let’s immediately agree that we will not consider budget options for this radio. And this is not because of foppishness or snobbery. It’s just that budget models do not have all the necessary settings that we will talk about. Devices of this kind can be identified by the initial numbers. If it is 1, 2 and further, then this is a typical budget version of the Pioneer radio. And you can start setting up only if you purchased model 3100 and higher. Let's take the Pioneer DEH 3100 radio as an example.
- 1.5.40 AM-VHF radio with electronic tuning
Level two. Replacing standard speakers
This is where you need to be very careful. This is a field with a rake; you can’t run with your eyes closed. This upgrade option is not always applicable. If you replace only the speakers and leave everything else, then it is far from a fact that the system will “sing.” Moreover, in some cases the result may be completely negative. Although the standard audio system itself is not of a high class, everything in it is matched to each other and balanced.
It is clear that the audio system is far from a priority element when designing a car, but sometimes the methods for installing standard speakers are simply surprising. The photo shows a standard BMW speaker, which was simply attached to the inside of the upholstery and covered with a light casing
One of the tricks that automakers resort to is reduced acoustic impedance. In general, the most common acoustics in car audio are 4-ohm ones, but in “standard” speakers they often use 2-ohm ones. All in order to boost the dead standard amplifier and slightly increase the volume headroom. Replace these speakers with more conventional 4-ohm ones and you get a quiet system, and any attempts to increase the volume will be accompanied by an increase in distortion.
But that’s okay, there are plenty of aftermarket acoustics with 2-ohm ones. Don't step on another rake - a corrected signal. This, by the way, is one of the “tricks” of many branded standard systems - it’s not the components that are better, but correction that compensates for the features of cheap speakers and the shortcomings of their acoustic design. Replace the dynamics in such a system, and such a correction will no longer be appropriate.
But there is no need to be scared and completely discard this option. Today you can find many acoustic kits that are tailored specifically for certain brands and models of cars. Mainly for European ones, in this part of the world such an upgrade is most in demand.
The video demonstrates the ease of upgrading a standard audio system by simply replacing the OEM speakers with a set specially designed for a specific car brand:
Level one. Noise insulation
Yes, yes, this is the very first point for any upgrade of a standard audio system. If you want to listen to music, first of all get rid of unnecessary sounds. By the way, we are talking not so much about outside noise as about body noise. Look at the home speaker. Durable body, devoid of overtones. Sound emits only what should emit sound, and what should not be held monolithically. Now take a look at where and how any car speaker is installed and what the housing is for it. Most often it is mounted on some kind of metal panel, and in the worst case, even on plastic upholstery. And the body of such a “column” is a door or some kind of body niche. Tough, and that's all. By the way, in the literal sense of the word.
The easiest way to improve the acoustic operating conditions of speakers and get rid of unnecessary resonances and other metallic sounds is to use vibration-damping materials. They are usually made from bitumen or rubber, often with some additives. Their main feature is high internal viscosity. Basically, these are just sheet materials that are cut right on site and carefully rolled onto the metal. But sometimes such materials come in the form of mastics.
Vibration-damping materials are heavier and more rigid, more effective, but they are also harder to work with, so not all craftsmen like them. Thinner and lighter ones are easier to work with, but their effect is not so high. The optimum is usually somewhere in the middle.
Various kinds of lightweight foam and fibrous materials can be considered only optionally; they work somewhat differently and do not have much effect on the absorption of metal vibrations.
Operating Instructions Operating Instructions Portable.
User manual
Operating instructions
Portable stereo system
for CDs
Portable CD stereo system
Please read these instructions carefully before turning on, setting up and using the device. Do not throw away these instructions.
Please, please, read this instruction thoroughly. We ask you to save this reserve for later developments.
RX-ES29_Ru_Uk-ad.book 1
Is it necessary to use a filter on amplifiers with processor sources?
#1 OFFLINE Vyacheslav from Ekb
From: Ekb
resident of Blues 78 posts Registration: 05/20/2019
Good day, tell beginners whether it is necessary to use a filter on amplifiers if the cutoff settings come from the source, in particular from the GU, or simply turn them off (the filter on the amplifier). ?
#2 OFFLINE DyadyaVova
- From: Barnaul Russia
resident of Blues 1,859 messages Registration: 04/06/2011
Good day, tell beginners whether it is necessary to use a filter on amplifiers if the cutoff settings come from the source, in particular from the GU, or simply turn them off (the filter on the amplifier). ?
It all depends on the available arsenal of filters at the Source.
There are GU/Prots models with truncated filter values - frequency limitation (fixed tuning step), filter order limitation 6, 12, . 24 dB/octave.
In some cases, the use of an additional filter on the amplifier is quite justified.
For example, the GU cuts the sub only with a 1st or 2nd order filter (6 or 12 dB/octave), but you need to cut it with a 4th order filter (24 dB/octave)
By turning on 2 filters of the 2nd order on both the PG and the Amplifier, you can get the 4th order.
Ural ConceRt, Pioneer P99RS, CarDSP-Lite+ P99RS (as a digital source)
resident of Blues 1,035 messages Registration: 07/13/2005
- From: Novocherkassk
resident of Blues 5,400 messages Registration: 07/31/2008
***Of course, turn it off and forget it.
#5 OFFLINE Antip
- From: Kovrov
resident of Blues 1,372 messages Registration: 06/18/2009
Filters in amplifiers can be used when there is no other way to cut the signal (for example, in a wild bezprotse), and of course it is necessary that the filters themselves built into the amplifier are of the required steepness and aural quality.
Message edited by: Antip - May 31, 2022 - 13:53
#6 OFFLINE lukasarts
- From: Hero City Donetsk
Resident of Blues 1,422 messages Registration: 02/19/2012
Even Audison filters from Vrix do such a miracle with sound that it’s easier to cut them out and throw them away. I tried to cut completely with them. When I listened to it, it was already distorted. Muddy mud!!
It is possible, of course, from without originality. It's better to just passcross. Better yet, buy a pioneer p 90 and listen to music in this life.
Level four. Complete replacement of the standard system
There are situations when you are not satisfied not only with the sound of the standard system, but also with the functionality of the head unit itself. In this case, thoughts about replacing it become especially annoying. But this cannot always be done with small forces.
Initially, this Honda was equipped with a standard head unit integrated into the dashboard. Using a non-standard panel, it was possible to install a new head unit of standard DIN sizes
First of all, take a close look at what the standard head unit is. If it has its own display, and all audio system controls are not connected to other car systems (climate control, on-board computer, etc.), then it can most likely be safely removed, while all other systems will remain unaffected.
Don't let the original shape and size of the standard GI confuse you. Firstly, there are now many alternative head units that are produced for specific car brands and fit into the panel using the pin-to-pin principle - the seats and connectors are completely the same. Or you can use an adapter frame to install a standard 1DIN or 2DIN size device and an adapter from a standard connector to a standard ISO. They are produced by many manufacturers, so choosing the right set is usually not difficult. As a last resort, no one has canceled the custom solution either.
If the standard head unit has many standard functions, then replacing it is a very difficult task; there are not simple solutions for every car. Pictured is an Alpine kit designed specifically for Mercedes
But if the standard “head” is combined with other car systems, then it’s more complicated. It is far from a fact that there is an alternative head unit for your car. In this case, the approach will be individual, and most likely costly.
This McIntosh became the head of the new audio system, and a mounting frame was made especially for it. All that remains of the standard system is the head unit, which now serves as the second most important source
But there is another option. It looks quite extravagant, but sometimes the only way to organize a truly high-quality audio source in a car is to leave the standard head unit unchanged and install a second one. In this case, it becomes the main one in the system, and the audio system is built from it. The standard one is shifted from the role of the main one in the system and becomes additional - its outputs are connected to the AUX inputs of the new head unit.
Why is the car radio always hissing?
Many car owners are faced with a very unpleasant problem when, while listening to music on a radio station, various sound distortions occur - noise, wheezing, interference, etc. This makes you wonder why the radio hisses in the car, the signal is poorly received, and how to correct the situation.
A simple radio malfunction - incorrect settings. Some people use automatic frequency search in the car, others use manual search; it is enough to save them in the device’s memory.
The signal may deteriorate if the radio station is far away or the vehicle passes a source of electromagnetic interference. Here we can only advise you to change the location to a more accessible one.
Loudness compensation
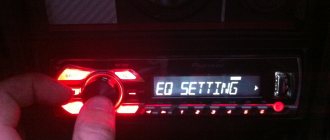
I would like to end here, but we forgot about something - loudness compensation. This is such a regime. It is easy to find it in the audio settings menu by rotating the joystick. Find the inscription LOUDNESS. Press down the joystick, and the same LOUDNESS will light up on the left, and three levels will be displayed on the right: low, medium and high. This setting adjusts the high and low frequencies at low volume. That is, the quieter the sound, the more clearly the effect of this setting is felt. However, if you turn the sound up to full power, this mode will not be felt at all. Therefore, you can fix the high level, which is indicated by the inscription HIGH. Now go to the audio settings in the EQ SETTING1 menu. Press down the joystick until the display shows EQ SETTING1 and three options in columns, adjusting bass, mid and treble. You can move through the columns by tilting the joystick to the right, and the adjustment itself is done by rotating the joystick handle. Using these options, adjust the frequencies to your liking. However, we do not recommend exceeding the low frequency parameter by more than one. From 0 to 1 will be quite enough - take pity on your acoustics. Although, if your speakers are powerful enough, then you can experiment. Now, that’s probably all. This time your “Pioneer” will sound at a professional level. I must say that there are still a few settings left in this radio, but only real music lovers with an ear for music will need them - and that’s a completely different story. We wish you a fun and safe journey! Video about setting up radio stations on Pioneer radios:
TagsTips for motoristsAn article on how to properly set up a Pioneer car radio. Features of setup, step-by-step algorithm. At the end of the article there is an interesting video about setting up radio stations on Pioneer radios.3 -> Sources used:
- https://mgp-avto.ru/nastrojka-radiostancij-na-magnitolax-pioneer/
- https://1avtozvuk.ru/podkluchenie/nastroit-radio-na-magnitole
- https://fastmb.ru/soveti_auto/1621-nastraivaem-avtomobilnuyu-magnitolu-pioneer.html
What can and should be configured in the equipment of this company
Depending on the model of the audio recorder, the user has the ability to independently adjust parameters such as:
- equalizer;
- radio stations;
- menu language;
- time;
- enable or disable the Bluetooth wireless protocol (if available) and AUX;
- activation/deactivation of demo mode, etc.
Among all that has been said, special attention should be paid to setting the equalizer, as well as the radio, where the first is useful for those who like to listen to their own music, and the second for car owners who prefer radio stations to music from a disk/flash drive. Special adjustments are also required for the subwoofer.
Supra
After pressing the MODE button, select the Radio function, then RADIO and the saved band with the broadcast frequency will be displayed on the screen. Pressing BND selects the desired broadcast band.
Next, you need to press the key with numbers from 1 to 6 to use the already saved radio station in the radio.
Press and hold the >>|| button.
Then click the button >>|| to select the desired station. If these keys are not pressed for up to ten seconds, everything will return to its original operating mode.
Automatic tuning and scanning of selected radio stations
Search for existing radio stations in memory:
Briefly press the AS/PS key to start searching for saved radio channels. Any station can be listened to for about a couple of seconds. To automatically save radio channels, hold down the AS/PS key. The receiver will tune in to six optimal stations, which are the most powerful in this broadcast range. This option can be used in any wavelength range. Once the automatic saving of stations is completed, the receiver will stop scanning them.
To tune into a specific radio station, press the >>|| button, this will scan and select radio channels with the best reception signal. By pressing the >>|| button, you can manually select the station you want. Hold down the key numbered 1 to 6 for about a couple of seconds to memorize the channel under the desired key.
Joystick positions
First, let's characterize all possible movements of the joystick. The positions of its handle can be as follows: So, let's begin. We set the volume to about 30 units, not paying attention to possible wheezing during playback. After that, press down the joystick and go to the list of settings. Here you will see a large number of options, but don’t let that scare you: now you only need one setting. Start turning the joystick to the left or right until you find the “Audio” item. Found it? Now you need to press the joystick again and enter “Audio”, and there you will look for the item where the balance and fader are indicated. It looks like this: FADER / BALANCE. Press the joystick again so that the inscriptions FAD 0, BAL 0 are displayed. If instead of zeros there are other numbers, it’s okay. This just means that an adjustment has already been made here before. If you tilt the joystick to the right, you will thus move from the fader settings to the balance settings. Rotating the joystick will allow you to adjust these settings. At such moments, the current menu will flash. Set the fader to position + 15. In this case, the sound must be passed only to the front speakers so that the rear speakers do not interfere with the settings of the front speakers.
Why is it necessary to set up a Pioneer radio?
Before moving on to the process of setting up your Pioneer audio recorder, it’s worth understanding why you need to do this:
- This is done in order to maximize the audio capabilities of the head unit and the acoustics installed in the car.
- Knowing the settings will allow you to easily connect various external devices, eliminate wheezing and distortion of the audio composition, as well as change the interface language and other everyday characteristics, the correct configuration of which will make using the device more comfortable and understandable.
Incorrect adjustment of the radio can nullify the sound of even the most expensive and high-quality professional-level acoustics.
Video: pioneer 4019 clock setting
Also, in some Pioneer radios, you can call up the clock settings menu by simultaneously pressing the CLOCK + FUNC keys or by going to the SYSTEM item and finding the corresponding sub-items CLOCK SET/CLOCK OFF, which is located in the main settings block.
How to change language
To change the settings language, go to the system settings (SYSTEM), located in the main settings block, which may require holding down the SRC or SOURCE buttons. After this, we find the LANGUAGE sub-item, where we select the language we need.
Sony
Setting up the radio in the Sony radio will also not be a problem. Searching for stations is usually carried out in two common ways: manually or automatically. Automatic memorization of radio stations:
- Turn on the radio. Long press the Source button and wait until TUNER appears on the display.
- The range is changed by pressing the Mode button. If you press the joystick, a menu of options will appear.
- Rotate the joystick until the VTM option appears. Radio channels are assigned to numbered keys as standard.
To manually scan and save you need:
- Turn on the radio and start searching for stations.
- Once the desired radio station has been found, you need to press the number key from 1 to 6, after which the name “Mem” will appear. Note: when saving a radio station on a digital number that already has a radio station, the previous one is automatically erased.
Thus, you can set up a radio in a Sony radio in 5-10 minutes.
How to turn off
The radio is turned off by pressing the SRC or SOURCE button (but it is worth remembering that another button, for example, FUNC, can be programmed for this function, which directly depends on the model of the radio being used).
Once the radio is fully configured, you can safely enjoy the high-quality and rich sound of the car’s audio system, which will make even long trips more comfortable and enjoyable.
Useful for car enthusiasts - everything about cars
Dear Customer Thank you for purchasing the stereo systems.
Dear buyer
Thank you for purchasing our stereo system. Please read the operating instructions carefully before turning on the stereo system.
Content
Contents of delivery
.
3 Precautions
.
3 Caring for your stereo system
.
3 Selecting CDs
.
3 Location of controls
.
4 Operation from batteries
.
6 Power supplies
.
6 Battery for the memory unit
.
6 Radio
.
7 CDs and MP3 files
.
8 Playing tapes
.
10 Recording on tape
.
10 Setting the time
.
12 Playback and recording timer
.
12 Sleep timer
.
13 Sound quality
.
14 Surround sound
.
14 Possible malfunctions and methods for eliminating them
.
15 Technical specifications
. 15
Made in Malaysia Matsushita Electric Industrial Co., Ltd. 1006 Kadoma, Osaka, Japan
WARNING:
TO REDUCE THE RISK OF FIRE, ELECTRIC SHOCK, OR PRODUCT DAMAGE, DO NOT EXPOSE THIS APPARATUS TO RAIN, MOISTURE, SPLASHING OR DRIPPING, OR PLACE OBJECTS FILLED WITH LIQUIDS, SUCH AS VASES, ON THE APPARATUS.
WARNING!
THIS UNIT SHOULD NOT BE INSTALLED OR PLACED IN A BOOKCASE, WALK-IN CABINET, OR OTHER RESTRICTED SPACE IN ORDER TO MAINTAIN GOOD VENTILATION CONDITIONS. ENSURE THAT CURTAINS AND OTHER SIMILAR OBJECTS DO NOT OBSTRUCTE NORMAL VENTILATION TO PREVENT THE RISK OF ELECTRIC SHOCK OR FIRE DUE TO OVERHEATING.
DO NOT COVER THE VENTILATION HOLES OF THE APPLIANCE WITH NEWSPAPERS, TABLECLOTS, CURTAINS OR SIMILAR OBJECTS.
DO NOT PLACE ANY OPEN FLAME SOURCES SUCH AS LIT CANDLES ON THE UNIT.
DISPOSE OF BATTERIES IN THE TRASH IN AN ENVIRONMENTAL CONSIDERATION.
THIS UNIT IS DESIGNED FOR USE IN A MID-RANGE CLIMATE.
This product may receive radio interference from cellular telephones. If such interference is evident, please increase the distance between the product and the handset.
WARNING!
THIS DEVICE USES A LASER. THE USE OF ADJUSTMENTS AND SETTINGS OTHER THAN THOSE DESCRIBED BELOW MAY RESULT IN HAZARDOUS LASER EXPOSURE. DO NOT OPEN THE COVER OR CARRY OUT REPAIRS YOURSELF, IT IS BETTER TO LEAVE IT DONE
TO A QUALIFIED PROFESSIONAL.
The mains plug must be located near the equipment and be easily accessible, and the mains plug or adapter of the appliance must remain quickly accessible.
For Russia “Installed by the manufacturer in accordance with clause 2 of Art. 5 of the Federal Law of the Russian Federation “On the Protection of Consumer Rights”, the service life of the product is 7 years from the date of production, provided that the product is used in strict accordance with these operating instructions and applicable technical standards.”
Marking example: ± ± 1 A ± ± ± ± ± ± ± Code elements: 3rd character year of manufacture
If in the recent past a good signal from a radio station in a car stereo was available only near the city, when the car was not moving, today this is possible even while moving far beyond the borders of civilization. To achieve the best reception, you need to know how to set up your car radio and what can affect the sound quality.
Equalizer
An equalizer allows you to make the sound more even - raise or lower the bass, mid and high frequencies. This is a rather fine adjustment of the audio system. It is not the entire sound range that is regulated at once, as in other menu items, but specific frequency bands. Different models have different numbers of them, depending on the class of equipment. There are five of them in Pioneer radios: 80 Hz, 250 Hz, 800 Hz, 2.5 kHz and 8 kHz.
The equalizer is located in the “Audio” section of the settings menu, EQ item. In it you can select one of the preset standard settings. For those who are not satisfied with these options, there are two sets of user settings (Custom). You can switch between them both from the menu and the EQ button next to the joystick.
To make changes to frequency parameters in a custom setting, you need to select it with the wheel and press the joystick. Then turn the wheel to select one of the equalizer frequency bands. Press the joystick again and set the position from -6 (attenuate frequency) to +6 (increase). By doing this you can make some frequencies louder and others quieter.
There is no universal recipe for setting the equalizer on the radio. It is performed by ear depending on the preferences of the consumer. In addition, different adjustment options are selected for a specific genre of music.
We can only give rough recommendations:
- if heavy music is played, it is worth increasing the bass - 80 Hz (but not too much, +2–+3 is enough). Percussion instruments sound around 250 Hz;
- for music with vocals, frequencies of approximately 250-800+ Hz are needed (male voices are lower, female voices are higher);
- for electronic music you will need high frequencies - 2.5-5 kHz.
Setting the equalizer is a very important step. Using this tool, you can improve the sound quality many times over. Even if the acoustics are not very expensive and of high quality.