On Russian roads there are special requirements for vehicle permits. Therefore, production cars often lose bumpers or mufflers, or have a puncture in the gearbox or crankcase. After reading the article, you will learn how to increase the vehicle's ground clearance using spacers, how to install them yourself and what consequences this will bring.
Types of spacers
On cars with MacPherson strut suspension, spacers made of plastic, rubber, polyurethane or aluminum are often used to increase the distance between the shock absorber strut and the body. These spacers are installed on both the front and rear suspension. Other types of front suspension use rubber spacers to increase the distance between the spring and the lower control arm.
Sometimes, if you need to increase the ground clearance by 4-6 cm, the same spacer is installed between the spring and the upper suspension arm. The rear spring suspension of front-wheel drive cars uses a house-type strut. The rear spring suspension of rear-wheel drive vehicles uses the same spacers as the front one, which increases the distance between the spring and the axle or body. Sometimes rubber (polyurethane) spacers are used, which are inserted between the coils of the spring. These spacers significantly increase the spring rate and therefore reduce ride comfort.
How much can it be changed?
Although a low ground clearance is always dangerous with the risk of damage to the rear axle or driveshaft (rear-wheel drive), the figure must be increased within the limits allowed. On front-wheel drive passenger cars, it is better not to raise the engine area above 2022 mm at all, and increase the ground clearance of the rear to 2030 mm. The fact is that if the ground clearance is increased excessively, there is a risk of encountering difficulties in adjusting the camber. Therefore, for example, when installing spacers, careful attention must be paid to the length of the bolts and studs.
The main limitation that arises in the process of increasing the clearance is the approach/departure angles. Ground clearance is increased based on their performance, because the standard geometric cross-country ability must remain untouched. For this reason, it is necessary to competently increase the clearance, taking advantage of every opportunity. For example, if a car is “shod” in 55/R15 tires, by changing them to size 65/R15, it will be possible to increase the ground clearance by 22 mm without any design changes.
However, this method is not so popular among motorists. The fact is that installing non-standard tires increases fuel consumption and “breaks” the wheel sensor system. The on-board computer gets confused and produces incorrect pressure data. In addition, too high tires rub against the arches.
Characteristics of spacers made of various materials
Online stores sell spacers of various types, shapes and sizes. In some cases, finding suitable spacers is quite difficult and you need to make them yourself, for which you need to clearly understand how a particular material affects the car. This will help you choose the optimal material for the spacer. Aluminum spacers have good strength, but cause corrosion to the body and strut. Plastic and fiberglass spacers are as strong as aluminum ones, but do not cause engine damage. But it is very difficult to remake them.
If the mounting holes of the spacer and rack bolts do not line up, drilling additional holes will reduce their strength. Polyurethane gaskets have good durability, but they must be selected carefully. If the spacer is at least 1mm larger than the seat, it will be very difficult to install. Rubber gaskets have less resistance than polyurethane gaskets. Their duration is 2-3 times less and rarely exceeds 30 thousand kilometers.
Consequences of installing spacers
The only advantage that the use of spacers gives is accompanied by a considerable number of disadvantages, here are the main ones:
- changing the angle of attack (the angle of inclination of the front shock absorber) impairs the maneuverability of the car;
- an increase in the rotation angle of the CV joint (CV joint, “grenade”) leads to a sharp acceleration of its wear and a reduction in mileage by 2-5 times;
- increasing the distance from the control point to the axis of a rear-wheel drive vehicle, which increases wear on the driveshaft support bearing;
- changes in wheel camber and toe-in, resulting in increased fuel consumption and tire wear, and decreased handling;
- problems with passing technical inspection and insurance company. Installing spacers is a modification to the vehicle design that is prohibited by the Road Traffic Regulations. Consequently, there is a high probability of denial of insurance compensation after an accident.
How to install spacers on a car with your own hands + Video
To install spacers you will need an elevator, overpass or inspection pit. If none of this is available, you can get by with a jack and two support posts. You will also need a set of wrenches and a suspension spring remover. The procedure for installing spacers on various types of suspension is described below. Before starting work, carefully read the article on the safety of car repairs and maintenance, this will help you avoid injuries and injuries.
Installation of spacers on MacPherson suspension
- We unscrew the CV joint nut, then suspend the front part of the car with a lift or jacks and supports and remove the wheels. If the decorative cap touches the CV joint nut, remove one wheel without lifting the other side of the front of the car. Ask an assistant to engage first gear (you do not need to start the engine) and fully depress the brake pedal. Then do the same operation on the other side.
- Remove the cotter pin and unscrew the nut securing the tie rod pin in the shock absorber strut. If for some reason the nut does not come out, turn the steering wheel in the opposite direction. After unscrewing the nut, remove the pin from the strut using a puller, which can be purchased at any auto store. Do not try to finger tap with a hammer as this will damage the threads and the entire tie rod end will have to be replaced. Unscrew the ball joint nut, press the lower arm down and remove the steering knuckle from it. Place a wheel or other support under the strut; this will allow you to install the spacer without removing the brake caliper.
- Remove the nuts that secure the shock absorber to the car body. Do not drop the riser as this may damage the brake hose. Carefully lower the strut until the main bearing studs come out of the housing. Then position the riser so that there are no deformations or kinks in the brake hose. Install the spacer onto the support bearing and tighten the nuts. For spacers 1 cm thick, there is no need to tighten the nuts.
- Carefully lift the bearing until the main bearing studs fit into their holes. Tighten the nuts. Do not use nuts with plastic inside; they will not secure the spacer rod sufficiently. Therefore, use two regular metal nuts. If the studs are not tall enough to tighten the two nuts, sand one of the nuts down to half thickness and use it as a locknut. Place the steering knuckle onto the CV joint shaft. Have a helper step on the brake pedal and tighten the CV joint nut to the torque specified in your vehicle's repair manual, then be sure to tighten the nut with a hammer and chisel.
- Reinstall the tie rod end, tighten the nut, and install the cotter pin. Insert the ball joint into the lower arm and tighten the nut. Install the wheels and tighten the wheel nuts or bolts. Lower the vehicle to the ground and tighten the wheel nuts or bolts. Adjust camber and toe. You can do this at any car service center or yourself.
Installing a spacer on the front multi-link suspension
Suspend the front of the car and remove the wheels. Unscrew the lower part of the shock absorber from the lower control arm. Using an extractor, compress the springs so that the distance from them to the shoulder cup is at least twice the thickness of the spacers. Lift the spring and insert the lower spacer. Then install the top brace. Loosen the puller until the spring snaps into place, then remove it completely. Attach the lower part of the shock absorber, install the wheels in place and adjust the camber and toe. This procedure applies to any type of front-wheel drive or rear-wheel drive multi-link vehicle.
Installation of a “house” spacer on the rear axle of a front-wheel drive car
Shift into first gear, loosen the rear wheel bolts and raise the rear of the car. Remove the wheels and place something under the control arm. Unscrew the nut from the bolt connecting the lower part of the shock absorber to the lever. Pull the lever down and screw the “house” to the shock absorber. Lift the lever and screw in the spacer with a new bolt and nut. Tighten all nuts to the torque recommended in your vehicle repair manual (may vary from vehicle to vehicle). Install the wheels.
How to install spacers on rear spring suspension
Raise the rear of the car and remove the wheels. Compress the springs with a puller as described above. Install the lower brace and, if necessary, the upper brace. Remove the extractor and replace the wheels.
Many motorists tune their cars. Upgrades can be made to almost any part of the car. Painting and tinting are not limited to. One of the ways to improve the quality performance of a car is to increase the ground clearance - body height.
Useful tips
- To break off and tighten threaded connections, so as not to damage the edges of nuts and bolts, use socket or spanner wrenches.
- If the thread of the bolt is rusty and the nut will not come off, and you have run out of WD-40, wet the rust with brake fluid - it softens the rust well and the process will go easier.
- Before installation, do not forget to clean the rusty bolts with an iron brush and lubricate them with a thin layer of lithol or other grease.
- Before tightening the suspension silent blocks after assembly, place the car on the wheels and rock it from top to bottom several times so that the silent blocks take their middle position; this is the position in which they should be tightened.
Clearance
Ground clearance is the distance between the ground and the lowest point of the car. Amateurs measure ground clearance from the edge of the body. But there are a lot of protruding parts on the bottom of the car. The lowest point of the car is under the engine, which is protected by a metal or plastic “skirt”. It is from this that you need to measure the distance from the ground in order to accurately determine the distance.
Foreign cars are often greatly undervalued. It looks nice, but it’s better not to crush the car’s belly on Russian roads. And off-road you need to drive at least 200 mm. Ground clearance has also increased on older cars that have noticeably lower springs.
Each group of cars has its own optimal ground clearance:
- passenger car - 140-200 mm;
- SUV - 180-250 mm;
- SUV - 200-350 mm.
Having measured the ground clearance of his iron horse and remaining dissatisfied, the motorist begins to improve it by increasing the height of the car.
How to increase clearance yourself
The distance can be increased on its own. Most often, special devices are used for this - spacers.
Selection of materials
Spacers to increase the overall dimensions of a car are made from the following materials:
Each material has its own advantages and disadvantages.
Rubber spacers
- resistant to external influences in the form of acid, salt, alkali;
- they do not affect the car’s maneuverability and comfort in the cabin;
- they do not have a corrosive effect on the body;
- they are cheap in the car market.
- rapid wear;
- subject to deformation and damage.
Rubber gaskets are secured under the springs.
Polyurethane spacers
In addition to the benefits of rubber, they also have:
- increased resistance;
- withstands significant loads without breaking;
- Capable of absorbing impacts on uneven road surfaces.
The disadvantages include:
- high pressure on the bushings;
- possibility of body deformation.
These spacers are also suitable for installation under springs. They are more expensive than rubber ones, but cheaper than metal ones.
Aluminum spacers
All of the above advantages of other materials are more pronounced in aluminum spacers. They also do not wear out for a long time.
The only significant drawback is the possibility of corrosion on the body. They are usually mounted at the junction of the shock absorbers with the car.
ABS plastic
Currently, it is the most acceptable gasket material on the automotive market. It has all the advantages of previous models, but without their disadvantages.
Plastic spacers are placed under the springs.
Installing spacers on the front of the car
Installation of spacers in front of the machine is carried out in accordance with the following instructions:
- The car is jacked up and the wheel is removed.
- Disconnect the brake hoses and unscrew a couple of nuts from the front strut, after tightening the springs with a clamp.
- The support is removed by unscrewing the nuts from the upper support.
- Old bolts are replaced with new ones of longer length.
- The gasket is screwed on and assembled in the reverse order. If there is interference from the crossbar, it is supported by a second jack.
- All the same actions are repeated with the second wheel.
Installing rear spacers
Installation of spacers on the rear of the car is carried out according to the following instructions:
- The thresholds of the rear doors of the car and under the trunk lid are removed.
- The rear seats extend as far forward as possible. The lining is removed from the barrel and side walls, completely exposing the body.
- Jack up the car from behind with a jack and remove the wheel.
- Tighten the nuts at the top and bottom and remove the holder.
- Old bolts are replaced with new ones of longer length.
- Attach the spacer to the bolts and reassemble in reverse order.
Main rules when installing spacers
There are a few things to keep in mind when installing spacers:
- metal spacers must be subjected to anti-corrosion treatment;
- if a passenger car has front-wheel drive, it should not rise above 20 mm;
- in 80% of cases it is desirable to install spacers both above and below the synchronizing spring;
- when installing spacers on the backrest, it is necessary to take into account the angle of the car (it is better not to raise it more than 30 mm);
- if the play increases by more than 30 mm, problems with car alignment may occur;
- Bolts and studs of the correct size must be supplied with spacers.
PNEVMOBALLONI.RU
Fans of off-road driving put a lot of stress on the suspension, so many people think about strengthening it. To do this, you can use special spacers for the springs, which increase not only their rigidity, but also their ground clearance.
Such modifications are recommended only when the springs have shrinked and the ground clearance has decreased significantly. This is an excellent option for those who often drive off-road and country roads.
But even in the most unpleasant cases, you should not use spacers thicker than 30 mm, since a large thickness can seriously damage an already worn spring.
Note that an excellent alternative to spacers is the installation of air cylinders. This method is not only cheaper, but also easier to implement. You can find out more about air springs here.
Types of spacers to increase ground clearance
The choice of modification depends on the make of the car. Aluminum and steel options are used for the front shock absorbers. They are a box with holes for fastening.
Spacers for the rear spring are made of high-density rubber, polyurethane or plastic. They are shaped like rings with three eyes.
There are also spacers to increase ground clearance, the core of which is made of steel and the body is made of polyurethane. They have a serious drawback - the body wears out faster than the inside, so there is a risk of damage to the car body.
Aluminum spacers are more reliable, but this metal is susceptible to corrosion. Ultimately, plastic proves to be the most reliable, which is why car owners prefer such modifications.
Disadvantages of using spacers
Despite their effectiveness, installing spacers on the front springs has several significant disadvantages:
The use of spacers on the rear wheels does not have significant side effects.
In order to reduce the negative effect, you need to follow the following rules:
Note that taking into account all the listed disadvantages, a more reasonable solution would be to install pneumatic cylinders.
How are spacers installed for front springs?
You can install spacers on your car either yourself or at a car service center. To get started you need:
Problems may arise with the last point, since on some cars it is very difficult to get to the nuts on the hood side, and additional parts have to be disconnected. The original bolts are too short to add trims, so they must be knocked out and new ones installed. Now you can install the spacer and reassemble the entire mechanism, performing all the steps in reverse order.
A situation may arise when the spring of the transverse strut prevents everything from being put into place. In this case, you need to prop it up until it reaches the hole for the fastener. This cannot be done manually, so another jack will be required.
Installing rear spring spacers
The scheme may vary depending on the car model, but approximately the preparation process consists of the following steps:
After these steps, you will have access to the metal frame of the car, with which you have to work.
Then, using a jack, the rear wheel is lifted, and actions similar to working with the front springs are performed: removing the wheel, supports, replacing bolts, installing a spacer and reassembling in the reverse order.
Nuances of self-installation
Before installation, it is necessary to calculate the optimal clearance value. This parameter is different for different types of cars. For example, for passenger cars the clearance should be from 140 to 200 mm, for SUVs - from 180 to 250 mm, and for SUVs - from 200 mm to 350 mm.
If the car is under warranty, then in the event of a breakdown, the parts that were manipulated will not be covered by the warranty. Therefore, in this case, it is better to contact the official service center where you are undergoing service. This will be more expensive, but more reliable.
So, installing spacers to increase ground clearance is a fairly relevant modification for off-road driving.
It doesn’t matter what material they are made of, aluminum, polyurethane or rubber: each option will give you new emotions from driving off-road and on bad roads.
You can view the range of spacers here.
Disadvantages of tuning
Increased ground clearance also has disadvantages:
- the load on the carriage increases;
- poor machine stability on ice;
- a shift in the center of gravity leads to deterioration in maneuverability;
- wear of steering system elements accelerates;
- Toe camber imbalance occurs.
If the car owner is not a car expert, he is more likely to damage the car by installing spacers himself. In this case, it is better to entrust the increase in height from the ground to professionals.
Other methods for increasing ground clearance
In addition to installing spacers, motorists know other ways to increase the free space of a vehicle:
- Increase your wheel size.
- Replacing shock absorbers and springs.
Increasing wheel size
To increase ground clearance, larger wheels are installed on the car. This is fraught with some problems:
- the speedometer will show the wrong speed because it is based on the number of wheel revolutions;
- wheels that are too large will stick to the fender liners and interfere with driving;
- Larger wheels will change the diameter of the disc, which will lead to accelerated tire wear.
Replacing shock absorbers and springs
You can increase ground clearance by replacing shock absorbers and springs with longer ones. This method has some disadvantages:
- the cost of parts is much higher than the cost of spacers;
- replacing these elements is a very complex and time-consuming task, and when contacting a specialist it is expensive;
- Changing these major parts will void the warranty if the machine is new.
Conclusion
In general, the method of installing spacers under shock absorbers, on the one hand, is not such a difficult thing, however, there are nuances in this task that only a fairly experienced person can do. And of course, this part is designed specifically to reduce the costs that you might incur when replacing shock absorbers. At the same time, the car stops sagging due to increased weight and the fender liners no longer touch the wheels. So spacers are a worthy way to eliminate this problem, which has every right to life.
Sources
- https://pricep-vlg.ru/auto-gadget/prostavki-dlya-uvelicheniya-klirensa/
- https://www.kolesa.ru/article/vsyo-vyshe-i-vyshe-i-vyshe-kak-i-zachem-podnimat-kuzov-avtomobilya-prostavkami
- https://zamena-podshipnikov.ru/prostavki-dlya-uvelicheniya-klirensa.html
- https://AutoTopik.ru/sovet/1269-prostavki-dlya-uvelicheniya-klirensa-svoimi-rukami.html
- https://AvtoKart.ru/diagnostika-i-remont/kak-uvelichit-dorozhnyj-prosvet.html
- https://autodont.ru/running-gear/shock-absorber/prostavka
Results
The structure of a car requires complete balance of all its parts. If you make any changes, you can break it badly. If you need to use the car in poor background power conditions, it is worth choosing a suitable car model. If you need to increase ground clearance, you need to correctly calculate all the details.
Do-it-yourself spacers for increasing ground clearance are one of the simplest and cheapest ways to solve the problem of the bottom of the car catching on uneven roads and increasing cross-country ability.
But how much they can help, what their advantages and disadvantages are, is worth understanding in more detail.
What then?
It is necessary to remember about the gradual wear of spacers if they are made of rubber or polyurethane. Every 20 thousand kilometers it is required to do computer diagnostics of the chassis and carefully inspect the wheel tread. If any problems are detected, new inserts should be installed or removed altogether.
Increasing vehicle clearance is a necessity for most car owners. The quality of roads in many cities of the Russian Federation leaves much to be desired. Spacers allow you to increase the vehicle's maneuverability and reduce the likelihood of damage to the vehicle when driving on country roads.
The problem of insufficient clearance
Many owners of passenger cars during operation are faced with a problem - the car’s low ground clearance, due to which, when overcoming bumps, the car clings to the bottom until it hangs on its “belly”. This is especially noticeable in winter.
In addition, the problem with insufficient height can arise both with a new car, in which a small ground clearance is structurally provided (such cars are usually called “puzoterka”), and with models with a tolerance, in general, quite acceptable, but due to the spring suspension it happened decrease.
So, what driver doesn’t want to bring his car at least a little closer to crossovers and SUVs in cross-country ability.
And the easiest way is to increase the ground clearance.
Ways to increase clearance
There are several ways to increase ground clearance; when choosing the best, you should take into account the problem being solved: increasing ground clearance to increase cross-country ability or eliminate the consequences of a withered spring.
One of the easiest ways to increase ground clearance is to install larger diameter wheels on your car. This solution can really help add a couple of inches between the bottom and the road.
But there are many negative aspects: installing such wheels will be expensive, the play will increase, but the distance between the wheel and the arch will decrease, and the load on the suspension and transmission will increase. In general, this method is not the most optimal.
It is possible to increase the stiffness of the tensioned springs, thereby reducing body vibrations when driving over uneven surfaces, not only by replacing them (which is not always cheap), but also by installing elastic elements between the coils of the spring.
Their main task is to resist compression. Previously, ordinary tennis balls were used for these purposes (and now for some this setting is quite relevant).
Now you can simply buy special rubber gaskets that are installed between the coils. This modification of the suspension only increases the stiffness of the springs and has virtually no effect on ground clearance.
You can also increase the ground clearance by completely reworking the chassis and installing air suspension instead of the usual ones. But this is a very expensive option.
Installing spacers is the easiest way to increase both ride height and spring rate.
You don’t need to change anything in the car’s suspension; they are cheap or you can make and install them yourself.
The essence of this method is to add special pads under the shock absorbers between the body and the support (increases ground clearance) or between the support and the spring (increases stiffness).
everything is simple: the spacer will not allow the shock absorber to fully unfold (rest against the body), as a result, the supporting part will rise relative to the wheel, thereby increasing ground clearance.
As for spacers to increase rigidity, after installing the strut the spring will be in a more compressed state.
Big wheels
This is a rather expensive method, but at the same time simple to implement. You can do it yourself without any problems, as it is as simple as possible. Your task is to buy other wheels and tires of a larger diameter and install them.
For example, you can easily increase the ground clearance by removing your 15th wheels and installing 16th ones, respectively, installing the same tires. But be careful, take tires with the same profile as it was. The fact is that if it is less, then the ground clearance will either not change, or, on the contrary, will decrease.
Look at what wheel sizes are suitable for your car, as if they don't match, problems will arise. When turning, the wheels can touch the arches, thereby damaging the tires and the arch itself, which is not particularly encouraging.
You also get an improvement in appearance, but that's a plus. The speedometer will display a lower speed, and the vehicle's mileage will be lower according to the instruments than in reality. In addition, dynamics and maximum speed will decrease, and consumption will increase. The fact is that wheels with a larger diameter are simply heavier. But these changes will not be particularly big.
Most cars will allow this method to increase their ground clearance by a maximum of 3 centimeters. This is not so much, but maybe someone needs it, plus they wanted new wheels.
What are spacers made of?
Manufacturers of auto parts and accessories have already noticed that spacers are in demand, so they have already started producing them.
In addition, different materials are used for their manufacture:
Polyurethane and rubber are elastic materials by nature, so they can shrink during operation, which allows them to better dampen vibrations.
At the same time, polyurethane is very resistant to negative environmental influences, so it can last a long time.
But the design of such spacers often uses metal bushings in the bolt holes, and this is their disadvantage.
When compressed, these bushings come into contact with the body, and corrosion may appear at the points of contact.
Although rubber is subject to “aging,” such gaskets do not contain metal elements, so they do not have a negative effect on the body.
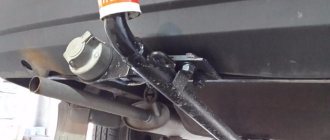
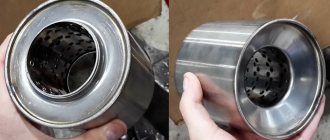
On a Suzuki Escudo it looks like this:
Aluminum gaskets are very durable, but since they are metal, corrosion can occur where they contact the housing.
Plastic is better in this regard. It is also durable but will not rust. Therefore, spacers made of rubber and plastic are optimal for installation on cars.
It should also be noted that it is advisable to use spacers made of durable materials on the front suspension, and elastic ones on the rear suspension.
Also, you cannot endlessly increase the space with the help of spacers.
Their thickness should not exceed 3-5 cm; the use of thicker substrates will lead to a significant deterioration in vehicle handling.
Conditions of use
If we consider this issue from a mechanical point of view, then the only conclusion suggests itself is that the use of wheel spacers is permissible only in cases where the offset is greater than the standard one. In this case, the width of the part itself (in millimeters) must exactly match the difference between the actual and required overhang.
It should also be understood that the key aspect when choosing a spacer for a disk is the quality of its manufacture. If the alloy of the part is not homogeneous, or there are errors (even minor ones) in the location of the bolt holes, then wheel damage is very likely, which will literally destroy the car’s suspension in the shortest possible time. And in extreme conditions, these unaccounted for critical loads can even lead to instant destruction of the suspension, with all the ensuing consequences.
All of the above should warn every car enthusiast from purchasing the handicraft parts in question, and also avoid purchasing products from an unknown manufacturer.
Advantages and disadvantages
If we consider the positive aspects of using spacers to increase ground clearance, in general there are not so many of them:
- Increased vehicle maneuverability;
- Increase spring stiffness;
- Increase the carrying capacity of the car (when loading the car does not fold so much);
- The likelihood of damage to the underbody of the vehicle is reduced.
There are many more disadvantages to such a suspension setup, so you should think carefully about whether it is worth installing them.
Car suspension spacers are:
- Reduced vehicle stability on the road due to a change in the center of gravity;
- Increased wear of truck components;
- Increased load on transmission joints (in front-wheel drive vehicles);
- Change the task to fail as a whole (becomes more difficult);
- Deterioration in controllability.
But here it is worth noting that with the right approach to the problem of installing spacers, the negative impacts will be minimal and almost unnoticeable.
A little about the results
Although installing spacers on the struts is the best way to raise the car, one should not hope that this intervention in the suspension design will be completely without negative consequences.
Result of installing spacers
This value was not calculated in any way; it was revealed experimentally. And experience suggests that installing a little more than two centimeters of spacers on the front end is most often enough to confidently overcome small road obstacles on city streets and country paths. The same experience says that no matter how much we increase the ground clearance of an ordinary sedan, we will not make a jeep out of it.
A few more arguments that prevent excessively increasing the clearance:
- changing suspension angles;
- changing wheel alignment angles;
- deterioration of the aerodynamic qualities of the car;
- upward shift of the center of gravity.
Having increased the ground clearance of your car and thereby increasing its cross-country ability, do not forget that the price for this is a deterioration in its stability on the road, especially at high speeds.
If everything worked out perfectly for you and you managed to lift the car with your own hands, then you still cannot do without a visit to a car service center. There you need to adjust the headlights and geometry, since these operations are best left to professionals. Yes, there is no way to make them in a garage.
Now that the ground clearance of your iron friend has been increased, you can test the result, but don’t overestimate it; choose a test drive site carefully, otherwise you won’t have to run after the tractor.
Installation algorithm
Installing spacers to increase ground clearance (if they fit between the strut support and the body) is not difficult and can be done with your own hands.
Below is the general sequence of work for installing them. It fits almost any car, but it should be borne in mind that each model has its own specific nuances.
To install spacers in front you need:
- Unscrew the wheel and remove it from the car;
- Disconnect the levers and steering tips from the rack;
- Unscrew the nuts securing the strut to the body;
- Lower the stand and turn it so that there is access to the upper support;
- We remove the “original” bolts from the support (knock them out), put elongated ones in their place (so that the bolts do not turn when tightening the nuts, it is better to weld them to the support);
- We put a spacer on the bolts;
- Place the holder in place and secure it with nuts;
- Let's put everything in its place.
Then the operation is repeated on the other side. After installing the spacers, you need to adjust the camber angles.
The underlays are installed on the rear suspension in much the same way. That is, we disconnect the stand from the body, change the bolts, install a spacer, and put everything in place.
The only thing is that after installation work, adjustment of the angles is not required.
But this describes the installation of spacers on passenger cars, which are mainly used in front of MacPherson struts.
But there are also machines that have a different design, so supports are often installed under the springs. All this is shown more clearly below.
Varieties
There are three main types of these elements used to increase ground clearance and increase the rigidity of a car's suspension.
- Interturn. Mounted in springs. They are considered the simplest and most accessible. Strengths include ease of installation and versatility. They are mounted in the rear and front springs. However, you should not count on an increase in ground clearance. They are designed to increase rigidity. Having installed them, you can easily load the car, place bags in it and not worry that the bottom of the car will start to rub against the asphalt. Installation is generally elementary. You need to jack up the car, hang the desired wheel and stretch the spring. Then a spacer is inserted there. Advice from me personally. Before inserting the element, wet it with soapy water. This way he will easily fit into his place.
- Under the springs. The problem of insufficient ground clearance is already being solved here. The element is mounted between the spring itself and the body of your car. Please note that the ground clearance rises exactly as much as the thickness of the spacer. Remember, if you install a spacer on a body with traces of corrosion and a faulty spring, the consequences can be dire. Also, if the spring sag, spacers for the spring will be ineffective. At this point, immediately replace them with new ones.
- Spring adjustable. They perform a function similar to the previous version, but can be adjusted. Well, yes, you already understood it from the title. A good option, since you will be able to quickly change the clearance height, if necessary, depending on the load of the machine. Yes, their price is higher, but it is completely justified if you want to do everything really efficiently and usefully.
Homemade spacers
Any spacers are structurally simple, so they are easy to manufacture. In addition, it is quite a creative process.
Some make them by simply cutting out an old tire, others use hard rubber, steel, polyurethane and other materials.
All tools are good for the job. At home, a drill, a puzzle, a file, etc. They can be useful for this.
Those who have the ability to use a lathe will simply sand them down piece by piece.
As a rule, any suitable material can be used for manufacturing, and it can also be processed using various tools and equipment. The only important condition is compliance with the dimensions.
For cutting, you can try to find drawings, and if there are none, you should be guided by the dimensions of the suspension parts (for example, a spacer for a spring is made according to the diameter of the spring itself and its seating position).
In general, if you wish, it is quite possible to make spacers at home.
Other springs
This method is used most often by car enthusiasts, since it can be figured out even without using an Internet search. Increasing ground clearance using this method is not difficult, but if you do not have a particularly popular car, then you will have a very difficult time finding springs.
This method has a lot of disadvantages. Firstly, you will not find such a spare part from the manufacturer, that is, you cannot be sure of the quality of the spring and the materials from which it is made. Secondly, handling suffers greatly, with increased roll and poor stabilization on the highway.
This is very easy to do, you buy new springs and install them. It is difficult to discuss the cost, since the amounts depend on the manufacturer and the specific model. As a result, you will get plus 6-12 centimeters. But such increases will have a very bad effect on your driving safety.
Examples of spacers for different cars
And now about installing spacers on different models. The first will be the VAZ-2121 Niva.
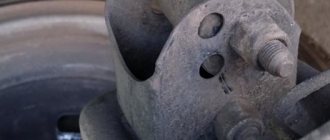
To increase the play in it, you will need to make spacers for almost all suspension elements; those installed at the top under the springs and shock absorber look like this:
In addition, in the Niva they can be installed under the ball joints of the levers, under the spring, etc.
But the Ford Focus 2 uses MacPherson suspension, so it is possible to install a pad at the front between the pillar and the body.
The dimensions of the spacer are as follows:
The same situation applies to Kia Sid 2. The underlay for this car looks like this:
Factory spacers for Daewoo Nexia look like this:
But after taking the necessary measurements on the top support, you can easily cut the same ones at home.
On the Nexia rear support you can use this option.
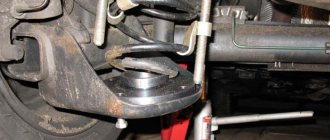
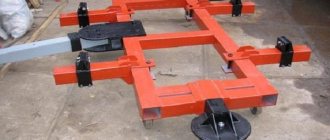
But UAZ has the same situation as Niva. The front spacers on this car look like this:
As you can see, their shape is quite complex and it will be impossible to make them at home.
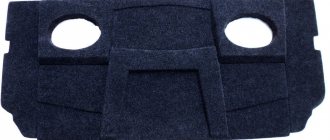
But it’s not difficult to make rear spacers for the spring. Their factory version looks like this:
And here is a series of spacers for the front and rear suspension of the Chevrolet Lacetti. If the back substrates are actually cut at home, then the services of an experienced turner will be required to make the front ones:
For Renault Logan, it is better to buy spacers to increase ground clearance, since this is almost impossible to do in a garage:
But on the Suzuki SX4, the front pads can be cut out to increase ground clearance. They look like this:
An important condition for the manufacture of spacers is compliance with all dimensions.
Therefore, if they are made based on measurements of the suspension elements, then it is better to first make cardboard templates, and then make substrates based on the dimensions of these templates.
However, during installation it will almost always be necessary to replace the mounting bolts with longer ones.
And here it is very important to approach the quality of the equipment. It is better to take high-strength bolts with fine threads.
Video: homemade spacers to increase ground clearance.