The catalytic converter is a purely environmentally friendly part. Platinum and palladium deposited on the surface of its honeycomb accelerate the oxidation of exhaust gases to harmless water vapor and carbon dioxide, which are absorbed by trees. And rhodium activates the reduction of pure nitrogen.
All harmful substances interact with oxygen, which means that its share at the outlet of the catalyst should decrease. EURO 3 and higher standards strictly regulate exactly how much less it should be. Therefore, on any car that meets these standards, a second oxygen sensor is always installed behind the “can”.
He is being deceived.
Why do you need to fool the oxygen sensor?
If you found out the cost of replacing oil seals and decided to delay this procedure, then remember - the catalytic converter does not last forever. It’s rare that anyone replaces it with an analogue, much less an original. It is much cheaper to install a flame arrester, and solve the issue of additional oxidation of harmful substances in exhaust gases by installing a catalyst blende yourself. The idea of this solution is not to remove the second oxygen sensor, but to make it show the readings necessary for the normal functioning of the ECU.
If you cut out the catalyst and leave everything as it is in the electronic engine management system, you will instantly get a lambda error. This will be indicated by the Check Engine icon, a “stifled” gas pedal and increased fuel consumption.
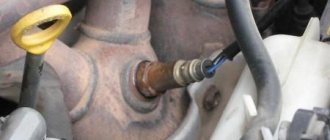
For your information. A lambda probe, located immediately behind the exhaust manifold, is found on all injection engines. The second sensor appeared on cars with EURO 3 class and higher.
There is only one alternative to emulation - flashing. Control programs under EURO 2 see only one oxygen sensor - the one that corrects mixture formation. “Sewing” the ECU just to disable the second sensor is expensive, and the reliability of non-original firmware can be poor.
What is a lambda probe emulator
To deceive the oxygen sensor means to force it to produce standard values. That is, show the electronic engine control system that there is a catalytic converter and it properly cleans exhaust gases.
What does it look like
There are two types of decoys: mechanical and electronic. A table with a photo gives a general idea of what they are like.
| Type of blende | Subspecies | Photo of the emulator |
| Mechanical | Plug with hole | |
| Bushing with minicatalyst | ||
| Electronic | Autonomous unit with microcontroller | |
| Resistor and capacitor circuit |
Where is it placed?
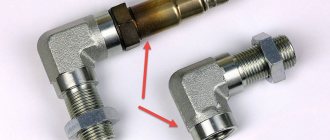
- Any of the mechanical decoys is a bushing that is screwed in instead of the original lambda, and the sensor is already placed directly into this screw.
- The resistor and capacitor are soldered into the contact gap of the original sensor.
- An autonomous unit with a microcontroller is placed between the block and the lambda probe.
Do-it-yourself mechanical blende of an exhaust system catalyst
The table presented two types of “mechanics”. The scope of their application is different, the design and principle of operation are different.
Attention! When choosing/making a mechanical lambda probe with your own hands, evaluate the amount of space above the second oxygen sensor. If there is a deficiency, it is necessary to use a rotary sleeve.
Option No. 1: screwdriver with a small diameter hole
So-called “empty” mechanical emulators are suitable for a narrow series of cars with EURO 3. Tentatively, these are foreign cars produced before 2004 and domestic cars produced before 2011.
Principle of operation
The function of the bushing is to isolate the lambda from the direct flow of gases, which contains a lot of oxygen. Through the small hole, only a small part of it reaches the sensor, but enough for the sensor to respond to the ECU with a qualified signal.
How to do
Where is it placed?
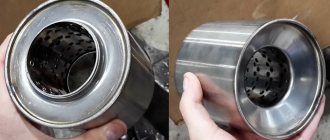
Option No. 2: bushing with minicatalyst
Suitable for cars of any EURO environmental class.
How does it work
Manufacturing technology
It is difficult to make on your own due to the inaccessibility of small-sized copies of catalysts. Otherwise, the technology is not much different from that specified in option No. 1. The work is carried out on a lathe; the dimensions are entered in the drawing after preliminary measurement of the sensor thread and the seat for it.
How to install
The installation technology is identical to the method described in option No. 1: unscrew the oxygen sensor and screw it into the adapter sleeve. Screw the assembly unit into the exhaust pipe.
Important! When using bushing spacers of any type, the lambda must be in good working order.
Do-it-yourself electronic snag of the second lambda probe: diagram and recommendations
The table shows two types of electronic designs. If we evaluate it strictly, then only a circuit made of a resistor and a capacitor falls under the definition of a handmade blende, since it can be made by yourself. The autonomous unit operates on the basis of a microcircuit, which is difficult to solder at home.
Option #1: Integrating a resistor and capacitor into the wiring
A universal circuit suitable for many machines is shown in the photo. When designing with your own hands, you should only take into account the configuration of the electronic blende of the second lambda probe:
- The resistor is soldered into the break in the signal wire.
- A non-polar capacitor is connected to the ground gap and the signal contact.
The characteristics of the components are selected individually for each vehicle. Let’s say for Mitsubishi Lancer X you need a pulse resistor of 1 MOhm, 0.5 W, 5% and a non-polar “condenser” of 2.2 μF, 50 V. And for Nissan Primera - a resistance of 150 kOhm, 1 W + a capacitor of the same class, only at 1 µF.
There are plenty of examples of unsuccessful lambda deception. Let's say on the Audi A4 this kind of intervention is pointless. After soldering the components, the system records the fact that incorrect readings are being given or there is no signal at all from the sensor.
For your information. Thematic forums for specific cars or blogs of users of the automotive social network DRIVE2.RU will help you find out the characteristics of the resistor and capacitor that are suitable for your car, and generally make sure that this method will give results.
Option No. 2: microprocessor board in the lambda probe wiring break
Intelligent emulators based on medium-complexity chips are often purchased ready-made. The device has a presentable appearance: the connection is made without any twisting/soldering - only connector blocks.
For your information. When purchasing, it is important to discuss with the seller the compatibility of the electronic catalytic converter with the firmware version of the central computer of your car.
Which lambda probe decoy is better to install?
The advantage of mechanics is that there is no electrical part, which means there is nothing to break. But it is useless if the oxygen sensor is broken. If you do not take into account homemade electrical circuits based on a resistor and capacitor, then a full-fledged electronic blende can be considered as an alternative to purchasing a new oxygen sensor.
| Emulator selection table depending on the year of manufacture of the car and the sales market | ||
| Sale market | Mechanical snag | Electronic snag |
| European Union | 1997-2000 | 2001-present |
| USA | 1996-1999 | 2000-present |
| Japan | 1998-2003 | 2004-present |
| Russia | 2004-2005 | 2006-present |
| Belarus | 2006-present | 2007-present |
| Ukraine | 2007 | 2008-present |
After all, many microprocessor emulators do not need a lambda probe. They generate a signal using information from the first lambda. The main thing is to choose the right device so that it matches the specific ECU.
In total, we advise you to follow two recommendations:
- A device with a minicatalyst is the best option.
- Microprocessor unit - if it was not possible to unscrew the lambda probe or it has failed.
Asking price in the store and at the service station
The trick is positioned as a cheap alternative to flashing it for EURO 2. Indeed, they ask for at least 15,000 rubles to change the ECU software. Even the most expensive standalone emulator with installation costs a maximum of 8-10 thousand rubles.
At the same time, the factory engine control program is preserved, and hence the reliability of the system as a whole.
If you take the best option, a fake with a minicatalyst, then the problem with the ECU can be completely solved for 1,000-2,000 rubles.
And for owners of cars with low-sensitive sensors (EURO 3) it will cost even less: 500-1,000 rubles.
Flashing the ECU
This method is a radical solution to the problem. The point is to program to exclude the oxygen sensor located after the catalyst from the “field of view” of the ECU. In this case, the computer will operate with data from the first lambda probe, and emergency mode will not be activated.
While mechanical deception of the catalyst can bear fruit, this method has a significant drawback: it is impossible to find the correct factory firmware. And you can use third-party tools only at your own peril, as there is a risk of ruining the performance of the engine. To solve this issue, you will have to look for an excellent specialist, and in terms of money the costs can be compared with the cost of the original spare part. So is it worth it?!
How to make a simple lambda probe or oxygen sensor
In this article I want to talk about how you can make a lambda probe or oxygen sensor with your own hands. Usually such decoys are made when cutting out the catalyst, its poor performance, or when the second lambda probe is faulty, then you can install a decoy without buying a new one.
A lambda probe or oxygen sensor converts data on how much oxygen is contained in the exhaust gases into an electrical signal. The sensor sends an electrical signal at the moment when it detects changes in oxygen, the signal is transmitted to the controller, which receives the signal and compares the received data with the indicators stored in memory.
If the received data does not coincide with the optimal values for the current mode, the control unit changes the fuel injection duration accordingly. This is done to achieve maximum engine efficiency, save fuel and reduce the amount of harmful emissions into the atmosphere.
Usually, recently, two sensors are installed on cars, one before the catalyst, the second after the catalyst, the signals from these two sensors should be different, then the control unit regulates the injection duration according to the received signals from 2 sensors, but if one of the sensors fails or the car owner removed the catalyst, or alternatively replaced it with a flame arrester, the signals from the 2 sensors will begin to coincide, which will be perceived by the control unit as an emergency mode.
In this case, the controller will select average injection control parameters, which will ultimately lead to an increase in fuel consumption with a simultaneous decrease in engine power and its unstable idling, and “Check-Engine” will light up on the dashboard, indicating an error.
So, let's consider the mechanical type of blende, this is when a spacer is installed in place of the second sensor, and then a lambda probe is screwed into it.
The spacer can be made according to the drawing below, which has been tested for more than one year of operation.
But I think it’s more effective to make a blende using the second method, since I don’t know a turner, but I can probably solder one resistance and a capacitor. The figure below shows how to install a capacitor and resistor into the wires that go to the oxygen sensor.
This method is also time-tested and has proven itself on the positive side.
And I also want to note one point that sometimes the heater of the sensor itself fails, in this case the “Check-Engine” error also appears, but even here you can put a trick.
This can be done this way, without unscrewing the oxygen sensor, we connect to two white wires that go to the sensor heater, a simple car light bulb, for example, from the dimensions, it is desirable that it has a resistance of 4 to 12 Ohms (the resistance varies on different cars).
The resistance of the light bulb will tell the ECU that the heater is in good condition and will not generate an error. This is only acceptable for the second oxygen sensor, which is located after the catalyst.
And to summarize, making a fake oxygen sensor is not such a difficult task. Good luck to everyone on the roads.
What do spare parts manufacturers offer?
On the shelves of auto stores you can find all kinds of parts for tuning the exhaust system. The production of mechanical simulators of the normal operation of the catalytic converter is made of bronze or chrome-plated steel. The price of such devices ranges from 400 to 800 rubles, and a standard installation at a service station will cost about 500 rubles.
A spacer with a minicatalyst is offered much more expensive than its elementary counterpart, its cost is 1,500-4,000 rubles. Simple electronic emulators of industrial production are sold for 1,500-3,000 rubles. The range of prices for flashing ECU software is quite wide - from 1,000 to 30,000 rubles.
Good day everyone! In previous entries I wrote that I wanted to install a lambda probe (mechanical) but the idea was not successful... - I could not unscrew the sensors...
In the end, I decided to make an electronic deception and install it, read a lot of information on the Internet, consulted with smart people and began to implement the decoy =)
Then, as usual, the photo is of poor quality =)
I don’t have a photo from the installation, I didn’t have time to make it clear from the diagram how to install it
I’ll tell you a few things right away:
1. wires we have black (signal), gray (ground) and 2 white (heating)
2. experimentally and on the advice of “experienced” people, it turned out that all the diagrams on the Internet are nonsense... the installation is correct, but the components are not the same...
Everywhere they write that you need to install a non-polar capacitor - I agree with this, but a 1 MΩ resistor gives a not entirely accurate amplitude on an oscilloscope... yes, if Jackie-Chan appears, this option will work, but the sensor will not work quite accurately... But during installation a 150 kOhm resistor, the amplitude will be almost similar to the amplitude when there is a catalyst...
in general, think for yourself... I decided to try both options... 1 was dropped immediately, because after riding for a couple of days, I didn’t notice any difference at all, but when I installed the second option... then it’s a completely different matter! I’ve been driving with it for about a week now, so far the consumption has dropped, but not by much... earlier, with active driving, the BC showed more than 13 liters... which was not pleasing, now it’s 10.5 with active mode, 9 with “grandfather” mode, in general, consumption has dropped and is not increasing =)
Excerpt from Murzilka:
Excess air in the mixture is measured in a very original way - by determining the residual oxygen content (O2) in the exhaust gases. That's why the lambda probe is located in the exhaust manifold in front of the catalyst. The electrical signal from the sensor is read by the electronic control unit of the fuel injection system (ECU), which in turn optimizes the mixture composition by changing the amount of fuel supplied to the cylinders. Some modern car models have another lambda probe. It is located at the outlet of the catalyst. This achieves greater accuracy in preparing the mixture and controls the efficiency of the catalyst.
Let's modernize: do-it-yourself catalytic converter and design options
At the present time of strict Euro standards, only outdated models do not experience any problems associated with the exhaust system. The situation is completely different with cars that meet Euro-2 and higher standards.
The oxygen sensor in such systems is an integral part that monitors the quality of the mixture and the amount of toxic substances in the exhaust.
In cases where the neutralizer is removed or replaced with a flame arrester , the ECU begins to malfunction, causing emergency operation.
At such moments, experienced motorists use a corrector for the operation of the oxygen lambda probe, which allows them to avoid mistakes and continue operating the car.
Do you need an oxygen sensor emulator?
Before you learn how to make a fake catalyst with your own hands, it would not hurt to familiarize yourself with the arguments in favor of this operation. Vehicles that are structurally compliant with Euro-4 or Euro-5 standards are equipped with two oxygen controllers installed before and after the catalytic converter. The sensors compare the readings, and if they do not match, the on-board computer concludes that the autocatalyst is faulty or missing altogether. This situation leads to the following consequences:
- The ECU puts the engine into emergency mode when the engine operates according to the specified fuel maps without taking into account the readings of the oxygen sensors.
- The “Check Engine” indicator lights up on the dashboard and an enriched fuel mixture enters the cylinders.
- Soot on the spark plugs increases, the power of the internal combustion engine decreases and the oil becomes contaminated.
- Increased fuel consumption entails extra financial costs.
Almost all automakers recommend replacing a faulty converter. But not every car owner will do this, because the price of some copies, for example, for VAZ, reaches 60,000 rubles. It is also worth adding the cost of installing the device. Therefore, many car enthusiasts are interested in what a do-it-yourself catalyst blende is and the scheme for its implementation.
The essence of the emulator's operation is to change the real sensor readings, after which the ECU switches to normal operation. In this case, the neutralizer itself can be cut out or replaced with a flame arrester. The procedure for installing a simulator is no more complicated than increasing the ground clearance of a Renault Duster.
How to make a do-it-yourself lambda probe for a car catalyst
To change the readings of the exhaust system oxygen sensor, our car enthusiasts use several methods; the choice depends on the design features of the car and the capabilities of the motorist himself:
- Mechanical spacer for lambda probe.
- Spacer for the sensor with built-in minicatalyst.
- Use of electronic simulators.
Any of the methods copes with the task quite effectively. Another option not listed here is flashing the on-board computer. The fact is that to independently implement such a project, you need not only specific knowledge, but also equipment and software.
How to make a mechanical corrector for the exhaust system?
To implement a mechanical blende for the catalyst with your own hands, it is recommended to use blanks made of heat-resistant steel or bronze. This way the parts will not be deformed due to high temperature. There are two designs, but both options require a lathe or the help of an experienced turner.
First option
It is a sleeve 40-100 mm long. On one side, a standard sensor is screwed in, and on the other, the circulation of gases is limited by a small diameter hole. The essence of the “device” is that the composition of the exhaust mixture is averaged, because the lambda probe is removed from the gas stream itself and, accordingly, catches fewer toxic substances. Due to this, it is possible to deceive the ECU.
A typical drawing with spacer dimensions can be changed in terms of dimensions, it depends on the model and brand of the car. The optimal inlet diameter remains unchanged - 1.5-2 mm. In some cases, the length of the bushing may not allow it to be installed in its original place. As a result, you have to weld the mount elsewhere in the exhaust pipe.
Tips and tricks
Pajero mini
As you can see, a catalytic converter error can be a real problem for the owner, and a large amount of money is required to replace the catalytic converter on the car.
Of course, you can install a lambda trick, but you should remember that this solution is not always possible to integrate well, especially on “fresh” cars. For this reason, it is advisable to follow certain rules to increase the service life of the catalyst.
First of all, it is important to understand that bad fuel can damage the catalyst. You should only refuel at proven gas stations, and also fill in gasoline of the brand recommended by the car manufacturer itself (for example, you cannot pour cheaper AI-92 gasoline into a car where the use of AI-95 or AI-98 fuel is allowed.). Secondly, you should not actively pour various fuel additives into the tank, especially from little-known manufacturers
The effect may be questionable, and the damage to the catalyst may be great.
Secondly, you should not actively pour various fuel additives into the tank, especially from little-known manufacturers. The effect may be questionable, and the damage to the catalyst may be great.
Third, any mechanical impact on the catalyst should be avoided (during car repairs and when operating the car). The fact is that the ceramic honeycomb of the catalyst is very fragile and can crumble even during aggressive off-road driving.
You also need to drive through puddles and snow piles carefully, since in this case the highly heated catalyst quickly cools. Such temperature changes can quickly destroy the fragile honeycomb of the catalyst.
DIY lambda probe emulator circuit
January 16, 2022. Category: Automotive equipment.
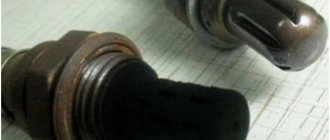
Lambda probe (also called oxygen controller, O2 sensor, DC) is an integral part of the exhaust system of vehicles that meet EURO-4 environmental standards and higher.
This miniature device (usually 2 or more lambda probes are installed) monitors the O2 content in vehicle exhaust mixtures, thereby significantly reducing the emission of toxic waste into the atmosphere.
If the DC is not operating correctly or if the lambda probe is disconnected, the functioning of the power unit may be disrupted, causing the engine to go into emergency mode (the Check Engine light will light up on the panel). To prevent this from happening, the car system can be outsmarted by installing a decoy.
Mechanical snag of the lambda probe (“screw-in”)
“Vvertysh” is a bushing made of bronze or heat-resistant steel. The inside of such a “spacer” and its cavities are filled with ceramic chips with a special catalytic coating. Due to this, the exhaust gases are burned faster, which, in turn, leads to different indicators of pulses 1 and 2 DC.
Important! Any snag is installed only on a working lambda probe.
A homemade lambda probe decoy, the diagram of which is presented below, is easy to manufacture. To do this you will need to prepare:
- workpiece;
- screwdriver;
- a set of keys.
The blende is made on a processing lathe. If there is none, then you can contact a specialist by providing him with a drawing.
The resulting part is compatible with most exhaust systems of both domestic and foreign cars.
Installation of the lambda probe blende is carried out as follows:
- Lift the car onto the overpass.
- Disconnect the negative terminal on the battery.
- Unscrew the first (upper) probe (if there are two of them, then remove the one located between the catalyst and the exhaust manifold).
- Screw the lambda probe into the spacer.
- Reinstall the "advanced" sensor.
- Connect the terminal to the battery.
Healthy! Typically, mechanical blending of the second lambda probe is not performed, since this DC is protected by a catalyst and only controls its condition. The most sensitive is the first sensor, which is installed closest to the collector.
After this, the “Check Engine” system error should disappear. If this method does not work, you can use a more expensive deception.
Electronic snag
Another way to eliminate problems with the DC is to use an electronic decoy of the lambda probe, the diagram of which is presented below. Since the oxygen sensor transmits a signal to the controller, a decoy circuit connected to the wiring from the sensor to the connector will “crude” the system. Thanks to this, in a situation where the lambda probe is faulty, the power unit will continue to operate correctly.
Healthy! The installation locations for such deception may differ depending on the PBX model. For example, it can be mounted in the central tunnel between the seats, in the dashboard or in the engine compartment.
The decoy circuit is a single-chip microprocessor that analyzes the processes in the catalyst, receives data from the first DC, processes it, converts it to the indicators of the second sensor and issues a corresponding signal to the car processor.
To install this type of snag, you will need a lambda probe connection diagram, which looks like this.
As you can see, there are different pinouts of the lambda probe (4 wires, three and two). The colors of the wires may also vary, most often there are products with 4 pins (2 black, white and blue).
To make a deception device, you will need:
- soldering iron with a fine tip and solder;
- rosin;
- non-polar capacitor with a capacity of 1 µF Y5V, +/- 20%;
- resistor (resistance) 1 mOhm, C1-4 imp, 0.25 W;
- knife and insulating tape.
Healthy! Before installation, it is best to place the circuit in a plastic case and fill it with epoxy.
Next, the electronic snag is mounted on the lambda probe with your own hands as follows:
- Disconnect the negative terminal of the battery.
- “Dissect” the wire that goes from the DC itself to the connector.
- Cut the blue wire and connect it back through the resistor.
- Solder a non-polar capacitor between the white and blue wires.
- Insulate connections.
Below is a do-it-yourself diagram of a lambda probe for pinout into 4 wires.
At the final stage, the following should happen.
Such manipulations should not be performed if you do not have the proper experience. Today, stores offer ready-made decoy circuits that even a novice driver can easily install.
Reflashing the controller
Some particularly sophisticated car owners decide to reflash the control unit, which blocks the processing of signals from the second oxygen sensor.
However, it must be taken into account that any changes to the system operation algorithm can lead to irreversible consequences, since returning the factory settings will be almost impossible and costly.
Therefore, it is not recommended to perform such manipulations yourself. The same applies to ready-made firmware that is sold on the Internet.
Healthy! When flashing the lambda probes, they are removed.
If you still want to flash the system, then contact a competent specialist who can disable receiving DC data using specialized equipment.
It is also worth considering that almost any intervention in the operation of systems can lead to not the most pleasant consequences.
What are the consequences after installing decoys?
You need to understand that any deception is installed at the risk of the car owner. If the installation was carried out incorrectly, you may encounter the following problems:
- Due to the fact that the on-board computer cannot regulate fluid injection, engine malfunction may occur.
- If the circuit is not properly soldered, it may damage the wiring.
- In the process of installing the decoy, you can damage the oxygen sensors, after which you will not even know about their malfunction (since you will already have the decoy installed).
- After such interventions (not only during flashing), the on-board computer may fail.
Any inaccuracy will lead to disastrous consequences, so it is better to install a safer ready-made emulator.
Unlike deception, it does not “deceive” the control unit, but only ensures its correct operation by converting the DC signal.
A microprocessor is also installed inside the emulator (as in a homemade electronic decoy), which is capable of assessing exhaust gases and analyzing the situation.
Which lambda decoy is best to use?
There are no perfect dupes. It all depends on the specific car and the features of the implementation of the function of monitoring the condition of the catalyst. In general, the only way out is to change the ECU firmware.
Often this is even provided for in its program; many cars are produced in various versions, including without catalysts. In any case, bypassing the built-in control will not be difficult for an experienced car chip tuning specialist.
Price issues stop many people and force them to engage in all sorts of deceptions. Here you need to clearly understand which methods work with this car, and which will be a waste of time and money. Although you can experiment if you have access to lathes, radio components and a soldering iron.
It is unlikely that you will be able to ruin the car here, but in case of final failure, you should still contact a specialist who will register the program for a lower environmental class.
As an option, you can install a fairly durable and reliable repair catalyst, which, considering the time spent and payment for the services of a specialist, does not look very expensive.