A common problem with a car's cooling system is a failed fan. It stops functioning. As a result, the running motor overheats, which leads to serious problems. In most cases, the device is damaged because the fan on-off sensor (FVS) is broken. To replace it, you need to know what it is, where it is located and how it works.
Types of devices, what they are used for
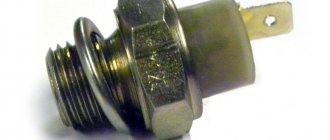
The sensor is a simple device. It consists of a pair of terminals and a bimetallic (brass-invar (iron-nickel alloy)) plate.
- For the cooler to work, an electric current is supplied to the device.
- It's warming up.
- Because of this, the plate expands.
- She closes the contacts.
- Next, voltage is supplied to the excitation winding in the fan motor.
- The cooler blades begin to spin.
In the newest cars with injection engines, the electronic unit that controls the engine is responsible for turning on the sensor. The functions of the block are the collection and processing of data from all indicators mounted in the machine. Based on the collected information, the electronics decide whether the fan should turn on. In older cars with carburetor engines, electromechanical sensors are installed that have a response temperature scale.
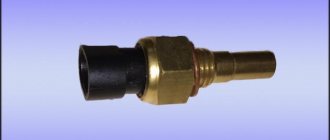
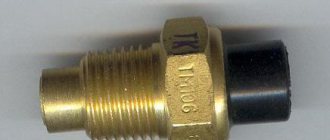
Depending on what type of device is installed, the cooler's turn-on time changes. You can find out at what temperature conditions the device operates by looking at the markings. They are located on the device body.
Where is?
It is important to regularly inspect the machine, paying attention to the condition of the temperature sensor. It is not difficult to detect, since it is fixed in the radiator. It is impossible to indicate a more specific location; there is variability depending on the car make, model, and year of production of the car. For example, the element is sometimes built into the left or right compartment of the radiator tank, top or bottom.
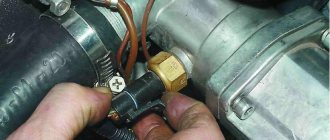
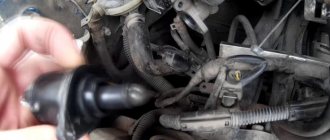
You can identify it in the radiator without much difficulty, since it is the only element to which the wires are connected.
A nut with a large head, which can be unscrewed using a 30mm wrench, will also help to distinguish.
Sensor location
About where the fan switch sensor is located. Most often, DVVs are placed on the side of the radiator. On some machines it is mounted at the top, on others - in the center of the device. On some models, the DVVs are located near the thermostat. Occasionally they are found in the cylinder block.
It is not difficult to determine. The device looks like a large brass nut. 2-3 electrical cables are connected to it.
When replacing the fan connection sensor, you need to consider one thing. The lower the switch-on temperature of the device, the lower it is mounted in relation to the coolant level. The numbers at which the lower sensors turn on do not exceed +85º. The temperature of the sensors, which are installed in the center of the radiator, is +90–95º.
Functions.
The element performs the function of a thermostat, but its main purpose is to protect the vehicle’s power unit from excessive heating. When the heating reaches a certain level, you need to send a signal to the ECU to turn on the ventilation device.
How does this system work? A significant amount of generated energy is transferred to the coolant. During this process, its gradual warming up becomes inevitable. The liquid heats up significantly; after reaching the t ° critical for the engine condition, the thermoelement sends a command to the electronic unit of the vehicle.
This will start the cooling process. Powerful air flows will flow to the radiator. The coolant will quickly return to normal.
Checking the device
If there is a suspicion that the DVV is out of order, the electrical network supplying it is first checked. When the integrity of the fuses and cables is not broken, the functionality of the device itself is determined. How to check the fan switch sensor:
- If the engine is fuel injected . The device wires are disconnected from the terminals. Then the motor turns on. The electronic control unit, having detected the absence of a temperature sensor, should start the fan after a few seconds. If this happened, then the cooler did not work due to the DVV, which transmits incorrect data.
- If you have a carburetor engine . The device cables are disconnected from the contacts. Then the motor turns on. The terminals are then closed. If the fan starts working, then the cooler connection indicator is damaged.
To definitively determine that the device has failed, it must be removed from the car. Then:
- Take any suitable container to pour water into. Lower the DVV into it. Then put a thermometer there, it will control the temperature.
- After this, take the tester and turn it on for continuity testing (resistance check). Connect the leads of the multimeter to the contacts of the device.
- Place the basin on the gas stove to heat the water.
- In this case, you need to monitor the temperature of the liquid using a thermometer. As long as the water is cold, the multimeter will show infinite or close to infinite resistance. When the liquid heats up to the temperature at which the combustion engine is switched on and it starts working, the resistance will drop significantly.
- Here you need to monitor the water temperature. The number will be an indicator of the health of the device.
- If all this does not happen, the device is faulty.
The cooling fan sensor cannot be repaired. If it is completely or partially damaged, it needs to be replaced.
Changing the safety valve
Another equally common problem that can lead to fan interruptions. If the above checks have been previously performed and all elements are in order, then you need to check the safety valve of the expansion tank.
The main function of the valve is to maintain the operating pressure above atmospheric pressure. Thus, the water present in the liquid does not boil when the temperature reaches 100 degrees. If the valve stops working, the pressure becomes the same as atmospheric pressure, and the liquid will begin to boil when it reaches a certain temperature.
The sensor will only work at 105-107 degrees. The liquid will begin to boil and the fan will not work. It is impossible to check the operation of this element in artisanal conditions. But it’s realistic to buy a new part and make a replacement.
If you need to replace the sensor, it is important to buy the same model with identical characteristics. Otherwise, the cooling system will start working too sooner or later. You can do the replacement yourself using the following procedure:
disconnect the battery terminal;
empty the radiator of liquid;
disconnect the two wires that are connected to the sensor. Use a 30 mm wrench;
Apply sealant to the new sensor and install it in the appropriate place;
do not tighten the sensor too much;
Fill with coolant, start the engine and wait until the temperature rises.
If all steps are done correctly, the procedure does not take much time. On average, replacing a new sensor takes no more than 30 minutes. You can contact a specialized center, but a simple procedure can be expensive.
Installing a new fixture
The operation occurs a little differently, based on the model and make of the car. But its stages are not fundamentally different. Replacing the fan switch sensor in most cases occurs as follows:
- First, coolant is removed from the radiator. This is done because the DVV is installed in such a way that after its dismantling, the substance pours out through the hole.
- Next, the power wires are disconnected from the device.
- After this, the device itself is unscrewed with a wrench.
- Then the device is replaced with a new one. To do this, it is mounted in the place where the sensor is located according to the instructions.
- Lastly, the coolant is drained back into the radiator. Wires are connected to the DVV.
After the car owner has changed the sensor, he must check the functionality of the device. While monitoring the temperature of the liquid and monitoring whether the cooler will work. If the fan spins, then the device is working properly.
General understanding of the cooling fan
The design is presented in the form of an ordinary electric motor, which is powered by 12V from the on-board network. The shaft has a special impeller, through which an air flow is formed, directed to the surface of the radiator. The fan is attached to the front of the frame, and is covered with a radiator grille on the reverse side.
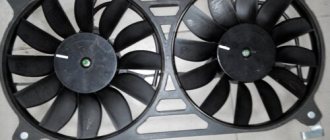
Using the VAZ as an example, it is worth noting that most often there is only one fan in the system, but there are exceptions among the domestic auto industry, as well as foreign cars. For example, NIVA is equipped with an impeller with two independent electric motors. This design helps to increase the cooling rate of the liquid, which is an additional guarantee of engine safety.
How to replace the fan switch sensor on a VAZ 2101-VAZ 2107?
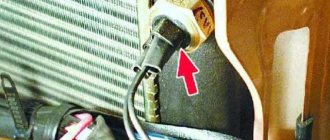
Removal: To replace it, there are two ways, as has already been said, either you need a 10 liter container empty, or without it, you choose, but if you decide without it, keep in mind that you must do everything quickly and not hesitate, otherwise all the coolant will be the motor gets dirty, first disconnect both wires from the sensor (we already wrote how to do this a little higher), when they are disconnected beyond the edges that are present on the sensor, loosen it (you can also see the edges in the photo above, they are indicated by a red arrow) and then carefully turn it out with your hand, when just a little bit remains straight, turn it slowly and in your other hand you should have a new sensor with a new sealing gasket put on it (the gasket is indicated with a blue arrow in the photo above), after you unscrew pull the sensor sharply to the side and insert a new one into the hole and tighten it, in this case a little coolant will pour out of the radiator (Very little if you do everything quickly), and the sensor will be successfully replaced.
Note! If you do not want to change the sensor in this way, or if you do not have a sealing gasket for it and will have to remove it from the old one and transfer it to the new one, then drain all the coolant from the radiator into an empty container and calmly and slowly replace the sensor! (For information on how to drain the fluid, read the article: “Replacing coolant on VAZ cars”)
Installation: There is also nothing complicated during installation, and although we have already explained a little higher that you need to unscrew it and screw another one in its place, in fact this is all you need to know, although regarding the two wires that are connected to the sensor (Those we mean the terminals itself), they can be inserted into any hole in the sensor, this does not play a special role, oh, and one more thing, when buying a new sensor, be sure to look at the markings that you will have on the old one, buy a new one with exactly the same markings, It’s just that all sensors have a different range of fan operation, some of them work when reaching 95 °C, and some can even work at 100 °C, so be sure to look at the markings.
Additional video clip: Just below we have posted a video that explains in detail how to change this sensor and how to check it, but only the front-wheel drive VAZ 2109 is used there, but don’t pay much attention to this, because this sensor is, in principle, on all cars It’s similar, it’s just located in different places, but it works on almost the same principle.
Source
How to determine that the DVV needs replacement?
It is generally accepted that the design of temperature sensors is reliable due to its simplicity. But it is not so. Failures can be caused by a violation of calibration, which leads to changes in resistance and causes malfunctions of the electronic unit.
When one sensor is used to regulate startup, a clear indication of its malfunction is when the fan stops working.
Modern cars are able to display information about a malfunction on the on-board computer display. However, these indicators do not always mean that it is time to replace the sensing element. The wiring may have been damaged or parts may have oxidized.
The operation of a damaged temperature sensor will soon affect the functioning of many devices: fuel consumption will increase, the idle speed will increase, and detonation will occur. It is likely that the car will become much more difficult to start after warming up, and the power plant may overheat.
Sometimes, drivers try to save money and are in a hurry to replace spare parts. Such actions can lead to even greater costs, since the failure of one part inevitably leads to the deterioration of many others. It is better to buy a new spare part in a modern way than to hastily solve even more complex problems later.