Location and principle of operation of the idle speed sensor
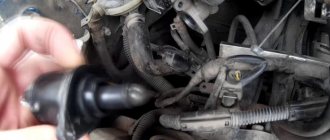
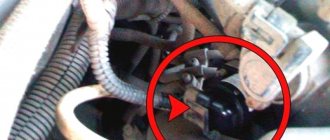
The idle speed control is located next to or on the throttle body. The location of the sensor may vary depending on the make of the vehicle. For example, on Opel and BMW models the regulator is remote, that is, located separately from the manifold.
In most cases, the IAC is secured with two bolts through a rubber O-ring and is located directly in the throttle valve. Difficulties in dismantling and installing the product may arise due to sticking of the bolts; if such a problem persists, then try the simplest method - drilling.
The main task of the IAC is to supply fuel at idle, which helps us save fuel consumption and maintain stable idle speed.
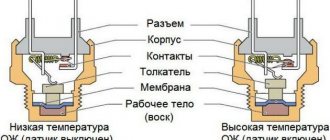
When the ignition is turned on, the sensor rod moves forward to its maximum length and rests against the hole in the throttle pipe.
After the required number of steps have passed, the valve returns to its original position. The number of steps is a constant value, which is set by the manufacturer. When you start the engine, you can watch on the tachometer how the revolutions drop as the engine warms up; this is a process that occurs due to the presence of a sensor.
The more the rod is pushed forward, the more steps are used in the work. The average stroke of the rod is 250 steps. According to this principle, the engine receives the required amount of air for its full operation, and thus the idle speed of the car is regulated. When the engine is not warmed up, thanks to the regulator, the speed increases, which allows you to start moving without fully warming up the engine.
Further work is carried out and adjusted by the mass fuel flow sensor; it analyzes the air entering the engine and gives a command to supply fuel based on the data received. Observing the engine speed, the controller begins to control the regulator. In this way, the required volume of air is monitored and further work is adjusted.
The main task of the IAC is more complete combustion of fuel due to air supply and, of course, reducing wear on the crankshaft bearings.
What does the valve consist of?
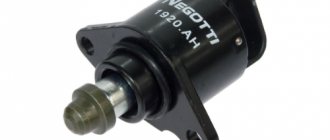
Structurally, the valve consists of a stepper electric motor, a four-position rod and a spring element. it also contains needles. The device is located near the throttle valve and TPS. Some vehicle models provide for fixing this sensor to the damper body. This is done using varnish. However, it also happens that the device is mounted on two bolts with mounting holes. In this mounting option, the main thing is that the distance from the needle to the mounting flange on the device is no more than 2.3 cm.
Installing the sensor in reverse order
Once the sensor and its seat are completely cleaned, complete assembly can begin. To do this, it is important to lubricate the rubber sealing ring with grease or unused oil and carefully install it in its normal place without damaging the integrity of the seal, without which operation of the vehicle will be impossible.
The work is done, now everyone knows perfectly well how to clean the idle air valve. It is safe to continue driving your vehicle.
Internal combustion engines include an idle speed regulator or IAC (in common usage an idle speed sensor). The stable operation of the power plant directly depends on the serviceability of this sensor.
The idle speed control consists of a stepper motor with two windings and a spring-loaded cone valve connected to it. The worm gear used in the sensor design converts the rotational motion of the stepper motor into the translational motion of the cone rod.
When receiving an impulse on one winding, the valve stem takes a step forward, and on the other, a step back. At the command of the computer, the valve changes the cross-section of the air channel when the throttle is closed, by extending or retracting the cone.
Design features
The valve structurally consists of:
- electric stepper motor;
- four-position rod;
- spring element;
- needles.
When IACs first appeared, they were rotary or solenoid mechanisms. Such devices had two positions - open and closed. This contributed to a decrease in the efficiency of engine speed control. Today, cars use four-step sensors, characterized by the possibility of stepwise feed through the bypass.
The idle air control itself is classified as a consumable item and is therefore considered non-repairable. It can be repaired if it malfunctions, but it will be cheaper to replace it completely.
Where is RXX located?
The device should be located next to the throttle valve and TPS. In some cars, the sensor can be fixed directly to the damper body using varnish. Sometimes the device is mounted using two bolts equipped with special mounting holes. The main thing is that the distance from the needle to the mounting flange on the installed device is 2.3 cm.
Connection diagram
Idle air controller connection diagram
One harness consisting of four cables is connected to the idle speed sensor; it comes from the microprocessor module. As a result of this connection, diagnostics may cause certain difficulties. The car owner will not be able to simply apply voltage to the terminals of the device, since the microprocessor module does this pulsed.
Instructions for replacing IAC on a Priora: choosing the optimal regulator option
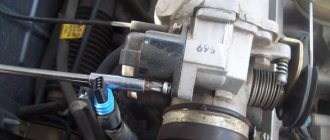
There is nothing complicated in the procedure for replacing the IAC on a Priora. Knowing where this element is located, all that remains is to disconnect the power supply and unscrew the two screws that secure the product to the throttle body.
After this, the procedure for cleaning, lubrication or other types of repair work is carried out. It is important to note that if the part has a faulty bearing or winding of one of the circuits. Then do not attempt to repair the product. In this case, repairs can cost you a lot if the ECU fails.
This is interesting! When replacing the IAC, it is not at all necessary to disconnect the negative terminal from the battery. After replacing or removing a standard product, you will still need to perform the procedure for setting the regulator parameters.
The idle speed control on the Priora is installed in a similar sequence to the dismantling process. Initially, take the time to clean the valve seat on the damper body. In this case, the mounting screws are screwed in by hand without the need to control their tightening torque. Below is a video that describes and shows the detailed process of replacing the IAC on a Priora with your own hands.
After replacement, you will need to perform the procedure for setting the valve parameters. How to do this correctly is described in the next section.
One of the important and open questions is: which IAC is better to install on the Priora. Indeed, such devices are produced by different manufacturers, and it can be confusing to find a suitable option. The best option is to buy inexpensive products produced underground. To do this, choose products from the following manufacturers:
- Elkar;
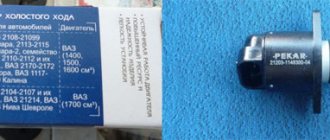
- Regulators from the Kaluga plant are famous for their reliability (it is precisely these products that are installed on Priora). The photo below shows what the packaging looks like. Their cost is approximately 600-800 rubles;
- Pekar - good products, the cost of which is around 700 rubles;
- Omega group (yellow packaging) - keep in mind that the products of this company are inferior in quality to previous options, and they usually last no more than 30 thousand kilometers.
There are other options for regulators, for example, as in the photo below.
It also fits the Priora, but when buying such products from unknown manufacturers with Chinese designations, you risk that the part will not last even a month, and may not work correctly at all. That is why it is recommended, if necessary, to spend money once on the purchase of an IAC, which will last at least 100 thousand kilometers and will not cause your headaches.
This is interesting! Chinese manufacturers or unscrupulous people produce an analogue of IAC from the Kaluga plant. A fake is very similar to the original, but its cost is lower and the quality of the product is much worse. To distinguish the original from the fake, see the photo below.
It is also important to pay attention to the regulator itself, which also has characteristic features of differences.
Choose only original products to ensure not only stable engine operation, but also not to damage the integrity of your car’s ECU.
It is important to note that when purchasing a regulator, you need to pay attention not only to the shape of the valve (cap), but also to the code that is indicated on the body. For front-wheel drive vehicles, this code begins with the numbers 2112.
Be careful, as there are also devices that begin with the numbers 21203. They are designed for all-wheel drive vehicles, in particular for the Chevrolet Niva.
Now also about encoding. The Priora may have a regulator with the number 2112-1148300-01 or 2112-1148300-02 from the factory.
The products differ in the shape of the tip (valve). Pay attention to this and buy exactly the type that is on your car. The analogue for IAC with number 2112-1148300-01 is the device with code 2112-1148300-03 and vice versa. For regulator 2112-11483-02 it is equivalent to 2112-1148300-04 and vice versa. You cannot install a device with number 2112-1148300-01 or 03 instead of 2112-1148300-02, as the product will not work correctly.
After replacing the IAC, we move on to the process of setting it up. How to do this correctly, read on.
Signs of a malfunctioning idle speed sensor
The main problem will be that this part is not equipped with any type of self-diagnosis. On the control panel you will not see a flashing light or an inscription that will indicate a malfunction of the IAC. Everything will depend on your attentiveness and how you feel and hear your car. Signs that indicate that a part is worth checking include:
- the car began to stall at idle (uneven idle speed);
- a sharp drop or increase in speed during idle;
- when driving on a cold engine, the speed does not increase;
- When changing gear, the car stalls.
There are few reasons why the IAC failed. As they said earlier, this is a fairly reliable part, but it can still fail. There may be several reasons for the malfunction:
- The guide needle is worn.
- Broken contacts inside the part.
- The needle is clogged due to poor quality fuel.
As we all know, fuel is one of the most important components of the operation of both the engine and the car as a whole, and the idle speed sensor is no exception. Most of the reasons for part failure are the use of gasoline with impurities.
A malfunction and inadequate operation of the XX sensor is indicated by any changes in the engine speed. If the part fails completely, you will not be able to start the car without using the gas pedal. And such a procedure will negatively affect the operation of the vehicle as a whole. Manufacturers do not recommend this practice for nothing.
General concepts
One of the most common troubles that prevents you from fully driving a car is the idle speed sensor of the VAZ 2110 and modifications.
Although this device is called a sensor among drivers, it will still be correctly called the idle speed controller, abbreviated as IAC, because all automobile sensors are measuring equipment, and this product serves to automatically stabilize and maintain idle speed by supplying air to the engine VAZ 2110 with the throttle valve fully closed. IAC is an important component of the engine and plays a significant role in the stable and uninterrupted operation of any VAZ vehicle.
Idle speed control
The VAZ 2110 idle speed sensor (abbreviated DXX) is an actuator, simply a valve consisting of an electric motor, a spring, and a rod on which a shut-off needle is installed (you can see it in the photo). It is through which the volume of air is dosed. That is, when the throttle of a VAZ 2110, 2112 is completely closed, and the controller determines that the idle speed needs to be increased, the IAC generates a command to change the position of the needle. It moves, partially or completely opening the intake port, through which air bypasses the throttle and then mixes with fuel. As a result, the engine does not stall.
Checking the idle speed sensor
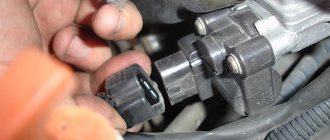
Diagnosing the part is quite easy, but pay attention to a few points. The first problem may be removing the part; most manufacturers attach the XX sensor to screws, and in extreme cases they can be drilled out, but in some variations the part is mounted on varnish. If your regulator is secured with varnish, be careful not to forcefully remove it, as this may damage the intake part of the car. In your case, it would be correct to completely dismantle the throttle assembly and only then disconnect the IAC.
The easiest way to check is, of course, visual inspection. During a visual inspection, the first thing you should pay attention to is whether the needle is dirty. Also pay attention to the condition of the contacts and the throttle valve itself.
If broken wires are found, they must be returned to their place. Solder them and, to avoid corrosion, treat them with varnish.
It would be appropriate, if possible, to check the IAC with a multimeter or a homemade tester. You can check the resistance with a multimeter, and use a homemade tester (you can make one from a mobile phone charger) to check the stroke of the regulator rod.
If you find that the motor is damaged, the rod is completely worn out, or the cone needle is worn out, the part will need to be replaced. Don’t be too upset about this, the cost of the part will only be about 1000 rubles.
Main aspects of checking IAC
We figured out how to clean the idle speed sensor, now we’ll take the time to diagnose it. Like cleaning, testing can be done at home.
How to check the idle speed sensor:
- Find the IAC and remove it along with the wires. Unscrew several clamps that secure the throttle assembly with the receiver, then move these elements apart by about 1 cm.
- Using a diagnostic tester, check the IAC circuit - now you should make sure whether there is voltage in the network or not. Connect the tester probes to contacts A and D - as a rule, they are marked on the body. Having connected the probes, you need to activate the ignition and look at the results. The best option is 12 volts. If this parameter is lower, then most likely the problem lies in a poor battery charge, and if it is completely absent, then it is quite possible that the problem lies in the control unit.
- Make sure that the circuit is on the IAC itself. To do this, the tester's probes must be connected to pins A and B, and then to C and D, and you need to set the tester to ohmmeter mode. When checked, the diagnostic parameters should be about 53 ohms. Then the same actions should be repeated with other pairs of contacts, for example A and C, and the resistance should tend to infinity (the author of the video is Ivan Vasilyevich).
There is another option; for this, checking the idle speed sensor must be carried out with the IAC removed. Connect the power cable, then touch the end of the needle with your finger (no force required). During shutdown, the regulator should begin to extend the needle fully, so when you turn, there should be a slight push of the finger.
As you can see, in general, diagnosing a device is not that difficult, but for a quality test you need to understand how to use the tester. If you have no idea how to do this, it is better to seek help from an electrician, but in practice, after studying the instructions for the multimeter, there should be no problems with its use. Of course, the tester itself must be working, otherwise the readings will not correspond to reality and you will only get confused.
Nuances of choosing a sensor
The original idle speed controller is marked as XX-XXXXXXXX-XX. The last two characters define the compatibility label.
More details about them:
- odd characters (03 and 01) are interchangeable, as are even characters (04 and 02);
- device group data cannot be replaced, that is, even ones cannot be replaced with odd ones.
You can identify a fake low-quality idle speed sensor by several criteria:
- there are no distinctive marks on the device packaging;
- the tip of the rod has a dark shade;
- the yellow sticker on the device body has no frame;
- original sensors are equipped with a thin black seal, while counterfeits are equipped with a thick red ring;
- the body of a low-quality device will be 1 cm shorter;
- non-original sensors are equipped with a white spring instead of a black one, its turns are sparser;
- There are no caps with a diameter of 3 mm on the case rivets.
How to disassemble the idle speed control (IAC)?
You should disassemble the idle speed sensor very carefully, otherwise we may completely break it.
- To disassemble the sensor, you first need to remove three studs that serve as a housing fixation.
- After removing the pins from the sensor, using little effort, carefully pull out the connector housing. Do not damage the wire contacts or tear them off.
- Look at the cause of the problem.
The simplest thing that can happen is a broken wire. In this case, solder the wire back and cover it with varnish. “Why varnish?” you ask – for protection against corrosion.
The needle guide drive or the guide itself could also be worn out. In this situation, there is nothing we can do except install a new sensor.
Cleaning Rules
It often happens that cleaning the idle speed sensor can solve the problem of device inoperability. In general, this procedure is quite simple. Therefore, almost anyone can cope with it.
So, how to clean the idle air regulator:
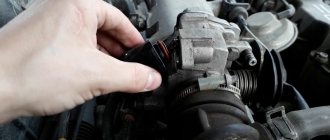
- First of all, the IAC must be disconnected from the wiring.
- Next, take the WD-40 liquid and apply it to a Q-tip. This stick is used to clean contacts.
- Next, take a small Phillips head screwdriver and unscrew the controller latches, there are two of them. If the fastenings are completely missing, this indicates that the IAC is mounted on varnish; if this is the case, then, most likely, the entire throttle will need to be dismantled.
- Dismantle the DXX and inspect it. If there is dirt or traces of motor fluid on the device, then in addition to the regulator itself, you will need to clean the entire throttle assembly.
- Now take a cleaning fluid (you can use carburetor cleaner instead of WD-40) and apply it to the cone needle and spring. Although carburetor cleaner is better for cleaning! Having done this, you need to dry the controller and put it in place. Before installation, make sure that the distance from the device body to the needle is 2.3 cm. If cleaning does not help fix the problem, then most likely you will have to change the DHC.
Controller connection diagram
Operating principle and location of the IAC
Briefly, everything happens as follows. When the engine is idling, a certain amount of air enters it, which allows it to function smoothly.
DPKV takes into account the number of revolutions, this data is sent to the control unit, from which a command is given to the IAC to reduce or increase the air supply. Which he does, ignoring the closed throttle.
IAC device: 1) valve; 2) regulator body; 3) stator winding; 4) lead screw; 5) plug terminal of the stator winding; 6) ball bearing; 7) stator winding housing; rotor; 9) spring.
If the engine warms up to operating temperature, the controller automatically begins to maintain idle speed. If the engine has not heated up to the required degree, then the controller itself will increase the speed due to the IAC, thereby ensuring the engine warms up at higher speeds. This mode of engine operation allows the car to start moving immediately, without warming up.
Where is the idle air control valve located? Yes, in the throttle body - it is secured there with two screws. There are cars on which the heads of the mounting screws can be drilled out or the screws themselves are set on the varnish, which, of course, can significantly complicate the replacement or cleaning of the IAC air duct. In such cases, it is extremely difficult to do without dismantling the throttle body.
Currently, automakers use the following types of idle air regulators:
- solenoid;
- stepper;
- rotary.
Let's look at each of the listed types in more detail.
The idle speed control solenoid operates using electromagnetic force. So, when voltage is applied to its coil, the core is retracted, and the damper mechanically connected to it rises, thereby opening the air channel. When the voltage is lost (that is, the solenoid is turned off), the damper returns to its place, closing the channel.
Adjustment of the operation of the solenoid IAC is carried out by changing the frequency of command signals to the actuator. In order to pass a precisely measured amount of air through itself, high-frequency signals are sent to the working element. This allows air to be supplied in small portions.
The stepper idle speed controller has a ring magnet in its design, as well as four electromagnetic windings. Voltage is applied to them alternately, thereby creating a rotating magnetic field that causes the control rotor to rotate. It is connected to an actuator, which locks or unlocks the air channel.
As for rotary idle speed controllers , they are controlled using frequency pulses. The operating algorithm is similar to the solenoid type, however, instead of a solenoid, in this case a rotor is used.
The process of cleaning the idle speed sensor
To stabilize the operation, a cleaning process is required, especially if during inspection you find a clogged needle or throttle valve. To clean the contacts, use a cotton pad: after dipping it in alcohol, wipe them off.
Clean the cone needle with carburetor cleaner or WD-40. After generously spraying the needle, let it dry, after which you can install the part back.
Cleaning the throttle body will take a little more time, but will also not be labor intensive. You will need any cleaning agent: gasoline, solvent, carburetor cleaner, WD - 40. Also use a rag and a brush. Be sure to remove the air filter bell before cleaning, and do not forget to clean the damper on both sides.
Cleaning the idle air control
It is quite obvious that on any car with an injector, the idle speed sensor can fail (IAC VAZ or idle speed controller on a foreign car).
Having discovered the symptoms of malfunction discussed above and signs of malfunctions of the idle speed regulator sensor while the internal combustion engine is idling, the idle speed valve of a VAZ or other car needs to be diagnosed. At the same time, you should not rush to purchase a new sensor to replace without checking the old one. Let us remind you once again that the engine can become unstable for a number of reasons, while the regulator is only one of the possible options. Also, the sensor may be working properly, but dirty.
- First you need to clean the idle speed sensor, since its contamination usually leads to serious failures. In this case, the installation location is such that the sensor becomes contaminated quite actively, and the IAC itself, due to its design features, is sensitive to contamination.
Cleaning the idle speed sensor is not a complicated procedure. The main problem is removing the regulator itself. If you are not sure where the idle speed sensor is located on a particular car, you need to study the manual in advance. As practice shows, the IAC is located near the throttle position sensor. In turn, all that remains is to determine the location of the throttle assembly and TPS.
In fact, it is enough to wet a soft rag or cotton wool with carbicleaner or any other similar cleaner, and then carefully clean the sensor contacts. Next, the remaining elements of the regulator are also actively wiped with a rag soaked in the cleaner. In this case, you can clean intensively (for example, using a soft brush), removing dirt from the needle, rod, and IAC spring.
Cleaning the needle and bypass channel
To provide access to valve parts, removal of the IAC is required using the following technology:
- disconnecting the block from the connector;
- cleaning the connector contacts and plug with a cotton swab soaked in WD-40;
- unscrewing screws with a curved screwdriver;
- removing the regulator to check the condition.
IAC cleaning
Attention: There is no need to disassemble the regulator, just spray the spring and rod with needle with WD-40 spray, wait for it to dry, and at the same time clean the throttle bypass channel.
The adjustment is made by the on-board network controller itself. However, for stable operation of the engine, you should check the distance from the mounting flange to the protruding needle cone. By default it should be 23 mm.
Monitoring and regulation of the idle speed sensor by an electronic unit
The operation of the idle speed sensor is controlled exclusively by the on-board computer ECU. As already noted, the ECU receives signals for this control not from the XX sensor itself (since such a function is not provided for in the part), but from the crankshaft sensor. How is everything going?
- The controller receives current data from the sensor about crankshaft speed;
- Analyzes and determines the current operating parameters of the motor using signals from a bunch of other sensors;
- A comparative analysis is carried out with the readings of the TPS and MAF. Based on the comparison, it determines the degree of closure of the damper and, consequently, the characteristics of the lean fuel mixture;
- Carrying out the task of enriching the fuel with oxygen, the ECU sends signals to move the rod to one of four positions (depending on the voltage of the electromagnetic pulse) and open the IAC valve to supply air in a roundabout way.
Types of malfunctions of the XX regulator on Priora
As mentioned above, such a part rarely fails, unless the car has a cheap fake. However, breakdowns of this device occur and, as a rule, this happens with the following defects:
- Slippage occurs when the worm gear of a stepper motor wears out. Slipping leads to the fact that the ECU is not able to set the required number of steps to open the channel to the required distance.
- Jamming - most often, the valve is blocked in the closed position. This happens when the driver turns on the ignition and the regulator is set to zero (in this case an electrical circuit malfunction or rod damage occurs). If the rod is jammed in the closed position, the car engine can only be started by pressing the accelerator pedal. If it is possible to start the engine in this way, then the cause is clearly a malfunction of the XX regulator.
- A stepper drive malfunction occurs due to a break in the stator winding circuit (one of the windings).
- Air leakage - there is a sealing gasket on the IAC housing that prevents the possibility of air leakage through the product body. If the gasket is damaged, this will lead to excess air entering, and as a result, there will be unstable speed.
- Rod play in axial and radial directions. If you have removed the IAC, and by manually moving the rod, it is found to be freely moving, then this is considered a serious malfunction. This malfunction usually appears while driving, when the gas is released and the engine is idling. Due to the presence of play, the rod is delayed in opening the XX channel, so the engine stalls. There should be no play either when it moves in the axial direction or in the radial direction. The presence of play indicates the need to replace the product, but cannot be repaired in any way.
- Damage to the IAC housing - this often happens when a non-original Chinese element is installed on a car. Engine vibrations cause damage to the rivets, and as a result, the regulator simply falls apart. Even if the product can be repaired by installing new rivets, it is not recommended to use it further.
- Clogged cone valve - often during the operation of the car, carbon deposits consisting of dust and oily substances form on the valve. Dust comes from the air duct when the air filter is not changed for a long time. Oily substances enter the throttle assembly along with crankcase gases. The likelihood that the IAC valve is dirty can be determined by the clogged damper. A valve with a large amount of contamination cannot be set to zero and ensure complete closure of the channel. In addition, contamination causes the rod to become distorted.
Most of the above faults can be identified visually. Failures in the electrical circuit can be determined using a multimeter. And we’ll find out further how to identify all kinds of regulator malfunctions on a Priora.
What do you need to know when replacing the IAC?
To change and install a controller that allows you to regulate idle speed, you need to pay attention to the position of the rod. It must not be allowed to be pushed forward too much. This can happen if the device is connected to the block and the ignition is activated before installation. It is not allowed to push the rod in by hand.
If the valve is installed with the needle extended and the retaining screws are tightened, damage to the unit may occur due to shearing of the worm gear. It is impossible to repair such a sensor. Depending on the vehicle model, after installing a new regulator, it may need to be calibrated. In some cars, this procedure is carried out using special equipment or a stand.
On VAZ cars, calibration is performed as follows:
- A terminal is connected to the negative output of the battery.
- The key is turned in the lock to turn on the ignition for ten seconds. There is no need to start the power unit.
- The ignition is turned off.
User Ovsyuk talked about replacing the idle air valve on his own using the example of a Lada Samara car.
Main breakdowns and malfunctions of IAC
Causes of problems with the idle speed sensor:
- Power supply circuit interrupted. This malfunction may be related to the wiring in the car, oxidation or damage to the contact elements on the block. If the connection is of poor quality, then this problem will appear periodically. It may be difficult to diagnose the device.
- Contamination of the rod, which leads to its incorrect movement. This problem is the most common and manifests itself as a result of the accumulation of dirt deposits in the channels of the throttle assembly. If the damper is not cleaned for a long time, then the reason should be looked for on the sensor rod.
- Failure of the electric motor. It is unlikely that such a device will be repaired; the engine must be replaced as an assembly with the regulator.
- Destruction of the sealing element due to wear. The problem may appear immediately after replacing the sensor if an old ring is installed instead of a new one.
- Rod wear. If the regulator is working properly, then the shutter should move without snagging, and slipping in the worm gears is not allowed. To determine the condition of the structural elements, you will have to disassemble the device.
The channel “Sdelaj Sam!” spoke about the causes and signs of malfunctions in the idle air valve! Pljus interesnoe!
Preventive measures
In order not to encounter a complete malfunction of the regulator in the future, it is worth periodically carrying out the cleaning process described above. How often to carry out the cleaning process depends on how actively you use your vehicle. If the car is a work vehicle, it is recommended to check and clean the sensor once a year; if you use it only for yourself, once every two years will be enough. But, of course, do not forget about the signs of a part malfunction; if they appear, do not delay. This will help you avoid complete failure of the part and enjoy a quality ride.
Together with you, we come to the conclusion that the part is unpretentious, simple in its functionality and use. Don’t forget: timely detection of a malfunction is the key to overall vehicle productivity. The full operation of the engine depends on the serviceability of each of its components, and if you neglect any part, including the idle speed sensor, this can lead to more labor-intensive repair processes and failure of the entire car.
Restoring the performance of the DXX
After testing, the question arises of eliminating the causes of malfunctions or replacing the part. It should be noted right away that this part is initially considered consumable. Breakage, wear or deformation requires replacement of the sensor rather than repair. Fortunately, the low price of the part allows you to do this without much damage to the family budget.
So, restoration means thoroughly washing the channels and voids in the part and restoring the integrity of the electrical circuit - this means sealing the loose pins (and then covering them with protective varnish), eliminating breaks in the winding and wires.
During dismantling, each element of the part should be carefully treated with a special aerosol reagent WD-40. In this case, there is no need to disassemble the part itself into parts; it is enough to process all accessible parts with a directed jet, not forgetting about the bypass channel, which also often becomes the reason for the incorrect operation of the DXH.
There is no need to adjust the regulator after replacement or testing; this is handled by the on-board computer. However, do not forget to check the distance between the needle head and the screw seat (should be 23 mm).
Regular preventative cleaning will help avoid serious problems and significantly increase the service life of not only the idle speed sensor, but also the entire fuel system of the car.
Idle Air Control Malfunction - Check Engine Signal
Control systems in cars with an injector record deviations in the operation of the fuel regulator. Below are some possible IAC failure codes with decoding:
- P1509 (control circuit overload);
- P1513 (short to ground);
- P1514 (open circuit or other problems at 12 V).
If you receive information about a problem, check the wiring - perhaps the problem lies there. Test codes are received through a special connector using a scanner. You can decipher the obtained values yourself using special tables (search online). If you can't quickly check the system, a thorough cleaning will help delay replacement for some time.
You can determine the serviceability yourself, but this will require skills and an oscilloscope.
Sensor diagnostics
You can check the idle air valve yourself. Its faults can be divided into two parts: mechanical and electrical. There are several verification methods.
Visual inspection
First you need to conduct a visual inspection. In this way, you can detect body defects, needle wear, and carbon deposits. If deposits form, you can clean them with carburetor cleaner. It is also recommended to clean the entire throttle body as it is in a similar condition.
Using diagnostic programs
The operation of the IAC can be checked using a diagnostic adapter and special programs. For example, you can use the simplest ELM327 adapter and the OpenDiagMobile program. In the program menu you need to select the desired position of the XX regulator and watch the operation of the valve. It is better to set it at least 20 steps more than the current position.
Wiring check
For this we need a multimeter. With the engine off, remove the connector from the sensor. We set the measurement limit on the measuring device to 0-20 V DC voltage. We measure the voltage at the connector. Normally it should be 12V.
Checking the regulator resistance
To do this, we will need to measure the resistance between terminals A, B, and C and D after disconnecting the sensor terminal. We move the multimeter to the position of measuring resistance at the limit of 0-200 Ohms (Ω).
The normal value is within 50-55 Ohms. The resistance between A and C, B and D must be infinity.
Checking with throttle assembly
There is another way to diagnose IAC. To do this, you will need to remove the throttle assembly from the studs along with the sensor.
By connecting the valve connector and turning the ignition on/off, you can observe the operation of the IAC live. See how the needle works, if it is rubbing somewhere, check the evenness of the stroke, hear suspicious sounds.
How to check the sensor?
If you have a tester, checking is easy:
- Set the VAZ 2110 to the handbrake;
- Disconnect the IAC connector to check;
- Check the voltage of the VAZ 2110, 2112 sensor circuit, while connecting the “minus” to the engine, the “plus” to the removed block, namely to terminals A: D (marked on the block, you can see the diagrams);
- The ignition is turned on and the readings given by the idle speed regulator are checked, which should be about 12 V. The value will be less - most likely the battery is discharged. When there is no voltage, it is necessary to check the entire circuit, and then the electronic control unit. There are no malfunctions, which means the circuit is working - the IAC installed on VAZ 2112 engines and other modifications are checked;
- The tester terminals are connected to the block, the circuit is as follows - first to terminals A: B, then to C: D. The resistance should be within 53 Ohms;
- Next, pairs A: C, B: D are checked - in this case, the resistance on a working product will be infinitely large.
IAC diagram
When, as a result of these checks, the sensor reveals a discrepancy in the readings, it should be replaced. Also, the inoperative state of these VAZ 2110, 2112 engine sensors, in the unscrewed position, can be checked by attaching a block to them, then you need to turn on the ignition.
Thanks for subscribing!
When the power is connected to the working product, the rod with the needle will change position. No changes will occur on a broken sensor. If a breakdown of the idle air regulator is detected, of course, it must be repaired. But there is no need to rush to a car service center - you can do the repairs yourself, saving money and time. But first, in general, it is worth cleaning the IACs; often after this they return to “life”.
Calibrating a new IAC
What should I do if the test reveals that the sensor needs to be replaced? It needs to be calibrated.
- We check the distance from the end of the rod to the mounting plate, it should be no more than 23mm.
- We disconnect the minus from the battery, de-energizing the ECU.
- Install the regulator.
- We connect the battery back.
- Turn on the ignition for 5 seconds without starting the engine. At this time, the IAC calibration occurs.
- Turn off the ignition to complete the calibration.
- We start the engine and observe the idle speed.
Now you know how the idle air regulator works, how to check it and, if necessary, replace it. As you understand, there is nothing complicated about this and all operations are accessible even to a novice car enthusiast.
Sources
- https://auto-gl.ru/proverka-i-chistka-datchika-holostogo-hoda-6-prakticheskih-sovetov/
- https://automend.ru/articles/chistka-regulyatora-holostogo-hoda/
- https://autodvig.com/toplivnaja-sistema/datchik-holostogo-hoda-66182/
- https://autocentrum.ru/articles/17151-instrukciya-po-proverke-ochistke-i-demontazhu-datchika-holostogo-hoda-svoimi-silami.html
- https://vaz-2114-lada.ru/2012/10/kak-otremontirovat-rkhkh-datchik-kholostogo-khoda/
- https://avtika.ru/kak-pochistit-klapan-holostogo-hoda-inzhektornogo-dvigatelya/
- https://KrutiMotor.ru/kak-proverit-datchik-regulyator-holostogo-hoda/
- https://SwapMotor.ru/ustrojstvo-dvigatelya/regulyator-holostogo-hoda.html
- https://elm327.club/remont-i-obsluzhivanie-avto/raspolozhenie-datchika-holostogo-hoda.html
- https://avtoshkolak.ru/ustrojstvo/esli-otklyuchit-datchik-holostogo-hoda-chto-budet.html
- https://elm3.ru/diagnostika/regulyator-holostogo-hoda-rhh