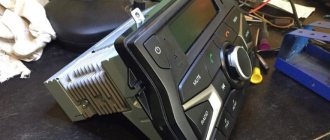
I bought a new MMS inexpensively for 2,500 rubles, they shared the phone number on the site. I wanted a new one with navigation, but the price kills all desire to buy it.
On the right side of the radio there is a USB connector, which is designed to connect:
1. USB Flash card (USB 2.0 and 3.0 up to 64 GB); 2.USB Flash player with a memory capacity of at least 1024 MB; 3.USB HDD with FAT32 file system; 4.Mobile phone (only in charging mode).
On the left side of the radio there is a slot for SD cards. SD Memory Card Slot: Supports SD, SDHC cards of 32 x 24 x 2.1mm size. SDHC up to 32 GB, SD up to 32 GB.
The file allocation table (FAT) of the connected device must be version FAT16 (2 GB). The maximum number of primary partitions should be no more than 4. It is advisable that the directory tree of the connected device have no more than eight levels. There should be no more than 1000 files in one directory.
While playing files, the display shows all the necessary information about the track. The playback source is selected using the AUDIO button on the left side of the radio. The radio has equalizer presets (JAZZ, POP, CLASSICAL, VOCAL and USER). The range of timbre adjustments for bass, treble, balance, and front/rear balance is from “‒7” to “+7” units.
The radio has Bluetooth and Handsfree functions. You can connect your phone by long pressing the handset button. When pairing on the phone, the inscription “MMC12” should appear in the list of found devices, the default password is “0000”. After successful connection, the BT icon will appear on the display of the radio. There is no phone book on the Kalina 2 and Grant radio, but it is possible to save up to 6 numbers in the radio’s memory. The audio system also remembers the last outgoing and incoming calls. The manufacturer does not guarantee operation of a phone in Handsfree mode that uses two or more SIM cards.
The radio allows you to listen to audio files from your mobile phone. To do this, you need to connect your phone to the radio via Bluetooth and launch the player on your phone. The manufacturer states that certain cell phone models may not work correctly with this radio, but this is not a sign of a malfunction.
The Kalina 2 and Granta radio has its own battery, which allows you to save user settings after disconnecting the battery for 10 days.
Supported Audio Formats
The audio system supports audio formats (MP3. With constant or variable bit rate, bit rate 32–320 kb/s and sampling rate 44.1/48 kHz; WMA. (without DRM protection). With constant bit rate and bit rate 10–320 kb/s , with variable bitrate and transmission speed 32–192 kb/sec).
Video review of the radio, the video is not mine.
The standard radio for Kalina 2 and Grant has all the necessary functions for a modern car. The audio system works flawlessly, there are no freezes, all operations are performed instantly. The build quality is at a high level. The only disadvantage is the lack of a CD/DVD drive, but nowadays discs are becoming a thing of the past. The standard radio of the Lada Kalina 2 and Granta without an LCD display is a good alternative for those who find physical buttons more convenient than a sensor.
The standard radio for the Lada Granta model is an improved device, the design basis of which is the “Sirf Atlas” processor, supplied by the well-known. In addition to the presence of a radio receiver, the device is equipped with a large touch screen and has the ability to connect an external source via a video input by replacing the software and performing firmware. However, in the basic configuration of a domestic car there is only a push-button radio. Many owners are not happy with this fact and want to connect a more modern radio. This article will tell you how to install a radio.
Why is it necessary to set up a Pioneer radio?
Before moving on to the process of setting up your Pioneer audio recorder, it’s worth understanding why you need to do this:
- This is done in order to maximize the audio capabilities of the head unit and the acoustics installed in the car.
- Knowing the settings will allow you to easily connect various external devices, eliminate wheezing and distortion of the audio composition, as well as change the interface language and other everyday characteristics, the correct configuration of which will make using the device more comfortable and understandable.
Incorrect adjustment of the radio can nullify the sound of even the most expensive and high-quality professional-level acoustics.
Other features of standard multimedia
The general feelings of owners who have a standard radio in their car are positive. The display is informative and easy to read. The touch keyboard functions flawlessly. The standard radio itself is capable of high-quality reproduction of sound programs from micro-SD cards. However, using USB format media can be challenging.
The device also has some nice options:
- equalizer;
- activated replay mode;
- random sequence of playing tracks (“Random”).
Multimedia LADA Granta is capable of supporting images in 5 formats, which allows you to view photos without any problems. But not everyone can make the correct settings for the “phone” option on the first try. This function will be convenient for a busy owner who is forced to communicate by telephone even while on the road.
What can and should be configured in the equipment of this company
Depending on the model of the audio recorder, the user has the ability to independently adjust parameters such as:
- equalizer;
- radio stations;
- menu language;
- time;
- enable or disable the Bluetooth wireless protocol (if available) and AUX;
- activation/deactivation of demo mode, etc.
Among all that has been said, special attention should be paid to setting the equalizer, as well as the radio, where the first is useful for those who like to listen to their own music, and the second for car owners who prefer radio stations to music from a disk/flash drive. Special adjustments are also required for the subwoofer.
How to improve radio reception in your car
...Probably everyone has noticed on the cables of monitors, printers, video cameras and other computer equipment, a ferrite cylinder in a plastic sheath.
What is it for?
A ferrite cylinder is a shield that protects against electromagnetic interference and interference: it prevents the signal transmitted through the cable from being distorted by an external electromagnetic field, and also prevents the radiation of the electromagnetic field (interference) from the cable into the external environment.
What is the principle of protection based on?
Internal and external cables of computer equipment can act as miniature antennas as they convert so-called voltage and current noise into electromagnetic radiation.
Video: creating a budget combination of car radio + subwoofer for a car
Next, using the twist wheel or the movement arrows (depending on the model), we look for and go to the SW Kontrol item. After this, we find ourselves in the sub-item EAR SP FUL, which must be changed to SW using the arrow or knob, after which we turn off the radio.
After this, it is necessary to further configure the subwoofer, for which we turn on the radio again and go to the preset menu, where we look for and enter the SW SETTING1 item. Once in this submenu, you need to select one of three types of settings: NORMAL, REV and OFF. As practice shows, most users choose REV.
Next, you need to go back to the preset menu and select the SW SETTING2 sub-item, where we first indicate the frequency (recommended value 50 HZ), and then the power level (ranging from -6 to +6). In this case, you should choose the ranges based on the characteristics of the installed speakers and your hearing perception.
The last action in this paragraph is to regulate the loudness of the radio, for which we go to the menu and look for the LOUDNESS item, where we select the HIGH value.
How to set up the radio
There are three types of radio settings in Pioneer radios:
- Press or look for the FUNC button/menu in the menu, and then look for the BSM sub-item, which is responsible for automatically searching for radio stations. The search is activated by pressing the up or right key, after which the first station found will automatically turn on.
- While in receiver mode, which can be accessed by pressing the BAND button, hold down the right key and hold it for several seconds, then release it, thereby starting the process of scanning radio stations. After the station is found, scanning will be paused, after which the user can remember the radio station by pressing and holding the corresponding key - for example, 1. If the station is not needed, press the button to the right again, and the scanning process will continue.
- While in the radio station menu, briefly press the key/joystick to the right or left until the required wave of the radio station is found, then press the button (1–6) to memorize it.
What to do
You can remove interference from the radio yourself, the main thing is to be able to work with electronic devices.
To do this you will need a minimum of spare parts and simple tools. You can eliminate interference as follows:
- Replace the antenna cable with another one or make a shielded braid. With such protection, the antenna will not pick up extraneous radio waves.
- A cheap radio of poor quality also serves as a source of noise. To eliminate them, it is enough to change the equipment to a good quality model.
- Elimination of interference can be done by replacing the switching power supply of the recorder with a linear model.
- Sometimes a ferrite ring installed on the power cable helps solve the problem. Ferrite rings (cylinders) are sold in all specialized stores. They are selected according to the cable diameter. The rings are installed in two places: near the adapter and the DVR power plug. In this case, the cable is pulled 3-4 times through the ring.
- Extraneous noise in the radio can be minimized if the elements of the recorder and antenna are placed at the maximum distance from each other.
- Installing a stabilizer also helps solve the problem.
- If the DVR is connected not to the cigarette lighter, but to the on-board network of the car, then the interference will disappear, because most of them occur due to the power supply. Technically, this is difficult to do, and not every beginner will be able to integrate the device into the car’s power system. Therefore, for those who have never done this type of work, it is better to turn to specialists. Otherwise, incorrect installation will lead to breakdown of the entire system.
Before you take on complex work, changing the power supply or the design of the gadget, you first need to try simpler methods for eliminating noise on the radio.
Video: finding radio stations on Pioneer tape recorders
Setting up the equalizer
To configure the equalizer, go to the EQ SETTING1 menu item, where you can set the signal amplitude level for mid, high and low frequencies. In the EQ SETTING2 item, which is also located in the main settings menu, the user can select the center frequency of the signal correction, as well as the width of the adjusted range. All this is available for HF, MF and LF.
To configure the equalizer, go to the corresponding menu
It is necessary to select settings based on the capabilities of the speakers and the personal preferences of the listener.
How to enable AUX
To activate the AUX mode, which is not active by default, you need to turn off the radio, and then turn it on by long pressing the FUNC button, after which we look for the inscription AUX: OFF and use the up/down buttons to select the AUX: ON item.
Video review of the radio
The standard radio for Kalina 2 and Grant has all the necessary functions for a modern car. The audio system works flawlessly, there are no freezes, all operations are performed instantly. The build quality is at a high level. The only disadvantage is the lack of a CD/DVD drive, but nowadays discs are becoming a thing of the past. The standard radio of the Lada Kalina 2 and Granta without an LCD display is a good alternative for those who find physical buttons more convenient than a sensor.
Download the manual for operating the radio (from page 173): To download files you need to log in to the website
Let us remind you that AvtoVAZ installs radios with an LCD display on the “Lux” configuration.
Video: an easy way to make AUX on any car radio with your own hands
Important: entering the function menu can be done by holding down another button, for example, SRC or SOURCE.
Turn on Bluetooth
In order to activate Bluetooth, you need to go to the main settings menu and find the BT AUDIO sub-item there and select ON. After that, turn on Bluetooth on your smartphone/tablet and look for the radio.
After the radio is found, we connect to it, which may require entering the security key - by default “0000”.
How to set the clock
To set the clock, you need to enter the main settings menu, which can be done by turning on the turned off radio by holding down the SRC button or holding down the center button of the joystick. After which we find the CLOCK SET block, where you can set the format and the time itself. There is also a CLOCK OFF block in the menu, by changing the indicator you can enable or disable the time display on the device.
Characteristics of the standard radio "Lada Grants Liftback"
The radio for the Lada Granta liftback is supplied as standard equipment. Product in 2-DIM format (100 x 180 mm).
In addition to the classic radio, there is a built-in card reader, Bluetooth, and a USB output for connecting flash drives. The only disadvantage of the audio module is that it is a push-button type. Which is not to the liking of many car enthusiasts, which is why they install more modern modifications.
During the startup of the audio module, a greeting from Lada Kalina 2 is displayed. This is not an error, as many owners think. This type of audio was originally developed for the Lada Kalina 2. Obviously, the manufacturer did not change anything and started production for the Granta. Installation/disassembly of the module is somewhat complicated due to the tight fit, so be prepared for this.
It is based on the Windows operating system, which allows you to connect to the World Wide Web via a 3G modem. There is no such option out of the box; you first need to reflash the device, but more on that later.
Via Bluetooth, it is possible to connect to a phone, and the “hands-free” option is activated. Which is very convenient and practical when driving. The owners were also pleased with the stock radio. At first glance it looks simple, but it turns out not to be so. Available programming function for a specific channel on a given topic.
For example, as soon as a news broadcast comes on, the radio automatically switches to the programmed channel. The audio module reads the following formats: MP3, WMA, WAV, WMV. Control of the standard radio of the Lada Granta liftback is accessible and intuitive, even for an inexperienced owner.
Video: pioneer 4019 clock setting
Also, in some Pioneer radios, you can call up the clock settings menu by simultaneously pressing the CLOCK + FUNC keys or by going to the SYSTEM item and finding the corresponding sub-items CLOCK SET/CLOCK OFF, which is located in the main settings block.
How to change language
To change the settings language, go to the system settings (SYSTEM), located in the main settings block, which may require holding down the SRC or SOURCE buttons. After this, we find the LANGUAGE sub-item, where we select the language we need.
Other problems
Problems with reading storage media arise no less often than difficulties with turning on. You can eliminate them yourself.
No sound or noise
This problem can be caused by several reasons, the most common of which are:
- No signal. In this case, the sound disappears or loses volume. Checking the high-level pulse supplied by the fourth pin of IC901 helps solve the problem. If there is no signal, the controller must be replaced. If the sound disappears when you start the engine and adjust the volume, you need to inspect the amplifier contacts.
- No voltage at the base. In this case, the sound fades or disappears completely when you try to increase the volume. This problem is determined by checking the bases with a voltmeter. If the tested parameter is zero, the transistors must be replaced.
- The Mute button is broken. The change in sound quality in this case is due to a controller malfunction. If you have problems with volume control, you need to check transistor Q802.
- Amplifier chips burn out. If there is no sound, you need to inspect all the cables connecting this module to the tape recorder. Repair involves replacing capacitors and microcircuits.
Does not read the disk, flash drive or the disk is stuck
When using the car radio, the following problems with reading information may occur:
Video: “deep” settings menu + disabling DEMO mode + disabling time
Turn off the demo
To disable the demo mode, turn off the car radio, and then turn it on again by long pressing the SRC button (maybe the SOURCE button), after which we get to the start settings menu, where using the joystick or the right-left buttons we find the DEMO ON sub-item, and then change it parameter to OFF.
How to adjust the bass
To adjust the bass level, you need to switch the rear speakers to subwoofer mode, which is described in detail in subparagraph 1. Also, to obtain richer bass, correct adjustment of low frequencies through the equalizer, as well as activation of the BASS BOOST function, which is disabled by default, can help. To do this, turn off and then turn on the radio using the SRC (SOURCE) button, and go to the preset menu, where we look for the BASS BOOST sub-item, after which we activate it.
Depending on the Pioneer audio recorder used in the car, there may be other parameters, which you can familiarize yourself with by carefully reading the instructions for the device, which is included in the kit or can be downloaded via the Internet.
Choosing the right radio size
We carry out installation either independently or by contacting specialists at the service center. In the second case, the service is paid.
By default, all VAZ and Lada models are equipped with a 1-DIN radio. The opening dimensions correspond to: 180 x 50 mm. This is an old standardization that has been in force since the times of the USSR. Modern audio modules can be purchased complete with a pre-installed LCD display. The size of the opening must comply with the standard: 180 x 100 mm, that is, doubled in height. Size marking: 2-DIN.
To install the radio in the Granta liftback, cut out the top pocket, remove the plastic, and install the assembled module. For a beginner, the process will seem somewhat complicated, so strictly follow the instructions.
How to turn off
The radio is turned off by pressing the SRC or SOURCE button (but it is worth remembering that another button, for example, FUNC, can be programmed for this function, which directly depends on the model of the radio being used).
Once the radio is fully configured, you can safely enjoy the high-quality and rich sound of the car’s audio system, which will make even long trips more comfortable and enjoyable.
You can use a radio to pass the time on the road. Typically, drivers prefer to listen to music that is unobtrusive, so that it plays in the background and does not interfere with steering. An autoradio is most suitable for this, which first needs to be configured. But many people don’t know how to properly set up the radio on their car stereo.
Setting up the radio
Basically, setting up the radio consists of several simple steps. The broadcast range is selected and radio channels are searched and stored in the tuner’s memory. The search for radio stations occurs either automatically or manually. In the first case, radio channels are stored in descending order of broadcast quality.
Let's take a closer look at how to configure the radio on common car radios.
What is the functionality of the radio?
The fact that there is a standard radio in the domestic car Lada Granta Lux and in Kalina-2, and the devices are constantly being improved. A special feature of the radio is that it fits deep into the standard place, which is accompanied by minor difficulties when removing it. The large monochrome display displays a user-friendly interface.
Reviews from owners indicate that the software has an operating system based on the legendary Windows, the potential capabilities of which are increased by firmware. It is possible to create a desktop in the image of a household computer and connect to the Internet. To do this, you should use a 3g modem.
If you need to enter data, manipulation can be done using the on-screen keyboard. Own memory is not enough, so to meet the ever-growing demands of owners, it is recommended to use an SD card as a storage medium. This drawback is included in the list of reasons, due to the relevance of which, most motorists prefer choosing a foreign vehicle.
A convenient option for connecting with a mobile phone is available for the Lada Granta radio. This allows you to make calls without having to take your phone out of your pocket. You only need to activate a specific button on the device display. This is a kind of extended “hands-free” function.
The radio receiver is also not without pleasant features. If you program a news wave, the device will automatically switch to it from any other channel when a program on the designated topic begins broadcasting.
Pioneer
If you are wondering how to set up the radio on your Pioneer radio, don’t worry, setup is very easy. When automatically setting up the Pioneer, press FUNC, followed by BSM. To start searching for radio channels, press the right or up button; after finishing, the music of the first radio station found will turn on.
For manual installation in BAND mode, long press >>|. A search will be launched for any first station within this radius. After which the device will stop scanning and start playing the found station. Then you will need to save it; to do this, hold the key with the desired number for a long time. If you do not need the found station, you need to press the right key and hold it. Scanning will continue until a new station is found.
With this function, you can store up to 6 stations in the first bank. After this manipulation, press the BAND button and get into the second bank, it is shown on the display as F2. In the second bank, you can similarly store up to 6 stations in memory, and there is also a third bank. Most often there are three banks, but there are more. As a result, if you have three banks, you will have 18 stations active and saved. Now you know how to set up the radio on your Pioneer radio.
Setting up the radio in the Sony radio will also not be a problem. Searching for stations is usually carried out in two common ways: manually or automatically. Automatic memorization of radio stations:
- Turn on the radio. Long press the Source button and wait until TUNER appears on the display.
- The range is changed by pressing the Mode button. If you press the joystick, a menu of options will appear.
- Rotate the joystick until the VTM option appears. Radio channels are assigned to numbered keys as standard.
How to install a head unit on a car with basic equipment?
Since the Lada Granta base is not equipped with musical equipment, and only a push-button radio is installed on board, the question justifiably arises: how is the standard radio installed in the cabin? In reality, this is a simpler procedure than it might seem at first. The occurrence of problems during installation is excluded, since a seat is already provided for the standard device on the Lada Granta panel, regardless of the level of equipment.
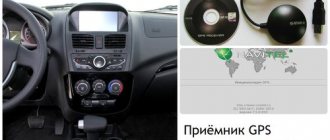
You can purchase the device in a retail chain or on an Internet site, where you can actually find an improved version, equipped with a navigation system with a detailed map of the Russian Federation. Don't forget to buy an additional luxury panel. Although multimedia will fit into the standard panel without any problems, the appearance will not be so beautiful. The price for this device reaches 2.5 thousand rubles.
Next comes the installation of the radio. The design feature of the landing niche in the Grants panel does not provide for the need for additional wiring.
- The first step is to remove the plastic pocket in the audio system opening. This is done using a flat-profile screwdriver. There is access to several connectors that involve connecting a radio.
- We remove the frame from the head unit and fix it at the location of the pocket.
- Next we move on to the connection. To do this, connect a couple of connectors and install the device in the landing niche.
- After this, you can install the speakers in the front door cards. The procedure involves the need to dismantle door trims with unlocking handles and adjust the position of the glass. Using a special template, we begin cutting out the mounting holes.
We attach the speakers to the cards using self-tapping screws. We insert the cables from the speakers into the input connectors intended for this on the rear panel of the car radio. We install the decorative door panels in their original places and evaluate the sound provided by the standard head unit. Thus, the radio is connected.
Attention! We carry out all manipulations with the battery disconnected from the on-board network!
Supra
After pressing the MODE button, select the Radio function, then RADIO and the saved band with the broadcast frequency will be displayed on the screen. Pressing BND selects the desired broadcast band.
Next, you need to press the key with numbers from 1 to 6 to use the already saved radio station in the radio.
Press and hold the >>|| button.
Then click the button >>|| to select the desired station. If these keys are not pressed for up to ten seconds, everything will return to its original operating mode.
Automatic tuning and scanning of selected radio stations
Search for existing radio stations in memory:
Briefly press the AS/PS key to start searching for saved radio channels. Any station can be listened to for about a couple of seconds. To automatically save radio channels, hold down the AS/PS key. The receiver will tune in to six optimal stations, which are the most powerful in this broadcast range. This option can be used in any wavelength range. Once the automatic saving of stations is completed, the receiver will stop scanning them.
To tune into a specific radio station, press the >>|| button, this will scan and select radio channels with the best reception signal. By pressing the >>|| button, you can manually select the station you want. Hold down the key numbered 1 to 6 for about a couple of seconds to memorize the channel under the desired key.
When tuning stations, it is possible to leave 30 FM radio channels and 15 AM channels in the tuner.
Installing stations manually:
- Select a broadcast band by pressing the TUNER BAND key.
- Click on button 4 to set the station.
- Hold down the key with any selected number on the panel to memorize the station in the radio's memory. The selected number will start blinking, after which you will see the station stored under the selected number. For example: To tune to station number 14, press the +10 key, followed by the 4 key for approximately three seconds or more.
- To store other radio stations in the device’s memory, you need to repeat steps one through three. And to change the settings of the entire station, you need to repeat the entire process from the beginning.
Tuning stations in automatic mode:
Stations will be given numbers by increasing the frequency range.
- Select the range by pressing the TUNER BAND key.
- Press and hold the AUTO PRESET button on the panel.
- To set a different range, you need to go through steps one through two again.
To replace selected stations in automatic mode, you must use manual installation.
Kenwood
Kenwood radios offer three types of autoradio settings: automatic (AUTO), local (LO.S.) and manual.
- Press SRC until “TUnE” appears.
- Press FM or AM to select a band.
For automatic setup, click >>| or |.
In case of manual tuning, after all the above steps, ST will light up, indicating the found station.
At the beginning of our article, it makes sense to immediately note that the following method for setting up a radio is designed for an entry-level user, and there is nothing overly complicated in it. Note also that the quality of the reproduced sound usually depends only 33% on the composition and quality of the equipment components. Another third depends on the correct installation of the equipment, and the remaining 33% depends on the correct setup of the audio system.
In this article we will look at how to set up a Pioneer radio. Adjustment recommendations are discussed using the example of the Pioneer DEH-1900UB model from the 2022 line. They can also be used to adjust other modern Pioneer car radios, since they all have the same menu. The exception is processor devices, the configuration of which is somewhat more complicated.
A few words about the radio of the “normal Kalina-2”
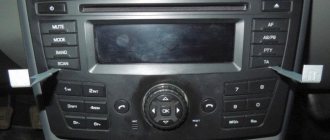
When looking at the “device”, which AvtoVAZ designates with the numbers 2190-7900010-40, it immediately becomes clear that installing such a device in a standard 1DIN compartment will not work. VAZ cars in the “Norma” configuration come from the factory with an empty compartment (its height is 1DIN), and in the “Norma+” radio tape recorder occupies the entire central part of the console. That is, the owner has the following choice: you can install a standard VAZ radio, but then the easy-to-use shelf will disappear, or you can look for and install a unit of standard height. The VAZ radio does not fit into the 1DIN high compartment. There is no touch screen on it, but under the “twist” there is a whole array of plastic buttons.
VAZ push-button radio for Kalina-2
Such a radio, as we see in the photo, can be found in the only configuration of the Kalina Cross. The “device” in question differs from the Granta radio in the presence of a frame with holes. There were rumors about the release of specific units intended only for crossovers, but in the end everything turned out to be simpler - VAZ always ordered radio tape recorders from Itelma, and this tradition was continued. What exactly is offered as part of the “budget” head unit? Let's try to figure it out.
First of all, let's say that the main task of a built-in radio is to play music. To do this, it provides two hardware ports (USB, SD) located on the front panel. Radio stations can be switched using the lower buttons, and the device can also perform the functions of a Bluetooth headset - it’s not for nothing that there are “Receive” and “End End” buttons. The amplifier power is standard, the number of channels is four.
Equalizer
An equalizer allows you to make the sound more even - raise or lower the bass, mid and high frequencies. This is a rather fine adjustment of the audio system. It is not the entire sound range that is regulated at once, as in other menu items, but specific frequency bands. Different models have different numbers of them, depending on the class of equipment. There are five of them in Pioneer radios: 80 Hz, 250 Hz, 800 Hz, 2.5 kHz and 8 kHz.
The equalizer is located in the “Audio” section of the settings menu, EQ item. In it you can select one of the preset standard settings. For those who are not satisfied with these options, there are two sets of user settings (Custom). You can switch between them both from the menu and the EQ button next to the joystick.
To make changes to frequency parameters in a custom setting, you need to select it with the wheel and press the joystick. Then turn the wheel to select one of the equalizer frequency bands. Press the joystick again and set the position from -6 (attenuate frequency) to +6 (increase). By doing this you can make some frequencies louder and others quieter.
There is no universal recipe for setting the equalizer on the radio. It is performed by ear depending on the preferences of the consumer. In addition, different adjustment options are selected for a specific genre of music.
We can only give rough recommendations:
- if heavy music is played, it is worth increasing the bass - 80 Hz (but not too much, +2–+3 is enough). Percussion instruments sound around 250 Hz;
- for music with vocals, frequencies of approximately 250-800+ Hz are needed (male voices are lower, female voices are higher);
- for electronic music you will need high frequencies - 2.5-5 kHz.
What is the problem?
To understand the problem in more detail, let’s look at how everything happens in detail:
- The ignition key is in position 0, and the music turns on (no interference, the radio does not disappear, everything works perfectly, no hiss);
- The key is turned half a turn and the ignition is turned on (interference begins, the radio disappears and appears, hisses);
- The key is turned a full turn, the engine starts (the noise increases, the radio may disappear completely if you press the gas pedal - the unpleasant hiss increases in proportion to the engine speed, the radio disappears or suddenly appears).
High pass filter
Next we find the HPF (High-passFilter) item. This is a high-pass filter that cuts the frequency of the sound supplied to the speakers below their specified limit value. This is done because it is very difficult for standard speakers (13–16 cm) to reproduce low frequencies due to their small diaphragm diameter and low power. As a result, the sound is reproduced with distortion even at low volumes. By cutting the low frequencies, you can get clear sound over a larger volume range.
If you do not have a subwoofer, we recommend installing an HPF filter at a frequency of 50 or 63 Hz.
You can then exit the menu using the return button and check the result. It is better to do this at a volume of 30.
If the sound quality is not satisfactory, or if you are outdoors and want to have a loud disco, you can raise the lower limit from 80–120 Hz or more. It is recommended to use the same level of boundary cut if you have a subwoofer. These measures will allow you to increase the purity and volume of the reproduced sound.
There is also an adjustment for the frequency attenuation rate. On Pioneer it comes in two positions - 12 and 24 dB per octave. We advise you to set this indicator to 24 dB.
How to connect a Lada Granta head unit with a 1-DIN connector
- We carry out the work inside the car, having previously disconnected the terminals from the battery in order to prevent a short circuit in the circuit;
- We remove the plastic partition - pocket. It covers the hole, preventing objects from falling inside the torpedo. We use a flat-head screwdriver to unscrew the bolts;
- Two ISO plugs are visible behind the partition body. These types of wire terminals are manufactured in accordance with international automotive standards. More than 98% of all automakers use the standard when equipping technical equipment;
- We remove the metal frame - the block - from the body of the audio unit and place it in the cavity of the torpedo.
- We first connect the blocks with wires. Fitting into the connectors is accompanied by a characteristic click;
- We insert the module into the metal frame.
Note to the driver. Incorrect terminal connections result in a short circuit. To ensure the safety of the connection process, the connectors have guides that allow you to install the block in only one position.
Low pass filter (subwoofer)
After we have dealt with the speakers, we will configure the radio for the subwoofer. For this we need a low pass filter. With its help, we match the frequencies of the speakers and subwoofer.
The situation looks like this. When we removed the bass from the speakers (set HPF to 80+), we got loud and high-quality sound. The next step is to “dock” the subwoofer to our speakers. To do this, go to the menu, select the audio item, and in it we find the subwoofer control section.
There are three meanings here:
- The first number is the cutoff frequency of the subwoofer. Everything here is the same as with the equalizer. There are simply no specific settings, and the range in which you can “play around” is from 63 to 100 Hz.
- The next number is the volume of our subwoofer. We think everything is simple here, you can make the subwoofer louder or quieter relative to the acoustics, the scale is from -6 to +6.
- The next figure is the frequency attenuation slope. Just like in HPF, it can be either 12 or 24. There is also a little advice here: if you set a high cut, then set the slope to 24, if lower, then you can set it to 12 or 24.
The sound quality depends not only on the settings of your audio system, but also on what speakers you have installed. If you want to replace them, we recommend that you read the article “what you need to know when choosing car speakers”
How to connect an amplifier and subwoofer?
In addition to the need to connect a radio, many people want to connect a subwoofer and amplifier. Not every Lada Granta owner will be able to enjoy the sound generated by the standard radio. This fact forces car audiophiles to lean toward the additional installation of high-quality audio amplifiers and subwoofers. The goal is known - great sound.
To install the indicated devices yourself, we resort to the following simple manipulations.
- First, we dismantle the lower part of the center console.
- We remove the panel and find mini ISO connectors.
- We insert the plug of the previously purchased adapter into one of these sockets (indicated in yellow). We do not touch the blue and green cables. Owners who have already performed this procedure note the following - we can no longer use standard wires, so we resort to the “mini iso” connector.
- Next, we connect a special fuse to the battery, having previously connected the cable from the amplifier (marked in red) to it.
- The subwoofer in combination with the loudspeakers is connected to the amplifier. We connect the battery ground wire (black) to the LADA Granta body and the corresponding terminal on the amplifier.
- After the measures have been taken, we return the panel and radio to their place.
- Enjoy the updated and high-quality sound.
Radio setup
Even your favorite music recorded on a flash drive or USB drive can get boring over time. Therefore, many car enthusiasts like to listen to the radio while driving. Setting up the radio correctly on the Pioneer radio is not difficult and can be done in just a few steps - you just need to select a band, find and save stations.
There are three ways to configure the radio:
When all 6 preset stations are full, you can switch to the next memory section. There are 3 of them in total. In this way, you can save up to 18 radio stations.
Additional signal amplifier
In some regions, even a working, powerful radio system has poor signal reception, since local transmitters and repeaters are either low-power or located far away. In this situation, a weak radio will find it very difficult to pick up the radio signal.
An additional signal amplifier solves the problem. It enhances the amplitude of received radio waves and makes reception stable. But keep in mind that if the main radio equipment of the car is of poor quality, or the geolocation is unsuccessful (in a lowland, surrounded by high-rise buildings, in close proximity to other sources of radio interference), it is unlikely to help you.
To prevent the radio system from malfunctioning, you should handle the equipment correctly, check it regularly, do not leave it turned on in the cabin overnight, remove dust and dirt if necessary, clean it and replace worn out parts in a timely manner.
In conclusion, we note that the car’s radio system is quite simple - it includes an antenna on a holder, a connecting wire and a radio with a radio tuner. If suddenly the quality of radio signal reception in the car is disrupted, malfunctions, interference, and loss of sound begin - the reasons may be mechanical (the equipment constantly operates in extreme conditions, in dust, in any weather, and under high vibration loads).
If no damage is found in the devices themselves, you should look for internal damage or misconfigurations. The easiest way is to completely replace the radio system by installing a high-quality, latest generation radio and a new external receiving antenna. You can also give the equipment to specialists for testing and repair.