Comments: one Published: 05/16/2016
Rating:
Tags:Arch extensions
Today it is very popular to install wide-profile tires on car wheels. This type of tuning has become widespread among car enthusiasts. This is explained by the fact that in this way the adhesion of rubber to the road surface improves, and thus the driving performance of the car improves.
When choosing to buy a car with wide-profile tires, you should familiarize yourself with the assortment presented at the online car market in Kyiv. The Internet provides many opportunities in the modern world, and the auto industry has not been spared this benefit. Having looked at a suitable model, you can immediately agree with the owner on the inspection and sale of the car.
However, this type of tuning leads to the fact that in some cases, when the rim width is increased very much, it is necessary to widen the car's wheel arches.
Do-it-yourself fenders for arches
If we talk about the goal that we pursue when widening the wheel arches of a car, we can name 2 main factors:
- protection of the body from dirt, dust and stones flying from under the wheels;
- improving the appearance of the car.
For this purpose, you can purchase universal fenders or make arch extensions yourself.
Wheel arch extensions
We have already said that such arches will help protect your car from dirt.
In addition, the wheel arches will serve you as a decorative element. For example, pay attention to an SUV; on it you will notice that the inflated tires of the wheels protrude slightly beyond the arch. When an SUV drives through a muddy area, the wheels naturally collect all the dirt and then scatter it all over the vehicle.
If you use the services of car washes every time after such a trip, then you won’t have enough money. Therefore, real car enthusiasts use these extenders. In addition, it is necessary to answer that you can buy inexpensive universal body kits on the automobile market.
Welding method
If the surface is so corroded that puttying is not possible, you will need welding. Obviously, to carry out work of this kind with your own hands, you must have a welding machine and have the appropriate skills to handle it . So, repair by welding looks like this:
Rear arch repair using welding
Making wheel arch extensions with your own hands
How to independently tune the trunk of a Niva and strengthen the body
To make your own wheel arch extensions, you will need:
- Foam for installation;
- Plasticine;
- Styrofoam;
- Special tools for carrying out the work itself.
Let's look at step-by-step instructions on how to make wheel arch extensions with your own hands:
- We will use a large wheel profile. Drivers willingly use it, since it is the most accessible and simplified way to raise the car to a certain height. In this situation, the distance between the ground and the raised car will increase significantly. Here, wheel arch extensions are necessary to protect the car body from dirt and other debris. There is a dependence of the expander size on the profile size. In this case, you must contact qualified specialists, since manufacturers do not equip the machine with such parts.
- If you use the services of a specialist, you will need a lot of money for this, so it is better to carry out all the technical steps yourself. The material is inexpensive, and doing the work itself is not difficult. There are many ways to increase the size of wheel arches. You can use any option. The simplest method is called "fender". This method involves the use of polystyrene foam, which must be used to cover the upper part of the arch. Before this, you need to thoroughly clean the area, cover it with a small layer of degreasing agent using microflex for fixation. Then you need to glue the foam itself over the arch.
- The foam must be made as smooth as possible using an electric knife. Utility knives and other sharp objects will not ensure a smooth foam surface. To achieve a good surface quality, it is recommended to make smooth movements until the surface takes on the desired appearance. Before completing the preparatory work, it is necessary to use sanding material with which the foam will be sanded. After this, the surface must be covered with resin, and then with fiberglass, when laying which no bubbles should remain inside.
- After all layers have dried, you should start puttingty. It is necessary to putty twice: the first time - the intermediate layer, and the second - the finishing layer. After finishing the putty work, when all problem areas are completely removed, it is necessary to prime the outside of the wheel arch and paint it in the color of the body. Before applying the final primer coat, it is necessary to cover the surface with construction tape to ensure protection. Nowadays, the use of plasticine to increase the wheel arch has become very relevant. The plasticine needs to be laid out in the place where the fenders will later be, and it is applied evenly to the construction tape. Special sculptural plasticine is perfect for these purposes. Before application, such plasticine must be heated to improve its plasticity properties. After aligning all the wheel arches, apply epoxy resin to the same area three times.
- It is permissible to use one layer of resin and the other of fiberglass. Plasticine itself is not the main means for expanding the wheel arch. Everything that was done above was only to create a form for future drainage. After all layers have dried, the arch must be removed from the surface of the body and completely freed from plasticine. To do this, you need a regular hair dryer or a “white spirit” solvent. There are also those who fill these molds with a product that contains a paint and varnish material called “gelcoat.” In the second case, you first need to carry out fine-tuning and cleaning, installing the body, and then putty twice, sand, prime and paint.
There is another way to create wheel arches, in which you need to use polyurethane foam. It is recommended to apply it to the place where the fenders will be located in the future, and then sand with an electric knife. Polyurethane foam is used on top of the wheel arches. In this case, it is necessary to blow foam on both sides.
Construction foam increases in size over time, so it should only be used this way. After drying, the surface should be sanded and covered with resin and fiberglass.
After all layers have dried, it is necessary to apply two layers of putty, sand, prime and paint the surfaces that were made by Fenders. This method is rarely used, because it is very difficult to use polyurethane foam, unlike using sculptural plasticine or polystyrene foam.
Ways to solve the problem
The first step is to assess the severity of the problem. If the problem is that the arches are not rotten, but corrosion has recently formed on them, then replacement of the part is not required, it is enough to simply get rid of the rust by carrying out repair work.
If the problem is much more serious and a hole has already appeared from rust, then you will have to make the arch yourself.
Arch repair
Before starting work, it is necessary to wash and dry the vehicle. Next you should proceed according to the following algorithm:
- areas damaged by corrosion must be cleaned;
- then they need to be polished;
- apply reactive primer;
- leave until completely dry;
- applying an acrylic layer.
Attention! It is worth knowing that it is strictly forbidden to apply putty on acidic soil!
After the acrylic layer has dried, putty is applied. Next, the car is left until completely dry. After this, you can begin grinding, gradually reducing the grain on the abrasive material. After leveling the surface, you can begin painting.
How to make wheel arch extensions with your own hands
How to make a motorhome on wheels yourself, photos of finished work
If for some reason you cannot purchase extenders in the store, you can make them yourself from various materials. Most often, the linings are made of special fiberglass, but there may be a different base. Each material has its own installation method.
https://youtube.com/watch?v=mw-9KYe3lyg%2522
Styrofoam. Polystyrene foam is a lightweight material that can be easily cut. Cut into the required shape and follow the following procedure:
1. Attach the workpiece to the car body using “macroflex”. Adjustment to the required shape can be done after the glue has dried using a special electric knife. After this, sand the surface of the foam using sandpaper.
2. To increase the strength of the foam, it must be coated with a layer of resin and a thin layer of fiberglass. Try to lay the pieces of fiberglass overlapping each other and remove any bubbles that form in time. Otherwise, there is a risk of seriously damaging the workpiece.
3. After the last two layers have dried, apply putty to the surface to be treated. Once it is dry, sand it down so that its shape is even and flows smoothly into the body of the car. It is quite possible that while you are leveling the surface of the future expander, small cavities may form. All this is eliminated with another layer of putty and processed again to a smooth state. This procedure is carried out until the surface is completely leveled, and after which a primer and paint material in the color of the car are applied.
Sculptural plasticine. Arch extensions can be made not only from polystyrene foam, but also from special plasticine.
1. Cover the working part of the body part with masking tape. Spread the prepared plasticine on the fenders of the car. Initially, plasticine must be rubbed into small layers of tape, after which the required shape of the future expander is created. The only difficulty that may arise is giving symmetry to the expanders. Here you will need a well-trained eye and knowledge of certain principles of geometry.
2. After this, apply a layer of epoxy resin, and then the same fiberglass. There must be at least three such layers. This amount determines the most optimal strength of the future expander.
3. Once the plasticine and fiberglass are dry, you need to remove the resulting expander. All the plasticine is pulled out from the inside of the future lining, the part is adjusted to the installation site and secured with self-tapping screws.
4. The final stage includes the same treatment with putty, sandpaper and painting.
Polyurethane foam. Polyurethane foam is also widely used in the manufacture of wheel arch extensions. It is perhaps the cheapest and most reliable material, which is why it is in high demand.
1. You need to take a regular universal plastic arch as a basis. The plastic part is cut into pieces and attached to the car body using self-tapping screws. Foam must be applied outside and inside the arch.
2. After the foam has dried, you will need good sculpting skills, since only the creative process will go on. Using a utility knife and sandpaper, create a shape for the future expander.
3. At the end, all the same operations are performed involving the application of resin to the surface of the hardened foam, after which the putty is laid and a layer of paint is applied.
That's all. These are all the most common ways to widen wheel arches. It is worth recalling once again that this procedure only makes sense when you plan to install tires with a wide profile. In other cases, such a change in body design may not be aesthetically pleasing. We wish you good luck on the roads!
Features of the material
Most drivers choose plastic fender flaps for the Niva 2121. The material is highly durable and, when properly processed, the flare does not corrode and provides reliable protection.
The price of plastic wings for Niva Vis starts from 2,400 rubles. In 70% of variants, pickup trucks are sold already with overlays. Plastic parts are made of low-density polyethylene, and ABS is used for the wing. Main advantages:
- resistance to corrosion;
- allow installation of larger diameter tires;
- plastic is UV resistant;
- high strength and flexibility.
The disadvantages of wings and extensions include the need for complete replacement under mechanical influence of medium force. If a dent forms on the steel plate after an impact due to careless parking, the plastic element will crack in this case.
Wheel hub spacers
Track wideners - wheel hub spacers
Wheel hub spacers make it possible to widen the track, which provides the SUV with some advantages. Namely:
- If an SUV is lifted and its center of gravity is higher than usual, there is always a risk of overturning or, simply, “making ears.” By widening the track with spacers, you can achieve better stability of the car and corner more sharply, take on more serious hills and not worry about capsizing;
- Wheel spacers for rims allow you to install larger diameter wheels without major changes to the SUV body. And if cutting arches doesn’t scare you, then spacers can come in handy in cases where the enlarged wheels touch any power units;
- The appearance of a car with a widened track becomes more aggressive and attractive, but this is not for everyone.
Track wideners - hub spacers
Wheel hub spacers also have disadvantages, not without them:
- The SUV will drive in its own track (the greater the likelihood of this, the thicker the wheel spacers). This means that the wheels will make their way through the mud on their own, and even when moving in a column, it will not be possible to use the common track - it will be more difficult to make your way through the mud, and the load on the engine will increase. But when installing tires of a serious size, this minus can be crossed out;
- With an extended track there will always be a risk of falling into the rut from heavy equipment or trucks. When ordinary cars are able to drive inside such a serious rut, an SUV with spacers will constantly slide into it and can eventually get seriously stuck (although here, of course, everything depends on the spacer between the steering wheel and the seat, that is, on the pilot and his skills);
- Installing spacers on the hub increases the load on the bearings, which can lead to rapid wear and failure. But there are no clear opinions here, since, naturally, no one has conducted full-fledged tests with open results. There is an opinion that if the hub bearing is already good in itself, then a spacer will not make it any worse. And if the bearing periodically still requires replacement, then with a spacer this replacement will become regular;
- Spacers on the hub can make the track wider by 8 centimeters, which quite naturally leads to the SUV being covered in mud. If you do not install wider arch extensions, then the car will tip over very quickly off-road. Although, for many this is not a serious disadvantage.
Track wideners - hub spacers
In addition, a very serious point needs to be highlighted separately - regardless of the quality of the hub spacer, there is always a risk that the wheel and it will simply fall off. And if this happens in the mud, then the problem can still be solved somehow, but if it happens on the highway or during high-speed traffic in the city, it can result in serious trouble.
It follows from this that if you install track wideners on an SUV, then either those of your own making (when you are exactly sure of what exactly you are making and from what), or from trusted companies and brands that have proven themselves well in this matter (not one and not two years in the spacer manufacturing business, but at least 8-10 years with good reviews for 95%). Now there are a lot of offers for spacers - track wideners for UAZ or Niva are sold almost everywhere. There are also plenty of offers for other SUVs, but given the simplicity of the manufacturing technology of this unit, in most cases the quality of the spacers leaves much to be desired.
Track wideners - hub spacers
And one more important point - it is recommended to install track wideners of the same thickness both forward and backward. It will be easier for the rear wheels to follow the track from the front ones and the overall aesthetic appearance of the car will be much more attractive.
If finances allow, then instead of track wideners it would be much more reasonable to install wheels with a negative offset - at least the reliability of such a direct connection of the wheel to the hub will be much better than a sandwich of a hub, wheel, spacer and two pairs of studs. This will not reduce the load on the bearings, but at least driving safety will be at a higher level. Although, on the other hand, if the spacers are really good, then you can drive hundreds of thousands of kilometers with them without any problems.
Self-installation
You will need a tool suitable for the procedure. There is not much of it, and if you have a garage, you may already have everything you need. Here's what will come in handy:
- Ratchet key.
- Torx head T-20.
- 7 mm head.
- Crosshead screwdriver.
- 8 screws 2.5x10.
- Adhesion activator 3M, 4 pieces.
- Bright tape that will stand out on the car body.
The set of protection pads itself will cost approximately 5,000 rubles. It is possible to purchase it for 4590 rubles. It will weigh a little more than 2 kg. A worthy option is arch extensions with a shagreen surface, and besides, you can easily install them yourself.
This kit includes the part itself, made of ABS plastic, in the amount of eight pieces, elements for fastening, a primer, and double-sided tape. Among other things, a car with such extensions will stand out among other Dusters, which is a plus for some.
Installation Features
It is important that certain conditions are met during the installation process. Otherwise, successful installation is not guaranteed. In particular, when installing extenders from Russian Artel on Renault Duster, you must:
- Leave the machine and all parts in a warm room for one hour. The temperature of the air and the surface of the lining must be higher than or equal to +21ºC.
- Immediately before installing the extensions, the car is washed, because installation is only permissible on a clean surface.
- The surface is then dried until it is completely dry.
- Finally, you need to degrease the surface so that it is in good contact with the tape.
- It is important to evenly distribute the load on the expander during installation. It should not be excessive in any small area. It is better to install the overlay from the middle to the edges.
- Double-sided tape is used only once.
- This tape is pressed against the entire surface of the car using short-term but strong pressure.
- After completion of the work, the machine is not used for a day.
- Also, you should not wash Duster during the day. Likewise, excess humidity in the room should not be allowed.
Temperature changes are critical and therefore avoided.
Guided by these simple but necessary rules, it will not be difficult to install high-quality protection on the Renault Duster arches. Violation of any of these conditions may result in further problems with the protective pads.
Installation procedure
Once the car is completely ready to install the arch extensions, you can begin installation. In order to attach the trim to the front fender liner, the latter's mounting screws, as well as the bumper mounting screw, are unscrewed using T-20 Torx.
Now you need to install the wheel arch extensions. For this purpose, the holes in the fastenings of the fender liner and bumper are aligned with the same holes in the two trims. The upper limit of contact between the body and the part is marked by gluing small pieces of bright tape perpendicular to the arch extensions. It is better to have more of them, this will make things easier in the future.
The expanders are removed, and then an adhesion activator is applied along the marking border. That is why it is worth sticking as many pieces of tape as possible, because then it will be easier to draw a line. An adhesion activator is applied to degrease the surface so that the double-sided tape can then adhere to it without problems.
It's time to install the arch extension. The order is as follows:
- The protective film comes off from both ends of the double-sided tape of the larger pad, but only in a small area. It bends perpendicularly.
- The expander is installed according to the markings.
- The same thing is done with the small arch extension.
- Now the mounting screws are screwed through the trim into the bumper and fender liner.
- You can remove the tape used to mark the border.
- The protective film is completely removed from both sides of each part.
- All that remains is to press the upper part of the expanders, that is, the place where the double-sided tape is located.
The rear extender is installed in the same way. There are no fundamental differences, except for one thing - here only the screws of the bumper and mudguard are unscrewed, and after the part is secured to them, additional 2.5 × 10 screws are screwed into the fender liner. As a result, the wings turned out to be wide and beautiful, and what is even more important, they really protect the Renault Duster from a lot.
Installation of universal extenders on Niva
Rubber arch extensions for the Niva are a set of profiled rubber tape designed to fit the circumference of 4 arches, aluminum plates with holes and self-tapping screws. To secure the rubber profile, you must first measure its required length, determine the width of the extension beyond the body, and then use plates to press it to the surface of the arch and secure it with screws. Such a simple operation will allow any Niva to acquire a finished look, and in addition, it will protect the body from dirt and stones.
10 charming celebrity children who look completely different today Time flies, and one day little celebrities become adults who are no longer recognizable. Pretty boys and girls turn into...
Top 10 Broke Stars It turns out that sometimes even the biggest fame ends in failure, as is the case with these celebrities.
Unforgivable Movie Mistakes You Probably Never Noticed There are probably very few people who don't enjoy watching movies. However, even in the best cinema there are mistakes that the viewer can notice.
15 things you don't have to explain to anyone Remember how often people come up to you and ask for unexpected things. Yes, undoubtedly, the process of interaction in society requires certain qualities.
What is it like to be a virgin at 30? I wonder what it’s like for women who didn’t have sex until almost middle age.
Why have you never seen a baby pigeon? Go to any city square and, without a doubt, you will see hundreds of pigeons flying around passers-by. But, despite such a large number.
Ready-made fenders
On sale you can find ready-made overlays that allow you to widen the wheel arches of your car. You can find the following options in stores:
- Universal rubber pads. Sold in rolls. They are usually used by owners of off-road vehicles. However, rubber pads do nothing to improve the external aesthetics of the car - they only serve to protect against dirt and stones. Therefore, they are not very popular among car owners.
- Fenders made of plastic. They are attached to the arches using self-tapping screws.
- Fiberglass body kits are covers that are mounted on arches with self-tapping screws. The surface and gaps are covered with putty, after which they are painted to match the main color of the car.
If such overlays turn out to be unsuitable for some reason, you can make arch extensions with your own hands.
Why are wheel arch extensions needed?
Off-road driving or frequent visits to rural areas necessarily requires further car washing. The fact is that wide-profile tires, most suitable for driving on such terrain, protrude significantly beyond the car’s arches. All the dirt collected on the tire treads, when the wheel rotates, flies towards the body, as a result of which it becomes quite dirty. To combat this problem, many SUV designers have made the vehicle body significantly wider by increasing the protrusion of the wheel arches.
This improvement did not apply to all cars. Many models are produced on ordinary narrow tires, which insatiable drivers are sure to replace with wide-profile ones. The wheel arches, in turn, remain the same size, which makes it necessary to increase them.
Increasing the width of the wheel arches is now possible with special linings that attach to the car body and make it a little wider. Wheel arch extensions are produced as car accessories and are installed outside the factory.
Wash and dry the arches
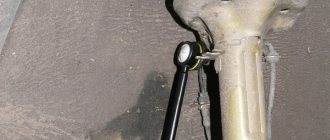
- We hang the rear axle on trestles, or jack up one side so that the wheels can be rotated freely:
- Working tool for rolling out car arches:
We will use a hairdryer to warm up the arch, which will give elasticity to the paint and possibly help avoid damage.
Using a hydraulic jack under the lever, raise the wheel so that you can roll the edge .
Those. squeeze the bit between the wheel and the arch and begin to rotate the wheel.
- The bit, accordingly, also scrolls, crushing the shelf.
- As you roll the bat, lower the handle lower and lower to the ground:
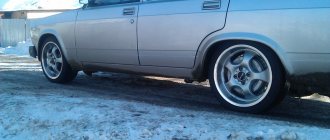
The use of arch extensions on domestic cars
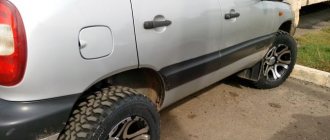
Most often, fenders are installed on SUVs, although sometimes you can find these elements on tuned passenger cars. Among the representatives of the Russian automobile industry, the most common car that is subjected to this type of modification is the VAZ-2121 Niva, as well as the VAZ-2123 Niva and Niva-Chevrolet. Having unique cross-country ability and reliability, these models have gained wide popularity among lovers of hunting, fishing and just travelers. In addition, these cars are easily amenable to any type of tuning. They are equipped with a variety of body kits, dog guards, winches, additional lights, etc.
Arch extensions were no exception. "Niva-Chevrolet", for example, looks much nicer with plastic fenders painted to match the body color. An aesthetic and non-aggressive appearance will not distinguish such a car from others in the city, and plastic protection will protect the arches from the harmful effects of road chemicals in winter. Large wheels with studded tires combined with rubber flares that contrast with the body color, on the contrary, will add aggression and brutality to the SUV.
Popular manufacturers
Today, many domestic and foreign companies are engaged in the production of extenders for car wheel arches. The following have proven themselves to be the best:
- Bushwacker is an American company with many years of experience, producing a variety of accessories for various models of SUVs and pickups. The production uses high-quality materials that are resistant to ultraviolet radiation, low temperatures, and also resist the destructive effects of acids and salts found in dirt or natural waters.
- GFG is a Spanish company known not only for its accessories for vehicles, but also for the production of special additives that make the car more economical and the fuel materials used by the car owner more environmentally friendly.
- Cezar is a Polish company that produces high-strength plastic tape materials.
- Master Sport and Russian Artel are Russian companies that are equally successful in manufacturing wheel arch extensions for domestically produced cars - Zhiguli, UAZ, Lada Niva.
Bushwacker Wheel Arch Extension
Design and installation features
These protection elements can be round or square, and also have different extension widths. Round extenders are more practical and are used directly for protection, while square ones serve more of a decorative function. In addition, they additionally require mudguards. Plastic expanders are installed over the entire plane of the arch and attached to the body using a threaded connection. Sometimes when installing them, it becomes necessary to trim the arches themselves, increasing their radius. This is done in order to be able to install larger wheels. Fiberglass fenders are most often used on sports cars as they are much stronger than plastic ones. All plastic extensions can be painted beautifully, which makes it possible to give them the color of the body or, conversely, create a contrast with it.
Rubber expanders, given their variety in shape and width, can be used on any model. They are made in the form of a continuous strip of durable frost-resistant rubber and are sold complete with fasteners. Such fenders are much cheaper than plastic ones, and their installation does not require any additional work. It is enough to select the required profile, measure the required length and secure it with self-tapping screws.
Types of fenders
Wheel arch extensions are presented on the modern market in several variations:
- universal. These are rubber pads sold in rolls. The use of such parts has no restrictions on the make or model of the vehicle - when installed, they can easily be adjusted to any arches. But despite the excellent protective properties, universal arch extensions do not have an elegant design and significantly worsen the appearance of the car, which is why they are most often purchased by SUV owners;
- plastic. They are attractive, but are produced for a specific model. Fixation to the body is carried out using self-tapping screws. A significant disadvantage of plastic wheel arch extensions is the low level of protection and fragility, so they are most often used for beauty;
- fiberglass. The pads are quite durable and look like plastic ones. Most often they are made by hand or made to order;
- fiberglass. They are characterized by excellent appearance, as well as good protective qualities. They are quite expensive. In addition, the installation of these elements is a labor-intensive and complex process. To install such a wheel arch extension, you must first clean its surface and apply a layer of putty. After this, the trim is aligned with the car body, secured with self-tapping screws and painted with the appropriate shade of paint.
Wheel arch extensions are presented on the modern market in several variations
We expand the wheel arches of a car using polystyrene foam
Expanded polystyrene is great for widening the wheel arches of your car. It has the following advantages:
- affordable price;
- non-hygroscopic;
- low specific gravity;
- excellent machinability;
- high compression resistance;
- non-flammability.
The process of working with polystyrene foam in our case is as follows:
- Using Macroflex we glue the foam pieces to the car body.
- Using a knife and sandpaper, we give the material the desired shape.
- We apply resin to the treated polystyrene foam.
- We overlap the fiberglass, making sure that there are no air bubbles.
- We wait for the fiberglass to dry and perform puttying.
- We grind the dried putty, fill all the irregularities with filler and wait for it to dry.
- We sand again and treat with a primer.
- After the primer has dried, we paint the arches to match the color of the rest of the car.
DIY wheel arch covers
How to restore a rotten arch – Crafts for cars
Before working with the welding machine, you need to disconnect the power supply, that is, the battery. The problem we have is this: we need to heal the corroded arch.
First of all, we clean everything with an emery machine and cut out the damaged area with a grinder.
After we cut out the damaged area, we treat everything with acid so that there is no more corrosion. We make blanks, cut out patches. Made from food grade stainless steel 0.8 thickness.
We scald it from the inside and cover it with baxite soil. Carefully, even under the seams.
If it is not convenient or difficult for you to make a patch according to the diameter, you can use cardboard for this. Apply and press along the perimeter of the cutout. You will be left with a mark, cut it out and apply it to the metal to cut out a patch according to your cardboard model.
For in-depth processing, you will also need a Movil, a hose with a spray nozzle in all directions.
After all the processing, take the first patch and insert its hole where the cutout was. In order to be able to safely operate the patch, it is necessary to weld an unnecessary screwdriver or a metal rod.
Thanks to the fact that you weld it to the patch, you will have the advantage of not only adjusting it, but also pressing it tightly to the metal. And so we weld all the patches.
Then it is necessary to clean everything so that the surface is even and when painting everything does not stick out. We clean it with an angle grinder and then go through it with a special iron brush for an angle grinder.
We clean everything inside the seams with a brush so that there are no deposits and in the future it does not oxidize or become covered with rust. And just to be sure, we go through the Circoram again.
Next you need to take 120 sandpaper and apply marks. After applying the marks, everything must be degreased.
After it dries, cover it with baxite primer. Once the primer has dried well, re-apply the marks with 120-grit sandpaper. Then apply a thick layer of putty.
We apply the putty, pushing it tightly under the seam, and tightly without air. Afterwards we sand it with a die so that it is smooth and without holes.
Degrease again before applying universal putty.
We apply universal putty and smooth out the marks from 120-grit sandpaper and the remaining unfinished parts, pores, and edges.
We wait for the putty to dry and begin sanding. We sand it with 240 sandpaper. At the end, if there are any pores left, we go through it again with putty and sand it.
Then we apply several layers of primer, letting it dry for 5 minutes between coats.
The end we will have is painting, paint it according to color, and your arch is ready.
The result of our work is this.
Author; Matula Mikhail
Similar articles:
Application of polyurethane foam
Another suitable material for forming wheel arch extensions is polyurethane foam. Working with it is quite simple, and the algorithm looks like this:
- We use standard plastic fenders as a basis - we divide them into parts and fix them with self-tapping screws on the car body.
- First, from below, and then from above, we blow out layers of polyurethane foam.
- We wait until it dries, after which we give it the desired shape using sandpaper and a knife.
- For strength, we coat the resulting fenders with epoxy and fiberglass, as described above.
- Next we putty, sand, prime and paint as indicated in the previous sections.
Liquid sound insulation of wheel arches
Most often, mastic or liquid rubber is used as a material for external sound insulation of wheel arches. The mastic is applied to a cleaned metal surface using a brush, and liquid rubber is sprayed using a pneumatic spray gun (purchase separately, or use the services of a service station).
By soundproofing the wheel arches (metal with STP NoiseLIQUIDator mastic, fender liners with STP GB 4), it was possible to reduce the noise level by 2 times (the comparison was made using a sound level meter).
What is the purpose
As a rule, it is impossible to do without a car wash if you go out of town or into the countryside. Even driving on city streets in rainy weather can be a real test for a washer. Wide-profile tires are considered the best tires for such trips, but they protrude far beyond the boundaries of the tires. As a result, all the dirt collected during the trip is scattered in all directions when driving, heavily contaminating the body of the car. This problem is solved thanks to the extended overhang of the body, which is provided by universal wheel arch extensions.
Despite its versatility and usefulness, this idea for car body has not received the desired recognition. Today, standard bodies are still actively produced, which do not fit well with wide types of tires, so drivers independently remake this design.
There is no need for welding work, which degrades the entire structure of the machine. Today you can use linings that are attached to the car body in simple ways, increasing its size.
Ways to solve the problem
Two methods for increasing wheel arches are widely used today. You can make your own special pads or buy ready-made ones. They are represented mainly by the following types:
Replacing the rear arches of a car with penetrating corrosion
Welcome to the kuzov.info blog!
Let's talk about replacing the rear arches of a car. The rear arches of some car models are a weak point that is easily subject to corrosion. There are options when you can “cure” rust without changing the arches, but, usually, car owners wait until the last minute, when drastic measures are needed. The need to replace the rear arches arises, as a rule, due to their through corrosion. In such cases, all that remains is to cut off all the rusty metal and weld a new, non-rusty segment in its place. How to do this, and what subtleties need to be taken into account. Let's look at everything in detail.
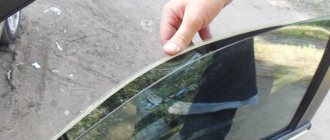
First we need to determine the boundaries of the area that has been corroded. To do this, you need to clean off the old paintwork in the place where the rust is visible. An autopsy, as they say, will show what's under the paint. It is necessary to clean, with a reserve, retreating from the zone with corrosion to the zone with normal metal. Usually an autopsy reveals that there is much more rust than it seemed at first glance.
Next we need to cut off all the corroded metal. We use a grinder and cut everything down to bare metal. After cutting off the rusty segment, you need to check the back side of the remaining intact metal as much as possible. Why do we need this? It happens that the front part of the part does not contain corrosion, but on the back side everything is much worse. Usually you just have to slightly enlarge the area being cut so that the repair segment can be welded to metal that is good on both sides.
Cut out segment of rear wing Arch made by yourself from sheet metal
Next, we need to get a repair insert somewhere to weld and restore the arch. Here you can choose the following options:
Welding a homemade arch
New repair arch
The front fender has a similar shape to the rear fender arch. How
You can use this method. Take cardboard, lean it against the cut-out area and the boundaries of the cut-out area will be imprinted on it. Now, along these boundaries, you can cut out a stamp from cardboard, and using this stamp, cut out the desired patch from metal. It is better to slightly increase the boundaries of the cut metal, since welding will need to overlap.
Welding the repair insert
The next step is to weld the repair insert. When welding, you must not overheat the metal. It is better to weld with points, starting from one end of the patch, then weld with a point on the other side and at intervals, then reduce the interval. The point is to prevent the metal from moving too much.
After welding, you need to clean the seam from oxides and grind the weld seam.
Weld protection
Next you need to protect the seam from corrosion. One option is epoxy anti-corrosion primer. After the primer has completely dried, you need to sand it without rubbing it to the metal, then you can apply putty.
It is also important to protect the reverse side of the weld. To do this, you can use anti-corrosion primers in aerosol cans. The most important thing is to get to the other side. If there is no access, then you can use a can with a long tube and a nozzle on it. One of these options is “Movil”. Very convenient design. You can crawl into the hidden cavity by inserting a tube into a small hole. "Movil" is not the best option for protection against corrosion, but the tube with a nozzle can be adapted to any other means of protection in an aerosol can.
Then you can proceed to the final removal of the putty, priming with acrylic primer, preparation for painting and the actual painting.
Share “Replacing a rusty rear fender arch. How to do everything right.”
More interesting articles:
Cutting car arches
This is a method used to widen the wheel arches of a car. Often practiced on Nivas to install larger wheels and improve the off-road properties of the car. To carry out such a procedure, it is necessary to significantly change the design of the openings to be able to install large wheels that would not rub against the structural elements during movement.
Important! The cutting of arches must be carried out by specialists at a station provided for this purpose.
The protection of wheel arches, although not widely used among motorists, can have a good effect on preserving the properties of the coating from mechanical damage and corrosion.