According to the technical documentation, the alternator belt must be changed every 45-60 thousand km. You should also not forget about the quality of vehicle maintenance, since this directly affects the service life of the parts, in this case the belt. If you notice significant cracks or damage on it, do not hesitate, it is better to replace it.
Video material
The video will tell you how to change the roller and belt of Hyundai Solaris attachments yourself
Stages of work
To adjust the degree of belt tension on Kalina engines, a mechanical tensioner is used, in contrast to the timing drive, which uses a hydraulic tensioner. When changing an element, it is recommended to carry out preventive maintenance of the roller by adding fresh lubricant.
To complete the work you need to do the following:
- Loosen the roller bolt. The thread on it is reversed.
- Use a screwdriver to pry up the plastic plug on the roller and carefully remove it.
- Unscrew the fixing nut on the tensioner rod a few turns.
- Loosen the belt tension by rotating the rod nut clockwise. The nut must be unscrewed until the rod begins to move freely in the seat.
- Unscrew the side bolt securing the rod end, located next to the tension roller.
- Remove the tensioner and set it aside.
- Proceed to dismantle the strap. The procedure must begin with the generator pulley, while overcoming the slight resistance of the belt.
- Remove the element from the crankshaft pulley and remove it completely.
- Unscrew the roller bolt and remove it.
- Using a needle, carefully pry up and remove the protective caps on the bearing. Wash the bearing with white spirit or gasoline.
- Refill with fresh grease and install protective rubber caps.
- Assemble all the parts and mount the roller in place. When assembling, you must remember that the bushing is in the bearing on the side of the bracket.
- Change the belt by installing it in the reverse order - from the crankshaft pulley to the generator pulley.
- Install the tensioner and begin tightening the belt by turning the nut counterclockwise. The nut must be tightened until the resistance increases. A well-tensioned strap should be slightly pressed when pressed by hand.
- Tighten the nut securing the tensioner rod.
- Check the operation of the mechanism; if a whistle occurs, tighten the strap.
Troubleshooting
The following signs indicate a malfunction or wear of the alternator belt tensioner:
- the headlights shine dimly;
- The indicator lights on the dashboard do not seem as bright as usual;
- interior heating works intermittently;
- the car siren has become duller and lower;
- the operating intervals of windshield wipers and turn signals have increased;
- There are no battery charging indicators;
- The alternator belt tensioner assembly makes a whistling sound, hum or squeak;
- When the engine is turned on, the roller or belt vibrates.
If at least one of the above symptoms is present, we diagnose the condition of the alternator belt tensioner. We perform all operations in a certain sequence.
Step 1. Open the hood of the car and conduct a visual inspection of the unit. If cracks, traces of rust, or misalignment of the tensioner block or tensioner arm are detected, we replace, adjust, or adjust the worn parts.
Step 2. Start the engine and observe the operation of the unit
We pay attention to vibration, noise (creaking, crackling, whistling), resistance during rotation, beating of the lever during operation and other deviations from the norm. If extraneous sounds are heard from the unit, we try to understand which part is causing them
Step 3. Check the serviceability of the video. To do this, remember the position of the generator belt and remove it from the unit, having first loosened the adjusting nut. Next, we proceed to inspect the video. Its surface should be smooth, without deep nicks and other damage that contribute to belt wear. We rotate the roller and make sure that the rotation is free and that the roller does not jam. If the roller is in order, we install it in its original place.
Step 4. Check the integrity of the belt. There should be no peeling or cracks on its surface, in the presence of which the belt must be replaced
We pay special attention to the uniform wear of the belt. In case of wear on one side, inspect the bracket or stud for securing the roller
These parts may be bent or askew. If the misalignment is not corrected, the new belt will not last long.
Step 5. Check the belt tension. To do this, with the car engine stopped, we grab the belt and try to turn it 90 degrees clockwise. If the belt rotation angle deviates from 90 degrees, it needs to be adjusted.
ATTENTION! Experts recommend checking the tension of the generator drive belt at least once a week, and constantly having a new belt in emergency supply.
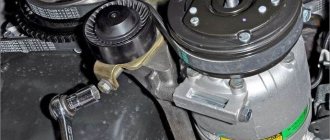
Removing and installing a Hyundai Solaris car generator
- An LG 08L5 alternating current generator is installed on the car
- The conversion of electric current into direct current is carried out by a rectifier unit
- The voltage regulator and brush assembly form a common unit, which is attached to the rear cover of the generator.
- The stator and covers are secured with four bolts. The rotor shaft rotates in bearings that are installed in the covers
- When the ignition is turned on, the voltage to excite the generator is supplied to terminal “L” of the voltage regulator
To monitor battery charging, there is a warning light in the instrument cluster. When the ignition is turned on, the indicator should light up; after starting the engine, it should go out if the generator is working.
If the indicator lights up brightly or at half intensity, this indicates a malfunction of the generator.
Table of possible faults and troubleshooting methods at the end of the article
Removing and installing the generator
- Disconnect the negative terminal of the battery
- Removing the right engine mudguard
- Use a wrench to turn the tensioner roller counterclockwise to loosen the belt tension.
- Remove the belt from the tensioner pulley
- Removing the accessory drive belt
- You don’t have to completely remove the belt, but it’s better to remove it and inspect for defects:
- — traces of wear of the toothed surface, cracks, peeling of fabric from rubber;
- — fraying or delamination on the end surfaces of the belt;
- - traces of oil on the surface of the belt
- A belt with traces of oil on any surface must be replaced; oil quickly destroys the rubber.
- Find out the cause of oil leakage and eliminate it
- When installing the belt, you need to make sure that the internal grooves of the pulleys remain free
- We release the clamp of the wiring harness block
- Disconnect the block from the generator
- Disconnect the holder along with the wiring harness from the generator
- Open the protective cap of the generator output
- Unscrew the nut securing the power cable lug
- Disconnect the power cable from the generator
- Unscrew the bolt of the lower mounting of the generator
- We take out the bolt
- Unscrew and remove the upper bolt securing the generator to the bracket
- Removing the generator from the car
- Install the generator in reverse order
- After installing the belt, turn the crankshaft three full turns so that the accessory drive belt is in the correct position.
Possible generator malfunctions and solutions
| Malfunction | Remedy |
| The battery is recharging (boiling) | |
| Malfunction of the voltage regulator or rectifier unit | Replacing the regulator unit |
| Severe voltage drop in the generator-battery circuit | Check, clean or replace the contact group in the ignition switch, check the contacts in the fuse and relay blocks, connectors. Check the connections of the generator housing to ground |
| The generator does not charge the battery or does not charge completely | |
| Battery terminal oxidation | Clean, secure and lubricate the wire ends with petroleum jelly |
| Battery faulty | Replace the battery |
| Weak accessory drive belt tension | Replace the belt or tensioner |
| The voltage regulator or rectifier unit is faulty | Replace the regulator-brush holder unit |
| The low battery warning light does not go off after starting the engine | |
| Weak accessory drive belt tension | Replace the belt |
| The generator is faulty (the generator brushes are worn out or do not fit tightly to the contact rings of the brush) The generator excitation winding is burned out | Replace or repair the generator |
| Short to ground in the wire between the generator and the signaling device | Insulate or replace the wire |
| When the ignition is turned on, the low battery indicator does not light up | |
| Broken wire between the generator, ignition switch and warning light | Eliminate the break |
Source: https://aubito.ru/solaris/elektrika-solaris/snyatie-i-ustanovka-generatora-avtomobilya-hyundai-solaris
Replacement process
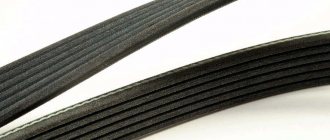
Like every part in a car, the alternator belt is subject to wear and therefore needs timely replacement. Therefore, the manufacturer recommends checking the auxiliary drive belt in accordance with routine maintenance 2. This happens every 30,000 km. And change it as it wears out or cracks, tears, peeling of the fabric base and other defects appear on it. However, it should be remembered that the belt performance tests were carried out in factory conditions. Therefore, when operating a car in difficult conditions, the need to check or replace the belt may occur much earlier than expected.
Attachment belt diagram.
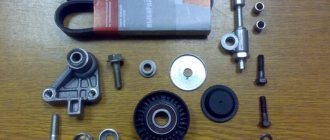
To replace the attachment belt (also known as the generator belt), you must have the following tools:
- inspection hole or overpass;
- ratchet with extension;
- head at “17”;
- keys for “17”, “14” and “12”;
- tension roller;
- vice;
- the belt is new.
Let's consider the process of replacing a belt step by step:
We install the right side of the car on a jack or on an overpass (if there is one).
We remove the wheel.
Remove the negative terminal from the battery, as well as the right front wheel.
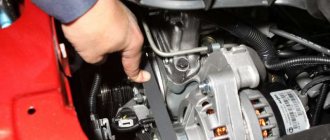
Unscrew the fastening bolts on the right engine mudguard and remove the shield. Then, using a “12” wrench, completely unscrew the upper bolt on the generator, and using a “14” wrench, loosen the bottom bolt, this is necessary so that the generator will move forward and the belt will loosen a little.
Unscrew the top bolt securing the generator.
If after this the belt does not loosen, then it is necessary to loosen the tension roller bolt with a key, thereby tensioning the roller spring, then the belt will sag and we can remove it.
Loosen the tension roller.
Remove the old belt.
We take out the old belt.
After removing the belt, turn the tension roller, it should turn without effort and not jam, otherwise you need to replace the tensioner
Using a “17” socket, unscrew the bolt securing the tensioner device using a special extension for the head, then remove it and remove the device.
Unscrew the tension roller. We remove the roller from its seat.
We install it on the tensioner and tighten the bolt.
Install a new roller on the tensioner.
We put on a new belt, be sure to pay attention to the fact that when fixing the belt, it falls into the groove, but not past it. Rotate the crankshaft three times until the accessory drive belt is in the correct position.
Install the video.
We put the tensioner in place, screw it on, and put the belt on it.
Install the belt.
Place the wrench on the tensioner bolt and tighten it until the belt is tensioned.
We tighten the tensioner. We tighten the belt.
Tighten the bottom bolt
We put the wheel in place.
Tighten the generator bolts.
Then we start the engine, check how everything works and whether there are any extraneous noises.
We start the engine and make sure there are no unnecessary noises or squeaks.
We also check how the tensioner works.
The peculiarity of the bypass strap tensioning system is also its main problem. Very often, simultaneously with the loss of performance of the drive belt, the tension roller fails. A distinctive sign of a broken tensioner roller is a whistling sound produced during operation. The whistle is more often noticed in damp and cold seasons, but if the roller is working on the edge, then the whistle can be heard constantly.
Part selection
For a complete replacement on a Hyundai Solaris, the following belt is suitable:
| Vendor code: | Trademark: | Manufacturer country: | Width, m | Height, m | Length, m | Weight, kg |
| 6PK2137 252122B000 | Hyundai/Kia | South Korea | 0.2 | 0.025 | 0.23 | 0.245 |
Replacement belts: original poly V-belt from the company 252122B000. Price 1500 rubles.
Rollers and tensioner for replacement: the original tension roller (with tensioner) from the manufacturer Hyundai/Kia has article number 252812B010, the cost of the product is 6,000 rubles. But you can use more accessible analogues:
Generator belt.
Belt analogue
| Manufacturer | vendor code | Prices in rubles |
| Dayco | 6PK2130 | 1500 |
| Hutchinson | 2140 K 6 | 1000 |
| Meyle | 050 006 2140 | 1000 |
| Bosch | 1 987 947 958 | 1000 |
| Finwhale | BP6PK2138 | 1100 |
| Flennor | 6PK2138 | 1200 |
| Contitech | 6PK2140 | 1200 |
Analogue video
| Manufacturer | vendor code | Prices in rubles |
| Denckermann | P254005 | 1000 |
| Magneti marelli | 331316171229 | 1000 |
| Febest | 2287-CER | 1500 |
| LYNXauto | PB-5349 | 3000 |
| Ruville | 58447 | 7000 |
| Gates | T39210 | 7000 |
| Ina | 534 0417 10 | 7000 |
conclusions
Thus, you can quickly check and replace the alternator belt yourself. Good luck to everyone and good travels!
The following two tabs change content below.
I've been driving Solaris for four years now. Happy as an elephant. As soon as I pay off the loan for him, I’ll get myself a new Korean!
Tags: Hyundai Solaris
Belt marking 6РК 2137 (six-strand, length 2137 mm).
Turn the tension roller. The roller should turn easily, without jamming. If the roller jams or rotates with great force, the tensioner must be replaced.
To do this, use the “17” head to unscrew the bolt securing the tensioner.
Remove the bolt and tensioner.
Automatic tensioner assembly.
Install the tensioner and auxiliary drive belt in reverse order.
When installing the tensioner, the protrusion on the housing must fit into the corresponding recess on the cylinder block.
Error in the text? Select it with your mouse! And press: Ctrl + Enter
- 1,050 rub.
- 700 rub.
- Are available
- Weight: 0 kg.
Drive belt with air conditioning (DAYCO) for Hyundai Solaris 2010-2017 fits Hyundai Solaris 2010, 2011, 2012, 2013, 2014, 2015, 2016, 2022, before restyling and restyling Solaris 1; Article 6PK2135, good replacement for the original spare part
When can you use a belt squeal remedy?
The drive belt makes a characteristic squeak for one of the following reasons:
- Insufficient tension. Belts tend to stretch over time, and the tension roller may loosen a little. To eliminate this reason, you just need to re-tension the belt to the required value (check by deflection using your finger).
- Belt wear. During operation, the straps wear out, the area of contact between the belt and the surface of the drive mechanisms decreases, and accordingly, the load on it increases. Ideally, such a belt should be replaced with a new one, since it obviously won’t be ridden for long.
- Rubber tanning (drying). Over time, the rubber belt loses its elasticity, causing it to adhere less well to grip surfaces. This, in turn, leads to a reduction in the transmitted force. In this case, it is also advisable to change the belt to a new one.
Tensioning or replacing the suspension belt in a car engine is not a difficult task. However, in some situations this cannot be done, and the car enthusiast is forced to put up with the unpleasant whistling of the strap. In this case, conditioner lubricant for drive belts, which is sometimes called anti-squeak, can come to the rescue.
Belt squeal preventers perform the following functions:
- Softens hardened rubber. Because of this, its top layer becomes softer, which helps it work more efficiently.
- Increases the coefficient of friction on the contacting surfaces of the belt and drive pulleys due to a sticky coating (usually black to match the color of rubber). The belt becomes very sticky, which allows it to be securely attached to all drive pulleys and not slip on them. Sometimes car enthusiasts mistakenly consider this layer to be a decomposition product of the rubber from which the belt is made as a result of using these products.
- Increases the overall life of the drive belt. A dried belt is prone to constant slipping, which increases its already considerable temperature. Because of this, microcracks appear in its structure. Softening and creating a protective layer on the surface of the belt reduces its wear, and accordingly, extends the overall service life.
However, with all the described advantages, the use of belt conditioner is only a temporary measure that can briefly extend the life of the belt. Because very quickly the belt becomes covered with dust and the clutch is lost. Accordingly, it is necessary to tighten or replace the strap as soon as possible.
Typical malfunctions of the alternator belt tension roller
Since its basis is the bearing, most of the malfunctions of this part are associated with it. The most common malfunctions of the bearing that is part of the belt tension roller are the following:
- wear that causes backlash and gaps when the part rotates;
- destruction of individual bearing parts, causing jerking during operation;
- corrosion or destruction of the cage, balls or rollers, which leads to complete failure of the roller.
In any case, it is necessary to remember that if this element begins to make extraneous sounds (usually a whistle), then postponing the replacement of the part for a long time is not easy, unacceptable, but even dangerous!
DIY replacement instructions
How to change and how to tighten the alternator belt on a Lada Kalina car? If you have already completed a similar task before, then completing it will not take much time and effort. But if you are encountering such a problem for the first time, then, of course, it would be better to entrust this procedure to specialists at a service station. Be careful when performing this task as mistakes can have serious consequences.
Tools and materials
To perform all steps correctly, prepare all the tools and materials that may be required.
In particular, we are talking about:
- a set of wrenches, you will need wrenches 8 and 13;
- new strap for installation;
- open-end wrench 19 (video author - Kalinin channel).
Stages
After all the tools and materials have been prepared, you can begin replacing the belt:
- To begin, turn off the engine and ignition and open the hood of your car.
- The strap itself is located on the left side of the engine compartment. If you cannot find it, then start the engine and look in the engine compartment. The belt itself will rotate on special rollers, you will be able to see it, just do not confuse it with the timing belt.
- Once the installation location has been found, you need to use a wrench to loosen the bolt that secures the adjustment rod to the bracket. Having done this, touch the RG itself to make sure how tightly it is stretched. This is necessary so that you can objectively assess how to install the tensioner after replacing the RG.
- When you loosen the nut, you will need an 8-mm spanner; use it to unscrew the adjusting rod, this will reduce the tension. The rod itself must be unscrewed almost to the very end. These actions will allow you to loosen the tensioner tensioner as much as possible. When this happens, you can start dismantling the lower mount; to complete this task you will need a 13 key.
- After these steps are completed, you will need to move the adjusting rod as high as possible, this will allow you to dismantle the belt. But before you do this, you will need to remove it from the generator assembly shaft. Once you manage to remove the RG part from the pulley, you will be able to completely remove it from the crankshaft.
- Next, when the belt is dismantled, it should be carefully checked visually. If there are signs of damage on its surface, then, of course, the part must be replaced. The replacement procedure is performed in reverse order.
How to check the condition of the circuit
There is a folk method, very tempting and simple, but not working! The owners themselves periodically tell me about it. The point is to reach the chain with your fingers and touch it for sagging. The chain will almost always be slack between the intake and exhaust gears. Unfortunately, it cannot be verified that easily.
The popular way to check the condition of the circuit
The condition can be assessed by the position of the chain tensioner, counting the number of teeth by which it has come out of the housing.
7th tooth - you need to prepare, 8th tooth - it’s time to change
The problem is that getting to the tensioner is not as easy as on other cars. Many engines have a special viewing window; Solaris does not have such a window. Apparently the factory is confident in the chain. To get to the tensioner you will have to remove the valve cover.
You can see how to remove the cover yourself in our video.
Your browser does not support the format
After the valve cover is removed, many suggest checking the condition of the chain by checking its slack. But this method is not indicative.
Ignore the chain slack here.
Let's see how far the tensioner has extended.
Your browser does not support the format
You need to find a position where you can see the chain tensioner. It is located on the left side of the engine closer to the engine shield.
We count the number of teeth that the tensioner reaches
How to tighten the alternator belt
Once you have discovered that the alternator belt is loose, it is better not to delay with this problem and immediately begin solving it, that is, tighten the belt. This is a simple job that you can do on your own without professional technical skills and knowledge. However, depending on the car, the process of tensioning the alternator belt may differ; let’s consider the main ones.
Adjustment screw
A more reliable and modern way of mounting the generator involves using an adjusting screw. On modern premium foreign cars, as well as on many models in the middle and even budget price segment, this is the mounting method used. To tighten the alternator belt, tensioned using the adjusting screw, you must:
- Loosen the top or bottom tightening of the generator;
- Next, turn the adjusting screw clockwise once;
- Move the generator away from the cylinder block, making sure that the belt is sufficiently tensioned;
- Tighten the nuts that secure the generator.
After this, you need to check how well the alternator belt is tensioned. If necessary, re-tension.
Important: An over-tensioned alternator belt can lead to rapid wear.
Adjustment bar
The simplest mechanism for adjusting the tension of the generator belt is the adjustment bar. It can be found more often on cars in the budget price category.
A generator with a similar mechanism is attached to the engine block or crankcase using a long screw. Using this screw, you can move the generator relative to the motor. A bar with a slot for a nut is used as an adjustment mechanism. Most often, this mechanism is located at the top of the generator.
To adjust the generator mounted on the bar, you must do the following:
- Unscrew or loosen the adjusting nut itself;
- Using a pry bar or other similar tool, move the generator away from the engine until the belt is sufficiently tensioned;
- Next, the previously loosened nut is tightened on the bar.
- After this, you can check how well the work was done and whether the belt is tensioned enough.
Important: It is also recommended to test the tension after 2-5 minutes of engine operation. Run the engine for a while, then turn it off and check the tension of the alternator belt
Using a roller
Regardless of the method used for tensioning, after completing the task, the engine crankshaft must be turned several revolutions.
After this, the tension level is re-diagnosed. A control check can be carried out after the trip, but it should not be long. The adjustment procedure using a roller may differ depending on the car model and have its own characteristics.
To complete the task, you will need a set of wrenches and a tool designed to turn the adjusting bearing. The tool is a key made in the form of two metal rods with a diameter of 4 mm.
If you don’t have a key, you can use curved pliers; the process of adjusting the tension is discussed using the example of a Lada Priora car:
The hood of the car opens and the generator device is located. There is a fixing screw on it, with which the roller is secured. It must be loosened, but not completely unscrewed. To loosen, use a 17mm wrench. Then, using the adjustment wrench, the roller is rotated. Depending on the need (increasing or decreasing the tension value), the roller rotates in one direction or the other. Using a wrench after adjustment, the roller is fixed
When setting up, it is important to select the correct tension force. When the procedure is completed, a diagnosis of the correctness of the work is performed. To check, the power unit is started and all electrical equipment is activated.
You need to turn on the optics, radio, heater or air conditioning system, wipers, heated glass system, etc. If all devices function correctly and the drive belt does not whistle, then the tensioning procedure has been completed correctly.
Hyundai generator repair
One of the main activities of STO Exclusive is the repair and replacement of generators. We service cars, both domestic and foreign, and we have been expertly providing such services as Hyundai generator replacement and repair for more than 20 years.
The generator is the “second heart” of your car. And, after a certain time, you may need to replace the Hyundai alternator belt, replace Hyundai alternator brushes and other components.
The main advantages of the Exclusive car service
- We provide a guarantee for all work performed in our car service center.
- We carry out repairs and replacements of the Hyundai generator and all its components very quickly - from one hour to several.
- Our advantage is that we have our own warehouse of spare parts and components for starters and generators.
- At the Exclusive car service center, diagnostics of the Hyundai generator are free.
About Hyundai cars
The Korean brand Hyundai was born in 1967, when only oversized trucks came out of factories. Subsequently, the company's production was reoriented to another market segment and the first passenger cars appeared.
In 1985, Hyundai cars began to dominate everyone in terms of sales in Canada, after which the conquest of the US market began. In 1988, the company released its immortal model, the Sonata, which quickly conquered the whole world. It is still popular today; only certain elements in the external design and the engine compartment filling have changed.
Hyundai's next hit turned heads around the world in 1994 with the introduction of the Accent.
Nowadays, the Hyundai company produces 1.5 million cars per year, most of them are aimed at the Russian market, followed by Europe and the USA.
Replacing Hyundai generators
To identify all problems with the generator, it is necessary to perform diagnostics.
Our qualified workers will expertly identify all the faults and will be able to say for sure what will be most optimal - replacement or repair of the Hyundai generator.
Current repairs are carried out without interfering with its internal structure, in contrast to major repairs, when it is inevitable to disassemble the unit.
Price list for repair of Hyundai generators
| Hyundai generator repair services | Price, rubles | |
| Removing/installing the generator | From 880 | |
| Replacing generator brushes | From 330 | |
| Replacing the generator bearing (front and rear) | From 770 | |
| Replacing the regulator relay | From 770 | |
| Rotor replacement | From 550 | |
| Replacing a diode bridge without soldering | From 330 | |
| Replacing a diode bridge with soldering | From 660 | |
| Diagnostics of a generator without a c/o | Free* from 330 | |
| Replacing the battery | Check by phone | |
| Replacing collector rings | From 770 | |
For more information about the service, see the section: repair of car generators
When you print the coupon, you get a 5% discount on your first visit! There is a cumulative discount system
Our car service center on Vasilyevsky Island repairs and replaces Hyundai generators of all the following models:
- Hyundai Accent
- Hyundai Elantra
- Hyundai Starex
- Hyundai IX35 (Hyundai ix35)
- Hyundai Santa Fe
- Hyundai Solaris
- Hyundai Sonata
- Hyundai Getz
- Hyundai Tucson
- Hyundai Terracan
- Hyundai Porter
- Hyundai HD
What do car enthusiasts think about replacing the timing chain on a Huyndai Solaris?
1. Don't touch what works.
“The first commandment of the Red Army soldiers is not to interfere with the vehicle while it is moving, and this way the vehicle will not let you down for a long time. Until it rattles and knocks openly. If there are no extraneous sounds, then the rollers and chain are moving properly under the hood. You shouldn't go there. Enjoy the car, don't worry ahead of time. This is the case when you are very lucky that your Hyundai Solaris does not have a belt. There’s no need to worry about replacing it frequently.”
2. It’s easy to determine the malfunction
“How do you know when the timing chain is on its way?”
- The machine itself will inform you with a lighted “check” that the chain is too stretched and the tensioner cannot cope with the large backlash. Using a scanner, you can read the error code and make sure that this is the problem. And this is a signal from the tensioner sensor.
- The computer checks the correct timing of the ignition angles with a stretched chain (even with the Check not lit). In this case, their value deviates from the required one or may be close to critical figures.
- Usually, an experienced mechanic will be able to determine drive stretching by a specific sound coming from the motor (although this is not always the exact cause). If the “verdict” is correct, the corresponding noise will be heard in the engine. The diagnosis for Hyundai Solaris in this case is more obvious.
In general, one of three options can happen, or all points at once, but the angle will shift - this is 100%.”
3. The angle is difficult to determine
“The Hyundai Solaris is equipped with a system for changing the advance angle for each cylinder individually, and during operation the values are constantly adjusted.
My opinion is that it is impossible to determine the angle in real life; if the drive is still stretched, a CHECK indication will appear with error code POO11 (0012) - similar to, for example, on Captive, replacement is needed.”
4. Changed it at 60 thousand km
“During this run of the Hyundai Solaris, I began to hear unnatural engine noise. Although it is not very loud, with the climate and on lousy roads it is not audible. Appears when you start up for the first few seconds, and at about 2000 rpm when you let off the gas. The Kulibins from the garage said that the timing chain needs to be replaced. I made a replacement and the knocking went away.”
Details about the deflection roller
A part such as a deflection roller is changed quite often on any car, including solaris. When we say “often,” we mean the same frequency as when replacing major components.
It is also important to understand that if replacement is not required, then it is better not to do it
It is enough to look at the deflection roller to see its wear, if any. It can often be seen where the belt fits, which is not surprising. In principle, there is nothing particularly terrible about this, because the video works, spins and all that. But how do you know if this will affect the new belt? Will it break before 30,000? It’s better not to risk it, but to replace it.
Also, experts often notice that the bearing on the idler roller gives play, which is sometimes not critical, but it still exists. It is impossible to change the bearing on Solaris if the roller is plastic. But there are also metal ones; they do not suffer from wear-out and replacement problems.
As you can see, replacing the drive belt is a fairly simple procedure. Almost everyone can really handle it. But sometimes it will be better not to do something yourself. Sometimes you need to turn to professionals so that replacing one part does not result in the repair of several others.
General information and site resource
Our machine uses an automatic belt tensioner. Same for engines 1.4 and 1.6. Convenient, no need to worry about checking the tension and tightening the belt. But it also has disadvantages.
- Low resource for such a node. Not for all cars. Details below.
- Quite a high price. A good analog costs about the same as the original. Cheap takes are wasted money.
According to repair statistics, everyone's resource is different. Moreover, there is no connection with the year of manufacture or engine size. It has been noticed that if the lower right plastic protection is missing or broken, the service life is shorter, and on machines without air conditioning, other things being equal, the service life is always longer.
Plastic right guard extends the life of the tensioner
The main problems are in the range of 60,000 - 180,000, but it should be noted that there are cars with mileages of 200,000 - 300,000.
Interesting fact: on the new Solaris 2 with a 1.6L engine, the automatic tensioner was abandoned. The belt began to be tensioned the old fashioned way by a generator.
Solaris 2 with 1.6l combustion engine, belt tensioned by generator
Purpose and functions of the generator belt tensioner roller
The alternator belt tensioner ensures uninterrupted operation of the vehicle's alternator, which is the main source of electrical power for the vehicle. Normal operation of the generator drive is ensured only taking into account the required tension of the generator drive belt.
On most domestic and foreign cars, a special device is used to ensure proper tension - a belt tensioner. The specified generator belt tensioner is characterized by a simple design, is attached to the internal combustion engine block using a separate bracket and is based on the following basic elements:
- tension roller with bearing;
- tension roller bolt;
As for mounting the bracket, this element is mounted on the engine using several bolts, and can also be secured using studs that are tightened with nuts. In fact, it is the tension roller in the design of the entire tensioner that regulates the degree of tension of the alternator belt. On different engines you can find different solutions. The simplest is considered to be a roller with an offset center, which is secured with a bolt. The belt is tensioned at the moment of rotation of the eccentric.
Another common option is a tension roller, which is placed on the above movable bracket with tension using a bolt. In both the first and second cases, the condition of the generator belt tensioner roller must be monitored, as well as timely replacement of worn elements. It is optimal to carry out monitoring at moments when it is necessary to loosen the tension of the generator belt during repair work or for the planned replacement of the generator belt with a new one.
It should be added that the bearing is often the first thing to fail in a belt tensioner design. Such a bearing is constantly under load and also rotates quickly in such conditions, resulting in an accelerated depletion of its service life. Next, we will look at how to check the bearing yourself and replace the generator belt tensioner pulley if necessary.
Alternative to tensioner
Another option is to switch to manual belt tensioning. To do this, you need a generator bracket and a mechanical tensioner itself. Kit article number 37460-2B006. Using this number you can order it in any online spare parts store. Approximate price from 1200 rub. You will also need a different size belt 6pk2075.
Mechanical tensioner
This is what it looks like
Keep in mind that the belt must be of high quality, as this option is demanding in terms of tension. Cheap belts stretch out very quickly. At our service station we use GATES.
Replacement process
Like every part in a car, the alternator belt is subject to wear and therefore needs timely replacement. Therefore, the manufacturer recommends checking the auxiliary drive belt in accordance with routine maintenance 2. This happens every 30,000 km. And change it as it wears out or cracks, tears, peeling of the fabric base and other defects appear on it. However, it should be remembered that the belt performance tests were carried out in factory conditions. Therefore, when operating a car in difficult conditions, the need to check or replace the belt may occur much earlier than expected.
Attachment belt diagram.
To replace the attachment belt (also known as the generator belt), you must have the following tools:
- inspection hole or overpass;
- ratchet with extension;
- head at “17”;
- keys for “17”, “14” and “12”;
- tension roller;
- vice;
- the belt is new.
Let's consider the process of replacing a belt step by step:
- We install the right side of the car on a jack or on an overpass (if there is one).
- Remove the negative terminal from the battery, as well as the right front wheel.
- Unscrew the top bolt securing the generator.
- Loosen the tension roller.
- We take out the old belt.
- Unscrew the tension roller.
- We remove the roller from its seat.
- Install a new roller on the tensioner.
- Install the video.
- Install the belt.
- We tighten the tensioner.
- We tighten the belt.
- Tighten the generator bolts.
- We start the engine and make sure there are no unnecessary noises or squeaks.
The peculiarity of the bypass strap tensioning system is also its main problem. Very often, simultaneously with the loss of performance of the drive belt, the tension roller fails. A distinctive sign of a broken tensioner roller is a whistling sound produced during operation. The whistle is more often noticed in damp and cold seasons, but if the roller is working on the edge, then the whistle can be heard constantly.
Part selection
For a complete replacement on a Hyundai Solaris, the following belt is suitable:
| Vendor code: | Trademark: | Manufacturer country: | Width, m | Height, m | Length, m | Weight, kg |
| Hyundai/Kia | South Korea | 0.2 | 0.025 | 0.23 | 0.245 |
Replacement belts: original poly V-belt from the company 252122B000Order from us. Price 1500 rubles.
Rollers and tensioner for replacement: the original tension roller (with tensioner) from the manufacturer Hyundai/Kia has article number 252812B010 Order from us, the cost of the product is 6,000 rubles. But you can use more accessible analogues:
Generator belt.
Belt analogue
| Manufacturer | vendor code | Prices in rubles |
| Dayco | 1500 | |
| Hutchinson | 1000 | |
| Meyle | 1000 | |
| Bosch | 1000 | |
| Finwhale | 1100 | |
| Flennor | 1200 | |
| Contitech | 1200 |
Analogue video
| Manufacturer | vendor code | Prices in rubles |
| Denckermann | 1000 | |
| Magneti marelli | 1000 | |
| Febest | 1500 | |
| LYNXauto | 3000 | |
| Ruville | 7000 | |
| Gates | 7000 | |
| Ina | 7000 |
Part selection by article number
When choosing a part, you should always focus only on original models. Drive belts for vehicles with and without air conditioning will vary in price by a factor of two or more.
The minimum cost of a model that matches the article number will be 650 rubles, but purchasing a non-original version will lead to its rapid wear. Take care in advance to purchase rollers that match the article number.
The drive belt of auxiliary units (aggregate) for the Korean model, according to the requirements of technical documentation and regulations, must be replaced every 35 thousand kilometers; in practice, the replacement operation has to be done more often.
Experienced car enthusiasts about replacing the drive belt roller
- Is it time to replace the roller? Don't save!
“There is an official concept - motor resource. When it is running low, play is felt along the radius and axes. In this case, no lubricant, even an ideal one, will help the car, but will only improve the situation for a short time.Everyone knows that a high-quality bearing cannot be cheap. Although the concept of price can be relative and depends on where the part was purchased.
Unjustified savings can lead to big problems.”
- The cost of replacing the drive belt tensioner pulley is not that high, if you think about it.
“I installed two new rollers + a belt (rated for 100 thousand km), since the old one from the factory recently broke.BE SURE TO CHANGE THE TENSIONER!!! I purchased a new drive unit along with a tension pulley, installed it, and now everything is fine.
Don’t forget that a stingy man always pays twice.”
- Replace, but check.
“If you are at a service station replacing the tensioner and belt in a car with air conditioning, don’t be lazy, stick your hand in and feel if there is a new idler pulley. Personally, I was so deceived, but I didn’t bother to check. Then I couldn’t figure out where the stripes on the new belt came from? At first I thought it was catching somewhere. As it turned out, it was the worn out roller that was striping my drive belt. Although at the service they gave me all the old parts, I didn’t know that I needed to check who they belonged to and where they were.” - Does the belt tensioner need to be replaced? Let's check with a stick?!
“I recently learned a popular way to find out the cause of noise under the hood. An excellent method that does not require special tools or disassembly.At first it seems that this is a primitive method, but it is almost foolproof. I checked it myself many times. You take a wooden stick (you can use a meter-long handle from a shovel), someone uses a large screwdriver - whatever you like. This is not the point, the main thing is the principle.
We start the engine and press the end of the stick against the immovable part of the problem unit (for example, the tension roller of the drive belt). We carefully lean the other end against the ear so that it rests on the tragus (the cartilage protruding in front of the ear opening). We press lightly, as if plugging the hearing organ. As a result, all sounds produced by the mechanism are transmitted through the wood to the ear. For greater safety, this edge of the handle can be sanded with a file.
If there is extraneous noise in the unit, this simple “device” will allow you to hear it; the piece of wood transmits all sound vibrations directly to the ear.
After such a check of the moving components and mechanisms, you can find the cause of the noise. Its source will differ in strength and sound character. Well, then decide whether you need to replace the drive belt roller. The price, as they say, will pleasantly surprise you.”
- Diagnostics of the drive belt roller with water.
“As a rule, either the belt or the tension roller makes the whistle. The latter can be easily checked in the following way.Remove the belt and rotate each roller by hand. Its movement should be quiet without any left sounds or rumbles. Next, swing each roller back and forth to make sure there is no play in the bearings.
Regarding belt replacement. There are many reasons for whistling. This is the wear of the tracks, which become conical and do not provide the necessary engagement, which is why the belt slips (especially in the cold, when the rubber freezes and loses its elasticity, as well as in damp conditions). The cause may be dirt or sand embedded in the contact surface, causing friction and squeaking.
In general, there are quite a few reasons, but in all cases there is only one solution - replacing the drive belt. Despite all the tricks - lubricant (I strongly advise against it!), washing, laundering, treatment with imported lubricants - you will cover up your problem for a short time, but only for a short time!
Now about the water: if it’s not the roller that really whistles, but the belt, it will instantly respond to washing its surface with water. You will immediately draw the necessary conclusion whether a replacement is needed or not. Either the tone of the noise will change, or it will stop for a while. For spraying, you can use anything, even put water in your mouth (about 10-15 ml).
Don't worry about the drive belt, it won't get damaged and will dry out very quickly if you don't pour a whole bottle on it. The lack of reaction to water suggests that the problem is probably in the video.”
How to change tension and guide rollers on a Kia Rio?
A whistle or squeak coming from under the hood, even with the engine turned off, often indicates problems with the tension rollers. Sometimes the problem of weakening can be solved by knowing how to change the belt tensioner on a Kia Rio or replace part of the bearings.
If an unpleasant sound occurs more and more often and does not go away, you need to look for the cause:
- or in the belt itself (it can tear, weaken, or receive other damage);
- or in the tension rollers.
If the problem is in the rollers or bearings, they need to be replaced. The price of a new device with article number 6203 GMB is about 200 rubles. To do this, you will have to drive the car onto an overpass. To work, you will need a socket wrench with a 14mm head. Algorithm for performing operations:
- turn off the engine;
- open the hood;
- remove the negative terminal from the battery;
- find the location of the belt, open the engine compartment lid;
- loosen and remove the belt from the roller. To do this, press out the tension roller bracket;
Unscrew the roller mounting bolt. In order not to strip the thread, you should remember that the thread on this particular bolt is reverse, counterclockwise. In operation, you can use a wrench instead of a key;
knock out the old bearings from the mechanism using a wooden hammer and a 17-19 socket. When knocking it out, you must not damage the plastic of the case;
- install new bearings;
- Reassemble the mechanism in the reverse order - tighten the tension bolt, put the strap back in place, restore power.
Drivers recommend changing the rollers in this way every 30-40 thousand km. A task such as changing a Kia Rio roller requires special scrupulousness and accuracy. Of course, it’s better to entrust this to a professional to avoid problems and unplanned damage to the video itself. BUT if you still decide to do it yourself, then video materials from car enthusiasts will help you.
Belt location in Hyundai Solaris
The drive belt on the Hyundai Solaris is located under the hood on the passenger side. It rotates the pulleys of the generator, power steering, and air conditioning. There are different types of consumables. In general, the pattern resembles longitudinal tracks that provide wear resistance. There are different lengths depending on the vehicle model. In particular, the Hyundai Solaris requires a 1530 mm long consumable for a 1.6 liter engine.
Preparing for replacement
Before you begin the drive belt replacement procedure, you need to prepare for it.
Required:
- Set of wrenches;
- Screwdriver and pliers;
- Hex socket set.
You will also need to study safety precautions.
Safety regulations:
- The drive belt needs to be replaced only when the engine is cold. There is a risk of burns.
- Replacement should be carried out using special gloves and clothing.
- To ensure maximum safety, disconnect the negative terminal of the battery.
Drive belt replacement process
Step-by-step instructions for replacing the drive belt in a Hyundai Solaris:
- Place the vehicle in the garage.
- Open the hood. The engine cover is visible on the passenger side. It needs to be dismantled.
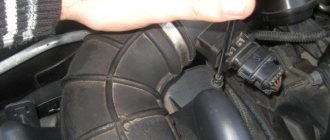
- Release the tension on the drive belt. Use a pry bar to press out the tension roller.
- Carefully move the element to the side, removing it from the pulleys.
- Visually evaluate the operation of the tension roller. The manufacturer recommends replacing the drive belt along with the roller. If the roller wear is not visible (no play or jerking), it can be left.
- Remove the roller along with the tension device. To do this, remove the bolt using a 17 mm socket. Please note: the bolt has a left-hand thread. To unscrew it, you will need to rotate it clockwise.
- Traces of oil and antifreeze are visible on the drive belt; you will need to find the cause of the leak and eliminate it. As a rule, leakage occurs due to wear of the shaft seals.
- When installing a new element, carefully ensure that the grooves fit on the pulleys. The consumable must be installed directly in the center of the pulleys.
- After installation, it is advisable to rotate the crankshaft several times. Thus, the transmission element will fall into place.
- After assembly, install the right boot of the power unit in reverse order.
Replacing the drive belt on the Hyundai Solaris 1 6 is completed.