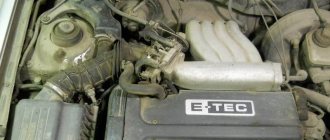
From the moment of its appearance and at the time of writing, all Chevrolet Niva cars were equipped with a single engine model - 2123. This engine is easy to maintain; almost all elements on it can be changed independently with a minimum set of tools. Belt drives are especially easy to adjust. They are installed on the generator and other engine auxiliaries such as air conditioning. Most of them can be changed independently of each other, so the Niva Chevrolet alternator belt with air conditioning can be changed as easily as on a simpler version.
Sequence of work
The first step is to prepare the generator for the repair and replacement process. To do this, old parts are removed. To do this, you will need wrenches of diameter 10 and 17.
- Removing faulty parts. The first step is to loosen the belt and remove it, otherwise you will not have access to the bearings themselves. To do this, you need to loosen the roller, which is held by a platform with nuts. There are three nuts, they require a 10mm wrench. Once they are all unscrewed, you need to unscrew the adjusting screw so that it moves up from the platform. This will allow the section with the rollers and belts to move freely up and down. In order to remove the belt, move the platform up. It is also worth noting that it is not necessary to remove the belt completely - just lower it from the faulty part.
- The next step is to remove the faulty rollers:
- Place the car in first gear to prevent the crankshaft from turning;
- Unscrew the nut that secures the part
- Remove the spring washer and remove the part.
The process of removing generator rollers on a Niva Chevrolet is identical to any other car.
Preparation
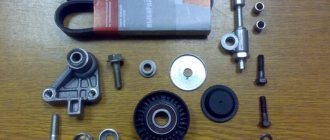
The Chevrolet Niva alternator belt has a more precise name - the drive belt for additional units, because in addition to the rotor, it drives the water pump pulley and the power steering pulley. Before work, you will need to prepare all the necessary tools. By the way, there are not so many of them:
Key for 10; Key to 13; Dynamometer; Ruler.
The required drive tension is provided by a special roller with a movable bracket.
A dynamometer with a ruler is precisely used to correctly set the degree of its tension. Too little tension will result in slippage, and too much tension will result in excessive wear on both the serpentine belt and the alternator bearing.
Do-it-yourself replacement and tensioning of the alternator belt
Depending on the vehicle configuration, various schemes and drive options for auxiliary units may be used.
Belts may vary in size, since auxiliary units such as a power steering pump, generator, and air conditioning compressor may be from different manufacturers.
Therefore, before checking and replacing belts, you need to decide which option is right for you.
The size of the belts is indicated on the outside of the belts. You need to buy belts according to their size.
When replacing belts, be sure to check the condition of the tension and auxiliary rollers.
You should definitely carry spare belts with you, especially on a long trip. Let's look at some options and technology for replacing belts.
Insufficient belt tension impairs fluid circulation in the cooling system, which leads to engine overheating. In addition, recharging the battery worsens and the belt itself wears out more. If the tension is too strong, the bearings of the water pump and generator may fail.
Check the tension of the drive belt of the water pump and generator from above in the engine compartment.
Tension is characterized by the amount of belt deflection between the pump and crankshaft pulleys (deflection “B”) (Fig. 1) or the generator and pump pulleys (deflection A) when a force of 98.1 N (10 kgf) is applied in the middle of the distance between the pulleys.
Deflection A should be 10 - 15 mm, deflection B - 12 - 17 mm.
It is more convenient to check the deflection “A”.
To check the tension, you can use a spring balance scale by hooking a belt branch with its hook and pulling it up.
Adjust the belt tension with the car mounted on a lift or inspection ditch.
The adjustment is carried out by moving the generator relative to the engine.
You will need: a 13" wrench, a mounting blade.
1. Remove the oil sump protection and engine splash guard.
2. Loosen the nut securing the generator to the tension bar by about one turn
3. Loosen the nut of the lower mounting of the generator.
4. To increase belt tension, move the generator away from the engine.
When moving the generator to increase belt tension, apply force only to the generator housing. placing the mounting blade between the housing and the engine.
5. To reduce belt tension, move the generator towards the engine by hand.
6. Without changing the position of the generator, tighten the nut securing the generator to the tension bar and the nut of the lower mounting of the generator.
nuts securing the generator to the tension bar 28.08-45.3 N m (2.9-4.6 kgcm);
nuts for the lower mounting of the generator 57.3-72 N m (5.95-7.35 kgcm).
7. Install the oil pan protection and engine splash guard in the reverse order of removal.
8. To replace the belt, unscrew the crankshaft position sensor screw and remove the sensor from the bracket socket without disconnecting the wires.
9. Remove the power steering pump drive belt.
10. Perform steps 2 and 3 for adjusting the belt tension and push the generator towards the engine until it stops.
Also interesting: Chevrolet Niva camshaft sensor
11. Remove the belt first from the pump pulley, then from the generator and crankshaft pulleys.
12. Place the new belt first on the crankshaft pulley, then on the generator pulley, and then on the pump pulley.
If the new belt is tight on the pump pulley, and the generator is pushed all the way towards the engine, carefully turn the pump pulley by hand or slowly turn the crankshaft until the belt is completely seated on the pulley. Have an assistant turn the crankshaft.
13. Perform steps 2-6 for adjusting belt tension.
14. Reinstall the crankshaft position sensor.
As an option, one serpentine belt can be installed on the vehicle, which drives all auxiliary units (water pump, generator and power steering pump). In this case, the generator is installed to the left of the engine at the top.
In this case, the belt tension is checked by deflecting it between the generator and water pump pulleys. With normal belt tension, the deflection “h” under the action of a concentrated load “P” of 75 N (7.6 kgf) should be equal to (12 ± 1) mm.
The belt tension is adjusted by moving the tension roller 3, rotating the tensioner bolt 5 while the nuts 8 securing the tensioner bracket 4 are loosened. After adjustment, turn the engine crankshaft two turns and check the belt tension again.
In this case, the belt tension is checked by deflecting it between the generator and water pump pulleys. With normal belt tension, the deflection “h” (Fig. 11) under the action of a concentrated load “P” of 75 N (7.6 kgf) should be equal to (12 ± 1) mm.
The service life of the belt in the field is 50,000 - 100,000 thousand kilometers, then it is recommended to replace it with a new one to avoid breakage and rattling, of course there is nothing terrible in this when it whistles, but it is slightly annoying, and the generator works worse. The most important thing is to supply an original, high-quality belt, which is not so easy to find now. But there are good imported manufacturers Bosh and Gates size 940x10.
Possible causes of whistling:
- Liquids, antifreeze, oil, etc. get on the generator pulley.
- Bearing wear in the generator.
The tool you need is a 17mm wrench or a ratchet wrench.
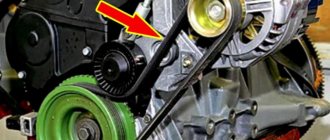
First of all, unscrew the belt tensioner nut as in the picture below.
Next, you need to remove the engine protective sheet and unscrew the lower nut.
Now it is weakened and you can try to move it. The arrow shows the direction of movement.
The belt is free and can now be removed.
1. De-energize the car by disconnecting the terminals from the battery.
2. Pull out the connector from the crankshaft sensor; this can be done by unscrewing the mounting bolt with a Phillips screwdriver. Then remove the sensor.
3. Lightly unscrew the device that is secured with a nut and move it towards the block.
4. Remove the belt that is worn out; this is easy to do since the device is loose.
5. The right side should be jacked up, placing emphasis on the wheels in advance. We put the field in fourth speed, since we will rotate the right wheel.
6. We pull it gradually, removing it from the pump pulley, we turn the wheel, gradually pulling out the belt from the pulley.
The belt that you have removed, as a rule, cannot be repaired, so after removing the old one, we immediately proceed to installing a new one.
1. First we throw it on the crankshaft pulley, and only then on everything else.
Also interesting: Factory thickness of Chevrolet Niva paintwork
2. It is best when the procedure ends by putting it on the generator pulley. The wheel rotates all the time until it is completely dressed.
3. After the device is installed in its seat, it should be secured with a bolt.
· This is the Crankshaft Pulley.
· Then onto the tension roller.
· Then the right lower pulley.
· A roller that is located under the generator.
· Then the pump pulley
· And at the end is the generator pulley.
After all this, it should be tightened well. Since if the tension is weak, then the battery will not be provided with the charge it needs.
4. Install the sensor in its place.
On Chevys, LUZAR belts have proven themselves to be the best.
The only easy repair option is to replace it or you can tighten it; other problems that arise are usually eliminated only by removing it.
Tension adjustment
In order to check the belt tension, you just need to press your finger on it approximately in the middle - between the gears of the coolant pump (pump) and the generator itself. If the force is 8 kgf, then the maximum deflection value should be no more than 12 mm. But you don’t need to tighten it too much, as this will reduce the life of the bearings and belt. And not only the generator, but also other auxiliary devices. When replacing a belt roller on a Chevrolet Niva, it is important to follow the instructions and correctly adjust the tension.
This will lead to rapid wear of the battery.
Replacing the Niva Chevrolet camshaft drive chain tensioner shoe
The size of the belts is indicated on the outside of the belts. The belt tension is adjusted by moving the tension roller 3, rotating the tensioner bolt 5 while the nuts 8 securing the tensioner bracket 4 are loosened. The optimal indicator of belt deflection between the generator and pump pulleys is mm with an applied force of N 10 kgf.
And so, if the alternator belt still fails on a Chevrolet Niva, then it should be...
Unscrew the alternator mounting nut one turn. One of the most common causes of generator failure is a broken belt, since its service life is the shortest compared to other car designs.
I rest a block against the belt, with an electronic steelyard attached to the other end. To avoid accidental short circuits, you need to turn off the power to the car. You can replace the alternator belt on a Niva yourself; for this you need a jack, a set of wrenches and a screwdriver.
Then check the belt tension and tighten the fastening nut. Lastly, replace the crankshaft sensor and connect the connector.
Installed new consumables The replacement procedure for a car without air conditioning is described above. On cars with air conditioning, a compressor pulley is added to the device, onto which the belt drive is also tensioned.
It is important to correctly adjust the belt tension. To replace the belt, unscrew the crankshaft position sensor screw and remove the sensor from the bracket socket without disconnecting the wires. Remove the power steering pump drive belt, see.
Replacing rollers lada 2123 (vase 2123)
The alternator belt on a Chevrolet Niva performs a connecting function between the engine and the generator, helping the latter produce the necessary energy. However, there is a special roller between the crankshaft pulley and the generator pulley, which helps the belt to be in the required tension and not slip out of its place of fixation.
Over time, this connecting element may need to be replaced. This procedure is quite simple and you can do it yourself, without any help.
Why does the roller fail?
Before inspecting the roller for damage, you need to know why it breaks:
- A foreign body has entered - traces and marks on the roller body will indicate this.
- The belt adjustment is not performed correctly - this applies to both too weak and too strong belt tension.
- Entry of a foreign body. This is indicated by impact marks on the body and marks on the flat side of the belt.
- Incorrect belt tension - it is overtightened or weak. This negatively affects both the tension roller and the insufficient outgoing voltage from the generator.
- The part works in a skewed state - this will cause belt marks on the body.
How to identify a faulty belt tension roller?
The presence of extraneous noise or increased vibration may indicate that you should start replacing the rollers; first of all, they may appear during engine operation. Also, replacement will be necessary during a visual inspection if:
- Part backlash.
- Mechanical damage to the body.
- Damage to the bearing or bracket.
- There is difficulty when turning the shaft.
You should also inspect the belt for cracks, delamination, cuts and, if any are found, it must be replaced.
Step-by-step procedure for replacing a Niva Chevrolet
First of all, it is necessary to prepare all the tools so that dismantling is quick and easy. You must have keys for “10” and “17” on hand.
- So, in order to dismantle the roller, you need to loosen and remove the belt. And to do this, you need to loosen the tension roller along with the landing pad, where you need to unscrew the three nuts to “10”. However, such work is not necessary, and if not necessary, you can only loosen its central bolt with a key set to “17”.
- When the belt is “thrown off”, it is necessary to engage first gear, thereby blocking the crankshaft from turning.
- Unscrew the nut on the roller and remove it along with the spring washer.
- When starting to dismantle the generator roller itself, you must first remove its protective cap.
- Then, using a wrench set to “17”, remove the central nut.
- And after that we remove the spacer ring, which prevents the rollers and the motor housing from aligning.
Installation of new parts
- Before installing a new, working roller, you must first mount the ring, then the roller itself.
- Next, using a washer with a spring mechanism, tighten the bolt.
- After this, put on the belt and tighten the tension roller so that the belt is pressed no more than 1 centimeter from its position.
Thanks to such a well-coordinated and precise procedure, it is possible to replace the alternator belt rollers on a Niva Chevrolet quickly and in the shortest possible time.
Such checks should be carried out every 30 thousand kilometers, thereby eliminating the possibility of new malfunctions.
In the Dimavto.com online store, any car enthusiast customer can choose and buy drive belt rollers for the Lada Chevrolet Niva with a 1.7-liter engine capacity from such manufacturers as INA, RUVILLE.
If you have questions, or they appeared during the selection process, and this prevents you from making a final decision, our support service will come to your aid.
This will help you choose the right parts that match your car model.
The success of finding the required part in our store is due to the widest range of spare parts supplied to us from manufacturers from different parts of the world.
Our store's policy is based on careful checking of the quality of the spare parts we sell and their compliance with the highest standards. All products sold by us are of original origin.
Each buyer buying drive belt rollers for Niva Chevrolet 2123 selects a spare part according to the search pattern from a huge catalog that suits him best.
Spare parts search options:
- By product code;
- By car manufacturer and model.
- With tips from a parts specialist.
The selected product can be immediately picked up in the cart on the website online, or you can call 096 258 29 80 or 093 630 27 55 and place an order in person.
Using the catalog, our customers can not only find the product they need, but also read its characteristics. Here you can see a detailed image of the product from photographs and videos. Our pricing policy is always transparent and accessible.
To make it easier for you to understand the features of spare parts Drive belt rollers and their compatibility with Niva Chevrolet 2123 by year of manufacture, modification and type of car, it is better to play it safe and clarify the nuances with our managers.
Before purchasing drive belt rollers (tensioner, bypass) for replacement, it is better to consult with specialists. Taking precautions will help you easily replace an old part with a new one the first time. To do this, our managers are guaranteed to help you with your choice and quickly complete your purchase with delivery.
Replacing the drive rollers of VAZ-2123 auxiliary units
The condition of the belt tension rollers should always be checked when removing or replacing the drive belt. When rocking and rotating the rollers by hand, there should be no play, jamming, or noise in the roller bearings.
- In many cases, noise when the roller bearing wears out is observed when the engine is running.
- We carry out the work on an inspection pit or on a lift.
- Remove the accessory drive belt. For this:
- Remove the mudguards from the engine compartment.
On-board computer ORION BK-70
Availability: out of stock
Buy goods in other stores
- About the product
- Reviews (0)
- Question - answer (0/0)
- Characteristics
- Reviews
Description
The Orion BK-70 car on-board computer is designed for operational control of the operation of the main components of the car and is intended for installation in a standard place instead of the glove box on VAZ cars of the following families: 2110 with Europanel, Lada Priora, equipped with an injection engine with electronic control units: January 5..., Bosch M1.5.4, Bosch M1.5.4N., Bosch MP 7.0 (Euro 2.3), VS 5.1 Itelma, Bosch MP 7.9.7, Bosch MP 7.9.7+, January 7.2, January 7.2+, January M 7.3.
You can connect the Orion BK-70 on-board computer without installing it in a standard place on VAZ cars of the following families: Classic, 2108, 2109, 2115, Niva, Chevrolet Niva, Kalina; as well as for IZH (ODA), ZAZ (Slavuta), DAEWOO (Sens) cars equipped with an injection engine with OBD II. electronic control unit MIKAS 7.6.
A design feature of this model is a large graphic display that allows you to see up to 7 parameters simultaneously.
Installation and connection:
Installed in a standard place Easy to install Remote temperature sensor Non-volatile memory Allows you to connect a fuel level sensor Display: Matrix graphic display Two screens displaying two parameters Each third screen displays some parameters when the ignition is turned off Easy to read large font Russian-language interface and convenient navigation system Multi-color super bright backlight , which has several stages of brightness and color adjustment Normal or inverse display Control: Switching between screens with a “Hot button” Quick viewing of 7 accumulated parameters with a “Hot button” Possibility of displaying for permanent indication of 7 accumulated parameters Indication of parameters going out of range Basic modes
On the digital display, the device allows you to set the following parameters on the screen: Time and calendar Average fuel consumption (l/100 km) Instantaneous consumption (l/100 km) Instantaneous consumption (l/hour) Amount of fuel in the tank (l) Mileage per trip (km ) Mileage on remaining fuel (km) Average speed (km/h) Outside air temperature (C) Minimum daily temperature (C) Engine temperature (C) On-board voltage (V) Engine speed (rpm) Engine temperature (C ) Throttle position (%) Indication and reset of fault codes with the ability to delete detected fault codes stored in the memory of the control unit. The device allows you to monitor the following parameters: Mileage until the next maintenance (km) Replacing the alternator belt (km) Replacing the timing belt (km) Changing the engine oil (km) Changing the gearbox oil (km) Replacing the air filter (km) Replacing the fuel filter (km) Replacing spark plugs (km) BK-70 allows you to change the parameters: Adjustment of clock speed Adjustment of ADC Adjustment of mileage and speed sensor Adjustment of fuel consumption Selecting a fuel level sensor and calibrating the tank Selecting an ECU Setting the time and date Technical consultation Adjusting the backlight (Adjusting brightness and color) Adjustment Contrast Settings Alert Settings
Write a review
After checking the review, a promotional code for 100 rubles will be sent to the specified e-mail, which you can use on your next purchase!
Requirements for reviews - at least 200 characters - no obscene language
If you have not received a promotional code, write to
Checking installed parts
After this, a final check of all mechanisms is carried out and the elements are collected in the reverse order.
If the belt is tight and the force is not enough to loosen or tighten it, there are several ways:
- You can put the car in 4th gear, put the belt on the roller and push in the direction of rotation of the crankshaft. When it starts to turn, you need to pull the belt onto the generator pulley, and it will fall into place on its own.
- In the same way, you can not push the car, but lift the wheel and spin it, or spin the generator itself.
This makes it easy and quick to replace the Chevrolet Niva generator belt rollers. You should regularly diagnose the moving parts of the car in order to prevent possible breakdowns in time and replace faulty parts.
We recommend replacing the bearings and belt every 40 thousand kilometers.
When is it time to change?
According to the manufacturer’s recommendations, the belt drive on the Chevrolet Niva generator should be changed after 50 thousand kilometers. But this is not the main criterion. The belt can last longer; if it is an original product, it will last 65-75 thousand kilometers. Belts made in China have to be changed after 15-20 thousand kilometers. Therefore, it should be visually inspected regularly.
Wedge tensioning diagram
Replacement is carried out if the following defects are detected:
- traces of surface wear: abrasions, cracks, bulges, unevenness;
- peeling of material from the base;
- oil stains on the surface;
- frayed ends.
Installed new consumables.
A sign of a malfunction is:
- the appearance of extraneous whistles at maximum load on the electrical system;
- the battery discharge light is on;
- turning off devices that require power to operate.
If the belt breaks, the car will stop and starting it will be problematic. To avoid troubles along the way, you can carry a spare consumable with you.
When to change the alternator drive belt
Now let’s talk about how the belt is replaced on a Chevrolet Niva. There are no regulations regarding the generator drive belt, but the manufacturer still indicates the period when the element needs to be inspected. So, a condition check should be carried out approximately every 15,000 km. It can be considered normal if there are no cracks, traces of oil or antifreeze, or excessive wear on the surface.
If a whistle appears when the load is turned on, this is the first sign that the device needs to be replaced. Of course, you should first try to tighten it up to get rid of such a nuisance.
Why adjust the alternator belt?
A tightened belt makes a whistling sound during operation. In this case, the bearings wear out faster than expected. In addition, the belt overheats, which means it wears out quickly.
It would seem that the tension can be loosened, but an under-tightened belt wears out even faster. The reason is increased vibration.
Please note: the cooling system pump hangs on the alternator belt. These are the features of the VAZ-2123 internal combustion engine. Stopping the pump will not necessarily lead to overheating. But the engine cannot be operated without it.
Causes of whistling: incorrect adjustment, high degree of wear. Draw conclusions.
Chevrolet Niva
To check the belt tension, press your finger on the belt in the middle between the generator and coolant pump pulleys. To check the belt tension, press your finger on the belt in the middle between the generator and coolant pump pulleys.
With a pressing force of about 8.0 kgf, the belt deflection should be 12 ± 1 mm.
To adjust the belt tension, remove the rubber hoses for supplying air to the throttle assembly.
Step-by-step procedure for replacing a Niva Chevrolet
First of all, it is necessary to prepare all the tools so that dismantling is quick and easy. You must have keys for “10” and “17” on hand.
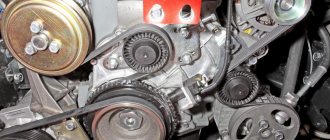
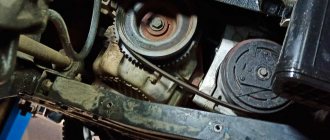
The location of the rollers is very clear.
- So, in order to dismantle the roller, you need to loosen and remove the belt. And to do this, you need to loosen the tension roller along with the landing pad, where you need to unscrew the three nuts to “10”. However, such work is not necessary, and if not necessary, you can only loosen its central bolt with a key set to “17”.
Roller on the site.
- When the belt is “thrown off”, it is necessary to engage first gear, thereby blocking the crankshaft from turning.
- Unscrew the nut on the roller and remove it along with the spring washer.
- When starting to dismantle the generator roller itself, you must first remove its protective cap.
- Then, using a wrench set to “17”, remove the central nut.
- And after that we remove the spacer ring, which prevents the rollers and the motor housing from aligning.
Installation of new parts
- Before installing a new, working roller, you must first mount the ring, then the roller itself.
The new roller is ready for installation.
- Next, using a washer with a spring mechanism, tighten the bolt.
- After this, put on the belt and tighten the tension roller so that the belt is pressed no more than 1 centimeter from its position.
The new roller and belt are installed and ready to use.
Thanks to such a well-coordinated and precise procedure, it is possible to replace the alternator belt rollers on a Niva Chevrolet quickly and in the shortest possible time.
Replacing the air conditioner belt.
To change the Niva Chevrolet air conditioning belt, you need to place the car on an overpass or inspection hole. After this, you need to remove the engine protection.
To do this, using a 13mm wrench, unscrew the 4 bolts around the perimeter.
After which you can remove the oil pan protection.
Using a 8mm head, unscrew the screws holding the protection.
Unscrew the front mudguard.
In order to check the tension, you need to press it with your hand between the compressor and crankshaft pulleys. The permissible deviation should be no more than 0.8 centimeters.
If it is worn out, then we proceed to replace it. To do this, use a socket wrench to loosen the bolts securing the tension roller.
If the air conditioning belt is in good condition, but is loose, you need to turn the bolt, tightening it clockwise, this will lead to tension.
Replacement is carried out if there are cracks, signs of delamination and breaks on the belt. To change, you need to loosen the bolt, to do this you need to rotate it counterclockwise.
After which it can be easily removed from the pulley. On Niva, a four-strand compressor with a length of 810 millimeters is used to drive the compressor.
The belt is put on so that it is closer to the inner edge of the pulley. Then you immediately need to check its tension.
After installing the part, reassemble the components in the reverse order.
In the article we will talk about replacing belts on a Chevrolet Niva. There are three of them - a gas distribution mechanism, an air conditioner and a generator. It is worth noting that the timing drive only on Opel engines has a belt drive. On other engines it is chain driven. Therefore, in our article we will only consider repairs on Opel power units. It is also worth noting that the generator drive belt also rotates the pump and power steering pulley. The easiest way to change the air conditioner belt is to start with that.
Belt installation:
If the belt is purchased and it is new, you can begin installation:
1. De-energize the car by disconnecting the terminals from the battery.
2. Pull out the connector from the crankshaft sensor; this can be done by unscrewing the mounting bolt with a Phillips screwdriver. Then remove the sensor.
3. Lightly unscrew the device that is secured with a nut and move it towards the block.
4. Remove the belt that is worn out; this is easy to do since the device is loose.
5. The right side should be jacked up, placing emphasis on the wheels in advance. We put the field in fourth speed, since we will rotate the right wheel.
6. We pull it gradually, removing it from the pump pulley, we turn the wheel, gradually pulling out the belt from the pulley.
The belt that you have removed, as a rule, cannot be repaired, so after removing the old one, we immediately proceed to installing a new one.
1. First we throw it on the crankshaft pulley, and only then on everything else.
2. It is best when the procedure ends by putting it on the generator pulley. The wheel rotates all the time until it is completely dressed.
3. After the device is installed in its seat, it should be secured with a bolt.
You should know in what order it is thrown onto the pulleys:
· This is the Crankshaft Pulley.
· Then onto the tension roller.
· Then the right lower pulley.
· A roller that is located under the generator.
· Then the pump pulley
· And at the end is the generator pulley.
After all this, it should be tightened well. Since if the tension is weak, then the battery will not be provided with the charge it needs.
4. Install the sensor in its place.
On Chevys, LUZAR belts have proven themselves to be the best.
The only easy repair option is to replace it or you can tighten it; other problems that arise are usually eliminated only by removing it.
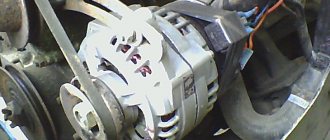
Installed a new Chinese generator on Shevik
As it turned out, the generator jammed and because of it the belt broke. Why did this happen? Most likely (my version) - when replacing the pump, the service center tightened the belt too much, because we couldn’t tighten the same one at all. As a result, during the hellish “tightening”, the old gene grunted; the bearings could not withstand such abuse. Therefore, it is better to do everything yourself or in a trusted service. Well, tighten it correctly, you could press the samples with your finger by 1 cm.
How did they even manage to tighten the 1885 belt? I can't imagine))
First I'll tell you about the generator
I took the old one, they completely disassembled it, looked at it and said that it had come to an end. The bearings were torn, and the rotor was worn out to such an extent that repairs would cost 2,500 rubles. And a new one costs 3100. It’s Chinese, but the warranty is 3 months, we checked it at the stand - everything works.
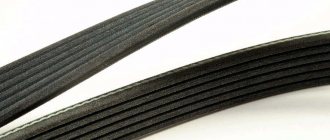
Therefore, it is better to take a native gene with the same width of the roller and with the correct number of rivulets (grooves). That’s why the belt is called a ripple belt, because the grooves must match, it turns out something like rails.
I wanted to buy a 100 Amp Pramo, but I couldn’t find it anywhere in the city; the original genes cost 4,000 rubles. So I decided to try Chinese))
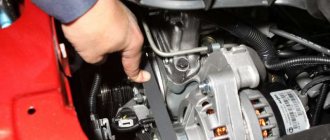
How to remove a generator from a Chevrolet Niva
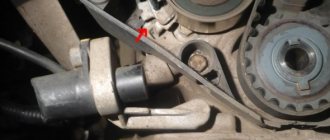
First you need to loosen the belt, which if tense, cannot be easily reset. So, our task is to loosen the tension roller; it is held in place by a platform with three nuts. You will need a 10mm wrench, it is very advisable to have a ratchet with the same head, preferably an elongated one, because the third nut is located directly under the belt and it is better to approach it from the side.
The first 2 nuts are easy to get out with a regular open-end wrench. But the third one is much easier with a ratchet.
We've loosened it - now we turn the adjusting screw (key 10) so that it moves as far up the platform as possible, so the entire platform with the roller will move freely up and down.
We need to go up to throw off the belt.
We remove the generator itself (in my case, I already put it back)