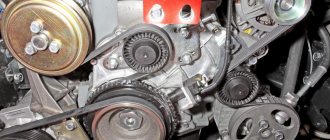
One of the problem areas in the electrical system of the domestic Lada Vesta car is the generator assembly together with the drive belt. The latter is generally a consumable component, the breakage of which causes undercharging of the battery and failure of some electrical appliances. It is quite possible to carry out repair work on your own if you choose original consumables and spare parts.
Removing and installing the tension roller of a Lada Vesta car with a VAZ-21129 engine
We change the tension roller if extraneous noise appears when it rotates.
You can detect play in the tension roller bearing when replacing the drive belt for attachments. We prepare the car for the job. Place the car on a lift and remove the right wheel.
Remove the right front wheel guard.
We remove the belt in accordance with the article on replacing the belt.
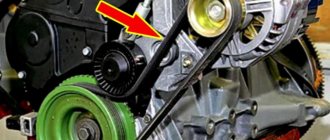
We unscrew two nuts 1, Figure 1, bolts 5 securing the spar to the subframe 6 and remove the bolts (you will need a 13 socket wrench and a 10 socket).
We unscrew bolt 3 securing the spar to the radiator frame 2 and remove the right spar 4 of the subframe (use a 16mm socket).
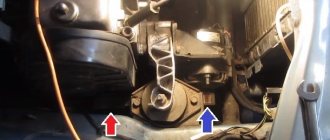
We install traverse 1 on the car, Figure 2 for hanging the power plant, insert hook 2 of the traverse into eye 3 of the right eye and hang the engine on the right side. You can lift the engine from below, then you need to remove the engine crankcase protection.
We unscrew and remove two bolts 1, Figure 3, securing the engine to the right support 2 of the power unit suspension (we use a Torx E12 head).
Lower the engine enough to remove the roller from the mounting stud.
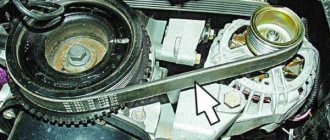
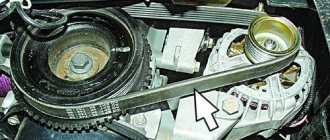
Using a 13mm head, unscrew nut 1, Figure 4, securing the tension roller and remove the tension roller.
Install the roller in reverse order.
Fastening torques:
— nuts 1 bolts 5 securing the spar 4 to the subframe 6 of the front suspension (Figure 1) — 18 Nm (1.8 — 2.4 kgcm).
— bolts 3 securing spar 4 to radiator frame 2 18 - 24 Nm (1.8 - 2.4 kgcm).
Install the generator drive belt.
The final tightening torque for the tension roller nut after installing the belt is 30 - 36 Nm (3.0 - 3.6 kgf.m).
To do this, engage fifth gear and slowly push the car back, inspecting the belt along its entire length.
It is important to check the reverse side of the belt. It is slightly visible from certain angles. You can also get a lot of information about the condition of the belt by touch.
The belt should not be too dry or lose its elasticity, and there should be no cracks on the side of the rivulets. It is unacceptable to continue using a belt that has begun to slip on the pulleys (a sign is a characteristic whistle immediately after starting the engine).
You can also get a lot of information about the condition of the belt by touch. The belt should not be too dry or lose its elasticity, and there should be no cracks on the side of the rivulets. It is unacceptable to continue using a belt that has begun to slip on the pulleys (a sign is a characteristic whistle immediately after starting the engine).
We hang and remove the right front wheel.
Install the new belt in reverse order. At the same time, tighten the belt by turning the roller hub clockwise
Please note that the hub can only be rotated to a position where the T-55 Torx key hole is lower and in line with the mounting stud. The position of the hub will be easily fixed. In this position, the new belt will receive the required tension.
Next, tighten the roller hub mounting nut to a torque of 20–24 Nm.
In this position, the new belt will receive the required tension. Next, tighten the roller hub mounting nut to a torque of 20–24 Nm.
Sources
- https://avtomechanic.ru/lada-vesta/dvigatel-lada-vesta/zamena-remnya-generatora-avtomobilya-lada-vesta
- https://autoruk.ru/lada-vesta/dvigatel-vaz-21129/zamena-natiazhnogo-rolika-privoda-remnia-generatora-vaz-21129
- https://www.zr.ru/content/articles/779188-lada-vesta-proverka-i-zamena/
Drive belt roller VAZ LADA Vesta, X RAY 1.6i tensioning mechanical 75x28.5mm
Both RRP prices (recommended retail price) or the one indicated below are available for ordering.
| Internal code | 81564 |
| vendor code | CM 0911 |
| Brand | TRIALLI |
| Type | Rollers |
| car brand | Lada(VAZ) |
| Express delivery | from 300 ₽ * | from 1 day * | Buy with delivery |
Your review will be published after being moderated
| Brand/Article | Description | Availability | Term | Price |
| RENAULT 8450006996 | Alternator belt tensioner roller “RENAULT” Vesta, X-Ray | 5 | 40 days | RUB 6,199 |
| LADA 8450006996 | DRIVE BELT TENSIONER ROLLER ASSEMBLY VESTA | 8 | 6 days | RUB 4,207 |
| LYNXauto pb5378 | Drive belt tension roller | 1 | 8 days | 771 rub. |
| PILENGA ptp1550 | Belt tensioner roller for air conditioner and power steering “PILENGA” Vesta | 5 | 40 days | RUB 1,702 |
| FENOX r14119 | POLICY BELT TENSION ROLLER LADA VESTA 2015- 1.6, 1.8, X-RAY 2016- 1.6, 1.8 | 1 | 8 days | 797 rub. |
Show all analogues
Thank you for your attention to the project. Together we will make dvizhkom.rf better. After correcting the inaccuracies, we will send you an email telling you about the changes.
Unfortunately, now you can order more if you call us at 8-800-775-7556
Prices, product availability and delivery methods depend on the selected city.
The quantity to order an item must be a multiple of
We have sent you a password to the specified email address. You can change your password or other registration data in your personal account settings
Hereby, in accordance with Federal Law No. 152-FZ “On Personal Data” dated July 27, 2006, you confirm your consent to the processing of personal data by RAT LLC: collection, systematization, accumulation, storage, clarification (updating, changing), use, transfer solely for the purpose of fulfilling your order and informing about it, as well as promotions and campaigns of RAT LLC, including blocking, depersonalization, destruction. We, RAT LLC, guarantee the confidentiality of the information we receive. The processing of personal data is carried out for the purpose of effective execution of orders, contracts and other obligations accepted by RAT LLC as binding on you.
This consent applies to the following personal data: last name, first name and patronymic, email address, postal address for delivery of orders, contact phone number, payment details.
Self-replacement of parts
The procedure for replacing the belt drive on Vesta is made difficult by the compact arrangement of the units in the engine compartment. Access to the belts is limited by the closely located side member of the body, so the removal of additional elements is required.
To complete the work you will need:
- lift or inspection hole,
- additional supports to support the power plant.
Carrying out the work requires knowledge of the car's design; if the owner does not have repair skills, it is recommended to transfer the car to a specialized service center.
Required Tools
A set of tools required when replacing timing drive parts on a VAZ Vesta:
- 10, 13, 15 and 17 mm socket wrench;
- 17 mm spanner;
- hex key size 5 mm;
- Torx heads T30, T55 and E12 and a key for installing the nozzle;
- hydraulic or mechanical jack;
- set of flat blade screwdrivers;
- an original key for changing the position of the tension roller (it is permissible to use a tool to remove the retaining rings);
- mounting blade.
Preparing the car
- Open the hood of the car and remove the decorative plastic cover.
- Remove the protective fender liner installed in the arch of the right front fender.
- De-energize the on-board network by removing the terminal from the negative pole of the battery.
- To access the mounting points, you need to jack up the car and then remove the wheel.
- Install a safety support under the body sill to prevent the vehicle from falling if the jack slips or breaks.
- Using a 10 mm socket, unscrew the bolts securing the protective screen located under the engine.
- Loosen the bolt securing the pulley to the engine crankshaft. To perform the operation, you will need the help of a second person who presses the brake pedal.
If there is no assistant, then you need to unscrew the 3 mounting bolts and then remove the starter. To fix the crankshaft, use a screwdriver, which is inserted into the gap between the clutch housing and the ring gear on the flywheel.
- Place a jack under the engine crankcase, having previously installed a wooden spacer, and then remove the cover of the auxiliary drive belt tension roller. To reduce the tension, use a Torx T55 wrench and turn the roller bracket clockwise.
- Unscrew the bolts securing the engine mount; the power unit must be lowered to the ground by 50-70 mm, which will allow you to dismantle the roller and remove the belt from the pulleys. It is recommended to inspect the parts; if worn, a new set (belt and roller) is installed.
Removing the timing belt on VAZ 21129 and 21179 engines
The procedure for removing worn parts on a VAZ-21129 engine:
- To change the belt, you will need to unscrew 5 bolts securing the top plastic cover covering the timing drive.
- Unscrew the bolt and remove the pulley from the engine crankshaft; under the part there is a guide disk, which is also removed from the machine. When removing, it is necessary to control the position of the pulley, which can damage the shaft position sensor.
- Remove the 3 bolts securing the bottom of the protective screen.
- Set the timing marks, turn the engine crankshaft using a bolt with a set of spacer washers screwed into the toe of the crankshaft. It is possible to rotate the shaft by rotating the suspended wheel when 5th gear is engaged. There are marks on the camshaft gears that align with mating parts on the rear of the belt guard. To fix the camshaft gears, devices made of polyurethane bushings with a bolt are used.
- Check the alignment of the mark on the crankshaft gear with the counter rib on the oil pump housing. Loosen the bolt securing the tension roller; the mechanism will rotate automatically under the force of the tensioned drive.
- Pull the belt off the pulleys; if further use of the part is planned, then a mark is first applied to it indicating the direction of movement during operation. If you plan to replace a part, then a set of rollers (tensioner and intermediate) is installed at the same time.
- Check the condition of the pump; if bearing play or antifreeze leakage is detected, the unit must be replaced. Before removing the pump, the coolant is drained from the engine jacket (through a special hole in the block).
The final stage of changing the timing belt drive
It is worth thoroughly preparing for the operation. Ideally, an electro-hydraulic two-post lift of the P-3.2G type is suitable, but you can get by with an overpass or inspection hole. First of all, collect the necessary set of tools:
- Traverse.
- The key is "17".
- Hex wrench "5".
- Driver and set of Torx sockets.
- Set of sockets and open-end wrenches.
- Extension for wrench and set of slotted screwdrivers.
- Device 67.7811-9516 or 67.7811-9704 for fixing camshafts.
- Lock ring pliers or special wrench type 67.7812.9573-01.
DETAILS: Adjusting the heater dampers of the VAZ 2110 Photo instructions on how to adjust the heater dampers of the VAZ 2110
Preparatory activities
Having placed the car on the lift, we are in no hurry to lift it. First, set the parking brake handle to the upper position, and then remove the negative terminal from the battery. Before replacing the timing belt on a Lada Vesta car, it is necessary to raise the car and dismantle the alternator belt drive and remove the starter.
To do this, you will have to remove the wheel and the mudguard in the wheel arch. The remaining operations are performed according to the following scheme:
- Use a screwdriver to stop the engine flywheel from turning by inserting it into the hole in the starter.
- Using a 17mm socket, unscrew the crankshaft damper mounting bolt.
- Remove the damper and washer, and then screw the bolt into place.
- Remove the screwdriver that was inserted into the starter hole to prevent the flywheel from rotating.
- Lower the lift.
By the way, after the repair it would be wise to treat the body with Movil, since the matter is related to the lift. The preparatory part of the process is not limited to the listed actions. For subsequent manipulations, you will need a special device - a traverse, with which we will lift the right side of the engine:
- Install the crossbar (No. 1) on the vehicle.
- Thread the hook (No. 2) into the eye (No. 3).
- Raise the right side of the unit.
- To simplify the subsequent installation of the right engine mount, it is recommended to outline its contours with a marker.
- Using a Torx E12 socket, unscrew the two bolts securing the right power unit support. Using a 16mm socket, unscrew two more mounting bolts.
- Using a 5mm hexagon, unscrew the five bolts on the top and three bolts on the bottom protective covers of the drive and remove them.
Don't forget to put a spacer washer on the crankshaft pulley. It is important to make sure that the auto tensioner is working; if it is not working satisfactorily, it must be replaced. Further activities are carried out on the following points:
- Using a 5mm hexagon, screw on both timing belt protective covers. The lower part of the casing is installed first, and then the upper part.
- Using a Torx E12 socket, tighten the two bolts securing the right engine mount, but not completely, tighten the other two bolts with a 16mm socket.
- Tighten the first two bolts with a Torx E12 head, maintaining a torque of 54-72 Nm.
- Align the support along the contours marked with a marker, then tighten the remaining two bolts to a torque of 54-72 Nm.
- Remove the motor from the yoke and remove it from the machine.
- Install a slotted screwdriver into the hole under the starter to prevent the flywheel from turning.
- Using a 17mm wrench, unscrew the crankshaft damper mounting bolt.
- After replacing the timing belt on the Lada Vesta, all that remains is to fix the damper and install the drive of the attached units.
- Place the starter and wheel arch mudguard in their original place.
- Install the wheel and connect the “–” battery.
Replacing the drive belt of the Lada Vesta generator with a VAZ-21129 engine
We remove the belt to replace it or during work related to replacing drive units, as well as when replacing the timing belt
We place the car on a lift or inspection hole. Disconnect the negative terminal of the battery.
Remove the right wheel.
Remove the mudguard 1 (Figure 1) of the right front fender.
Using a 10mm socket, unscrew thirteen bolts 1 (Figure 2) and remove the engine protection.
If a manual transmission is installed then:
— with a 13-point head, unscrew the two bolts 1 (Figure 3), and remove the clutch slave cylinder and hang it on the hook without disconnecting the hydraulic drive tubes 3.
If the car does not have air conditioning then:
— using a TorxE10 head, unscrew three bolts 1 (Figure 4), and remove bracket 2 for fastening the clutch cylinder (for cars with a manual transmission), remove starter 3 without disconnecting the terminal and connector of the wiring harnesses suitable for the starter, and hang it on a wire.
We install a device for locking the flywheel into the holes for the starter mounting bolts on the gearbox.
If the car is equipped with an air conditioner (with a tension roller for the accessory drive belt), then:
— remove the tension roller plug, loosen nut 1, Figure 5, fastenings and move tension roller 2 counterclockwise to the upper position (use a 13mm socket and a TorxT55 socket).
If the car does not have air conditioning then:
— unscrew bolt 7 of the damper fastening, carefully remove washer 8 and damper 6 of the crankshaft (use a 17 socket).
Next, remove the belt.
Installing the accessory drive belt
For vehicles without air conditioning:
Install the damper and washer onto the crankshaft and secure with a bolt. The tightening torque of the damper mounting bolt is 95…115 Nm (9.5…11.5 kgf.m) (replaceable head 17, ratchet wrench, torque wrench).
Install mounting tool 67.7834-9703 onto the damper pulley (tool 67.7834-9703 for installing the elastic accessory drive belt).
Install the belt on the generator pulley and put it on the damper through tool 67.7834-9703.
Rotating the damper by the head of the fastening bolt in the clockwise direction ¾ of a turn, put the belt on the grooves of the damper (ring key 17).
Stop rotating the damper after releasing tool 67.7834-9703 from the belt and remove the tool from the damper pulley.
Install the starter 3, Figure 4, and bracket 2 for fastening the clutch hydraulic cylinder (for vehicles with a manual transmission) and secure with three bolts 1. The bolt tightening torque is 18…24 Nm (1.8…2.4 kgf.m) (replaceable head Torx E10 , extension cord, ratchet wrench, torque wrench).
For vehicles with manual transmission additionally
Install cylinder 2, Figure 3, of the hydraulic clutch and secure with two bolts 1. The tightening torque of the bolts is 18…24 Nm (1.8…2.4 kgf.m) (replaceable head 13, ratchet wrench, torque wrench).
For vehicles without air conditioning
Install mudguard 2, Figure 2, of the engine and tighten thirteen fastening bolts 1 (replaceable head 10, wrench and extension).
For vehicles with air conditioning (with accessory drive belt tensioner pulley)
Install belt 5, Figure 5, of the attachment drive in the following sequence:
— crankshaft damper 6;
— pulley 4 of the air conditioning compressor;
— pulley 3 generator;
— tension roller 2.
Move tension roller 2 to the lower position in a clockwise direction and tighten nut 1 securing the tension roller. The tightening torque of the nut is 30...36 Nm (3.0...3.6 kgf.m) (used: - replaceable head 13, TorxT55 nozzle, wrench, torque wrench).
Install the tension roller plug.
Install the right front fender shield
Install the right front wheel and connect the negative terminal of the battery.
Sources
- https://vesta-lada.com/zamena-remnya-generatora-na-lade-veste/
- https://new-vesta.ru/zamena-remnya-generatora-lada-vesta-privoda-navesnyx-agregatov/
- https://avtomechanic.ru/marka-avto-1/lada-vesta/dvigatel-lada-vesta/zamena-remnya-generatora-avtomobilya-lada-vesta
Where can I buy?
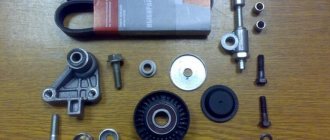
You can buy a Lada Vesta generator belt tensioner pulley both in a stationary store and in an online store. Both original and analog parts are available for sale. It is strongly recommended not to skimp on such components - it is better to purchase original spare parts.
The table shows the most popular sites where you can make a purchase.
| Online store | vendor code | Manufacturer | Price, rub.) |
| https://sv-parts.ru/catalog/privod-raspredelitelnogo-vala/rolik-natyazhnoj-remnya-generatora-v-sbore-lada-vesta-xray-ina/ | 8450006996 | INA | 1100 |
| https://lada-vesta-shop.ru/shop/dvigatel/rolik-natjazhnoi-v-sbore-dlja-lada-vesta-pod-zakaz.html | VS-RPGVX | VAZ | 1600 |
| https://lada-vesta-shop.ru/shop/dvigatel/rolik-natjazhnoi-v-sbore-dlja-lada-vesta-pod-zakaz.html | VS-RPGVX | Trialli | 930 |
| https://autostol63.ru/vesta/standartnoe-vesta/rolik-natjazhnoj-remnja-generatora-lada-vesta-xray.html | 8450006996 | VAZ | 1690 |
| https://www.avtoall.ru/rolik_privodnogo_remnya_lada_vesta_natyajnoiy_trialli-476356/ | CM0911 | TRIALLI | 955 |
| https://trialli.ru/catalogue/sistema-grm/roliki-generatora/rolik-generatora-lada-vesta-14-x-ray-15-1-6i-cm-0911/ | CM0911 | TRIALLI | 905 |
Alternative way to replace the belt
There is an alternative way to replace the belt, which does not require adjusting the valve timing and removing the tension roller. The drive mounted on the pulleys is cut lengthwise into 2 parts, and the outer section is removed. A new belt is then pulled onto the gears. After removing the remains of the old drive, the belt is tensioned to its original location. The procedure is used if the tension rollers are preserved; it is recommended to check the valve timing after installation.
Replacing the timing belt on Vesta, equipped with a 1.8-liter VAZ-21179 engine, is complicated by the absence of a crankshaft locking mechanism and the use of a phase shifter on the intake valve drive shaft. To hold the camshaft gears, a special device is used, available at service stations. The template is mounted in slots made on the rear of the camshafts. To access the slot on the intake shaft, closed by the position sensor disc, you will need to remove the receiver and valve cover.
If you are replacing it yourself, you will need to find the top dead center in cylinder 1 (by the positions of the pistons and the crankshaft pulley, the 20th tooth of which is located opposite the position sensor).
A common problem on VAZ-21179 engines is the shift in valve timing due to the rotation of the gears relative to the camshafts. The defect occurs due to a weak fit and a design feature of the joint (no key is provided).
In this case, the procedure for determining the correct position of the cams is carried out by comparing the faulty motor with a known-good unit from another machine. Since the procedure is labor-intensive, it is recommended to contact a service center that services Lada Vesta cars.
Installation of a new part and adjustment
Procedure for installing a new belt and adjusting tension:
- Install the tension roller in its original place, tighten the bolt by hand.
- The intermediate roller is removed along with the threaded bushing, which is installed simultaneously with the new part. It is recommended to apply an additional locking agent to the thread; the fastening bolt is tightened with a wrench.
- Throw the belt over the crankshaft pulley, and then the upper branch is thrown onto the camshaft gears. The side branch goes around the pump rotor gear and wraps around the tension roller. After installing the belt, check the correctness of the valve timing in accordance with the marks. If a discrepancy between the marks is noted, the shafts are turned in the direction of the minimum stroke until the teeth of the gears and the belt coincide.
- Pre-tension the belt by turning the roller with pliers or a special device. The bracket is rotated counterclockwise until the stops touch.
- Turn the roller clockwise until the cutout on the inner hub coincides with the rectangular notch located on the outer disk of the roller. After alignment, the bolt is finally tightened (the torque on the wrench is in the range from 30 to 36 N*m). Further tension adjustment occurs automatically.
The final stage of replacement
To check the correctness of the adjustment, you need to rotate the motor shaft 2 times and install the piston of cylinder 1 at the upper extreme point. In this case, the marks on the gears should coincide with the notches on the engine crankcase. If there is a shift in the marks on the crankshaft pulley, the belt is removed and the position is adjusted.
For additional checking, it is necessary to apply a force of 10 kg on the branch between the crankshaft and camshaft gears. A correctly operating tensioner begins to rotate clockwise (the design includes a dial indicator).
What generators are installed on the Lada Vesta
The main function of the generator is to provide electricity to all devices when the engine is running and charge the battery, leading to the restoration of its expended capacity.
Without this assistant, the battery life is quickly wasted, so you should pay attention to the signals of the warning lamp, which warns of a current or impending malfunction
The automobile plant itself, located in Togliatti, does not manufacture generators for its vehicles, and these functions are assigned to third-party suppliers. Based on this, generators for Lada cars are supplied by manufacturers such as Bosch and Valeo. These products are sold under production article 8450006900. On the domestic market you can find other analogues that are installed by car enthusiasts during operation. The most famous of them is the StarVolt company.
Design of VAZ engines
Both models are equipped with gasoline power units. One of them is a new development of AvtoVAZ - the VAZ 21179 engine, with a power of 122 hp. With. and a volume of 1.8 liters. The second is the base engine, 1.6 liters.
As for the regulations, it is recommended to replace it every 180,000 km (for a 1.8 l engine). However, mechanics advise not to take everything to the extreme and change the belt at around 100,000 km. This will avoid very unpleasant consequences.
The fact is that if the belt breaks, the valves on Vesta and X-Ray bend, which means that the engine will have to be overhauled, with the replacement of pistons, valves, guides and other components. And this is a very expensive procedure. Therefore, it is better to play it safe.
The progress of work is demonstrated using the example of a 1.6-liter power unit, since replacing the timing belt on a Lada Vesta and X-Ray with a 1.8-liter engine is more difficult due to the fact that the camshaft pulley is equipped with a phase regulator.
All this is told in the video.
How to check the belt
If the alternator belt whistles, then every owner of a Lada Vesta will decide on replacing it as soon as possible. However, it is not at all necessary to reach this point. According to the regulations, you can safely change the strap without checking it after 10-15 thousand kilometers traveled.
However, if there is a need to check the condition, then first of all we lift the engine screen up to provide access to the unit. With your finger we look for the area in the middle between the generator pulley and the coolant pump. We press on it with a force of approximately 8.0 kgf. The deflection value should be around 12 mm from the original position. If necessary, tighten the belt or replace it with a new one.
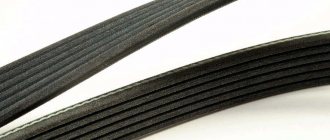
Which drive belt to install. Price
As mentioned earlier, the Lada Vesta engine is equipped with one auxiliary belt. In the production of cars, a 6RK 1039 belt is used as standard. The original of such a belt from the manufacturer LADA will cost 1000 rubles, product code 8450006328.
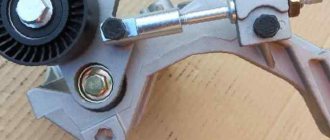
The tension of the drive belt is ensured by a tension roller. If it is discovered that the roller is worn out or inoperative, it must also be replaced.
A non-working roller has a characteristic noise when the engine is running, but for a more complete diagnosis, performance can be assessed using a stethoscope.
You can purchase an original tension roller from VAZ, product code 8450006996. The price of such a product is 800 rubles. For a similar replacement, a tension roller from Pilenga, article number PTP1550, is suitable. Its cost is 500 rubles.
Prices are valid for autumn 2017 for Moscow and the region.
Replacing the timing belt on Vesta with engine 21129 (1.6 liters, 16 valves)
- The procedure is as follows:
- Follow steps No. 1-4 from the previous method.
- Remove the right engine mount:
- Remove the engine splash guard (protection) by unscrewing 13 bolts with a 10mm head.
- Place a jack under the oil pan and lift the engine.
- Using a 16mm head, unscrew the 2 bolts securing the support to the body.
- Lower the right side of the engine until the support is below the lower edge of the side member.
- Unscrew the 2 bolts securing the support to the engine using a Torx E12 head and remove it.
- Unscrew the 5 bolts from the upper cover of the gas distribution mechanism with a hexagon and remove it.
- Unscrew 10 screws using a T20 Torx bit and use a screwdriver to pull out the fasteners securing the right fender liner to the body and remove it.
- Remove the accessory belt:
- Use a slotted screwdriver to pry up the plug on the tension roller.
- Using a 13mm head, loosen the nut on the roller
- Insert the T55 bit into the groove on the roller. Turn the part clockwise, loosening the tension, and remove the belt.
- Turn the crankshaft with the head “17” until the marks on the camshaft pulleys (convex points) coincide with the marks on the cylinder head cover (triangular slots in the plate).
- Follow step No. 8, 9 from the previous method
- Unscrew the 3 screws using a hexagon that secure the lower timing case cover to the cylinder block.
- Follow steps No. 10, 11 from the previous method.
- Place the right branch of the new part on the crankshaft pulley, the intake camshaft (right), and the exhaust camshaft (left), one by one.
- While holding the right arm taut, place the belt over the water pump pulley and tensioner pulley.
- Follow steps No. 13 and 14 from the previous method.
Second phase
The technology for performing the next stage depends on the type of engine installed in the car.
Complete set with VAZ-21129 unit
The short and simple procedure aims to align the alignment marks. To do this, before replacing the timing belt on the Lada Vesta sedan, you need to make several transitions:
- Place a 17mm wrench onto the damper mounting bolt.
- Rotate the crankshaft until the mark on the crankshaft wheel aligns with the mark on the oil pump.
- All marks on the camshaft pulleys must match the corresponding marks on the rear cover.
- Using the device with index 67.7811-9516, fix the camshaft pulleys.
Complete set with VAZ-21179 unit
The process of aligning the marks on Vesta is similar to the same action when changing the Priora timing belt. Also, using a “17” key, you need to rotate the damper bolt to align the marks on the crankshaft pulley and on the oil pump. But to fix the camshafts, a device with number 67.7811-9704 is used. After this, you need to use a marker to put marks on the pulleys opposite the markings on the back cover.
For all trim levels with VAZ engines
Using a 17mm wrench, loosen the auto tensioner fixing bolt (No. 1) to remove the spacer washer from the crankshaft pulley. After this, use two slotted screwdrivers to remove the belt.
DETAILS: Replacing cabin filter Mercedes W204
Disassembling the Lada Vesta generator
The unit itself is quite easy to remove, so we will omit this point. Next, you need to remove the plastic cover, which is secured with three screws and three latches. Behind the cover we see a diode bridge and a regulator.
The regulator is attached to two screws; after removing it, you can unscrew the four bolts that hold the two halves of the housing together. The rear bearing is located in a plastic sleeve, so you can remove the cover along with the diode bridge without much effort. Next, to remove the rotor, you need to unscrew the pulley, after which you can remove the front bearing cover and remove the bearing itself.
Self-replacement of parts
The procedure for replacing the belt drive on Vesta is made difficult by the compact arrangement of the units in the engine compartment. Access to the belts is limited by the closely located side member of the body, so the removal of additional elements is required.
To complete the work you will need:
- lift or inspection hole,
- additional supports to support the power plant.
Carrying out the work requires knowledge of the car's design; if the owner does not have repair skills, it is recommended to transfer the car to a specialized service center.
Required Tools
A set of tools required when replacing timing drive parts on a VAZ Vesta:
- 10, 13, 15 and 17 mm socket wrench;
- 17 mm spanner;
- hex key size 5 mm;
- Torx heads T30, T55 and E12 and a key for installing the nozzle;
- hydraulic or mechanical jack;
- set of flat blade screwdrivers;
- an original key for changing the position of the tension roller (it is permissible to use a tool to remove the retaining rings);
- mounting blade.
Preparing the car
- Open the hood of the car and remove the decorative plastic cover.
- Remove the protective fender liner installed in the arch of the right front fender.
- De-energize the on-board network by removing the terminal from the negative pole of the battery.
- To access the mounting points, you need to jack up the car and then remove the wheel.
- Install a safety support under the body sill to prevent the vehicle from falling if the jack slips or breaks.
- Using a 10 mm socket, unscrew the bolts securing the protective screen located under the engine.
- Loosen the bolt securing the pulley to the engine crankshaft. To perform the operation, you will need the help of a second person who presses the brake pedal.
If there is no assistant, then you need to unscrew the 3 mounting bolts and then remove the starter. To fix the crankshaft, use a screwdriver, which is inserted into the gap between the clutch housing and the ring gear on the flywheel.
- Place a jack under the engine crankcase, having previously installed a wooden spacer, and then remove the cover of the auxiliary drive belt tension roller. To reduce the tension, use a Torx T55 wrench and turn the roller bracket clockwise.
- Unscrew the bolts securing the engine mount; the power unit must be lowered to the ground by 50-70 mm, which will allow you to dismantle the roller and remove the belt from the pulleys. It is recommended to inspect the parts; if worn, a new set (belt and roller) is installed.
Removing the timing belt on VAZ 21129 and 21179 engines
The procedure for removing worn parts on a VAZ-21129 engine:
- To change the belt, you will need to unscrew 5 bolts securing the top plastic cover covering the timing drive.
- Unscrew the bolt and remove the pulley from the engine crankshaft; under the part there is a guide disk, which is also removed from the machine. When removing, it is necessary to control the position of the pulley, which can damage the shaft position sensor.
- Remove the 3 bolts securing the bottom of the protective screen.
- Set the timing marks, turn the engine crankshaft using a bolt with a set of spacer washers screwed into the toe of the crankshaft. It is possible to rotate the shaft by rotating the suspended wheel when 5th gear is engaged. There are marks on the camshaft gears that align with mating parts on the rear of the belt guard. To fix the camshaft gears, devices made of polyurethane bushings with a bolt are used.
- Check the alignment of the mark on the crankshaft gear with the counter rib on the oil pump housing. Loosen the bolt securing the tension roller; the mechanism will rotate automatically under the force of the tensioned drive.
- Pull the belt off the pulleys; if further use of the part is planned, then a mark is first applied to it indicating the direction of movement during operation. If you plan to replace a part, then a set of rollers (tensioner and intermediate) is installed at the same time.
- Check the condition of the pump; if bearing play or antifreeze leakage is detected, the unit must be replaced. Before removing the pump, the coolant is drained from the engine jacket (through a special hole in the block).
Signs of belt and tensioner wear
There are a number of characteristic symptoms that indicate an abnormal drive condition:
- Whistle when starting the engine. Appears due to insufficient tension caused by a worn belt or a faulty roller (on cars with air conditioning). If it rotates freely, there are no visible signs of wear, the cause is looked for in the belt. It has a polycline structure. The surface consists of several longitudinal ridges, called wedges, and depressions, “streams,” located between them. When the ribs are ground down, the wedges sink deeper into the pulley grooves, thereby reducing the internal diameter of the drive. The increase in length at a certain stage goes beyond the limits that the tension roller can compensate for.
- Cracks on the surface. With use, transverse cracks appear, often on the inner surface. Several of these are a warning sign; when there are many of them, the drive must be replaced immediately.
- Worn roller surface. An evenly ground pulley is not so bad if the sagging is compensated by moving the roller. Otherwise, the belt will slip and may even jump out of the groove. Uneven wear can create edges that cut the belt.
There are no effective ways to restore the functionality of the mechanism. The only way out is to replace worn parts.
When is it time to change?
On Lada Kalina cars, the manufacturer does not regulate the replacement of this part. However, its failure is a common problem. In particular, we are talking about Lada Kalina cars. This applies to both 16-cl and 8-cl engines.
This is what a deformed element of a Kalina generator with an 8-cyl internal combustion engine looks like
Therefore, let’s look at the signs that indicate that the belt may fail in the near future:
- Whistle when moving. As a rule, this whistle appears when the electrical appliances of the vehicle begin to load. For example, if you start the car, and when you press the gas, a loud whistle is heard from the engine compartment, this indicates that the belt is loose. In this case, it must be tightened using a tensioner or replaced.
- Cracks on the strap. If you open the hood, look at the belt and see cracks on it, then you know that it’s time to change the element. Neither tensioning nor adjusting the rollers will help here. The component can be tightened, but this will not be enough for a long time. The only option left is replacement.
- Deformation. As in the previous case, neither tightening the tensioner nor adjusting the rollers will give much effect. You just need to change the element.
- Noise when the engine is running. If the element has already served its service life, this can be understood by the noise that appears when the motor is running. For example, some Lad Kalin car owners report loud knocking and even impacts when the engine is running.
The assembly is disassembled: this is what the strap looks like on the shafts
If the vehicle is equipped with a generator sensor that determines its performance, then it will be easier to identify the malfunction
For example, if you heard a whistle from under the hood, and at this time the indicator on the sensor came on, then you need to pay attention to the strap. This indicates that the belt needs to be tightened, since it may be in a weak state or that its service life has been exhausted.
One way or another, if the slipping and whistling of the strap cannot be eliminated by adjusting the belt or rollers, it needs to be changed.
Lada Vesta generator belt with air conditioner size
Depending on the version of the Lada Vesta/XRAY car, replacing the alternator belt (belt of attachments) is performed differently. In one case a belt tension roller is used, in the other it is not. Before starting work, turn off the ignition and raise the car to a comfortable height.
Instructions for replacing the auxiliary drive belt are in the technical instructions:
Removing the belt
1. Remove the right fender liner by unscrewing the fastening screws. Raise the car to a height.
2. For versions without air conditioning, remove the engine protection (on Vesta, XRAY).
3. For configurations with a manual transmission, remove the clutch hydraulic cylinder (Figure 4-3, No. 2) by unscrewing two bolts (No. 1). Hang it by the technological hook without disconnecting the tubes (No. 3).
4. For configurations without air conditioning, remove the bracket (Figure 4-4, No. 2) and the starter along with the wires by unscrewing three bolts (No. 1). Hang it on a hook. Lock the flywheel through the hole for the starter mounting bolts on the gearbox.
5. For configurations with air conditioning, turn the tension roller (Fig. 4-5, No. 2) to the upper position counterclockwise, having first loosened the nut (No. 1).
7. Remove the attachment belt (No. 5).
Belt installation
We carry out assembly in reverse order. After installing the damper, we use the special device 67.7834-9703 for easier installation of the belt. In extreme cases, you can get by with a regular tool, such as a screwdriver.
For configurations without air conditioning, install the belt on the generator pulley (No. 3) and put it on the damper (No. 6) through the device. Rotating it by the head of the bolt clockwise 3/4 of a turn, we put the belt on the grooves of the damper.
For configurations with air conditioning, install the belt first on the damper (No. 6), then on the air conditioning compressor pulley (No. 4), alternator pulley (No. 3) and tension roller (No. 2). Move the tension roller to the lower position by rotating it clockwise and tighten the nut (No. 1) of the roller.
As practice shows, the process of replacing the belt and roller can be simplified.
Required
: Remove the wheel arch liner from the right front wheel.
How to remove the belt
:
- Remove the roller plug and pry it off with a sharp object.
- Loosen the roller with a 13mm wrench (counterclockwise).
- Release the belt tension by turning the T55 Torx bit counterclockwise.
Work progress
Removing the fender liner
First, you need to drive the car onto an overpass, jack it up and remove the front right wheel.
Next, the fender liner is removed. To do this, using a wrench and a Torx T-20 bit, first unscrew 2 self-tapping screws, with which the locker is fixed to the bumper at the bottom, after which 2 more self-tapping screws are unscrewed, but along the edge of the wheel arch.
Then, using a Torx T-30 bit, remove 2 screws that secure the locker to the subframe.
Attaching the locker to the subframe
The fender liner is fixed to the mudguard with 3 pistons, the clamps of which must be pryed and removed, and then the clips themselves must be removed.
In the end, all that remains is to pull the locker back so that it does not interfere with work.
We move the locker to the side
Of course, there is another option to simply cut out a piece of the fender liner with a knife, so as not to waste time on removing and installing it, but it is still not recommended to damage the component.
Features of belt removal
The process of independently replacing the alternator belt on a Lada Vesta directly depends on the vehicle’s equipment – the presence or absence of air conditioning, as well as on the type of gearbox.
Equipment without air conditioning requires removal of the standard protection. To do this, 13 bolts are unscrewed using a wrench and a 10-point head.
Attachment points for standard Lada Vesta protection
Version with manual transmission - remove the clutch hydraulic cylinder. It is fixed with 2 bolts. When the cylinder is removed, it should be hung by the hook, but there is no need to disconnect the tube.
Configurations without air conditioning - you need to remove the starter (along with the wiring), as well as the bracket, and then also hang it up. It is secured with 3 bolts. In addition, it is necessary to block the flywheel, which is done through the technical hole, which is intended for the starter mounting bolts on the transmission.
Versions with “conduit” - first you need to loosen the nut, then turn the roller (tension) to the left until it is in the upper position.
Configurations without “condya” - you will need to remove the crankshaft damper, for which you first unscrew the bolt and then remove the washer.
Replacement
In this case, the process of independently replacing the Lada Vesta alternator belt is clearly demonstrated.
First of all, you need to use a screwdriver to pry up and remove the plastic cap that covers the roller.
Then, using a 13-socket wrench, you need to loosen the nut that secures the roller.
We work with a spanner wrench 13
After this, you will need a Torx T-55 bit (length up to 28 mm).
The bit is inserted into the technological hole on the pulley hub.
Insert the bit into the hole
Next, using a crank, you need to turn it to the left (counterclockwise) until the belt tension weakens and it can be removed.
Self-installation of the alternator belt on the Lada Vesta is carried out in the reverse order. First of all, the damper is installed, and then, using tool 67.7834-9703, the belt is installed. If such tools are not available, a simple screwdriver will do.
The belt is tightened by turning the hub to the right (clockwise).
There are differences in the installation process that depend on the configuration of the machine.
Versions with air conditioning - first of all, the belt is put on the damper, then on the pulleys of the air conditioning compressor and generator, and on the tension roller. The tension roller rotates to the right and moves to the lower position. Finally, the roller nut is tightened.
Versions without air conditioning - first the belt is put on the generator pulley, and only then on the damper. Then it is put on the grooves of the damper, for which it is necessary to rotate it to the right by the bolt head.
IMPORTANT! It will be possible to rotate the hub only to a position where the technological hole for the Torx T-55 bit will be located under the fixation pin, but in line with it. At this moment, the hub will slightly lock and the installed belt will be tensioned with the required force. In the end, all that remains is to tighten the roller hub fixing nut. Tightening torque – from 20 Nm to 24 Nm.
This completes the independent replacement of the Lada Vesta alternator belt.
Everything is clearly shown in the video.
Removal and installation of the Lada Vesta car generator
Technical characteristics of the generator TG 12C209 f. Valeo:
Maximum output current (at 14 V and 6000 min-1), A 120
Engine-generator gear ratio 2.4
Generator type TG 12C209 f. "Valeo" alternating current, three-phase, with a built-in rectifier unit and voltage regulator, right-hand rotation (drive side), designed to operate as a source of electrical energy in parallel with the battery in the electrical system of a vehicle, designed for operation at ambient temperatures from - 40 to +45˚С and humidity up to 90% at a temperature of +27˚С.
Removal
For cars of all trim levels
Place the vehicle in the workplace and apply the parking brake.
Turn off the ignition, raise the hood, disconnect the earth wire terminal from the battery.
Remove the right front wheel.
Raise the car to a height convenient for doing the work.
Remove the right front fender shield.
Remove the engine splash guard.
Remove belt 5, Figure 1, of the attachment drive.
For vehicles with engine 21129 and air conditioning system
Unscrew the three bolts 1, Figure 2, fastenings, remove the compressor 2 of the air conditioning system without violating the tightness of the system, and hang it on a technological hook (used: replaceable head 10, knob, technological hook).
For cars of all trim levels
Remove the protective cap, unscrew nut 1, Figure 3, fasteners and disconnect terminal 2 of the wiring harness from the generator 5 (use: replaceable head for 13, extension cord, wrench).
Disconnect the 3 wire harness connector from the generator.
Using a 10mm socket, unscrew the four bolts 1, Figure 4, fastenings and remove the generator 2.
Installation
For cars of all trim levels
Install the generator 2, Figure 4, on the bracket 3 of the mounted units and secure with four bolts 1. The tightening torque of the generator mounting bolts is 21…27 Nm (2.1…2.7 kgf.m) (used: replaceable head 10, wrench, torque wrench ).
Connect the harness block 3, Figure 3, of the wires to the generator.
Connect terminal 2 of the wiring harness to generator 5 and screw in fastening nut 1.
The tightening torque of the terminal fastening nut is 18…24 Nm (1.8…2.4 kgf.m) (replaceable head 13, extension, wrench, torque wrench).
Place the protective cap on the terminal fastening nut.
For vehicles with engine 21129 and air conditioning system
Install the compressor 2, Figure 2, of the air conditioning system on the bracket of the mounted units and secure with three bolts 1. The tightening torque of the compressor mounting bolts is 21…27 Nm (2.1…2.7 kgf.m) (replaceable head 10, knob, torque wrench) .
For cars of all trim levels
Install belt 5, Figure 1, for drive of mounted units.
Install the engine splash guard.
Install the right front fender shield.
Install the right front wheel.