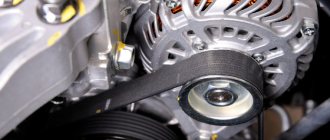
About the belt
All belts are different; the Niva 2121 uses a V-belt, while more modern Nivas such as Urban and Chevrolet use a poly-V-belt. The poly V-belt has a larger contact patch and is more resistant to wear.
The length of the belt depends on the number of attachments; if the car has air conditioning or power steering, the belt will be significantly longer than in a Niva without additional options.
When to change accessory drive
Carry out steps 2 and 3 for adjusting the belt tension and push the generator towards the engine until it stops. Remove the belt first from the pump pulley, then from the generator and crankshaft pulleys.
Place the new belt on the crankshaft pulley first, then on the alternator pulley, and then on the pump pulley. If the new belt is tight on the pump pulley, and the generator is pushed all the way towards the engine, carefully turn the pump pulley by hand or slowly turn the crankshaft until the belt is completely seated on the pulley.
Have an assistant turn the crankshaft. According to the Chevrolet Niva maintenance regulations, the auxiliary unit belt must be replaced once every 60 km, or once every 2 years, whichever occurs first.
My belt went 32 km, but went for 3 years.
This is what it looked like after its run. I found a box for this belt. It contained a spare belt, which I always carry with me in case of a breakdown on the road.
Preparing to replace the Chevrolet Niva alternator belt
I can’t say whether it came off normally or not, but I know cars on which the belt looks better after 40 thousand miles. As I already wrote, I stopped buying spare parts in stores.
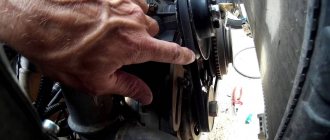
To check the belt tension, press your finger on the belt in the middle between the compressor and crankshaft pulleys. With a pressing force of about 10 kgf, the belt deflection should be about 8.0 mm.
Now let's get back to replacing the Shnivy alternator belt. To replace the belt, remove the rubber hoses for supplying air to the throttle assembly.
replacing the alternator belt on a Chevrolet Niva
Disconnect the DPKV crankshaft position sensor connector. Unscrew the sensor mounting bolt with a screwdriver and remove the device. Unscrew the alternator mounting nut one turn.
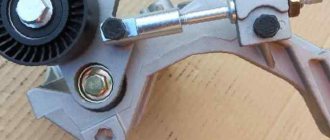
If necessary, unscrew the tension roller and move it upward.
Remove the belt (see Checking the condition and replacing the auxiliary drive belt). When rocking and rotating the rollers by hand, there should be no play, jamming, or noise in the roller bearings. Otherwise, the rollers must be replaced.
Using a flat screwdriver, pry off the protective cover of the tension roller bearing...
Using a socket or a z-shaped spanner “17” we unscrew the nut securing the tension roller...
...and remove it from the bracket axis. If it is necessary to dismantle the tension roller bracket associated with removing the timing cover...
...remove the spacer bushing of the roller...
...and a washer.
Using a 13mm socket, unscrew the three nuts securing the bracket to the timing cover. We remove the mounting elements of the bracket from the studs of the timing gear cover...
...and the bracket itself.
Remove the roller axis from the hole in the bracket.
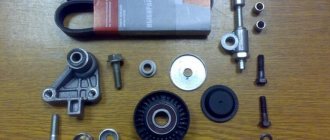
Tension roller bracket fastening elements. Install the bracket and tension roller in the reverse order. To remove the support roller...
...pry off its protective cover with a screwdriver...
Use a 17mm socket to unscrew the roller mounting bolt...
...and shoot a video.
We remove the Belleville washer...
...and a spacer sleeve. Install the support roller in reverse order.
Replacing the generator belt rollers is a standard procedure that you can do yourself. This article provides detailed instructions on how to carry out replacement on a Niva Chevrolet car.
Before moving on to the symptoms and solution to the breakdown, it is worth talking about the possible causes of failure, as well as what they are expressed in :
- Entry of a foreign body. This is most likely evidenced by traces of impacts on the body and marks on the flat side of the belt. Incorrect belt tension adjustment - too strong or too weak. In this case, the tension indicator, tensioner cover or tensioner limiter breaks. This can be caused by incorrect tightening of bolts or incorrect sizing. Work in high temperature. Part misalignment. Because of this, belt marks can be seen on its surface. Mechanical damage from tools during installation.
A number of signs indicate the need to replace old rollers with new ones. They appear both directly while driving, in the form of extraneous noise , and during visual inspection.
Replacement is necessary if:
- Mechanical damage on the surface of the rollers; Noticeable play; Grinding noises when turning. This is a clear sign that the car needs repairs; Damaged bracket or bearing; Leaking oil; High temperature during operation; Strong vibration during operation; Difficulty in turning the shaft.
It would also be a good idea to check the serviceability of the belt. It should not have cracks, cuts or delaminate. If it has defects, it must be replaced.
1. First of all, you need to loosen the belt and remove it, otherwise you will not have access to the bearings themselves. To do this, you need to loosen the roller, which is held by a platform with nuts. There are three nuts, they require a 10mm wrench. Once they are all unscrewed, you need to unscrew the adjusting screw so that it moves up from the platform. This will allow the section with the rollers and belts to move freely up and down. In order to remove the belt, move the platform up. It is also worth noting that it is not necessary to remove the belt completely - just lower it from the faulty part.
2. The next step is to remove the faulty rollers:
- Place the car in first gear to prevent the crankshaft from turning; Unscrew the nut that secures the part. Remove the spring washer and remove the part.
The process of removing generator rollers on a Niva Chevrolet is identical to any other car.
Replacement takes place in several steps:
1. First, remove the bearing protective cover;
2. After this, using the 17th spanner , remove the nut that holds the bearing structure;
3. Next you need to remove the spacer ring, which is located behind the roller;
5. The new ring is installed in its place; 6. A new roller is installed in place of the old bearing. Before doing this, you should check the diameters of both parts to avoid the mechanism not working; 7. Next, the bearing is fixed using a washer with a spring mechanism and a nut;
8. After this, the belt is put on the new roller.
After this, a final check of all mechanisms is carried out and the elements are collected in the reverse order.
1. You can put the car in 4th gear, put the belt on the roller and push in the direction of rotation of the crankshaft. When it starts to turn, you need to pull the belt onto the generator pulley, and it will fall into place on its own.
2. In the same way, you can not push the car, but lift the wheel and spin it, or spin the generator itself.
This makes it easy and quick to replace the Chevrolet Niva generator belt rollers. You should regularly diagnose the moving parts of the car in order to prevent possible breakdowns in time and replace faulty parts.
We recommend replacing the bearings and belt every 40 thousand kilometers.
Alternator belt Niva 2121 (carburetor)
The belt in such a field is slightly longer than in a field with an injector and power steering due to the fact that the belt drive also rotates the cooling fan with a pump. In the injection Niva, the cooling fan starts automatically.
| Model | Equipment | Belt type | Belt size, (mm) | Belt number | vendor code |
| 2121 | Pump, Generator | Klinova | 10x940 | 2101-1308020 | 2101-1308020 |
Adjusting the tension and replacing the VAZ-21213, -21214 coolant pump drive belt
We check the belt tension by its deflection between the pulleys of the units.
1. With normal belt tension, its deflection under a force of 98N (10 kgf) should be 10–15 mm between the pump pulleys and the generator
2. or 12–17 mm between the pump and crankshaft . We adjust the belt tension by moving the generator (with its fastening nuts loosened): from the engine to increase the tension or to the engine to decrease the tension.
3. To replace the belt, loosen the nut securing the generator to the tension bar with the “17” head on the carburetor engine.
4. or a “13” head – on an injection engine. We move the generator towards the cylinder block to loosen the belt tension.
5. Move the generator, acting on it with a screwdriver as a lever in the slot of the tension bar:
on a carburetor engine;
6. on a VAZ-21214 engine.
Install the belt in reverse order. Turn the crankshaft clockwise two turns and check the belt tension. Excessive belt tension causes increased loads on the generator and pump bearings.
Alternator belt Niva 21213 (Injector, power steering)
In this car, the generator drive also rotates the power steering pump.
| Model | Equipment | Belt type | Belt size, (mm) | Belt number | vendor code |
| 21213/21214 | Pump, Generator, Power Steering | Klinova | 10x838 | — | 21214-3407042-01 |
DIY replacement process.
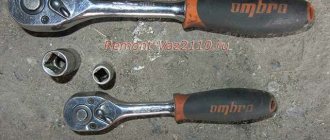
The tool you need is a 17mm wrench or a ratchet wrench.
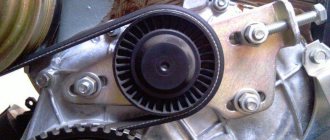
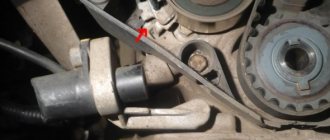
First of all, unscrew the belt tensioner nut as in the picture below.
Next, you need to remove the engine protective sheet and unscrew the lower nut.
Now it is weakened and you can try to move it. The arrow shows the direction of movement.
The belt is free and can now be removed.
Niva Urban generator belt
Niva Urban is a more modern modification of the Niva with plastic bumpers. A poly V-belt is used here as a generator drive.
| Model | Equipment | Belt type | Belt size, (mm) | Belt number | vendor code |
| Urban | Pump, Generator, Power Steering, Air Conditioning | Poly-Vline | 1125 | 5PK1125 | 21218-1041020 |
It should also be noted that if the Niva Urban is not equipped with air conditioning, then it uses a regular V-belt from the previous Lada 4x4 model.
Drive tension
The ignition must be turned off. After this, open the hood and remove the plastic trim. Then loosen the air duct clamp. You can use a regular screwdriver for this.
Then use a 10 mm socket wrench to unscrew the screw holding the air filter. After this, remove the air duct from the filter housing. At this point the preparation stage can be considered complete.
Niva Chevrolet
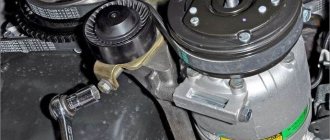
This car is significantly different from the classic Niva, therefore. and its components are completely different. In the Chevy Niva, the air conditioning compressor is driven by a separate belt. The alternator belt rotates the power steering, alternator and pump. Due to the large amount of equipment, the belt length is quite long.
| Model | Equipment | Belt type | Belt size, (mm) | Belt number | vendor code |
| Chevrolet | Pump, Generator, Power Steering | Poly-Vline | 1888 | 5PK1888 | 2123-1041020-30 |
Niva Chevrolet air conditioner belt dimensions
The air conditioner belt is a poly-V belt with the marking 4PK810, from here you can calculate its length as 810mm.
Installing the pump and timing belt
Further instructions for replacing the belt on a Chevrolet Niva.
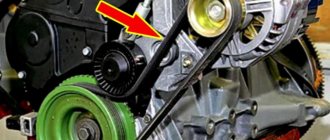
- Unscrew the bolts and remove the crankshaft position sensor and the roller that tensions the timing belt. It often happens that the roller cannot be secured and you have to knock it down with a chisel.
- Remove the pump; to do this you need to unscrew three bolts.
- All surfaces must be cleaned, degreased and a sealant applied to them. After this, you can install a new pump.
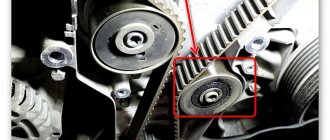
- Install a new drive belt and rollers. Check if the marks on the camshafts and crankshafts match. To do this you will need to turn the crankshaft several times.
- All elements that were previously removed must be installed in their places.
- Pour liquid into the cooling system.
In order to charge the air conditioning system with freon, you need to contact a service center.
Let's sum it up
Taking into account the above information, it becomes clear that the alternator belt on a Chevrolet Niva needs to be changed more often than many car owners believe. It is also important to monitor the general condition of the belt, checking it for wear, cracking, etc. At the same time, it is necessary to evaluate its tension and make adjustments if necessary.
We also recommend reading the article on how to replace the Lada Kalina alternator belt tensioner. From this article you will learn when and why you need to change the Kalina generator belt tensioner, as well as what you need to consider when performing this procedure.
Finally, we note that if the alternator belt is being replaced, it is important to purchase not only a product that matches the markings, but also a high-quality product. In fact, it is better to refuse the expensive original, while it is quite possible to purchase a cheaper, but high-quality analogue from a well-known manufacturer.
As a result, you can count on a fairly long service life of the generator belt, as well as reliable and stable operation of auxiliary equipment (provided there are no other breakdowns, liquids getting on the belt, etc.).