Causes of breakdowns
Below are the 2 most common reasons for element failure:
- Loss of bearing tightness. The fact is that the product body contains a certain amount of lubricant to reduce friction between the internal elements. The lubricant is retained by special protective covers made of rubber or plastic. Accordingly, these materials deteriorate over time, which leads to a gradual loss of lubrication and failure of the hub element.
- Large production resource. No matter how carefully you operate your car, over time most components and elements become unusable. Each part has its own service life. The bearing, whose service life is about 60 thousand kilometers, is no exception. In some cases (regular or periodic driving through potholes, under conditions of increased wear), the element fails much earlier than the above indicators.
How to find out about problems with the hub?
Instructions for replacing the rear wheel bearing on a VAZ 2114 with your own hands
The hub is an important part of any vehicle. It has a hole created to allow it to be attached to an axle or shaft, and the main purpose of this part is to transmit torque from the crankshaft to the wheel, due to which the latter begins to rotate and the car starts to move. Along with the hub, an equally essential element of the chassis assembly is the hub bearing, presented in the form of a double-row ball or single-row roller bearing. Together they are aimed at observing safety measures while the car is moving, so it is clear that failure of any part of them cannot guarantee this.
Today, the rear wheel hubs of any vehicle are subject to significant vertical and axial loads, and on vehicles with rear- or all-wheel drive, high torque is added to this.
Unknowingly, the car owner himself can contribute to the rapid wear of the wheel bearing during the process of replacing wheels. When tightening the fastening bolts, you may not calculate the force and tear them off, but this does not mean at all that you should not fix the wheel rim well
In this matter, it is important to find a “golden mean” and then you will not have to think about the possible consequences. To tighten the bolts, it is best to use an electric wrench, as it better “feels” the limit of permissible force
It affects the rapid wear of the bearing unit (rear wheel) and moisture and dust entering it from the road.
Penetrating into the hub, dust acts as an abrasive substance, gradually squeezing out the lubricant through the sealing parts, as a result of which the hub bearing is destroyed by heat.
It is not difficult to notice the need to replace the wheel bearing; you will be informed about this by a characteristic knock coming from the rear of the body, which intensifies when driving on uneven roads or when hitting bumps and holes. If the car moves on a flat surface, a hum occurs and, although this is not noticeable, the brake drum gets very hot. Also, when turning the steering wheel, quite often an uncharacteristic braking is noticeable - another sure sign of a faulty bearing.
Usually, to determine the cause of bearing failure, just a visual inspection is not enough; the condition of adjacent parts, the quantity (quality) of lubricant and the conditions of use of the vehicle should also be taken into account.
Among the main factors influencing rear wheel bearing failure are:
Reducing the service life of parts due to long-term operation in extreme conditions (the average service life of this type of bearings is calculated at approximately 1,000,000 km, which in reality often does not correspond to this indicator);
Unreliability of lubricants: their excess (lack) or poor quality (70% of cases);
Contamination when moisture or solid particles of various debris get inside the part (18% of cases);
Incorrect wheel installation: incorrect adjustment, excessive force, over-tightening of the bushing, overheating, inaccurate clearance, etc.
To avoid costly damage and take precautions, manufacturers recommend checking wheel bearings every time you replace brake pads, regardless of the age of the vehicle.
Bearing in the front hub
Replacing the rear hub of a VAZ 2109 and all about it
The process of replacing the front wheel bearing is labor-intensive and requires certain knowledge and skills. So, you will need quite a lot of tools: a set of large heads, screwdrivers and keys, as well as a medium-sized crowbar and two jacks. It is worth noting that the process of replacing a bearing with and without ABS is almost no different. For cars without ABS there is no hole for the speed sensor.
At the first stage, remove the wheel: engage the handbrake and first gear, unscrew the hub nut (key “30”). Loosen the four screws, and then use the jack.
Replacing a Renault Logan wheel bearing is not complete without removing the wheel arch liner. First, remove the bumper shield (two pistons and three screws). Then you need to get to the point marked by the arrow.
All fender liner mounting points
When the piston at the “important point” is removed, go through the remaining elements. These are four screws (1 and 2), two pistons in the front, as well as a self-tapping screw and pistons near the mudguard. In configurations with ABS, the following actions are carried out: disconnect the connector, remove the cord from the grooves (see
photo), disconnect and remove the sensor
In configurations with ABS, the following steps are carried out: disconnect the connector, remove the cord from the grooves (see photo), disconnect and remove the sensor.
The cord must be taken out of three grooves
All that remains is to remove the steering knuckle. But this operation is a long one.
Removing the brake discs
Let's try to remove the pads: move the bracket outward, unscrew the nut on the lower pin (key "13"), lift the bracket. The finger is kept from turning with a key “17”.
Down with the pads
We take out the pads, then remove the brake mechanism. To do this, use an 18mm wrench to unscrew the two screws. They hold the mechanism on the fist.
To prevent the disc from turning, you can temporarily tighten any screw that secures the wheel. A wedge is placed between the hub shoulder and the screw.
How to remove the steering knuckle
The tie rod end needs to be disconnected from the knuckle. To do this, use a 21 wrench to loosen the locknut, holding the tip itself by the flats (see photo).
Down with the rod tip
The most difficult thing will be to knock out the finger: loosen the nut with a 16mm wrench, and hold the finger itself with a Torx T30 wrench. Then we hit the end of the lever with a hammer. The pin must be pressed out completely, and the nut must be unscrewed at the end.
Let's move on to the suspension arm. The structure of the front suspension allows you to easily remove the stabilizer stud: use a 13mm wrench to unscrew the nut, holding the cap with a T40 wrench (see figure).
We only use a screwdriver and a wrench
Then, using a 16mm wrench, unscrew the nut of the coupling bolt. The “tie” is located at the bottom, and the “cheeks” of this tie can be opened with a screwdriver. The point is to bring the support down from the fist.
The simplest thing left is to unscrew the two screws on the stand. To do this, use the “18” key.
Attaching the steering knuckle to the strut
Removing the bearing
Using a vice and a thin mandrel, you will need to knock out the hub (see figure). In this case, the bearing is destroyed.
The old bearing will be destroyed
The outer bearing race is then knocked out of the knuckle. But first remove the retaining ring.
Let's consider all the steps in order:
- We separate the hub and fist (mandrel d=36.5);
- Using circlip pliers, remove the ring from the knuckle recess;
- We use a d=65 mandrel to knock out the outer ring.
Each step has a photo.
We got rid of the bearing by half
Now let's remove the extra part from our hub.
First, remove the washer covering the rubber seal. Next, move the bearing ring using a hammer and chisel.
Down with the other half of the bearing
At the last stage you will have to use a puller.
Bearing installation
First, the bearing is pressed in, then the retaining ring is installed, and then the hub is pressed in. In this case, a screw puller or a hammer and mandrels are used.
Tips for the ABS version
For trim levels with ABS, there are rules:
- Before installing the bearing, the sensor ring is installed. The legs of the ring “look” inward;
- Grooves 1 and 2 must match (see photo);
- The magnet on the bearing should “look” inside the fist.
Subtleties of crimping
The Renault Logan wheel bearing puller looks the same as the puller for AZLK-2141. The drawing is presented below.
Special tools from the AZLK plant
When working, follow two rules:
- When you press the bearing into your fist, cup 3 (72 mm) presses on the bearing;
- If the hub is being pressure tested, cup 4 (62 mm) is used.
In the first case, the spacer rests on the fist. In the second, it puts pressure on the hub.
Lada Granta, replacing the rear wheel bearing with your own hands. Photo and video instructions
Replacing the front wheel bearing of a VAZ Niva
We have a Lada Granta car under repair, on which the rear wheel bearing needs to be replaced. We will show you detailed photos and video instructions on how to do it yourself.
In addition to the usual tool, we will use a puller, which consists of a power screw, a glass and a set of washers.
We carry out the work on the rear left wheel. Use a 7 key to unscrew the guide pins:
To remove the drum, we screw M8 threaded bolts into adjacent holes.
If the drum has not been removed for a long time, a so-called “shoulder” of oxides forms between the hub and the drum; before you begin removing the drum, you must remove all of this. This is done using a chisel and a hammer.
Next, we remove the ABS disc by hand. We remove the protective plastic cap; it has a small groove into which we insert a slotted screwdriver and move it to the side. Use a 30mm socket to unscrew the hub mounting nut:
After removing the nut, we are left with a washer; the most convenient way to get it out is with a magnet. We press the hub assembly, but be careful, there is an ABS sensor in the front part, which can easily be damaged. For work we use a three-legged puller, but you can get by with a two-legged one:
Turn the screw and compress the hub. Usually this procedure goes without any difficulties, the only unpleasant moment that can arise is when one of the rings remains on the shaft. In our case, this is what happened.
In order to remove the half ring that we have left when pressing out the bearing, we use a more compact two-legged puller.
We secure the hub in a vice, we first need to remove the retaining ring, but before we compress it with pliers, we move it a little, since over time it gets stuck and is difficult to compress. To move it, use a strong screwdriver and a hammer, delivering several sharp blows:
After that, take tongs or pliers, squeeze the locking ring and lift it up. Now we need a special tool - a power screw, which we wrote about earlier.
Turn the screw to press out the old wheel bearing. Then we clean the seat and lubricate the working surface with grease. We clean the surface under the retaining ring using this hook:
After this, press in a new bearing:
Reinstall the retaining ring, making sure it is seated in its groove. Having previously lubricated the seating surface, we install the hub in place. First, we insert it with our hands, then hammer it in with not too strong blows through a suitable mandrel:
Place the washer and nut and tighten. We tighten the hub nut, it is recommended to do this using a torque wrench, the tightening torque is in the range from 180 to 220 Hm. We caulk the nut. We put back the protective cap, ABS disc and drum.
Video of replacing the rear wheel bearing in a Lada Granta:
Backup video on how to replace the rear wheel bearing in Lada Granta:
MrPodshipnik
Bearing replacement, repair
Enter the marking or size (for example: 8*22*7) of the product and the country of sale
- Car brands
- Auto components
- Moto
- Velo
- Equipment
- Tool
- Technique
New instructions
- How to make your own repairs and replace the bearing on the steering column in a ZOOM bicycle 10/09/2019
- How to independently, at home, replace a bearing in an electric motor of a Philips food processor 10/05/2019
- We repair a DAB heating circulation pump and change the bearing ourselves 10/04/2019
- How to repair a Shimano fishing reel yourself and replace a faulty bearing 10/03/2019
- We replace the bearing and repair the SBR_ 132_A concrete mixer ourselves 10/02/2019
How to replace the rear wheel bearing on a Lada Granta
Drivers who have a Lada Grante car at their disposal sometimes have to make a decision to replace a failed bearing. Carry out repairs yourself or at a service station (service station)? Choose the first option!
The replacement process is not as complicated as it might seem at first glance. I suggest you replace it in your garage, yourself. Read this article and you can replace the part yourself.
- Determining the suitability of a bearing on a Lada Granta
- Choosing a new bearing for Lada Granta (VAZ 2190)
- Preparing to replace a part
- Step-by-step instructions for dismantling and installing a bearing on a Lada Granta
- Practical advice
- Video: DIY replacement of the rear wheel bearing of a Lada Granta
- Photos on the topic
Replacing the rear wheel bearing on a Lada Granta with your own hands. Photo
The rear hub bearing on Lada cars is maintenance-free and does not require additional care or lubrication during vehicle operation; it is changed solely due to wear.
Wheel bearing wear can be diagnosed by the sound of its operation; a serviceable bearing does not produce additional noise or sounds while the wheel is rolling and is completely silent. Over time, the lubricant in the bearing becomes contaminated with wear products of the bearing balls, resulting in rolling noise and play when the wheel is rocked on a lift or jack. If you have the same symptoms, it is imperative to replace the rear wheel bearing, since operating a car with a defective bearing is dangerous, it can jam and lead to an accident.
To replace the rear hub bearing, you will need in advance: a 30" socket with a long wrench, a wrench or a 7" socket, a barrel, a jack, a rear hub puller, a mandrel for removing and installing the bearing, a strong slotted screwdriver or chisel, and a circlip remover.
Raise the car on a lift or jack. If you decide to use a jack to lift the car, be sure to install a reliable support stand under the car, since the jack may not withstand the load and cause the car to fall, which will lead to injury and damage to the components of the car itself.
Using a wheel wrench, remove the wheel. Using a wrench or socket “7”, unscrew the drum guides and remove the brake drum. If the drum is stuck and you cannot remove it by hand, screw the brake drum guides into the opposite holes to move the drum away from the hub.
Using a 30mm socket and a long wrench, unscrew the hub nut.
Using a rear hub puller, remove the hub from its seat on the rotation axis.
Using a circlip puller or narrow-nose pliers, remove the bearing circlip. Then we press out the old bearing.
If the planes where the hub bearing is located have a rusty coating, clean it with fine sandpaper and treat the seat with lithol to make installing a new bearing less difficult.
When pressing in a new bearing, you can “cheat” a little; you need to cool the new bearing, for example, in the refrigerator or freezer, and its installation will be much easier.
We press the new bearing into the hub until it stops until the lip for installing the retaining ring appears.
Afterwards, install the retaining ring.
Thanks for subscribing!
We return the hub to its place, it is allowed to upset it with the wide side of the hammer, lightly tapping the hub body.
Be sure to use a new hub nut, which must be tightened with a torque of 19-23 kilograms. Excessive force when tightening the wheel nut can lead to destruction and accelerated wear of the new wheel bearing.
After tightening the hub nut, crimp the collar to prevent spontaneous unscrewing. You can use a strong slotted screwdriver or chisel for this.
We return the brake drum and wheel to their place.
Replacing the rear wheel bearing with a new one can restore the former comfort from driving your car; wheel rotations will again be more stable and silent.
Problems when paying with bank cards
Sometimes difficulties may arise when paying with Visa/MasterCard bank cards. The most common of them:
- There is a restriction on the card for paying for online purchases
- A plastic card is not intended for making payments online.
- The plastic card is not activated for making payments online.
- There are not enough funds on the plastic card.
In order to solve these problems, you need to call or write to the technical support of the bank where you are served. Bank specialists will help you resolve them and make payments.
That's basically it. The entire process of paying for a book in PDF format on car repair on our website takes 1-2 minutes.
If you still have any questions, you can ask them using the feedback form, or write us an email at [email protected]
Checking the wheel bearing
The condition of the wheel bearings should be checked not only at intervals determined by the manufacturer, but also during each vehicle diagnosis. During inspection, it is necessary to determine the correct rotation of the wheel, which should not have free axial displacement (play). For this purpose, you need to act in the following sequence:
We lift the rear wheel on a jack and give it torque by hand, while there should be no extraneous noise or “murmuring” of the rollers;
We spin the car wheel clockwise, checking it for extraneous noise.
Alternately, in different planes, we loosen the wheel perpendicular to the hub axis. We act with both hands at the same time.
Checking for play is done by rocking the wheel in a vertical plane.
In the horizontal plane, play is less common, but diagnosing this malfunction is mandatory
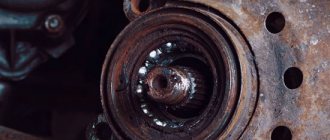
In the first case, a check is made for the presence of corrosion “shells” and the cleanliness of the roller track, in the second, the wear of the treadmills is checked, where even a small play should not be noticed.
An example of wear on the running part of the outer race of the bearing
Comments
TOP materials of the week
TOP products in the store (more)
Who services your Lada Kalina?
Lada.Online
Lada (“Lada”) is a brand of cars produced by JSC AVTOVAZ. Previously, it was used only for export cars, and for the domestic market, cars were produced under the Zhiguli brand. In 2004, the management of AVTOVAZ announced the transition to the Latin alphabet for the official spelling of the names of all cars produced by the plant: Lada - instead of "VAZ" and "Lada".
Lada.Online is the largest Russian-language automotive resource with a daily audience of thousands, which is dedicated primarily to cars of this brand, the domestic automotive industry and the automotive world in general.
Replacement procedure
Lubricate So, we have determined that this cannot be done with a little blood, and the car really needs to replace the bearing. Therefore, we adhere to a clear procedure and begin work.
- Remove the brake drum. There should be no problems with this, since it is fixed quite simply on the rear wheel.
- Pry up the hub cap using a flathead screwdriver and remove it.
- Now, using a narrow chisel, straighten the collar of the nut, which was jammed in two places at once. Don’t be afraid, it wasn’t you who did something, such a jam is provided at production so that the element does not fly out of its rightful place.
- Use a 30mm socket to unscrew the fastening nut.
- Remove the unscrewed nut and also dismantle the thrust washer.
- Arm yourself with a three-legged or two-legged puller, which will allow you to remove the hub from its place.
- If you don't have a three-jaw tool, press out the hub using two bolts or screws. As the practice of craftsmen has shown, bolts for fastening the head of a power unit are excellent for these purposes.
- Screw the screws into the opposite holes for fastening the wheel and rest their ends against the heads of the bolts securing the hub axle to the rear suspension beam of your car.
- Try to tighten the screws evenly to allow the hub to press out. There is no need to remove the pads.
- As a rule, the inner race of the bearing should remain on the hub axis.
- Secure the ring using a puller, then remove it.
- If you don’t have a puller, you will have to additionally dismantle the brake pads and use a chisel to mix the ring to the axle.
- Next, the ring moves. Two mounting blades will help you with this.
- Do not be afraid that after processing with a chisel, some kind of defects or nicks will form on the hub axis. This is not terrible, but it is highly recommended to process them with a needle file.
- Arm yourself with pliers, thanks to which you can carefully remove the retaining ring.
- Using a piece of suitable pipe, also carefully knock out the bearing, leaning on the inner ring.
- Another option is to press it out using a wheel bearing puller.
- Clean and effectively lubricate the hub into which the new rear wheel bearing is pressed with a puller or vice. The pressing force must be applied to the outer ring. It will be most convenient for you to do this using the outer ring from an old bearing.
- Install the new retaining ring in its proper place.
- Using light blows on the inner ring, press the bearing onto the axle. Drive until deep enough to fit the nut.
- Full pressing is carried out with the nut already on.
- Be sure to use only the specified torque to tighten the fastener.
- Press the collar of the nut into the two grooves of your hub axle to restore the element to its original appearance.
This procedure cannot be called incredibly complicated, but you will have to “tinker” in your garage. But this is better and more cost-effective than going to a service station and entrusting your car to unknown specialists.
https://masteravaza.ru/hodovka/stupica/zamena-zadnego-podshipnika-stupicy-vaz-2110-541 https://auto-self.ru/podshipnik-zadney-stupicy-vaz-2110-kogda-nuzhno-menyat -i-polnyy-process-zameny/ https://remontautohelp.ru/vaz-2110-vaz-2112-zamena-zadnego-stupichnogo-podshipnika-svoimi-rukami-video-instrukciya/ https://umelyeruki.info/avto /zamena-podshipnika-zadnej-stupicy-vaz-2110/ https://luxvaz.ru/vaz-2110/72-zamena-podshipnika-zadney-stupicy.html
How to change the rear wheel bearing of a Lada Granta
Work related to the removal and installation of the element will require special tools, namely: - a special hub puller; - chisel; — retaining ring remover (or pliers with round ends); — a “30” head, or a key of the same size; - vice; — a puller for pressing and pressing out bearings; - a flat-tipped screwdriver.
So, let's get started, below are 14 detailed stages of the work:
- Remove the plastic protective cap from the rear wheel.
- We move the gearbox lever to the “1st gear” position. To prevent the car from rolling away under the front wheels, we place supports.
- We loosen the tightening torque for the hub nut (it is most convenient to use a long lever). Unscrew it a little and loosen the bolts holding the wheel.
- Using a reliable jack, we lift the rear side of the car, where the bearing is actually changed.
- Unscrew the nuts and remove the rear wheel from the studs. We dismantle the brake drum.
- Unscrew and remove the hub nut, take out the thrust washer.
- We take the previously prepared puller in our hands and carefully press the hub from the axle.
- Now we take the hub, install it and clamp it with a vice. Remove the retaining ring (use a puller).
- Press the bearing out of the rear hub. Then, using a brush with metal bristles, we clean the inside of the hub from dirt. We press the new product back in. Don't forget to install the special retaining ring correctly.
- Taking advantage of this opportunity, we clean the brake system elements from rust and contaminants.
- We put the hub back on the axle element. We return the brake drum to its place and put the wheel back on.
- Tighten the wheel bolts. Let go of the raised part of the car until the wheel is firmly in contact with the ground.
- Tighten the hub nut securely using a long-lever wrench (or a special hub wrench). We return the protective plastic cap to its place.
- In order to check the results of the work performed, we start the car engine and start driving.
This completes the replacement of the rear wheel bearing (Lada Granta). As you can see, the process is not too complicated. All you need is a good specialized tool and some free time.
When a wheel (wheel) bearing breaks, it must be replaced. This detail, small in size, is very important; it ensures freedom of rotation of the hub mechanisms. Continuing to use a broken one is dangerous: it will jam, and then a major accident cannot be avoided. The range offered at car markets is quite wide. To decide which wheel bearing is better, it is useful to study its characteristics and the features of bearings offered by different companies. Of course, your choice will be influenced by what exactly you want: to qualitatively repair your favorite car, sparing no expense, or simply to make inexpensive repairs and put the car up for sale.
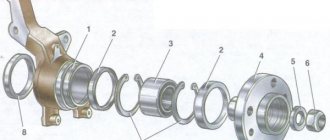
Hub configuration
The rear wheel hub of a Lada Granta car consists of:
— mud ring, — thrust washer, — lock ring, — hub fastening nut, — hub axle, — sealing ring, — Lada Granta hub bearing, — hub cap, — hub.
To repair and replace the bearing, you will need the following tools:
- universal puller, - thin chisel, - lock ring remover, - 30mm socket wrench (head), - puller for pressing out the bearing.
Changing the rear wheel bearing of Lada Granta
Front-wheel drive models of this line require periodic replacement of the rear wheel bearing in the same way as rear-wheel drive cars.
As a rule, their failure is indicated by the appearance of extraneous noise that occurs when the car is moving, grinding and vibration.
Primary diagnostic option
To confirm the version of bearing failure (CCD), you should perform a simple diagnosis:
Place the wheel on a jack; Unscrew it by hand (pay attention to the appearance of noise); If there is a malfunction, rotation is noticeably difficult; There is noticeable wheel play.
To pinpoint the problem, you will need to dismantle the unit and remove the hub.
What bearings need to be purchased for replacement?
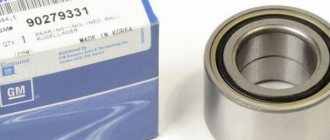
If you select from the AVTOVAZ catalog, you will need product 21080-3104020.
When selecting according to the markings introduced by the current GOST, you will need 256706 AKE12.
In addition, the required bearing can be selected from analogues recommended by the manufacturer:
- Russian brand VBF – type 2108-3104020;
- Domestic brand SPZ – type 2108-3104020;
- FAG – type 545312A;
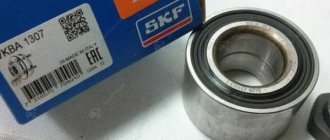
- SKF – type VKBA1307.
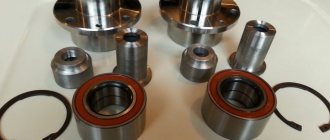
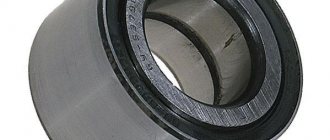
This is a double row angular contact ball bearing, made in a closed design.
Algorithm for replacing a faulty CCD
A significant advantage of the design of this vehicle is the ease of replacement work. No special tools, such as a puller or press, are required.
All upcoming work can be divided into three stages: dismantling the faulty product, installing a new bearing, and reassembling the unit.
Removing a faulty CCD:
- Remove the locknut protective cap. Unbend the rolled lock to prevent unauthorized unwinding.
- Loosen the locknut (most likely you will need a wrench or an extended handle).
- Loosen the wheel bolts.
- Hang it on a jack.
- Unscrew the bolts securing the brake drum.
- Unscrew the hub nut. Remove the latter from the axle shaft.
- Remove the retaining ring from it.
- Using a chisel, remove the protective ring.
- Treat the bearing installation area with WD40.
- Remove the faulty bearing.
To do this, you can use a puller, a hammer and a mandrel, a hydraulic press, a vice (one of the options). When replacing yourself, most often, a vice is used.
- We clamp the structure in a vice and press out the CCD.
- To completely remove the bearing, you will need to install stops (since it rests on the jaw).
- The last 5-10 mm are “achieved” with a hammer through a mandrel.
Installing a new bearing
Clean the mounting surfaces and re-lubricate them and the outer race of the new CCD.
- We place the new product in the mounting hole. We bait (using the old one instead of a mandrel) by about 5-10 mm.
- We clamp the assembly in a vice (to control possible distortion).
- Carefully tighten the clamp until the end rests on the existing inner side.
- Install the retaining ring.
Reassembly
To bring the hub to its original position, the following operations must be performed.
- Before pressing the assembly, lubricate the surface of the axle shaft.
- Fit the knot, screw and tighten the hub nut.
- Finishing broaching is done using a torque wrench.
- The hub nut is locked (chisel, hammer). After that, the brake drum is put on, the wheel is screwed on and mounted.
Choosing a new bearing for Lada Granta (VAZ 2190)
To do this, you need to know the original number of the Lada Granta bearing (VAZ 2190). The manufacturer AvtoVAZ indicates No. 21080-3104020. You can use GOST number 256706 AKE12. These two numbers are acceptable when selecting a part.
I also recommend using analogues:
— Russian manufacturer SPZ No. 2108-3104020;
— made in Russia VBF No. 2108-3104020;
— FAG German supplier No. 54512A;
- Swedish analogue of SKF VKBA1307.
Be sure to check the dimensions when purchasing. They should be like this:
— internal diameter – 30mm; — outer diameter — 60mm; - width - 37mm.
And of course, the part itself must be free of dents and rotate freely. Once you have purchased the bearing, you can begin replacing it.
Articles
We do not recommend the original article. also do not recommend Pilenga . It didn’t even travel 7,000 km with us. We replaced it with CRAFT 256706.
Original CRAFT bearing item 256706.
Many manufacturers also use this article:
- SKF
- TORQUE
- VALEO
- VBF
- ZOMMER
- LSA
Also suitable: SKF BA2B 633313 C.
The device of the hub on the Lada Grant
Front
- rounded fist;
- external and internal dirt-reflective metal rings;
- front roller bearings;
- hub;
- washer;
- hub nut;
- retaining ring, plug.
Rear hub device
- hub mechanism axis;
- metal ball bearing;
- mud ring;
- retaining ring;
- washer;
- screw;
- sealing ring;
- rubber boot;
- hub cover.
Resource for replacing hub mechanism elements
The average service life of wheel joints is 80 – 85 thousand km. The indicator is average, as it depends on the following factors:
- quality of workmanship of the part;
- frequency of operation of the technical device;
- driving style;
- quality of road surface;
- aggressive environment;
- high operating temperatures;
- compliance with technical inspection intervals.
Signs that a hub needs to be replaced
- the appearance of uncharacteristic noise during wheel rotation;
- wheel runout in the steering column;
- vibrations at different speeds. Sometimes there is vibration at a certain speed;
- metallic grinding noise as the wheel rotates;
- front wheel hub play.
Diagnostics of the hub mechanism
- We place the car on a level platform, squeeze the parking brake if we are checking the front row. For the rear, we install wheel chocks.
- Let's jack up the front (rear) part.
- We turn the car wheel and carry out troubleshooting.
- We shake the wheel up and down with our hands. In good condition there should be no play. Otherwise, we dismantle and replace worn elements.
Reviews
| № | Positive |
| 1. | Gennady: I’ve been actively using the car for two years, there are no comments on the chassis or suspension. Once I replaced the rubber boot on the left CV joint. |
| 2. | Kirill: I have driven the car over 80,000 km, I can say that the CV joint still has service life, but it is necessary to prepare for repairs. In general, the parts are maintained within the period specified by the manufacturer. |
| 3. | Vyacheslav: the car is a year and a half old, I bought it at a dealership, no complaints. I systematically carry out technical inspections, buy original consumables, and do not skimp on preventative maintenance. |
| 4. | Dmitry: replaced the “grenades” only at 90,000 km. The service station master said that the mileage is good, not every car gets that much mileage. I believe that careful driving contributed to extending the life of the vehicle's chassis. |
| 5. | Leonid: I’m pleased with the build quality of the car, there are no complaints. Breakdowns happen, but they are insignificant, I fix them myself. |
| 6. | Vasily: if you don’t take into account minor flaws, then the car is good, better than previous generations. |
| 7. | Victor: I drove Grant for a year and a half, didn’t do any repairs, visited a service station only for diagnostics. |
| Negative | |
| 1. | Ivan: I replaced the right CV joint for the first time at 45,000 km, after which the left one needed repairs. In general, the workmanship is low, I am dissatisfied with the machine. |
| 2. | Alexander: standard CV joints are weak and poorly made. After purchasing a car, experts recommend installing foreign analogues. True, the cost is 15% more expensive than domestic ones. |
| 3. | Vladlen: after two years of active driving, I can’t say anything bad. Minor defects are present, but they can be easily fixed. |
Replacing the front hub of Lada Granta
- We place the car within the perimeter of the repair area and provide priority safety measures.
- Let's jack up the right (left) side.
- Unscrew the bolts and remove the wheel.
- Let's unlock the hub.
- On the back side, unscrew the two bolts that guide the brake caliper.
Location of two bolts
- We remove the caliper, hang it on a wire (we fix it on the steering tip).
- Unscrew the hub nut and remove the brake disc.
Removing the hub nut
- We unscrew the two bolts - the rack clamps. If necessary, we use a liquid to remove deposits like WD-40.
- Disconnect the strut with the steering knuckle and unscrew the ball joint fasteners.
- We remove the CV joint.
Next, install the new hub assembly and assemble the structure in the reverse order.
Replacing the front wheel bearing of Lada Granta
- The front hub joint is located in the steering knuckle housing, remove it. Pre-clamp the structure in a stationary vice.
- We install the metal spacer - the head at “22” on the surface of the hub. We apply targeted blows with a hammer to press it out.
- We disconnect the inner race of the hinge and remove the separator with metal balls.
- To remove the outer part of the hinge, use pliers and remove the retaining rings.
- To dismantle the inner part of the cage we use a chisel. Gently tap with a hammer. Press-out puller
- Use a puller to press out the axle shafts.
Pressing in a new wheel bearing and assembling the unit
- We clean the surface from dirt, deposits, and rust. We remove the old grease from the hub and wipe it with a rag. We measure the diameter of the hub, it should be 35 mm.
- Apply a thin layer of graphite grease to the surface. Press in the new bearing.
- We press the hinge until the retaining ring comes into contact with the edge of the part.
- We insert the hub into the hole using a vice.
Preparing to replace a part
In order to quickly and efficiently replace a part, you need to properly prepare for this. So that you always have the necessary tool at hand and you are not distracted by searching for it in your neighbors' garages.
Assemble a set of tools and accessories.
I offer this list:
- a set of keys and sockets. It is advisable to have a ratchet; - a jack is required; - hammer, screwdriver, chisel and vice; — two types of puller; - metal pipe; - Vedashka liquid.
It is advisable, but not necessary, to have a torque wrench.
And familiarize yourself with the design of the hub using the sketch. You are ready. Let's start replacing.
Review of manufacturer prices for front and rear hinges
How to choose and buy quality parts
Service center specialists strongly recommend purchasing consumables and components exclusively from specialized stores, representative offices, and official dealers.
To a lesser extent, you need to use the services of unverified suppliers who sell spare parts at an unusually low cost.
When purchasing, check the catalog numbers with the actual data specified in the operating instructions for the technical device. If such a brochure is not available, consult a specialist.
Preparatory stage before replacing the hub mechanism
Required materials and tools:
- hydraulic (mechanical) jack;
- wooden stand;
- wheel wrench;
- screwdriver with a flat, cross-shaped bit;
- hammer;
- knob, nozzles;
- spanners;
- stationary vice;
- chisel;
- two-jaw and cup pullers. The exact dimensions of the pullers are indicated in the operating instructions;
- forceps;
- metal brush;
- lubricant type “CV joint - 4”;
- rags;
- caliper for measuring diameter;
- new wheel bearings;
- additional lighting provided that the work is carried out in the dark.