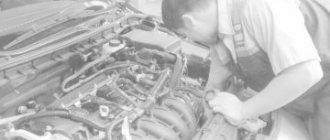
The breather “SMOKES”...Or the effect of breather ON IDLE STABILITY!
When was the last time you cleaned the crankcase ventilation? If it’s been too long, clean the system; it won’t take long! To understand whether it’s time to clean the system or not, you will have to remove the breather and if everything is dirty, then clean the system, and go inside the hoses with a rag to remove all the dirt! .Guys...Strong breathing damages idle speed...swimming, stalling and its absence... ˜ Dear subscribers! We recommend that you visit the website - https://minibk.ru. Here you will find information about a multifunctional device that allows you to measure fuel consumption, including gas, if the car is equipped with an LPG system, measures temperature and on-board voltage, and can answer the question - “What time is it now?” The developer of the device is our friend Alexey Tretyakov, an excellent specialist in the field of microelectronics and just a good person.
Replacing the transmission breather. — logbook Lada 2109 1990 on DRIVE2
I still couldn’t get around to dealing with the gearbox breather, since oil snot from underneath it constantly fouled the entire bottom of the box. And then I was standing on a light tile and I saw that there was even a leak in the area of the checkpoint. I think, well, enough with wiping every time, it’s time to get serious about the breather. Access to it is not entirely convenient, but by placing the wheelbarrow on its side you can get there:
Zoom
Zoom
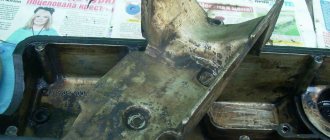
This photo shows that the entire box is covered in oil:
Zoom
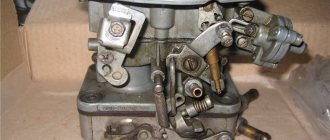
I immediately bought a new breather so as not to bother with cleaning. Still, it hasn’t changed since birth:
Zoom
Well, I took it out, but it was troublesome to put it in. For good reason, you need to settle it with a mandrel over the entire area, but you won’t get anywhere. I had to use a long tube with a flattened end to slowly tap the breather around the entire circle. With difficulty, but I climbed in, it’s an infection! To be sure, I coated the perimeter under the seating collar of the breather with black sealant:
Zoom
Zoom
Then in the pit I checked the level in the box. I didn’t unscrew the plug completely, as oil immediately poured out from under it; it was apparently filled in with a reserve, for better lubrication of the fifth gear. At the same time, I wiped the box clean of smudges. I couldn’t resist and opened the old breather:
Zoom
Well, why was he snotty? It’s not clear, the spring is intact, the valve is rubber and elastic, “and what do you, little bastard, want?!” It's been a week since everything is dry. That's all the latest news, all the best to everyone, smooth roads and clean gasoline!
Oil in the air filter and bellows, cause and solution.
No, this is not normal, the oil flies because the breather is too dirty and all the emulsion and this oil flies into the engine when it is running, after cleaning the crankcase ventilation, the oil will stop flying and if you constantly keep this system clean, it will not harm the engine! The Auto_Repair channel will help you troubleshoot your car yourself. We do not waste your time, but try to make our videos as informative and short as possible to save your time. No water, just the essence. On our channel you will find various information on car repair and operation. No water, just the essence. There are also many more interesting experiments in the plans, subscribe to the channel, write comments, like, we are always happy to have live communication. Our peculiarity is that the material is presented in an accessible way, even a child can understand it, but if we miss something, feel free to ask, we are always happy to help.
19/ ASSEMBLY OF TRANSMISSION VAZ 21074 — Lada 2107, 1.6 l., 2007 on DRIVE2
Five-speed gearboxes of the classic design since 2004 or after 2004 have received a number of changes and are slightly different from the previous ones.
This is how teeth should be. Spicy from top to bottom!
New fork, clutch and gears with 3rd gear synchronizer.
Fork and clutch for 5th gear and reverse gear. Also completely new.
The 1st and 2nd gear clutch and the 3rd and 4th gear clutch are the same. Clutch 5 and reverse are different. It is impossible to confuse them!
Secondary shaft.
Gearbox housing.
We start the secondary shaft. We install the bearing into the housing and screw the bracket.
Now we install the input shaft. Don't forget about the retaining rings, as well as the needle bearing inside the input shaft.
We put 1-2 and 3-4 gear forks. The forks are placed with the holes for the bolts facing up (in this case, the gearbox with the pan facing up).
We install the rod of the first and second gear, tighten the fork with a bolt (turn the shafts) and lay in a long cracker.
We put the 3-4 gear fork. We install the third-fourth gear rod. We do not thread it into the fork all the way and insert the cracker into the hole in the rod. Push in the rod and tighten the fork bolt. Similarly to the holder of the first-second gear rod, we install a short holder.
Now install the intermediate shaft.
The middle intermediate shaft bearing has an internal bearing race, which consists of two parts: a bushing and a ring. The bushing should be oriented inside the box housing.
We install bearings. Bearings should not dangle in the box body. They come in tightly. I used a tube with a large thick washer, having an internal diameter just enough to fit it onto the shaft. And using a hammer, he carefully pressed the bearings.
After installing each next part, rotate the primary and secondary shafts several times. They should rotate without jamming.
The intermediate shaft bolts are different so you can't mix them up. Just remember that the front one has a thick washer, and the rear bolt does not have a washer or Grover washer.
Assembling reverse gear and 5th gear.
Don't forget about the clever stopper!
Don't forget the ball.
Don't forget about gaskets without wings. You don't need to put sealant everywhere. It can bring with it not only good, but also a lot of bad.
We install the rear cover and clutch housing.
To fix the flange nut (elastic coupling) to the secondary shaft, I used thread sealant. The three of us unscrewed it, so I think it was intended that way.
This is how it turned out.
Can't fit more photos.
During assembly, do not forget to check that everything rotates and moves, and even switches.
The 5th gear spring is longer than the other two.
Don't lose the crackers and balls! ________________________________________
ATTENTION! BEFORE INSTALLING THE TRANSMISSION ON THE ENGINE, YOU MUST LOW THE REAR OF THE ENGINE DOWN.
Crankcase ventilation - system modification.
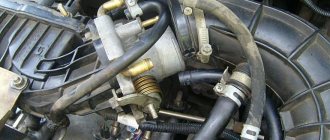
The stock engine produced in '71 is equipped with an additional (narrow) tube for crankcase gases and is connected to the air housing. I disconnected it from the body and plugged it, and directed the main hose from the breather into the beam. In general, anyone who more or less understands engine design knows that the so-called “crankcase gases” are removed from it through vacuum in the intake system. Naturally, not only “gases” get there, but also oil vapors, which is extremely undesirable, since the throttle valve becomes dirty and the combustion of the fuel-air mixture worsens. So I decided to improve the ventilation system.
Why is cleaning necessary and its frequency?
When the ventilation system is clogged, an emulsion containing soot and oil residues settles inside the engine, resulting in the creation of excess pressure, leading to damage to the seals. This leads to loss of sealing and oil leaks, which can be seen during an external inspection of the engine block. Crankcase gases are gases from engine cylinders that are not discharged through the exhaust valve, but are squeezed out into the crankcase through the gaps of the pistons and piston rings when the engine is running. This process occurs especially intensively in worn-out engines with high mileage. For VAZ 2101-2107, these are mileages of 80-100 thousand km.
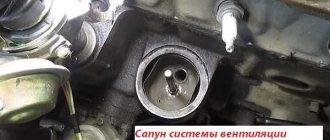
The principle of operation of the breather
During operation, gases accumulate in the engine crankcase. To remove them, there is a ventilation system called a breather. This makes it possible to reduce the pressure in the motor itself. Because there are always air masses with tiny particles of oil in the crankcase, a little lubricant sometimes passes into the breather along with the air flows.
There is a mesh here to catch the oil. But some drops still manage to penetrate. So slight contamination of the filter system is quite normal. But if there is too much oil, then it is worth thinking about the reasons for its entry. Oil particles contribute to clogging of channels and increase the amount of soot. The latter gets into the crankcase and cokes the channels through which the oil flows. As a result, the performance of the entire lubrication system will deteriorate.
If there are specific signs by which you can determine what is driving oil through the breather. In a carburetor engine, traces of lubricant may appear in the filter housing. Significant lubricant marks may also be observed on the filter component itself.
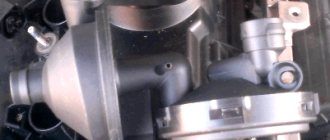
In injection engines, deposits appear on the throttle assembly. In this case, the engine may lose its power, and fuel consumption may increase.
Diagnostics
Since there are many reasons why oil flows through the breather, a comprehensive engine check will be required. To carry out such a check, you don’t even need to disassemble the power plant. It will only be necessary to measure a number of parameters and assess the state of the ventilation system.
For consideration, you can take a VAZ-2110 car. Let's say a lubricant deposit has formed in his engine. This indicates that oil is being driven through the breather. To find out the cause of this problem you will need a compression gauge, a screwdriver and several wrenches.
Diagnosis begins with assessing the gases escaping through the exhaust pipe. First, the engine is started and the color of the exhaust is assessed. If they are very dark in color, this indicates that oil is entering the cylinders as a result of damage to the CPG rings.
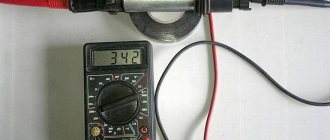
It is important to check the compression in each cylinder. If the cylinder-piston group is in normal condition, then it should be in the range of 11-13 MPa. The difference between the indicators of the cylinders should not exceed 1 MPa. If compression is lower in one of the cylinders, this may cause oil leakage.
But whether this problem arises from the valves or from the rings can only be determined by the spark plug that is installed on a given cylinder. If there is heavy carbon deposits on it, this will indicate certain problems with the CPG.
If the compression is small, and the spark plug has a normal appearance without plaque, then it is worth inspecting the valves. In a situation where compression is normal in all cylinders, it is necessary to check the ventilation system.
How to diagnose
If the car continues to throw out engine oil through the breather valve, this behavior of the engine cannot be ignored. It is recommended to do diagnostics.
Potentially knowing why oil comes out through the breather and pollutes everything around it, one can draw certain conclusions regarding diagnostics.
To check and assess the condition, it is not necessary to disassemble the engine.
Sometimes it is enough to conduct a visual inspection and take a few measurements. It is important to consider that due to the design and technical features of a particular internal combustion engine, the procedure may have its own distinctive features.
The motorist should establish what is the reason for the active selection of oil through the breather, since the problem may be in it itself, or related to other problems in the engine.
The task is to stop throwing oil. And for this you need to find the cause and try to eliminate it. To work, you may need a screwdriver, a set of wrenches and a compression gauge. Regarding diagnostics, it is worth giving several recommendations:
- Start by checking the exhaust. To do this, start the engine and take a closer look at the color of the gases coming out of the exhaust pipe.
- If the smoke is bluish or black, there are oil particles in the gases. This is usually due to timing belt malfunctions, stuck cylinder-piston rings, or their wear.
- Additionally, it is worth checking the compression readings of each cylinder.
- In normal condition, on most passenger gasoline cars, the compression ranges from 11 to 13 MPa. If it is a diesel engine, then from 20 to 32 MPa.
- There should not be a difference of more than 1 MPa between the cylinders.
- If one of the cylinders has low compression, the problem of oil flow through the breather may be related to it.
- Check the condition of the spark plugs in the problem cylinders. If there is carbon deposits, the cause is a faulty CPG.
- If compression is low and the spark plug is in normal condition, the problem lies in the valves.
If everything is normal with compression, then there is only one thing left to do. Namely, check and clean the crankcase ventilation system.
VAZ 2107 | Features of gearbox maintenance
Caring for the gearbox consists of periodic external inspection, checking the attachment of the gearbox to the clutch housing, the attachment of the front and rear housings, the shift lever housing, topping up and changing the oil after 60,000 km and cleaning the breather in accordance with the vehicle maintenance instructions.
The oil should be drained immediately after a trip, while it is hot. If the used oil is very dirty and contains metal particles, the box must be washed.
The gearbox should be flushed as follows:
• through the filling hole on the right side of the box, pour 0.9 liters of transmission oil into the crankcase;
• jack up one or both rear wheels and, engaging 1st gear, start the engine for 2-3 minutes;
• drain the oil through the drain hole in the lower part of the gearbox housing;
• fill the crankcase with fresh transmission oil to the level of the filler hole (if the hole is located on the right side) or 7 mm below the level of the filler hole (if the hole is located on the left side). When filling the box, you should not turn the gears, as this will fill in more oil than necessary, which can cause oil to leak through the extension seals.
The oil level is checked through the filler hole with the car standing on a horizontal platform, some time after the trip, to allow the oil to cool and drain from the walls, and the foam to settle.
During operation, you should pay special attention to the condition of the breather located at the top of the front crankcase.
The breather serves to communicate the internal cavity of the box with the atmosphere, and its contamination leads to an increase in pressure and oil leakage.
During the initial period of operation, before the oil seals are worn in, slight (but not in the form of drops) leakage of oil and the appearance of an oil deposit on the underbody in the area of the propeller shaft sliding fork cap are allowed.
When dismantling the driveshaft, you must follow the instructions (see “Driveshaft”). The hole in the extension must be plugged with a special plug or a spare sliding fork to prevent oil from leaking out of the gearbox. If there is no special plug, then before removing the gearbox from the car, you should first drain the oil from it.
Oil leaked from the gearbox — Lada 2107, 1.6 l., 2006 on DRIVE2
I was driving home without thinking about anything and suddenly I smelled oil, since I can distinguish the smells of oil, I immediately realized that it smelled like transmission oil. Without hesitation, I went to the garage to the pit to see what happened. The picture was like this!)
Oil leak at gearbox
And all the suspicions were on the gearbox input shaft oil seal. After 3 hours of disassembly, removing the cardan and muffler, I saw that the oil seal was there like new. I began to think what it was, at first there were suspicions of a checkpoint sniffle, but it wasn’t like that, the snort was also clean. My friend Maxim, thanks to him for his help, stuck his hand into the upper part of the gearbox and removed a piece of the gasket. Well, I climbed up to disassemble the interior and take a look. I went online from my phone and looked up how to properly disassemble the slide. And this is what happened.
View of the gearbox with the rocker removed from the passenger compartment
Next, I began to examine the rocker itself and found the cause of the oil leak. Here it is, you can clearly see it.
The old rotten gasket fell apart
It was necessary to change it, but it was already 23:00 and the shops were all closed. As a result, I cut out a new gasket from the paranit and assembled this drawstring with difficulty. So I assembled it and now the leak has been fixed) All that remains is to put everything in its place))
drawstring assembly
Note: If you remove the rocker from the interior, there is a wide and narrow circle, each of which has 3 nuts, so you need to unscrew the wide circle, and under no circumstances touch the narrow one. The point is that if you untwist a narrow circle, then all the springs, plates and other parts will all fall into the inside of the gearbox, PAY ATTENTION.
Visual explanation)
Like and comment
Issue price: 0 ₽ Mileage: 81,500 km
Signs of trouble
The motorist should know how to recognize the release of engine oil through the breather and understand what is potentially associated with it.
If you do not eliminate this phenomenon, when the lubricant begins to eject, more serious problems will arise in the future. The channels in the engine may become clogged, the amount of soot may increase, the oil channels may become coked and the operation of the entire lubrication system may be disrupted.
There are not many signs of such a phenomenon. But this makes it easier to recognize them yourself:
- In the case of carburetor engines, oil leaks appear in the air filter housing.
- On carburetors you can also notice oil on the filter itself.
- For injectors, deposits appear on the throttle assembly.
- There may be traces of oil on the surface of the intake manifold.
- At the same time, the power of the internal combustion engine decreases and fuel consumption increases.
Faced with such phenomena, one can almost certainly say that oil is passing through the breather.
Troubleshooting
- The first thing you need to pay attention to is the color of the exhaust, blue or black smoke, a sign of burnt valves or problems with rings.
- Next, you should check the compression in all cylinders. The value on gasoline internal combustion engines should be within 11-13 MPa.
- Disconnect the pipes from the valve covers, air vent and breather. Assess the degree of contamination. If the pipes are very dirty or clogged with oil deposits, use gasoline to clean them or a special carburetor cleaner.
- Check the condition of the oil separator. Unscrew the required bolts to get to this unit. Remove the oil separator and assess its condition. If necessary, clean or rinse followed by drying.
- Inspect and, if necessary, flush the breather valve. There are situations when the valve gets stuck, resulting in exhaust gases entering the crankcase and creating excess pressure. Remove the part and wash it; in most cases, this will resolve the issue of squeezing oil out of the breather.
Helpful advice! To distinguish stuck rings from a burnt-out valve, it is enough to perform several manipulations. After checking the compression in the cylinders, determine the cylinder with the lowest value. Then inspect the spark plug of this cylinder; if the rings are lodged in this cylinder, the spark plug will be covered with a thick oil layer. If the valve is burnt out, the spark plug will appear normal without any major abnormalities.
Why does grease escape from the breather?
There are quite a few reasons why oil is released from the breather, which is why diagnosis is so difficult.
- When the rings wear significantly, gas begins to flow into the crankcase. As a result, high pressure occurs there. It begins to drive oil out of the breather.
- Oil deflector drain is clogged. As a result of the lack of opportunity for escape, air masses with oil begin to be removed not through the purifier. This reason is very common.
- The air filter is clogged. As a result, the motor begins to absorb air with great power. In this case, part of the air also comes from the breather. This leads to the appearance of deposits in the filter.
- Breather valve malfunction.
- Valve problems. Exhaust gases begin to penetrate into the engine, which increases the pressure.