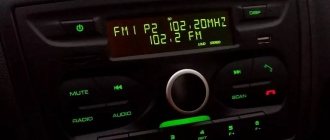
The factory multimedia system (MMS) of Lada cars has proven itself well; the sound quality suits the majority of owners of these cars. We'll tell you how, with a simple modification to your audio system, you can significantly improve its sound.
Required:
- microcircuit “ULF TDA7560” (without letters at the end);
- electrolytic capacitor 10000 uF 25 V (required 105 degrees);
- film capacitor “K73-17” 0.47 µF 250 V;
- operational amplifiers OPA 2132 or 2134 (only for MMC Kalina, Granta and Priora).
The total cost of the parts is about 900 rubles.
Removing the casing and installing the speakers (Acoustic system)
First of all, remove the casing.
Here you need to act extremely carefully; use a plastic card, not a screwdriver, to pry off the plugs and buttons. In addition to self-tapping screws, the casing is held on by clips, which constantly break when removed; it makes sense to purchase spare ones in advance.
Having removed the trim, when replacing the standard audio system, we see that AvtoVAZ attaches the speakers using blind rivets. If there is a piece of the pull rod left inside the rivet, knock it out inside and carefully drill out the caps. After removing the speaker, we remove the remaining rivets, making sure that nothing remains inside the door. To do this, place a suitable piece of paper in a semicircle in the door in advance.
The speakers are installed using spacers that dampen resonance. If you are cutting a spacer from plywood 10-15 mm thick, it makes sense to cut a thin rubber spacer for it.
We cut out the plywood along the recesses in the door; for this it is advisable to make an initial paper template, tightly attaching the paper to the metal of the door. We draw a small pencil on the outside for the recess, on the inside for the holes, cut it out with scissors, and try it on.
We apply it to the plywood, draw, saw. Ready. We drill holes for the screws, make a recess for the “sunk hole” so that the head does not stick out, and screw it onto the door.
To connect the speakers you will need an adapter; the factory wiring has an original Renault-Nissan plug. It is not recommended to cut it off ; there is a risk of losing the repair warranty. An adapter ST 55-17 or ZRS-AG-22 is suitable. We fasten the speaker with screws or self-tapping screws. Installation of speakers in the doors is complete.
Note
Don't forget to buy an adapter frame for a 2DIN radio.
Also note that if the depth of the radio is more than 150 mm, you will have to cut off part of the plastic T-shaped mount inside the dashboard. This is described in the instructions for installing a 2DIN radio on Vesta.
To connect the multifunction steering wheel, you will need a special adapter (price about 1,500 rubles), which is already sold in online stores.
What do you think is the best 2DIN radio for Vesta? Detailed photos and video reviews from the comments will be added to the article. By the way, some Android radios for Vesta can be found in the AliExpress catalog.
Photo: Lada Vesta Club in VK
Keywords: cassette player Lada Vesta | Lada Vesta torpedo
0 0 0 0 0 0
Share on social networks:
Installing a radio
After installing the speakers, you need to install the radio in the Lada Vesta in the appropriate place on the main panel of the car interior.
To dismantle the niche, it is necessary to partially disassemble the panel.
First you need to open the plastic plug. To do this, you need to pry the case from below and unscrew the fixing rivets from the plugs.
The standard one-block media system fits effortlessly into the cabin, is placed in a standard frame and connects to the connectors.
To install a 2 Din radio, you will need an adapter plastic frame.
Next, the entire panel is dismantled, i.e. decorative frame and front panel with plugs
It is worth carefully modifying the panel to the desired size without damaging the wiring cables
After fixing all the elements, all removed devices and frames must be installed in their places.
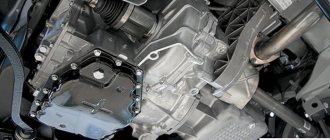
The aluminum casing must be removed from the chip.
To do this, bend the ears and pull them out. Solder the microcircuit:
It is best to carry out this work using a soldering station with solder suction. At worst, a soldering iron will do, but first you need to bite through all the legs of the microcircuit and remove them one by one.
Next, you need to clean the holes for the legs of the microcircuit, insert a new chip and solder it. Apply thermal paste to the chip and return the casing to its place.
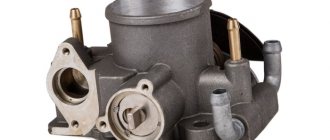
Changing the electrolyte
It is more convenient to mount it lying down, since it is larger than the standard one. On the opposite side we solder the film capacitor, parallel to the electrolyte.
How to remove the casing correctly?
This is necessary for installing speakers
Here, the Lada Vesta owner will need maximum care and attention to eliminate the risk of scratching the plastic panels. Using a screwdriver is highly undesirable
It is better to arm yourself with a plastic card.
To remove the plug located on the end of the door, you will need to use a card to pry it through special recesses. Using the same principle, we dismantle the buttons for electric window lifts. Fastening components in the form of tendrils are located on the front, rear and side sections of the MUS.
The fastening of the casing is represented not only by screws, but also by 4 “hedgehogs”. The risk of breaking them is quite high if the owner does not use a specialized tool during dismantling. These “hedgehogs” are borrowed from cars from Renault-Nissan. You can use elements from Grants instead, but minor preliminary modifications will be required. Such “hedgehogs” are stronger and their price is several times lower.
According to these manipulations, the upholstery on the driver's side is dismantled. Removing the trim from the right door panel has its own peculiarities. There is no need to remove the window lift button. There is also no need to look for a self-tapping screw plug.
A sufficient measure would be to remove the handle cover. To do this, we pry off the bottom plug, near which there is a convenient groove. We use the same plastic card. Now unscrew a couple of screws (10 mm), and then remove the upholstery.
Top multimedia car complex Lada Vesta
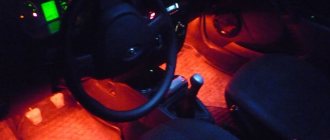
The control system fits very harmoniously into the interior due to the absence of unnecessary buttons - you can see under the screen two buttons and a volume control, made in a modern, eye-pleasing style. On the left there is a slot for an SD card, which is also quite convenient, since it is located under the driver’s right hand. All main controls are duplicated on the multifunction steering wheel, which makes it possible to answer calls, change the volume and change MMS settings. Six speakers provide an excellent acoustic effect, and good noise insulation only has a positive effect on the sound. This multimedia system provides many useful features:
- Navigation system CityGID (you can install third-party maps)
- AM/FM radio and listening to tracks from memory cards (USB and SD) and through the AUX connector
- Watching TV channels and videos from removable media
- View photos
- Viewing the rear camera
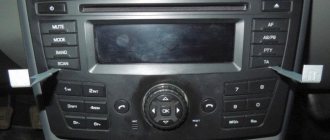
Installing a radio
We pry the plug of the car radio socket from below and take it out. The socket contains plugs for connecting: USB, ISO, AUX, FAKRA (antenna).
To replace the standard audio system, you need to remove the trim and deflectors. To do this, you will need to disconnect the ground (disconnect the minus terminal from the battery). Next, remove the trim, prying it from below, and disconnect the block from the emergency parking button of the car. Remove the deflectors (4 screws for the T20 head).
Behind the air ducts, again unscrew the 4 screws. We drag the car radio towards us, disconnect the connectors with the wires. That's it, they took it off. Installation of an alternative radio takes place in the reverse order. Watch the wires during installation, try not to pinch them. Please note that a 1DIN radio is suitable for Lada Vesta.
USB, SD card and supported file formats
The file system of the connected device must comply with the FAT16 version (2 GB). The maximum number of primary partitions should be no more than 4. Each external media connected to the MMC should contain no more than 1024 files and 256 folders (including root directories).
MMC Vesta supports SD cards, which its closest competitors do not:
- SDHC up to 32 GB;
- SD up to 4 GB;
- USB 2.0 up to 64 GB;
- USB 3.0 up to 64 GB (with USB 2.0 support).
The manufacturer warns that the more files/folders on the media, the longer the files will take to download. It is recommended to use external media that contains only audio files, images and video files.
It is strictly forbidden to place files with the extension *.bin in the root directory of external media, as this may lead to the inoperability of the MMC and loss of warranty. In other words, “Firmware”.
- The video file parameters should be as follows:
- resolution 320x240px;
- video codec WMV3;
- WMA audio codec;
- frame rate 25 fps;
- video stream speed (bitrate) no more than 750 kbit/s;
- audio sampling frequency 44100 Hz;
- audio stream speed (bitrate) 128 kbit/s.
To convert video files, AvtoVAZ recommends using the free video converter Freemake Video Converter.
An important note in the operation of the radio: photo and video files are played back in the order in which they were recorded. Therefore, the playback order may not match the input order specified by the user
MMS revision process
We remove the radio and unscrew the cover, turning the screws out into view. Next, we take out the audio system board and find on it the amplifier chip (circled in red) and the amplifier power capacitor (circled in yellow), which is located nearby.
1. Solder the microcircuit by first removing the metal casing and bending the lower ears. It is more convenient to do this using a hair dryer (25 legs in total, which are soldered with lead-free, refractory solder). Next, we clean the holes in the board and solder the purchased microcircuit and install the metal casing. Apply thermal paste.
2. Solder the capacitor (don’t forget that it is polar). We install the new one in a lying position, because its dimensions are much larger than the standard one. We solder a film capacitor on the back of the board.
Additionally : We change preamplifiers in a similar way.
As a result, the radio/MMC has a huge power reserve. Now you can listen to music at higher volume levels with virtually no distortion. In addition, the sound became cleaner.
Let us remind you that there is an easier way to improve the sound quality of music, for example, install an amplifier or flash MMC with a different version of the menu and equalizer.
Correct adjustment and configuration of equipment
An instrument called an oscilloscope is best suited for this purpose. However, it is practically inaccessible to the average car owner. In this case, you can use a simple method:
- Turn off the input pulses coming from the amplifier.
- Set the regulators to the minimum level.
- After turning on the music, select a volume of about 90% and a medium tone.
- Give a signal to one channel, and then distort the signal and slightly reduce it in the opposite direction.
- Turn off the signal. Repeat this with other sources.
Installation of an audio system in the rear doors
Installation of speakers in the rear doors of Lada Vesta is carried out according to a similar algorithm. The hole for the speaker is the same size as in the front doors.
When installing the casing, the algorithm is as follows:
- Remove the window regulator handle if it has a mechanical drive.
- Remove the door handle trim to gain access to the two screws.
- Unscrew the screws, unclip the rivets and remove the door card.
First of all, it is necessary to remove all the insulating material from the seats where the speakers will be located. When replacing standard speakers, it is necessary to disconnect the ground, remove the trim and baffles. Carefully pull the speaker system towards you and disconnect all wires.
When installing speakers measuring 16 cm or smaller, wood spacers are sufficient and there is no need to cut metal.
Mandatory for those who have Vesta under warranty
Important ! When installing, please note that the plug is not standard, but from Renault Nissan. In order not to lose the possibility of warranty service, you must purchase an adapter type CT55-17 or ZRS-AG-22.. Assembly of all equipment after installation is carried out in the reverse order
The casing is securely fixed and the process is considered complete.
Reassembly of all equipment after installation is carried out in the reverse order. The casing is securely fixed and the process is considered complete.
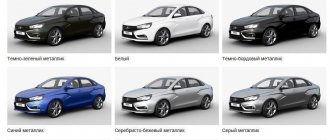
For the Lada Vesta car, not all trim levels have standard acoustics. But audio training is everywhere . Therefore, it is easy to install speakers with your own hands on both the front and rear doors at the owner’s request.
To ensure high-quality sound, you should not forget about the spacer and make sure that the speaker fits comfortably into the depth of the door, where there is a seat for it. It is better to select a size no larger than 16 cm in diameter, then there will be no problems during installation.
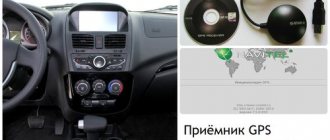
Navigators
The standard MMS is equipped with the CityGuide navigator. Flashing allows you to change the navigation system. Vesta owners download Yandex.Maps or install Navitel. The first option is more difficult, since Yandex programs do not work with Windows CE installed on the MMS.
CityGuide, ways to update the navigator on Vesta
CityGuide 7 allows you to download maps from third-party manufacturers. You can update the navigator on Vesta via SD media. Among the functions of CityGuide: changing the angle of the map, zooming, silent mode. You can set a route in the search bar, by address and coordinates, or by manually placing a point. The route history is saved, several trajectories can be added to “Favorites”.
The City navigator is convenient, but there are some disadvantages:
- the card cannot be rotated manually;
- there is no satellite browser;
- no online maps;
- The navigator does not offer alternative driving directions.
Drivers note difficulties in assessing the real size of a traffic jam: only a small section of the route is shown on the screen. It is difficult to plan a route in advance and avoid traffic jams. CityGuide navigation updates for the Lada Vesta are released regularly. We can hope that the developers will fix these shortcomings soon.
How to install Navitel on standard MMS
You can install the offline version of the Navitel navigator on Vesta for free. Before installing Navitel Navigator, you need to make sure that AppLauncher is present on the MMC. This utility launches third-party applications.
To install Navitel on the Lada Vesta MMC, the navigation program itself, maps of the required countries and the latest version of speedcam files are loaded onto the SD drive. The amount of information must be less than 5 GB: it no longer fits in the internal memory of the car radio.
From external media, the Navitel and NavitelContent folders are transferred to the MMC. To launch the navigator, a shortcut is placed on the desktop.
You can install the official version of Navitel. Then the navigator will work online. In a specialized service, the price of the service starts from 500 rubles.
Setting up Yandex.Maps
You won't be able to download maps from the official Yandex website. You can find a hacked program. The CAB format utility is installed from SD media. Yandex.Maps can be launched via AppLauncher or from a shortcut on the main MMS desktop.
Starting from 2022, the Yandex.Auto multimedia system can be installed on Vesta independently. This will cost the owner almost 30 thousand rubles. AvtoVAZ has not yet given any official statements about which cars the system will be standard on.
Mounting speakers
There is no need for special training when installing speakers. It will be enough to remove the insulating material located in the places where the speakers will be mounted.
We will need special gaskets that can be cut from felt material.
If 16-centimeter loudspeakers are mounted in the front door cards, then this procedure has a number of features. The standard set of fasteners involves fixing the speaker with three screws. In our case, we will need to install special spacers, whose dimensions depend on the size of the dynamic heads.
Using this technology, speakers are installed in the rear door panels of LADA Vesta.
General principles
The nuances of installing speakers in the rear and front doors may differ, but the general principles are as follows:
- It is better to carry out all work carefully;
- audio preparation is available in all models, even in the absence of standard speakers;
- it is better to select speakers 16 cm for the front doors, 13 cm for the rear;
- It is better not to cut standard connectors, but to purchase adapters;
- to improve sound quality, it is necessary to install sound insulation;
- The speakers are installed on spacers.
Installing acoustics on a Lada Vesta involves purchasing not only speakers, but also a spacer, if one is not available.
Some craftsmen cut out a transition frame from plywood. The purchase kit includes:
- spacer,
- rivets for its installation,
- adapter for connecting acoustics.
Powerful audio player
SinglePlayer is a powerful audio player for consoles running WINCE 6.0. Made for an alternative shell for SingleMenu and NewMenu.
https://www.youtube.com/watch?v=Dmk9_Iv26fo
Using an audio player will make the sound more interesting (there is an equalizer). The player also has an Internet radio (an access point can be made using a smartphone). You can also listen to radio stations on your smartphone and transmit them to MMS via bluetooth.
All player features:
- High performance and speed - Finger-oriented - Powerful design engine, allows you to create any skins - 13-band equalizer. Fine-tuning equalizer parameters. - Effects: reverb, echo, horror, flanger, tempo, pitch, compressor, distortion, phaser, freeverb, autowah.
Fine-tuning effects. - Filters: high, low, bandpass, peakingEQ, notch. Fine-tuning filters. - Anti-banner corrector - Full playlist (adding, moving, sorting, deleting from disk, playing, navigation, cleaning)
– Search for tracks, allows you to search for tracks in the current or all playlists, in titles and tags. - Built-in keyboard, supports up to 10 layouts. - Play queue, allows you to create a list of tracks that will play regardless of the playlist.
– Supports multiple playlists, up to 20- Supports id3v1, id3v2, vorbis(flac) tags- Rewinding tracks- Favorite tracks in a playlist- Favorite tracks in a separate folder- Switching playback of tracks by album- Multiple selection of catalogs and tracks to add to a playlist- Saving positions and track numbers for each playlist and automatic playback when switching to the desired playlist - Swipe through the explorer and playlist - Search for USB drives and quickly play their contents - Play mp3, flac, wav, ogg, aiff, m4a (aac, alac) formats
Speaker installation
All Lada Vesta configurations have audio preparation, which simplifies the task of installing equipment, because there is no need to run the necessary cables and wires.
The required minimum is present in all Vesta configurations, which allows you to effortlessly install both the head unit and dynamic heads with your own hands.
Installation of speakers does not require additional tools, so the work can be carried out without special training.
Before installing the speakers, you must carefully remove the insulation material in the places where the acoustics will be located.
Also, to seal the fasteners, you will need gaskets made of felt or similar material, which you can cut out yourself.
The installation area is equipped with only three fasteners, so to fix it with 4 fasteners you will need to install special stands. These stands can be made independently or purchased in advance at an automotive equipment store.
Then unscrew the screws at the bottom of the casing, bend the linings and push the spacers into this space. There is no need to secure them additionally; they will sit tightly in the prepared niche.
The installation area must be soundproofed. It is possible to improve the sound quality when playing audio.
The wires for the audio system are already in the cabin, but their connectors may not be standard. Therefore, it is better to purchase adapters in advance so as not to cut off the standard connectors, because this may affect the vehicle's warranty service.
This sequence of simple steps will allow you to install good-sounding speakers quickly and without the cost of installation by outside specialists
You need to act carefully, slowly, so as not to damage the trim and plastic in the cabin.
Reviews
| № | Positive |
| 1. | Sergey Ivanovich , 44 years old (otzovik.com): I use the standard radio, the quality is good, the functionality is sufficient. |
| 2. | Fedor Stepanovich , 40 years old (www.zr.ru): my comrades are all agitating me to install a 2-DIMM stereo system. I haven’t decided yet, because the price is steep, but the offer is good. |
| 3. | Vitaly , 22 years old (autobann.su): the quality of the standard MMC is not great, but it will last for several years, and then I’ll buy an imported one. |
| 4. | Daniil , 33 years old (lada-vesta.net): The factory stereo system is not bad, functional, no complaints. |
| 5. | Vitaly Semenovich , 43 years old (otzovik.com): for me, sound quality is not important, so MMS suits me, no comments. |
| 6. | Stepanovich , 44 years old (www.zr.ru): Three years have passed since the purchase of the car, all components are working properly, the condition is as if from the factory. |
| 7. | Vasilyevich , 20 years old (autobann.su): my positive review of domestic transport and assembly. A worthy car, a rival to many European brands. |
| 8. | Tolik , 43 years old (lada-vesta.net): I’m not a music lover, for me the quality and purity of sound are not particularly important. The phone is always on in the car. |
| 9. | Stepan Nikolaevich , 39 years old (otzovik.com): it has been working properly for two years, no special comments. |
| 10. | Konstantin , 43 years old (www.zr.ru): I’m happy with the purchase of the car, the interior is quiet, the acoustics are good. |
| 11. | Anton , 35 years old (autobann.su): after three years of operation, I can’t say anything bad about the MMC. |
| Negative | |
| 12. | Dmitry Viktorovich , 44 years old (www.zr.ru): constant problems with the firmware, glitches periodically. |
| 13. | Sasha , 37 years old (otzovik.com): in six months I’ve already been to a service station twice, with an electrician, changing relays and switches. |
| 14. | Nikolai Vasilyevich , 46 years old (autobann.su): replace the standard radio with an imported one, the sooner the better. |
General provisions
Installing music is not a complicated process, but it is responsible. Before directly installing audio components in the Lada Vesta interior, you will need to understand what composition of elements constitutes audio preparation. Therefore, a logical question arises: what is included in audio training?
The “Classic” modification has all the required minimum , allowing you to seamlessly connect both the head unit and dynamic heads. We are talking about the presence of cable lines, with the help of which the designated components of the audio system are switched.
Note that the corners of the doors near the exterior mirrors in this version of the equipment do not have wiring for connecting tweeters.
Installing music involves removing the plastic plug. After removing it, we find connectors according to ISO and FAKRA standards. They allow you to connect the antenna unit. We also see the presence of “USB” and “AUX” connectors.
You can install a 1DIN format radio in the seat. The installation process itself is not capable of causing any difficulties for the owner. It involves the need to connect wires. Please note that in order to successfully install a radio that fits the “2DIN” format, you will need to perform a number of serious modifications to the panel.
Installation of loudspeakers in Lada Vesta is endowed with certain nuances.
If you want a subwoofer
When connecting acoustics, it is better to look at the connection diagram provided by the manufacturer. They stretch the wire from the battery to the amplifier; the connection is made through the fuse. The cord is also pulled, connecting the mass of the receiver and the body. Acoustic cables are laid separately from the main wiring.
The ISO connector connects the subwoofer of the standard Lada Vesta radio. It connects to the high level input of the radio and goes to the speakers installed in the car. Simple installation is available for the average driver.
For those who perceive sounds sensitively, if you are not comfortable with a lot of wiring, connect an mmc audio amplifier using a mini iso plug. Such connection must be made with shielded wires. This circuit will provide clear sound inside the car.
Currently, we are developing a model in which the sound will be heard when the sensor goes out.