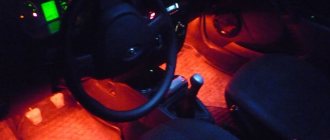
Some owners of modern Lada cars (Priors, Grants or Kalinas) experience a whistling sound in the door area when driving at speeds above 80 km/h. Others complain about water and dust getting into the cabin. All these shortcomings can be eliminated with the help of modifications, which involve installing an additional door seal.
You will need: D-profile seal with dimensions 14*12 mm, degreaser, RKI-19 (article 000017504293020), RGI-135 (1118-6107028).
Lada Granta door seals: installation recommendations
Car owners often face the problem of dirt getting into the car interior. As soon as it rains outside, a huge amount of dirt begins to accumulate on the thresholds, which gets inside the car and stains the driver and passengers. To solve this problem, you can install additional Lada Granta door seals yourself.
This car model has another problem: when driving, noise appears in the door area. It is created by a stream of air flying towards it. Of course, the interior is perfectly ventilated. But not everyone is satisfied with such a soundtrack: the noise begins to irritate and distract the driver’s attention. But in Russia the roads leave much to be desired. In addition, with the onset of cold weather, the temperature in the Lada’s interior begins to rapidly decrease. This is why there is a need to improve door seals.
Recommendations for modifying seals
To do this work, you need to prepare in advance:
You can use rubber that is used to cover apartment windows. First, the material is inserted into the gap between the guide and the windshield rubber. The operation starts at the top of the windshield and ends at the bottom of the hood. The inserted part needs to be glued. Gluing is done from top to bottom. The work begins at the junction of the car's roof and its frame. This place has a small recess, which makes it possible to hide the new seal.
Very often its edges do not look very impressive; they spoil the appearance of the Lada Granta car. They need to be trimmed with a utility knife. Then a dropper is installed in the gap. It is advisable to use silicone. This modification makes the seal much more reliable. For a better design, the installed sealing rubber bands can be supplemented with special seals. After installing them, Lada doors will close much softer.
You can also use a very ordinary dropper. To carry out the work, the standard seal remains in place. If you don't have a dripper, you can use a watering hose. A total of three meters of material will be required. If the work is done carefully, the door noise will be reduced by approximately 40%. This will be immediately noticeable: the door will make a dull sound when closing.
The quality of the seal made on a Lada Granta car is easy to check. You need to accelerate the car, light the lighter and hold it near the door. A calm flame indicates a correctly installed seal, which blocked the flow of wind from entering the interior.
Repair of door seals and installation of additional ones on Granta
AvtoVAZ produces many good cars. However, the door seals on them fail very quickly. We have to repair them. To do this, first clean the seal. The surface is degreased, for which you can use:
That part of the area that needs to be glued is coated with glue, for example, universal “88”. Sometimes the tire manufacturer specifies the exact brand. There should be several layers of glue. The first is considered preparatory. It prepares the surface for future gluing. The initial layer should dry. This will take 15 minutes.
Moreover, during drying, the surface must be protected from dust or dirt. There should be no mechanical damage present. Then the operation is repeated. A layer of glue is applied again and left for another 15 minutes. After this, the third, main adhesive layer is applied. It will hold the seal, which must be pressed firmly to the surface and wait 12 hours.
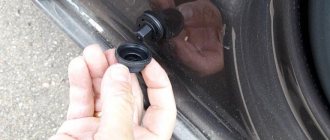
To install additional seals on the Lada door, you first need to remove the pistons covering the factory seal holes. Sometimes they are not there because they were removed by the dealer when additional anti-corrosion work was carried out. In order to remove the plugs, you will need a self-tapping screw. It is screwed into the plug and then pulled out.
As a result, the door remains scratch-free. The seals are mounted in finished holes using pistons installed on them. The seal is placed with the wide side towards the interior. If it is laid the other way around, no effect will occur. To install the RKI-19 brand seal on a Lada Granta car, you need to cover the end of the rear door with double-sided tape. After the operations and test, you can notice:
- The noise in the cabin has decreased by about half;
- the door closes very quietly.
As they say, the effect is obvious. In addition to the method described above, you can use another one - install seals taken from a GAZ car. To work, you will need a polyurethane sealant. There is an opinion that installing additional seals can cause corrosion on the doors. Car enthusiasts believe that moisture accumulates under the rubber. This is what causes rust. Of course, this is quite possible, but only if the rubber was poorly glued and the connection was loose.
For higher reliability, these places should be coated with an anti-corrosion compound. It won't require a lot of time or money. After installing additional seals, a very noticeable effect appears. There is complete silence in the cabin, no moisture gets inside the car. If wet areas are suddenly noticed, it means the job was done poorly. Everything needs to be redone. Another advantage of additional seals is significant insulation of the interior. This is noticeably felt in severe frosts.
Carrying out such a modification may be the beginning of other work, the purpose of which will be increased noise insulation of the interior and its thermal insulation. Naturally, this cannot be done without financial investments. However, after all such work has been carried out, the Lada Granta acquires new properties. The quality of the car increases several times.
Share on social networks:
Installation of door seals on Lada Granta
Without a doubt, it is unpleasant for each of us to get out of the car during wet weather and see street dirt on the thresholds, which, among other things, can stain outer clothing. To solve this problem, additional door seals can be installed in inexpensive Lada Granta versions. A set of door seals RGI-135 costs 500-700 rubles, a vertical seal RKI-19 costs around 300 rubles. Installation takes about 15 minutes.
Auxiliary rubber sealing component
There is an opinion that the Lada Granta is equipped with a seal made of the specified material when it is on the factory assembly line. In the budget variations “Norma” and “Standard”, only technological holes are left for the installation of the sealing element. This does not mean at all that the owner will not be able to acquire and install rubber seals on the door himself. To make the correct choice, you will need product catalog numbers. Let us remind you that a set of rubber seals requires the presence of plastic pistons. They allow you to install the element we are considering in a matter of minutes.
Installation of additional seals on Granta doors
| Why is there such a big difference between closing the door in a foreign car and a Russian car? In fact, there are several reasons behind the silence of the door slam, for example, high-quality silent locks and door seals. In this article we will look in detail at how to install a door seal on a VAZ 2190 (Lada Granta). |
Vertical seal between the front and rear doors of Lada Granta
The procedure for installing the vertical door seal:
- The seal is self-adhesive, so it should be installed indoors at a temperature not lower than -15°C.
- The door seal is installed from top to bottom.
- Before installation, it is recommended to heat the seal for at least 2 minutes at a temperature of 40-50°C to give it elasticity.
- Degrease the surface of the rear door flange with gasoline or alcohol, then dry.
- Peel off the protective tape at a length of 50-70mm from one end of the seal.
- Fix the upper end of the door seal to the top point of the rear door flange, and gradually tearing off the protective tape 50-100 mm at a time, without stretching, glue the seal in small sections to the lower edge of the flange.
- Install the door seal tightly against the flange end and door flange.
- On a curved section, carefully press the seal along the entire length of the section.
- After installation, additionally press the seal at the upper and lower ends to ensure secure adhesion.
Advantages:
- Reduction of aerodynamic noise (sound insulation).
- Protection against contamination of the front door lock area and rear door hinges.
- Additional sealing (thermal insulation) of the car interior.
Disadvantages: None found.
Rubber seal for Lada Granta doors
- 1118-6107028 Front door sill seal (2 pcs. per 1 door).
- 1118-6107066 Fastening button (14 buttons for 1 door).
Rear doors:
- 1118-6207028 Rear right door sill seal.
- 1118-6207029 Rear left door sill seal.
- 1118-6107066 Fastening button (11 buttons for 1 door).
So, we know the catalog numbers. Plastic pistons are included with the door seal, and we use them to install (the process will take no more than 5 minutes). See the diagram for which side to install these rubber seals correctly:
This is how additional Granta seals look in real life:
Advantages:
- Reduction of aerodynamic noise (sound insulation).
- Protection of thresholds from dirt.
- Additional sealing (thermal insulation) of the car interior.
- More silent/pleasant door closing.
Disadvantages: if you do not take care, then over time, under the rubber bands it begins to rust and rot.
By the way, in order to maximize the effect of the door seals, it is recommended to soundproof Granta doors.
Similar materials
Installation
There is nothing complicated here either - the emphasis is installed within half an hour. The first step is to use a level to select the optimal angle at which your emphasis will be located. Well, then, based on the result, secure the brackets yourself in the required places. Next, focus on them, and the job is done.
In the future, according to experienced drivers, you will never regret installing a stop under the hood. Firstly, the stop ideally withstands the weight of the hood, and secondly, during car repairs you don’t have to worry about getting hit in the neck by the hood.
Grant door seals. RGI 135 and RKI 19
However, hello! Finally got around to it and I installed additional door and sill seals on my Granta Liftback. Namely: RGI-135 (horizontal door seal) and RKI-19 (vertical seal between doors). Let me note right away that the “Lux” grants already have such seals and nothing else needs to be molded. There are no seals in the lower configurations. But let’s say “thank you” for the fact that the manufacturer left us the opportunity to install them.
The doors have special holes for installing door seals, which are neatly covered with special plastic plugs. The plugs can be pulled out in two ways. Either by prying them off with something flat (screwdriver, plastic card, ruler), or by screwing a self-tapping screw into the plug a couple of turns and simply pulling it out. I chose the second method, because... it is the safest for the paintwork of our beloved car. And the plugs won't be needed anyway. The picture was borrowed from one good magazine and a user from the network:
Now let's look at the door seals themselves. The RGI-135 seal is designed for installation specifically on doors in special standard places. Four rubber bands for each door with fastening clips. Serves as protection for thresholds from excess dirt and dust, and eliminates wind whistling when driving. One important and most crucial point when installing the RGI-135 door seal is that the seal must be installed with its WIDE side towards the threshold. Take a closer look at the photo and make no mistake at this stage. If you install the seal the other way around, there will be absolutely no effect. There will still be dust and whistling from the wind.
The RKI-19 seal has an adhesive base such as 3m adhesive tape and is glued to the pillar between the front and rear doors, removing the empty gap between them. Again, saving us from excess dirt and noise when driving. Installing RKI-19 will not raise any questions. Peel off the protective film of a few centimeters, apply the seal to the top of the pillar on the car and begin gluing it from top to bottom, gradually removing further the protective film. Having reached the bottom of the rack, cut the seal and move to the other side!
With seals, the doors close much more pleasantly, one on one, like on a good foreign car. They slam shut, without knocking, creating a “sense of vacuum.” At first, the doors may not close the first time, but this is a matter of time. You will get used to the new doors, and the seals will develop and become softer.
Installation of additional seals on Granta doors
Vertical seal between the front and rear doors of Lada Granta
As a door seal, you can use any suitable material (for example, flex, which we used as a seal on the VAZ 2110), which we secure with double-sided tape, but it is best to buy a vertical door seal RKI-19 (for Kalina and Chevrolet Niva), it works well Suitable for Lada Granta.
The procedure for installing the vertical door seal:
The seal is self-adhesive, so it should be installed indoors at a temperature not lower than -15°C. Installation of the door seal is done from top to bottom. Before installation, it is recommended to heat the seal for at least 2 minutes at a temperature of 40-50°C to give it elasticity. Degrease the surface of the rear door flange gasoline or alcohol, then dry. Peel off the protective tape at a length of 50-70 mm from one end of the seal. Fix the upper end of the door seal on the top point of the rear door flange, and gradually tearing off the protective tape 50-100 mm apart, without stretching, glue the seal in small sections until the lower edge of the flange. Install the door seal tightly against the end of the flange and the door flange. On the curved section, carefully press the seal along the entire length of the section. After installation, additionally press the seal at the upper and lower ends for reliable adhesion.
Advantages:
Reduction of aerodynamic noise (sound insulation). Protection from contamination of the front door lock area and rear door hinges. Additional sealing (thermal insulation) of the car interior.
Disadvantages: None found.
Rubber seal for Lada Granta doors
They say the Lada Granta Lux configuration has such door seals installed standard from the factory. On cheaper versions of this car, only holes for its fastening remained in the doors. But is it stopping us from buying a Granta door seal separately and installing it ourselves?
- 1118-6107028 Front door sill seal (2 pcs. per 1 door).
- 1118-6107066 Fastening button (14 buttons for 1 door).
- 1118-6207028 Rear right door sill seal.
- 1118-6207029 Rear left door sill seal.
- 1118-6107066 Fastening button (11 buttons for 1 door).
So, we know the catalog numbers. Plastic pistons are included with the door seal, and we use them to install (the process will take no more than 5 minutes). See the diagram for which side to install these rubber seals correctly:
This is how additional Granta seals look in real life:
Advantages:
Reduction of aerodynamic noise (sound insulation). Protection of thresholds from dirt. Additional sealing (thermal insulation) of the car interior. More silent/pleasant door closing.
Disadvantages: if you do not take care, then over time, under the rubber bands it begins to rust and rot.
By the way, in order to maximize the effect of the door seals, it is recommended to soundproof Granta doors.
Due to the fact that the Lada Granta was conceived as a budget car, in inexpensive trim levels the car plant saves on installing additional seals for door openings, as a result of which, when driving through puddles, the thresholds of the car are significantly contaminated and the clothes of the driver and passengers are dirty. However, installing them yourself is quite easy, but we will go further and upgrade the car door and hood seals by adding additional seals ourselves.
The car plant does not provide for the installation of a seal on the hood of the Lada Granta and Lada Kalina line of cars, as a result of which even in a relatively new car the engine compartment is covered with dust and splashes from the road.
We will start by installing standard seals. Purchase a set of door seals RKI-135. The manufacturer equips all doors with the necessary holes for installing additional seals, but on versions not equipped with them, the holes are closed with special plugs. To remove the plugs without damaging the paintwork of the car door, screw a thin self-tapping screw into it and use pliers to pull out the plug. Carry out this operation with all other plugs.
Install the RKI-135 seal by snapping all the fastening pins into the free holes on the door. Please note that the correct installation of this type of seal is to install its wide part towards the car interior, and not vice versa. Changing the side of the installation will lead to a significant decrease in the quality of its work. If you have already installed the seal incorrectly, carefully pull out the fastening pins and change the side of placement. If any of the pistons were broken during the replacement process, they can be purchased separately.
The effect of installing such a seal is significant; the inside of the threshold will always be clean. We will also prevent your fears; this type of seal does not interfere with the operation of the door drainage.
The second type of standard factory seal is RKI-19. The Lada is not installed on passenger cars; it is used in Chevrolet Niva cars, however, due to the similarity of the door design, it is ideal for the Lada Granta.
It is attached to double-sided tape applied to the seal on the edge of the rear door, closing the gap between the front and rear doors, thereby reducing air leaks into the gap and reducing not only the amount of dust that gets in, but also the aerodynamic noise that occurs during movement. Before applying the sealant, thoroughly clean the mating surface from dirt and wipe the surface with a degreaser.
Next we will talk about the use of non-standard methods for sealing body gaps. If we were able to close the gap between the front and rear doors using the factory seal, then the gap between the fender and the front door is always open. As a result, dirt gets in there, which damages the door hinges and its travel limiter, and also significantly deteriorates the aesthetic appearance that opens to us when opening the front door.
To eliminate this gap we need a Z-shaped seal. The approximate length required for the front doors is one and a half meters, but since they are usually sold by the meter, take two.
Peculiarities
To install the specified product, they resort to the use of any applicable material, for example “flex”. This option is used as a sealant for the VAZ 2110. The component must be fixed using double-sided tape.
The most appropriate action would be to purchase and install a sealing agent referred to as “RKI-19”. The product has proven itself well on Kalina and Niva Chevrolets. The Lada Granta is undoubtedly suitable for the model considered here!
Recommendations for modifying seals
To do this work, you need to prepare in advance:
You can use rubber that is used to cover apartment windows. First, the material is inserted into the gap between the guide and the windshield rubber. The operation starts at the top of the windshield and ends at the bottom of the hood. The inserted part needs to be glued. Gluing is done from top to bottom. The work begins at the junction of the car's roof and its frame. This place has a small recess, which makes it possible to hide the new seal.
Very often its edges do not look very impressive; they spoil the appearance of the Lada Granta car. They need to be trimmed with a utility knife. Then a dropper is installed in the gap. It is advisable to use silicone. This modification makes the seal much more reliable. For a better design, the installed sealing rubber bands can be supplemented with special seals. After installing them, Lada doors will close much softer.
You can also use a very ordinary dropper. To carry out the work, the standard seal remains in place. If you don't have a dripper, you can use a watering hose. A total of three meters of material will be required. If the work is done carefully, the door noise will be reduced by approximately 40%. This will be immediately noticeable: the door will make a dull sound when closing.
The quality of the seal made on a Lada Granta car is easy to check. You need to accelerate the car, light the lighter and hold it near the door. A calm flame indicates a correctly installed seal, which blocked the flow of wind from entering the interior.