Replacing headlight glass on a VAZ 2114
Replacing headlight glass is a frequent and completely uncomplicated procedure that even novice motorists can carry out. This article will show you how to replace the headlight glass of a VAZ 2110 and VAZ 2114 quickly and without any problems. First, you will need to learn how to disassemble the lantern in order to change the glass.
In conclusion
Now you know how to replace the headlight itself or its glass.
If you need to further disassemble the headlight, know that the reflector in the VAZ 2114 headlight is secured with three bolts, and the board itself is fixed with a spring, which will have to be released. Published January 11, 2018
09/07/2018 Off Posted by dakus
Replace headlights on a VAZ-2114 yourself
Many car enthusiasts were faced with the fact that they had to change the headlight glass on a VAZ-2114. There are many reasons for replacement. from accidents to sunburns that can't be buffed out. Not all motorists can perform this procedure on their own, since it is a scary process, but, as practice shows, it is quite simple.
Video on how to remove headlight glass from a VAZ-2114:
Video explains how to replace your glass headlights
The VAZ-2114 car, as well as some of the nuances and subtleties of the process.
Replacing headlight glass on a VAZ-2114
The headlight is removed during disassembly.
Replacing headlight glass on a car. this means a complete dismantling process. So, let's consider the sequence of actions aimed at glass repair:
- The first thing to do is remove the top grill.
Repair of VAZ 2114 headlights Replacement of VAZ 2114 glass headlights
Broke one glass headlight
and the second one is getting dark from old age, so I decided to replace it and make a good video on this topic well!!! READ How to Decode an Audi A6 C5 Radio
How about replacement glass in the headlights?
Using the example of Lada Samara-2.
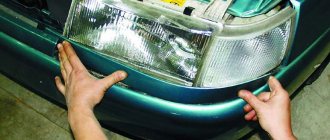
Remove the damaged headlight.
grease glass
lamps with glue or sealant. Photo. Headlight VAZ-2109, but the work is similar.
Gently press the new glass into the headlight and wait until it dries.
You can remove the glue without a knife. There are special products that dissolve frozen liquid. The variety of manufacturers today is quite large, so the car enthusiast will have to choose.
Glass selection
A glass replacement kit is required.
Glasses for VAZ headlights can be sold in originals or analogues. Thus, the analogue is 20-30% cheaper, but it is not a fact that the kit includes sealing rubber. This element is necessary because it prevents moisture from entering the headlights of the device.
Reasons for replacement
The most common reason for replacing headlight lenses is gravel on the highway.
The glass on a car's headlights can change for several reasons. Therefore, sooner or later the motorist will have to face this process. Of course, one of the options. This is to go to a car service center, where they will definitely tell you to completely change the product, but many do not want to do this. So, let's look at the main reasons for replacing glass headlights:
- Over time, the glass acquires the property of staining. The top layer does not help with the same shine, so you have to change the glass.
- Broken light. Cheap glass replacement is cheaper than completely replacing the entire headlight assembly, which is why many car owners tend to do it.
READ Removing the Steering Column VAZ 2110
One of the cheapest replacement options is purchasing floodlights during disassembly, since in most cases the housing becomes unsuitable, the glass surface remains intact.
conclusions
Replacing headlight glass on a VAZ-2114 is quite simple, and you do not need to change the entire product, which gives you a lot of money for all the little things and the work of a car service center. Glassware can be found at demonstrations or in the automobile market for relatively little money.
CategoryCar garageTags2114 change headlight
- https://carfrance.ru/zamena-stekla-fary-vaz-2114/
- https://masteravaza.ru/vneshnee-osveshhenie-avtomobilya/fary-elektroprovodka-i-elektrooborudovanie/zamena-stekla-fary-327
- https://remontvazov.com/kak-snyat-faru-na-vaz-2114
- https://autotexnika.ru/kak-pomenjat-steklo-na-fare-vaz-2114/
Why do you need to replace the canopy glass?
Let's figure it out first, why is it necessary to replace the headlight glass of a VAZ 2110 or 2114:
- It's simple - glass separately is cheap and there is no need to buy expensive headlights entirely. The reason why headlight repair is needed is some pebble that has fallen on the glass or other foreign object. When the glass of the lamp cracks, the light from the headlights becomes dim.
- In addition, the headlight glass of a VAZ 2114 or VAZ 2110 may fade over time and then again, by the way, there will only be a replacement. Polishing rarely helps in this case, and this process is not so easy. It’s easier to buy headlight glass and quickly replace it.
Why don't FZH work?
There are several reasons why FZHs can fail. Let's try to understand them.
| Cause of malfunction | What to do |
| Lamp burned out | Replace the burnt out bulb with a new one, check the condition of the contacts |
| The fuse is broken | Check, replace if necessary. A fuse can lead to loss of functionality of the entire contact circuit |
| There is no ground on the board | The board is located under the lamp. Simple repair to fix the problem |
| The contacts have oxidized and become coated | Cleaning contacts is not difficult |
| The wiring is broken | You will have to diagnose the condition of the circuit, check the integrity of the wiring using a tester and a visual method |
| The contact on the headlight film has burned out | You will need to clean the contacts and replace the elements if necessary. |
| There is a breakdown in the gearbox mechanism | In such a situation, the issue of gearbox malfunction will have to be resolved. |
| The frog (sensor) has failed | Check the condition of the reverse sensor, replace the device if necessary |
There are a lot of reasons for the failure of the FZH, so the driver must know exactly how to eliminate this or that type of breakdown.
Block ZF
Removing the rear light board
To remove the board, you will need to perform a few simple manipulations:
- Open the trunk;
- Remove everything unnecessary from the space so that it does not interfere with your work;
- Remove decorative trim;
- Remove the plastic casing;
- Remove the back panel;
- Having gained access to the socket and the license plate lamp, you can remove the devices;
- Remove the reversing sensor mounting studs and the headlight itself.
Many people confuse the reverse sensor with the speed sensor, since these devices are located in close proximity to each other.
Dismantling works
Checking the functionality of the sensor
If the taillights do not turn on, the culprit may be the reverse sensor, that is, a frog in the people.
Remove the contacts from the sensor and clamp them together, then turn on the ignition. If the light appears, the sensor needs to be replaced. If there is still no light, the integrity of the circuit is broken, but everything is fine with the frog itself.
Replacing the sensor is quite simple:
- Place the car on a pit or overpass;
- Apply the handbrake;
- Remove the protection from the bottom, opening access to the gearbox;
- Remove the contacts from the old sensor;
- Place an empty container under the sensor and remove the frog. The container is needed because when the device is removed, oil will leak out of the gearbox;
- Remove the old frog, insert a new one in its place;
- Let the car sit for a while;
- Check the oil level inside the gearbox;
- If necessary, add oil to the required level;
- Reassemble.
Such repairs can be done with your own hands, and the cost will be approximately 250 rubles. This is exactly how much a new sensor for a VAZ 2114 costs now.
Problem with the light bulb
It is not uncommon for taillights to stop functioning normally due to the failure of the bulb itself.
- To replace it, you need to disconnect the block with wires and remove the contact panel from the flashlight. Here you just need to squeeze the side latches to remove the plastic panel;
- Apply a little pressure on the cartridge and unscrew it counterclockwise;
- Check the condition of the contacts and wiring;
- Screw in a new light bulb that matches the previously installed one;
- If necessary, before screwing in the new lamp, clean the contacts and test the wiring with a tester. There may be a break in the circuit, so a new light bulb will not work.
Replacement options
The VAZ 2114 has a good basic package, but it can be improved if desired. For example, if you want to change the visual appearance of the front of the car, then simply replace the headlights. As for lighting elements, there are quite a lot of options to choose from: 20 different models to choose from. The twenty include all the options that can be found on the market: headlights from the cheapest and most inconspicuous varieties to very popular models with additional optics.
The design of the headlight includes a main powerful LED lamp, a turn signal and a classic type reflector.
Replacing the front headlight on a VAZ 2113, VAZ 2114, VAZ 2115
Headlight - if you just put light bulbs instead of headlights, then they won’t really illuminate the road, so the headlight is a very important and integral part of any car, thanks to them the light is scattered and the road is very clearly visible (Depending on how the headlights are still configured, there are just strong lamps stand and the headlight is directed downwards and thus the road is very hard to see), but the front headlights are most susceptible to deformation, since stones fly into them, breaking them, and birds also sometimes get caught (Rarely, but it happens), but without light you can’t see you travel, especially in the dark, and that’s why you have to change them for new ones.
Causes of poor headlights
This is what we should strive for
You need to look for the reason:
- Faulty lamp.
- Dirty glass.
- damaged or peeling reflector.
- Insufficient voltage.
- The direction of the light flow is not adjusted.
Replacing a dim lamp
The lamp is replaced with a screwdriver (thin) or an awl. The protection box is removed by unscrewing the screws on the headlight unit. Under the cover you can see the holder mechanism and the three-pin block.
The procedure begins by disconnecting the contact block. Next, pressing on the fastening spring, the lamp is removed and then replaced. At the same time, condensation is removed from the reflector block. The presence of this disables the lighting device. Moisture is removed through the drainage duct, after preliminary cleaning. Installation of the lamp, assembly is carried out in the reverse order.
Dirty headlights and cloudy windows
Dirty headlights reduce road illumination by 50%. Moreover, glass ages and becomes cloudy over time. Wiping with a dirty cloth contributes to this, which causes microscopic scratches.
The brightness of a car's light depends 50% on the condition of the headlight glass.
It is possible that there are cracks that allow dust particles and water to pass through (during washing). They settle on the outer and inner surface of the glass, the reflector and lead to low transmission of light rays.
An irreparable mark on the glass is left by specks of dust, grains of sand, and pebbles flying out from under the wheels of oncoming or passing cars. Scratches and microcracks refract and scatter light in different directions, as a result of which the direction of the beam is lost.
Replacing glass in headlights
The option of gluing with transparent film is not a technical solution. The obvious solution is to replace the glass.
Lamps and glass cannot produce any effect if the reflector has peeled off due to prolonged use. On domestic VAZ-2114 cars, it is possible to replace the reflector, for which you should:
- Disconnect the battery and remove the headlight unit (see “Removing the headlight on a VAZ-2114”).
Front view, headlight mounts
Unfasten the fastening latches and, cutting off the layer of sealant, remove the glass
We mount the assembled headlight in place
Lamp voltage low
Low voltage at headlight terminals can cause dim light
Low voltage occurs due to a malfunction of the current generator, oxidation or broken contacts. When checking this unit, you need to ensure that the voltage, including at the lamp contacts, is 13.8÷14.2 V. Low voltage can be detected by ringing the circuit and finding a defect and eliminating it.
A typical cause of dim headlights is often the xenon lamps used on the car.
Distorted headlight position
The wrong direction of the beams is due to the distorted position of the headlights.
This happens as a result of a minor impact, even a light touch of the bumper, for example, with a wall when parking, a tree or a curb.
Adjusting the headlights is accompanied by placing the car on a flat area in front of a smooth wall at a distance of 7–10 meters. The accuracy of the direction of the rays can be obtained provided the tank is filled (more than 50%) and the tires are properly inflated. The machine is loaded as it is normally used.
Two headlight adjustment screws
On the wall, draw with chalk the center of one headlight (the other is covered, for example, with a piece of cardboard) and the center of the body. A second line is made 12 cm lower. The third line is drawn 22 cm below the first. Based on these three projections, a vertical line is drawn covering the center of the headlight and the body. One of the two screws located inside the headlight adjusts the tilt of the light, and the second forms a directed beam.
Turning on the low beam will result in a projection on the second line. Having completed the procedure with the second headlight, you get an adjusted low beam. In this case, the high beam will also be adjusted.
Replacement timing and choice of optics
In addition to the difficulties described above, which are familiar to motorists who drive long distances, there are more banal reasons related to the depreciation of the headlight itself. This mechanism does not have a specific shelf life, but the lamps “burn out” over time, and the reflector material and diffuser become unusable.
The last two elements have a shelf life directly related to the material from which they are made and the methods of car care. At the same time, even the best of them are still susceptible to the ingress of dirt associated with depressurization of the headlight structure.
IMPORTANT! If you have working headlights, but you still can’t see anything, visit a good car service center that has a light debugging stand. It may just be necessary to clean the structure and adjust
The choice of headlights is extremely important for the convenience of the motorist. To be more precise, it is not the manufacturer itself that is important (although it affects the characteristics of the light), but the identity of the lighting fixtures. If your car has standard headlights, but you decide to replace only one, then find the original ones. You should not take AUTO SVET or BOSCH, which are similar in appearance.
From a technical point of view, the headlights will be the same, but the manufacturing technology of the optics differs from one company to another, and as a result, you will get two distinctly different headlights. Even if you don't care about the appearance of the car, don't forget about the properties of your eyes.
Human vision and the brain have a number of characteristics, and in this case they will manifest themselves in the fact that a more powerful headlight will create a “twilight zone” instead of a dimmer light. Consequently, there will be no improvement in visibility, and the brain will perceive the “blind spot” almost the same way if it did not exist at all.
How to adjust headlights, work progress step by step
If the headlights are not adjusted correctly, this can cause headlight problems. Correctly adjusting headlights is a very delicate process, however, it is very important and extremely necessary. Very often, it seems that small differences in the angle of the light flow are not capable of creating discomfort for the driver, even when driving on unlit roads. However, as practice shows, not only the health, but also the life of the car owner can depend on the correct setting of the headlights.
If your headlights are not adjusted correctly, you will dazzle motorists passing you, often leading to head-on collisions. Most drivers do not notice that the headlights are scattered; this can occur even with completely invisible damage to the bumper, although it is difficult to notice visually.
To check the direction of the light, just drive up to the wall in the dark. Deviations from the norm can be determined by eye. If there are discrepancies, adjustments should be made. Of course, you can contact a workshop or specialized service center, however, you can adjust the headlights yourself.
What does that require? A flat area, for example, the area in front of the garage is suitable for this. One side of this platform should rest against a vertical wall without corners or various irregularities.
On the wall you need to draw a line with chalk dividing the vehicle into two identical halves. The easiest way to do this is to drive the car close to the wall and determine the middle. Then you need to turn it back. For subsequent marking of the wall, you will need to know the distance from the lamp to the ground and from the center of the vehicle to the lamp. Now we draw another line on the wall, but five centimeters lower than the first. We measure the distance from the center of the car to the lamp and from the center of the lamp to the ground. The center of the headlight is the intersection of both lines.
Now let's move on to the adjustment. To do this, we drive the vehicle seven meters back and turn on the headlights. It is necessary that the angle of the headlights coincides with the line we drew. In addition, the place where the light spot goes up must coincide with the lines that intersect.
How to disassemble a VAZ 2110 headlight
The design of dozens of headlights can vary greatly depending on the manufacturer (see types of headlights). Disassembly of the headlight will be shown on the two most popular models: Kirzhach (Avtosvet Plant) and Bosch.
Headlights VAZ 2110 Kirzhach
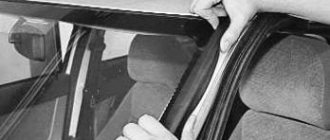
To remove the headlight glass, carefully insert a flat screwdriver into the corner of the glass, and then insert a utility knife into the resulting gap and cut off the sealant step by step, helping with the screwdriver. If the sealant does not yield, then it needs to be heated using a hairdryer; this is described in more detail in the video:
After the headlight glass is removed, remove the headlight reflector by unscrewing three bolts: To remove the board with the reflector and module from the headlight, remove the pressure spring through the hole in the hydraulic corrector. Then we tighten the adjustment as much as possible and slip in the screwdriver handle, after which we begin to unscrew first one adjustment screw, then the other. We remove the board from the headlight.
Headlights VAZ 2110 Bosch
Replacing Bosch headlight glass is easier because... Instead of sealant, a rubber seal is used. We remove the headlight glass, having first unfastened the latches. To remove the headlight reflector, we had to completely unscrew the adjusting screws and pull out the cap inside the reflector (covering the low beam lamp), prying it off with a screwdriver from the other side.
When reassembling the headlight, the glass is installed using a sealant or sealant (you can use a soft construction one). By the way, do you know how to tune the headlights of a VAZ 2110?
| Disassemble the headlights of the VAZ 2110 Kirzhach.. | Disassemble the headlights of the VAZ 2110 Bosch.. |
Photo source:
Keywords:
xn--2111-43da1a8c.xn--p1ai
How to remove a VAZ 2110, 2111, 2112 headlight; dismantling and installing a headlight unit
If there is a need to remove the headlight. for example to replace headlight glass. then this article is for you.
The main difficulty here is to remove the decorative trim - the “eyelash” - in order to get to the lower nut of the headlight assembly.
On VAZ models of the tenth family, the front headlight unit can be simply removed by slightly loosening the bumper fastening. This process is not as complicated as it seems at first glance.
It is worth remembering that plastic is very fragile in the cold, so this procedure must be carried out in a warm room.
Work order
- Disconnect the negative cable from the battery.
- Disconnect the two electrical connectors of the headlight unit.
- If there is a fender liner, unscrew it on the side of the bumper, usually 2-3 outer screws.
- Using a 10mm wrench, unscrew the two bolts of the upper headlight mounting.
- Unscrew the 2 bolts securing the decorative radiator grille.
- Lifting it and sticking your fingers into the gap between the grille and the bumper, release 2 latches on each side
- We unscrew the bolt of the lower fastening of the headlight unit.
- Unscrew or loosen the 2 bolts of the upper bumper mounting and slightly pull the bumper towards you.
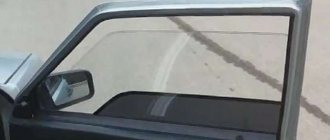
Using your fingers or a screwdriver, carefully pull the edge of the decorative trim — the “eyelash” — away from the headlight unit.
In the resulting gap we see a plastic tab-latch, with the help of which the edge of the eyelash is attached to the edge of the wing.
- CAREFULLY remove the tongue from engagement with the wing, without applying extra effort, it’s easy to do with your fingers!
- We move the trim to the center of the car and remove it.
- I HIGHLY recommend that before removing the eyelash, lubricate it along the entire arc of attachment to the bumper with silicone grease.
- Using a “10” socket, unscrew the nut securing the headlight to the bracket.
- Use a screwdriver to pry up the hydraulic corrector cylinder retainer, turn it and remove it from the headlight housing.
We carry out the assembly in the reverse order without using brute physical force. When installing the eyelash in place, we push its lower edge with a screwdriver.
If you work very leisurely, the entire procedure for dismantling and installing the VAZ 2110 front headlight will take 20 minutes.
Replacing headlight glass: how to do it yourself
Replacing headlight glass on a VAZ 2114 Replacing headlight glass is a frequent and completely uncomplicated procedure that is carried out even by novice motorists. This article will show you how to replace the headlight glass of a VAZ 2110 and VAZ 2114 quickly and without any problems. First, you will need to learn how to disassemble the lantern in order to change the glass.
Why do you need to replace the canopy glass?
Let's figure it out first, why is it necessary to replace the headlight glass of a VAZ 2110 or 2114:
- It's simple - glass separately is cheap and there is no need to buy expensive headlights entirely. The reason why headlight repair is needed is some pebble that has fallen on the glass or other foreign object. When the glass of the lamp cracks, the light from the headlights becomes dim.
- In addition, the headlight glass of a VAZ 2114 or VAZ 2110 may fade over time and then again, by the way, there will only be a replacement. Polishing rarely helps in this case, and this process is not so easy. It’s easier to buy headlight glass and quickly replace it.
- It’s easier to buy disassembled flashlights at flea markets. There you can find the glass you need and buy it very cheap. The assembled headlight itself costs about 5,000 rubles each. Why, one might ask, buy an expensive accessory if you can simply replace the glass?
Every motorist sooner or later faces problems with headlights. And he does what is best for him. If the headlight has become unusable, you can replace it as an assembly. To do this, you just need to buy a new model, sealant, film. Then dismantle the old headlight, apply sealant to the new lamp, and then calmly glue it in place. During the process, you need to make sure that no dust or dirt gets between the connections. Now we’ll find out how to replace the glass itself. First, let’s find out the design of the lantern, what it consists of.
What does the headlight consist of?
As you know, the main link of any lantern is its reflector or reflector. It is a concave mirror component, which serves to form a light beam of the desired shape.
Types of lamps for flashlights
As for the light source, they are car lamps. They can also be different. Currently known:
- ordinary incandescent lamps;
- halogen lamps;
- xenon lamps.
A conventional incandescent lamp is a sealed bulb containing a vacuum or inert gas. Inside the lamp there is a tungsten spiral, which, under the influence of electric current, is heated to a temperature of 2600-3000 K, thus emitting light and heat. As for the efficiency of such lamps, it is about 3400 K. Incandescent lamp A halogen incandescent lamp is similar in principle to a conventional incandescent lamp. Such a lamp contains minor additions of halogens, such as bromine, chlorine, etc. With the help of these substances, the bulb and glass of the headlamp are darkened. According to experts, the use of halogen headlights on car headlights doubles their service life and prevents rapid failure of the bulb. Halogen lamp Finally, a xenon lamp is a gas-charged version that contains xenon. Such lamps are also called HID lamps and their emission spectrum is identical to that of daytime sunlight. This lamp consists of two bulbs and quartz glass. Such a lamp consumes only 35 W of electrical power, instead of 55 W for a halogen lamp. Xenon lamp
Lantern glass
The headlight also consists of corrugated glass, which will be discussed in this article. The most popular types of glass are transparent. Although tinting headlights is becoming more and more fashionable now. Transparent headlight glasses for VAZ 2114, although reflective options, crystal, modular, lensed, etc. are also known.
How to replace glass on a headlight
2114 VAZ glass headlights As it turned out, this is quite simple to do. But there are two ways. The first method, presented below, involves quickly removing the glass and replacing it. The second method is to completely disassemble the headlight, which allows you to replace not only the glass, but also other parts.
Method one
Begin:
- remove the radiator grille;
Removing the radiator grille
- lift it and insert your fingers into the gap formed between the bumper and the grille;
- we find two latches on each side and unhook them;
- take out the grate;
- now we find the two bumper mounting bolts and unscrew them;
- pull the bumper towards you (nothing is holding it anymore and it should come out easily);
- we find three bolts securing the headlight and unscrew them;
- we recess the headlight inside;
- holding the eyelash of the headlight, we pull it towards the center of the car;
VAZ 2110 glass headlights
- take a screwdriver and, using it to pick up the eyelashes from the outside, pry the headlight out of engagement with the bumper;
- remove it;
- Now you will need to unscrew the lower nut securing the headlight;
- then unhook the connectors from the headlight, turn signal and hydraulic corrector cylinder;
- remove the headlight completely.
The headlight has been removed and now you will need to remove the glass, blow off dust from the reflectors and adjust the rubber gasket. We install new glass. We assemble everything in reverse order. VAZ 2114 headlight glass
- We install the eyelash in place, pushing its edge into place with a screwdriver.
Also check out
- Disconnect the connectors for the turn, then the headlight and hydraulic corrector. To perform the last step, you need to clamp the curved clip, turn the corrector plug down, and remove it from the socket.
- Using a 10mm socket, unscrew the 4 bolts located at the rear of the headlight.
Remove the headlight from the mounting socket, remove the middle frame fasteners from the common mount
It is important to do everything carefully to avoid damage to the paintwork.
- Remove the middle frame, dismantle the headlights with the lower eyelashes.
Before replacing the VAZ 2114 headlights, you should make sure that they are faulty, since they can probably be repaired. After this, you need to adjust the headlights of the VAZ 2114.
Replacing the headlight glass
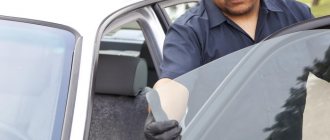
If you see that the headlight itself is working, and its cloudiness is due to glass defects, you need to know how to remove the glass from a VAZ 2114 headlight and then replace it.
- We dismantle the headlight using one of the methods described above.
- Take a thin flat screwdriver (spatula, knife) and pry up the corner of the glass.
- Insert the tip of a utility knife into the resulting gap and cut through the old sealant (if there is a lot of sealant left, take a hairdryer and heat the edges of the glass).
The glass is now removed, but remember that reassembly will involve applying sealant (can be replaced with a rubber seal), so be sure to get some in advance. Also, some manufacturers' headlights have headlights with clips, so don't use brute force, just look where they are and tighten them.
How to clean and use what to wipe the reflective part of the optics
Procedure:
- Using a brush for watercolor paints, gently wipe the mirror reflector of the headlight from dust without pressing.
- Take a plate and fill it with distilled water, which you can buy at any car store.
- Add a few drops of dish detergent to the plate.
- Mix everything with a brush. We take a spray bottle and fill it with our solution.
- Apply our solution to the reflector through a spray bottle and wait 1 minute.
- Then we repeat the operation with a brush, smoothly and without pressure we clean the mirror surface.
- We rinse the part with clean distilled water.
- Dry with a household electric hair dryer until completely dry in a horizontal position with the reflector facing down.
Replacing the headlight reflector of a VAZ 2114
Headlight reflectors are parts that affect visibility at night and the durability of headlights. Over time, they lose their properties and require replacement or restoration. Replacing a VAZ 2114 headlight reflector is a simple procedure, so you can do it yourself without going to a service station.
Headlight reflector design
The VAZ 2114 headlight reflector is an important element of the headlight unit, forming a beam of light. It is made of plastic and has a complex shape, different from the classic parabola. To achieve a “mirror effect,” the inside of the reflector material is coated with a thin layer of aluminum, protected with varnish.
Reasons for headlight reflector failure
During operation of the headlights, the reflector becomes very hot, which contributes to the destruction of the mirror layer. An additional harmful effect on the reflective coating is produced by moisture, which enters the headlight housing during depressurization. All this contributes to the fact that the reflective coating darkens or even peels off. At the same time, the heating increases even more, which accelerates the loss of properties of the VAZ 2114 headlight reflector. In this situation, only restoring or replacing the VAZ 2114 reflector helps.
To replace the reflector you will need:
- standard set of keys;
- screwdriver;
- new headlight reflector for VAZ 214.
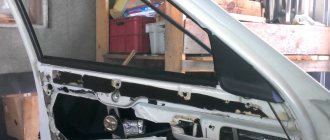
Dismantling the VAZ 2114 headlight
To replace or restore the reflector, the headlight unit must be removed from the vehicle. Before starting work, you must disconnect the negative voltage from the battery to avoid a short circuit. The VAZ 2114 headlight is dismantled as follows:
- unscrew the two pairs of upper and lower screws holding the radiator grille;
- remove the radiator grille;
- disconnect the wire block from the turn signal;
- release the spring holding the turn signal;
- press out the plastic clips and remove the turn signal;
Note: you can dismantle the headlight without disconnecting the turn signal from it. But in this case, the likelihood of damage to the plastic latches holding the pointer increases.
- unscrew a couple of nuts holding the side of the bumper to open access to the screw securing the protective lining of the headlight unit;
- unscrew the screw and remove the lining;
- disconnect the wiring block from the headlight;
- unclip the headlight adjuster latch and remove it by turning it counterclockwise;
- unscrew the three nuts holding the headlight;
- Unscrew the screw securing the headlight to the bracket;
- remove the headlight from the car.
Afterwards, all that remains is to remove the glass and inspect the condition of the reflector. The joint between the glass and the reflector is sealed - the parts are glued together with sealant. Therefore, before removing the reflector from the VAZ 2114 headlight, the headlight unit must be warmed up. This makes it easy to separate parts glued together with sealant. If the reflector has lost its properties, you should simply replace it with a new one. However, you can try to restore it by returning the reflectivity to the inner coating.
How to restore a VAZ 2114 headlight reflector
At home, you can restore the reflector by applying one of four types of coatings:
- mirror film;
- metallized tape;
- aluminum foil with epoxy glue;
- liquid chrome
The first two methods are the simplest, but the third is more durable and reliable. Unlike adhesive tape or mirror film, epoxy adhesive is more temperature resistant. Consequently, the mirror coating will not peel off from the surface of the reflector during operation. The fourth method - applying liquid chrome - is the fastest and easiest. The coating is applied from an aerosol can. The disadvantage of this method is that liquid chrome is very unstable and can be rubbed off with your fingers during assembly of the headlight unit. If instead of liquid chrome you apply a special heat-resistant coating, you can achieve much better results in terms of durability and reliability.
Restoration work, regardless of the chosen method, begins with surface preparation. Before applying the coating, the VAZ 2114 headlight reflector must be cleaned of flaking remnants of the old coating, washed and degreased. After restoring the old reflector, all that remains is to assemble the headlight unit and install it in place. When installing the headlight glass, it is necessary to carefully seal the joint using sealant. Otherwise, moisture will get inside and the reflector coating, like the lamp itself, will quickly fail.
How to replace glass on a headlight
2114 VAZ glass headlights
Method one
Begin:
remove the radiator grille;
Removing the radiator grille
- lift it and insert your fingers into the gap formed between the bumper and the grille;
- we find two latches on each side and unhook them;
- take out the grate;
- now we find the two bumper mounting bolts and unscrew them;
- pull the bumper towards you (nothing is holding it anymore and it should come out easily);
- we find three bolts securing the headlight and unscrew them;
- we recess the headlight inside;
- holding the eyelash of the headlight, we pull it towards the center of the car;
VAZ 2110 glass headlights
- take a screwdriver and, using it to pick up the eyelashes from the outside, pry the headlight out of engagement with the bumper;
- remove it;
- Now you will need to unscrew the lower nut securing the headlight;
- then unhook the connectors from the headlight, turn signal and hydraulic corrector cylinder;
- remove the headlight completely.
VAZ 2114 glass headlights
We install the eyelash in place, pushing its edge into place with a screwdriver.
Method two
It's time to find out how to change the glass on a VAZ 2110 headlight using the second method. And in one thing you can carry out a complete repair of headlights on a VAZ. Let’s get started:
- disconnect the blocks with wires;
- remove the upper radiator grille (you will need to unscrew several bolts with a 10mm wrench);
- Having disconnected the blocks with wires, remove the hydraulic corrector (to do this, press the latch and turn the hydraulic corrector 90 degrees clockwise);
How to change glass on a VAZ 2114 headlight
- we find the bolts securing the headlight with a 10 key;
- move the headlight back a little;
- move the eyelash to the center by 4 centimeters;
- disengage its edge using a screwdriver;
How to remove glass from a VAZ 2110 headlight
- loosen the bolts securing the upper buffer;
- remove the eyelash by pressing on the lower part of the pad so that its flange disengages from the front buffer;
- take a 10mm wrench and unscrew the last nut securing the part;
- remove the lantern.
Let's move on. Let's try to find out how to disassemble the headlight itself in order to replace not only the glass, but also its other parts:
- take a flat screwdriver or knife;
- insert the tool into the corner of the glass and lift it slightly;
- take a utility knife and cut off the old sealant.
How to remove glass from a VAZ 2114 headlight
It will be useful to watch this video
Let's continue:
Once the glass is removed, it can be replaced with a new one.
If you need to change any other part of the headlight, then continue the analysis:
- dismantle the headlight reflector by unscrewing three bolts;
- Now you will need to remove the board with the reflector and the module from the headlight.
Now we’ll find out how to disassemble Bosch headlights, which is much easier to do:
- remove the glass from the lantern (it will come out only after the latches are unfastened);
- Unscrew the adjusting bolts of the headlight reflector completely;
- we take out the cap inside the reflector, which covers the low beam lamp (to do this, we again use a screwdriver, with which we pry the reflector off from the other side);
- We change what is needed and assemble the part in the reverse order.
Rubber seal for headlights
Add a commentAdd a comment We advise you to readXenon in the foglights of the VAZ 2109 with your own handsXenon on the VAZ 2109: installation on your ownWe do the lens headlights on the VAZ 2109 ourselvesHydraulic corrector for the VAZ 2110 and its installationContents
Front light fixtures are statistically the most fragile part of a car. If there is slight contact with third-party objects, a bumper or hood can be straightened, but the fragile glass of lighting fixtures cannot be repaired.
Also, unlike the mechanical parts responsible for the appearance of the car, light repairs cannot be postponed, so every car enthusiast faces the question of how to remove the headlight on a VAZ 2114. Firstly, the life of the driver at night depends on their serviceability, and secondly, the malfunction of lighting devices is a significant reason for a fine.
Replacing headlights for VAZ 2114
In addition to collisions, there are many everyday reasons that result in the replacement of a VAZ 2114 headlight, the most common being a poorly maintained road. Even the smallest pebbles that pass the “millstones” of the wheels of the car in front turn into “bullets”.
Moreover, the starting speed of some of them is quite comparable with real small arms. Therefore, let's figure out how to replace the entire optics, change the glass and what lighting devices to buy.