On a VAZ-2109 car, replacing the rear struts is necessary in case of excessive wear or damage. If we compare the suspension of the “nine” with the “classic”, then it is more advanced, higher efficiency, and the design is a little simpler. Although there are still common features - the design has springs and shock absorbers.
Only on the “nines” they are assembled into a single unit, and on the “classics” they are installed independently of each other. Repair and maintenance of the suspension on a VAZ-2109 car can be done independently, you just need to know the general design of the car and be able to use the tool.
Rear suspension design
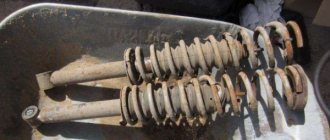
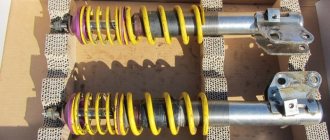
The basis of the entire structure is a shock-absorbing strut, which dampens body vibrations when driving on uneven surfaces. The rear struts of a VAZ-2109 are replaced without dismantling other components of the vehicle's suspension. The rear shock absorber strut consists of:
- shock absorber;
- metal plates under a spring;
- springs;
- rubber cushions;
- fastening elements - nuts and bolts.
All these elements are connected into a single unit and installed on both sides of the car. It turns out that the design dampens the vibrations that the entire rear part of the car produces when driving on an uneven road.
What does a shock absorber consist of?
In addition, the shock absorber itself includes many smaller elements. The basis is a system similar in some ways to a hand pump. Only instead of air it pumps oil. Some shock absorbers can be repaired - it is enough to completely disassemble them and replace all components that have become unusable. You will also need to add oil, and exactly as much as indicated in the technical specifications for a particular model.
To independently check the serviceability of the shock absorber, simply lower the body as low as possible. In this case, its rod should enter as much as possible. After this, the body is abruptly released. If the shock absorber is working properly, the body will make 1-3 oscillations and then stop. But if the device is faulty, the body will oscillate much longer. The reason for this behavior is most likely that the oil has completely leaked out of the housing or the rubber sealing rings have been destroyed.
How to check a shock absorber
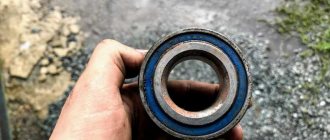
Before checking the operation of shock absorbers, you need to assess their condition visually.
Important! The presence of oil stains, even covered with a layer of dust, indicates that the inside of the case is empty. The stand will no longer work correctly.
Also pay attention to the presence of mechanical damage, the condition of the spring and other suspension elements. It is best to carry out diagnostics after a long trip, so that the oil in the struts (if it is still there) warms up.
What tools are needed to replace struts?
When replacing the silent block of the rear pillar of a VAZ-2109, it is advisable to install the car on an inspection hole or overpass. In this situation, repairs occur much faster, because there are more amenities. To make the repair yourself, you will need:
- Jack – preferably hydraulic.
- Body supports.
- Wheel chocks – installed under the front wheels.
- A set of keys.
- Spring puller.
- Steel wire.
Wire may be required to secure the spring in a compressed state. But you can use thick copper or aluminum instead of steel. Only these metals are much softer and under the influence of elastic force the springs can stretch.
Replacement procedure
For such work you need the following devices and tools:
- screwdriver set;
- a set of keys;
- jack;
- container for draining shock-absorbing fluid.
The procedure is as follows:
- at the gearbox, switch the lever to first speed;
- lift the rear of the car with a jack (both wheels must be in the air);
- provide reliable support;
- take away the jack;
- dismantle the old racks.
If you need to completely replace them, then the disassembly process ends.
When you need to repair any individual element, you should also perform the following steps:
- remove the anthers, bushings and buffer;
- make sure that there are no noticeable flaws;
- wash the shock absorber (it is its contamination that most often leads to breakdown);
- check the rear silent blocks;
- assemble the stand and install it in place.
It is very difficult for one person to complete all the actions on his own, so it is worth asking a friend for help.
In particular, your partner will have to direct the rod into the glass. Further:
- install the spring;
- pull out the shock absorber rod completely;
- put on the lower ear and clamp everything with a bolt as tightly as possible.
Preparatory work
Before starting work on replacing rubber bands on the rear pillars of the VAZ-2109 or dismantling elements, it is necessary to thoroughly prepare. To do this, before starting repairs, treat all threaded connections in advance with penetrating lubricant such as WD-40. The lubricant must remain on the metal for at least half an hour to completely clean the threads of rust and dirt.
There are only two mounting points at the rear pillar of the nine - the top one inside the trunk and the bottom one on the beam. To remove the shock absorber, you need to unscrew the nuts and bolts. But before this, you must compress the spring as much as possible and fix its position with steel wire or some kind of rigid staples. The main thing is to prevent the spring from relaxing during the repair process.
Installing a new part
- A compression buffer is placed on the rod.
- The part is installed on the lower seat.
- A bolt lubricated with lithol is inserted.
- The nut is tightened too much.
- By slightly extending the rod, install the thrust washer, together with the lower cushion. To make it easier to remove the rod, you need to screw the nut on top.
- An insulating gasket is inserted above the spring. She is tied with a thin rope.
- The spring is installed on the rack. Its coil must fit into the groove of the cup.
- To fix the rod, you need to compress the spring. To do this, you need to raise the rear beam. The rod should fit into the hole.
- All removed parts are put on it.
- The nut is tightened.
- The jack is lowered.
- The top nut is tightened tightly.
After installation, the functionality of the new part is checked.
Important! Replacement of the shock absorber must be carried out simultaneously on each side. After 100 km it is necessary to re-stretch the connections.
How to remove the rear strut on the "nine"?
To dismantle the rear pillar on a VAZ-2109, you will need to perform a few simple steps:
- Loosen the wheel bolts on the side to be repaired.
- Raise the rear of the car on a jack.
- Remove the wheel completely.
- Place a support under the body and lower the car onto it.
- Check how well the spring is compressed with a puller.
- Open the trunk, remove the rubber plug covering the place where the shock absorber rod is attached.
- Using a long tubular wrench size 17 or a special tool, unscrew the nut from the rod.
- Unscrew the lower mounting of the shock absorber strut.
- Pull out the entire rack assembly.
That's all, now you can repair or replace the rear struts of the VAZ-2109 with your own hands.
Front suspension VAZ 21099
For the VAZ 21099, the front suspension is the most complex element in the car, since the car is front-wheel drive. But the number of main nodes is small.
During each preventive self-examination, you need to pay attention to:
- the presence of operational defects on the balls;
- traces of deformation of the suspension by the body or external objects;
- any cracks or irregularities on the suspension;
- defects in the elements of any joints in the components of the front part of the machine, ranging from braces to levers and stabilizer, including hoses and struts;
- wheel angle, because any deformation makes work on their correct camber and toe useless;
- integrity and wear of silent blocks;
- absence of cracks and defects on the rubber bands of the stabilizer cushion;
- subsidence of telescopic suspension struts.
No parts should have cracks, bruises, traces of oil, torn fragments, or bulging rubber bands on one side.
To check the performance of the ball, measure the distance from the support disk to the lever in front. When, during the swing of the chassis, the distance varies by plus or minus 0.8 mm or more, it is necessary to change the ball joint.
When rocking, the hub should not knock - the sound means the bearing needs to be replaced.
When, when starting to move, the car begins to make a hum/vibration/unintelligible knocking sound or the vehicle pulls in a certain direction, this indicates a malfunction in the front suspension system.
How to remove the front suspension arm
Before inspecting the lever, the front part of the machine is fixed on a support (or on a pair of raised jacks), the parking (hand) brake is depressed, and the rear wheels are secured in a stationary position with “shoes”.
Using the 17th key, unscrew the four bolts and the wheel is removed. By unscrewing the ball joint nut, you can release the pin. The stabilizer bar is disconnected from the front suspension arm.
To remove it, you need to unscrew the nut, then remove the bolt connecting the structure to the body bracket.
The part must be replaced if the geometry of the lever is changed or the rubber components show signs of defects.
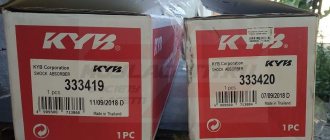
How to replace shock absorbers on a VAZ 21099
Quite often, restoring the front suspension involves replacing shock absorbers. If you hear knocks when driving, this most likely confirms the need for replacement. The cause of the problem lies in the deformation/breakage of the spring. Replacing coil springs (or already assembled shock absorbers) is done in pairs, using the front or rear axle.
Replacing the front shock absorber begins with disassembling the front strut. It is better not to remove it entirely, since after reinstallation the wheel alignment will be extremely difficult.
How to disassemble the front pillar on a VAZ 21099
Work begins with removing the crankcase protection. When working, have a 13-1 wrench and a 19th ring wrench available.
- The “protection” of the cap is removed from the upper mount of the rack.
- Use a specialized wrench to loosen the nut on the shock-absorbing rod (rod). It is recommended to carry out work on loosening or tightening bolts strictly on the ground/floor (not in a pit). Tightening is carried out in the range from 65 to 95 Nm.
- When putting the handbrake on and after installing the “shoes” under the rear wheels, the front of the car is raised on a jack, after which it is installed on supports. The wheels are removed from the front axle.
- The metal nut fastening (cotter pin) connecting the ball joint from the steering rod to the steering lever is removed.
- The fastener turns away. The hinge “finger” is pressed out.
- The rubber band for sealing and the hose going to the brake system are removed from the bracket.
- The location of the eccentric washer is marked in relation to the rack bracket.
- Two nuts are unscrewed, a pair of bolts are removed from the rack mounting.
- The eye of the rotary cam is brought out of the bracket.
- Three nuts are removed from the upper rack mounting.
- The work is almost complete. All that remains is to reach the front pillar through the lower part of the wheel well.
- The front strut is installed in the reverse order after removal. The eccentric is wrapped according to the marks applied with paint or marker.
- Wheel alignment and alignment are best done at a car repair shop or tire shop with special equipment.
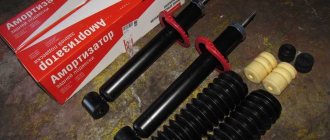
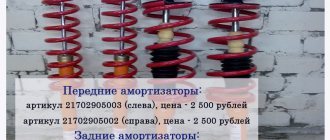
Repair or change?
Some motorists are faced with a completely reasonable question: shouldn’t they try to restore the old struts themselves, since the cost of new ones is quite high? The cheapest ones of unknown production and quality will cost no less than 1,500 rubles apiece. If you decide to repair them yourself, it will be at least three times cheaper. But there are several pitfalls:
- If the life of the old racks is already decent, then there may be strong wear on the rod, due to which it is sometimes impossible to achieve perfect sealing.
- It is unlikely that you will be able to fill the shock absorber with as much oil as is necessary for proper operation. If you make a mistake of a couple of grams on the smaller side, the shock absorber will not work. If you pour more than normal, the seals will break.
And the quality of the elements in repair kits often leaves much to be desired. Therefore, replacing the rack assemblies will be much more effective. Their resource will be much higher than that of restored ones.
Assembly of the rear pillar "nine"
And now a few words about how to properly replace the rear struts of a VAZ-2109. Many motorists change only the shock absorber and cushions and do not attach much importance to the springs. And it’s worth paying attention to them. As they wear out, they sag, and the length of all turns becomes less than necessary. As a result, the entire suspension will not work properly.
When assembling, you should adhere to the following rules:
- Install a compressed spring onto the strut.
- Secure the rubber pads on the last coil of the spring using insulating tape.
- Carefully, being careful not to move the spring relative to the shock absorber, install the strut in place.
- Install the nut on the top of the shock absorber rod.
- Install the bottom of the post onto the beam. Secure with a bolt.
Tighten all threaded connections after completing assembly and remove the puller from the spring. After this, you can replace the wheel and begin repairing the second side - it is done in exactly the same way. After repairs, it is advisable to make the final tightening of the nuts after installing the car on the wheels. And after 20-30 kilometers, check the tightness of all connections - sometimes the nuts get loose after driving. Try to use nuts with plastic locks on the threads.
Rear shock absorber device
Shock absorber 18 of the rear suspension (see Fig. 74) is a hydraulic telescopic double-acting one.
Using the lower eye, the shock absorber is tilted to the suspension trailing arm bracket using a bolt with a self-locking nut. The upper mount of the shock absorber is pin-type: the rod is attached to the upper support 9 of the suspension spring through two rubber pads 13 and a support washer 8. A spacer sleeve 10 is installed between the washer and the cover of the shock absorber protective casing. The shock absorber consists of a reservoir 28 (Fig. 75), a cylinder 29, a valve 32 compression, rod 26 assembled with piston 31 and valves, race 19 with guide bushing 18 and sealing and fastening parts.
Rice. 75. Rear suspension shock absorber:
1 — compression valve body; 2 — compression valve discs; 3 — throttle disk of the compression valve; 4 — compression valve plate; 5 — compression valve spring; 6 — compression valve cage; 7 — recoil valve nut; 8 — recoil valve spring; 9 — recoil valve nut washer; 10 — recoil valve plate; 11 — recoil valve discs; 12 — throttle disk of the recoil valve; 13 - piston; 14 — piston ring; 15 — bypass valve plate: 16 — bypass valve spring; 17 — restrictor plate of the bypass valve; 18 — rod guide bushing with a fluoroplastic layer; 19 — guide bushing cage; 20 — sealing ring of the tank; 21 — rod seal; 22 — rod protective ring; 23 — oil seal cage; 24 — tank nut; 25 — compression buffer support; 26 — shock absorber rod; 27 — spring cup; 28 - reservoir; 29 — cylinder; 30 — spacer sleeve; 31 — piston assembly with valves; 32 — compression valve assembly; 33 — shock absorber bushing assembly.
The reservoir 28 is made in the form of a pipe, to the lower part of which a bottom with an eye is welded, and in the upper part an internal thread is cut for a nut 24. The lower support cup 27 of the suspension spring is welded to the outside of the reservoir.
The compression valve 32 is pressed onto the bottom of the cylinder and pressed against the bottom of the tank. It consists of a body 1, a holder 6, a plate 4, a package of disks 2 and 3 and a spring 5. The body has a central seat, against the chamfer of which the compression valve disks are pressed from above. The upper and lower parts of the valve body have cross-shaped cutouts for the passage of liquid. The disk package consists of four flat disks, one of which, the top one, has two cutouts for throttling the liquid. The disks are pressed against the chamfer of the socket by a spring 5 through a plate 4, which has four through holes for the passage of liquid and a cylindrical protrusion. With this protrusion, the plate is pressed against the inside of the throttle disk 3. Thanks to the cylindrical protrusion, a gap is formed between the outer edges of the throttle disk and the plate along the entire perimeter for the passage of liquid to the throttling cutouts of the disk. A clip 6 is pressed onto the valve body on top. It has a flanged belt for fitting into the cylinder bore, one central and six peripheral holes for the passage of liquid.
In cylinder 29, a rod 26 moves in assembly with a piston 31 and two valves: bypass and return. The guide bushing 18 has a fluoroplastic layer on the inner surface, due to which the wear of the rod and bushing is sharply reduced. Clip 19 of the guide bushing is pressed into the cylinder. The bushing has a channel for draining liquid from the annular cavity of the cage into the cavity of the tank so that liquid pressure is not created on the gland 21. The guide bushing race is sealed in the tank with a rubber ring 20, which is pressed through the gland race 23 by a nut 24 to the collar of the race 19 and the surface of the tank. Using the same nut, through the gland race and the protective ring 22 of the rod, the gland 21 is pressed to the annular protrusion of the guide bushing race.
The rod seal 21 has three working edges, which are pressed against the chrome-plated surface of the rod. The grooves under the lower working edges are made at an angle, due to which the liquid passing between the guide bushing and the rod creates pressure on the working edges of the stuffing box, pressing them against the surface of the rod, which improves the seal. The compression buffer support 25 is placed on top of the shock absorber reservoir.
The following are installed in the lower part of the rod: spacer sleeve 30, restrictive disc 17 of the bypass valve, spring 16 and disc 15 of the bypass valve, piston 13 with sealing ring 14, discs 11 and 12 of the recoil valve, thrust disc 10, spring 8 of the recoil valve and nut 7.
The spacer bushing 30 limits the movement of the rod during the recoil stroke, resting against the cage of the rod guide bushing.
Piston 13 is metal-ceramic, has eight vertical channels located along circles of two radii. The channels located along a circle of larger radius are blocked from above by a bypass valve plate 15, which is pressed against them by a flat spring 16. The remaining channels are blocked from below by a package of recoil valve disks. The upper disk 12 is a throttle disk, it has four cutouts along the outer circumference; the next two disks are 11 flat. The disk pack is pressed by a spring 8 through a support plate 10. The piston assembly with valves is attached to the rod with a nut 7, which is fixed by opening the end of the rod in two places. A washer 9 is installed between the nut and the lower disk of the recoil valve, which protects the disks from damage when tightening or unscrewing the nut. To create a seal, a metal-ceramic ring 14 is used.