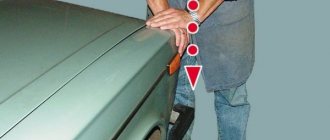
The front and rear shock absorbers on the Chevrolet Lacetti are presented in a classic form: oil type with top-mounted springs. Depending on the technical characteristics and configuration, the model is equipped with gas-oil struts. Gas-type shock absorbers are not installed by default. Only within the framework of an individual order, so-called upgrade by the owner of the technical equipment.
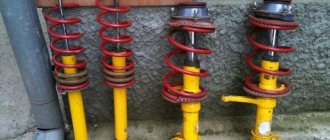
The average service life of standard racks exceeds 60,000 km, after which maintenance is required with subsequent replacement of mechanisms. Owners prefer the following brands: Sax, Kayaba, Profit, Monroe. There is no data available regarding other modifications. In order to save money, owners continue to install original front (rear) shock absorbers, despite their low actual mileage. As for the country of manufacture, the majority of opinions here are on Korea and Japan, all other manufacturers occupy secondary places.
Which shock absorbers to choose
The original shock absorber struts for the Lacetti sedan and hatchback have the following numbers:
- 96407821 - left
- 96407822 - right
Rear shock absorbers for Lacetti station wagon:
- Rear right - 96408641
- Rear left - 96408640
If you need original shock absorbers, then choose Mando. These shock absorbers are original.
You can also choose from analogues;
- KYB - 333420 (left); 333419 (right)
- Amd - AMD.SA116L (left); AMD.SA115R (right)
- Sachs - 317139 (left); 317140 (right)
Kayaba from this list are the most popular and expensive. And for me, more preferable (but with some nuances). Therefore, on this page we will install them.
Selection of shock absorbers
Depending on the type of road surface on which the car is operated, driving style, type of operation and design features, you should choose shock absorbers for the Chevrolet Lacetti. Considering domestic roads, it is better to choose only high-quality and proven products for installation. Still, let’s look at which shock absorbers are suitable for the Chevrolet Lacetti, analogues of the original, and indicate the catalog numbers by which you can find and buy.
The front shock absorber struts for the Lacetti differ only in the article numbers depending on the body. But other than that, they are no longer different and are interchangeable. Also, different shock absorbers are installed on the right and left wheels. Reviews of these spare parts from drivers are mostly positive. They are quite tenacious, but really a little harsh. On rough roads and at low speeds this is especially sensitive. More details about original articles and sizes in the table below.
| Front shock absorbers for Chevrolet Lacetti in different bodies | |||||
| Automobile | vendor code | Rod diameter, mm | Case diameter, mm | Body height (excluding stem), mm | Rod stroke, mm |
| Hatchback and sedan bodies, base, LS, LT trim levels | 96407819 (left); 96407820 (right) | 22 | 51 | 357 | 162 |
| Station wagon, base, LS, LT trim level | 96561721 (left); 96561722 (right) | ||||
| Sedan body, LT package | 96425338 (left); 96425339 (right) | ||||
| Station wagon with LT package | 96425340 (left); 96425341 (right) | ||||
Analogs of front shock absorbers for Lacetti
The original shock absorber struts are a little expensive, and not all drivers are happy with their rigidity. Therefore, substitutes for these spare parts are very popular. The table below shows the most purchased and popular ones.
| Manufacturer | vendor code | price, rub. |
| KYB 4.2 | 339030 (left); 339029 (right) | 2900 |
| Sachs 4.3 | 317151 (left); 317152 (right) | 2100 |
| amd 3.3 | AMD.SA113L (left); AMD.SA114R (right) | 1600 |
What is needed to replace rear struts
Materials:
1. Shock absorbers
2. Despite the fact that the shock absorbers come with a rod nut, it is still better for us to buy an original nut. It’s better not to install Kayabovskaya. You will further understand why.
The article number for the nut is GM 94515419. Naturally, you need 2 of them.
3. It is also advisable to replace the supports. Support article number 96457360.
4. Support gasket - GM 96404799
5. If desired - auto plasticine and anticorrosive (ordinary Movil can be used)
In general, this is what it should be. But also take into account the fact that not all nuts can be unscrewed. Therefore, you can still stock up on bolts and nuts:
- GM strut mounting bolt 94500712
- GM strut bolt nut 94515070
It is also quite possible that you will not be able to unscrew the stabilizer link. Then you can get stuck with them too. Their replacement is written and shown here - Replacement of rear stabilizer struts
Tools:
1. Keys/sockets for 17, 14, 9 and 12 mm
2. Metal brush
3. For Kayaba shock absorbers, it is advisable to have a special key for the rod
4. Jack and wrench for removing the wheel
5. Tool kit for removing the trunk trim (depending on the body version). I have enough Phillips screwdriver on my hatchback
see also
Comments 18
People. Tell me the front springs for the hatch: the thickest rod and the highest. I know 51 and 52 endings of articles, don’t offer a crazy price tag and wait 100 years.
These springs are for a 1.8 engine, that's high.
What are the parameters of the original sedan front springs?
how do the springs behave? didn't burst?
They didn't burst. The car began to hold the road perfectly.
Front horn 11902 is for 1.8 engines (reinforced in the description) 11901 - for 1.4-1.6 As experience shows, when installing reinforced springs we slightly increase the ground clearance and due to greater rigidity the roll in corners is reduced
I also want to put them on the back.
Front horn 11902 is for 1.8 engines (reinforced in the description) 11901 - for 1.4-1.6 As experience shows, when installing reinforced springs we slightly increase the ground clearance and due to greater rigidity the roll in corners is reduced
As a result, how much did you travel on these springs? what can you say about them?
I installed KYB from 1.8 in the front, FOBOS for the station wagon in the rear, and even the “reinforced” number 51616 is already holding, no super noticeable change was noticed on the road. It became a little higher, a little smoother.
I’m also thinking about changing the spring struts when replacing the struts, what can you say about the Phobos springs?
Also a Russian company. I think that the difference between the horn and Phobos is small.
I’m also thinking about changing the spring struts when replacing the struts, what can you say about the Phobos springs?
Hello. I installed reinforced springs on the back of a Lacetti sedan in May 2017, Phobos. The ground clearance has increased, and there is less roll. Now the front ones are next in line.
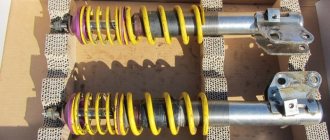
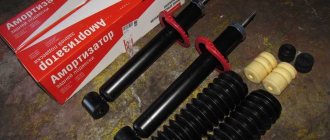
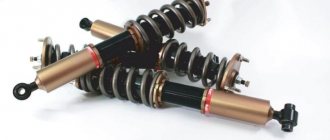
Shock absorbers Kayaba for Chevrolet Lacetti
The rear shocks come in fairly large boxes
Because they come without a stem tie
Stickers and inscriptions on the stand
The box also contains a small and not very useful instruction manual and a shock absorber rod nut
The main reasons for the failure of Chevrolet Lacetti shock absorbers
Failure of shock absorbers, as a rule, is directly related to their increased wear.
- oil leaks caused by the destruction of oil seals and seals,
- corrosion of elements,
- cracked or deformed mounting bushings
All these external signs of a “dead” shock absorber indicate that the built-in safety margin has been exhausted.
The recommended service life for Chevrolet Lacetti shock absorbers is about 80 thousand km.
Although there may be other reasons for the premature death of shock absorbers, there are many examples where the shock absorber did not cover even half of the above mileage.
- The first reason is a fake or simply low-quality part. And don’t be surprised if a spare part purchased for pennies did not last even six months: the production of a high-quality automotive component requires considerable production costs, which include mandatory factory tests, expensive equipment that requires constant checks and upgrades, and, finally, the use of high-quality materials from which The shock absorber is actually produced.
- Another, no less probable reason is increased loads during operation, the nature of which can be completely different. Exceeding the maximum load of transported cargo, fast driving on bumpy roads, an abundance of aggressive reagents on the roads - all this, as you might guess, does not in any way contribute to the longevity of the car suspension.
Replacing rear shock absorber struts
Partially remove the trunk trim. On a hatchback, just move the felt boots to the side. How to do this is shown here
We have access to three nuts securing the support to the body
Note. On a sedan you can access the support nuts from the interior!
They need to be unscrewed with a head with a small wrench or a 12 mm ratchet
A curved spanner like this is also very suitable for these purposes.
They can easily unscrew even distant nuts.
But! Before unscrewing the support, it is advisable to “tear off” the rod nut . It is sometimes very difficult to tear it off, so it is better to do it now, when the stand is firmly fixed.
To do this, pry off the rubber plug with your hand.
And we take it off
Next, it is advisable to have the same spanner wrench as I showed above. But only at 17 mm
“Tearing off” the nut
The work in the trunk is completed. Now we hang the wheel using a jack and remove it.
We see this picture
We have to:
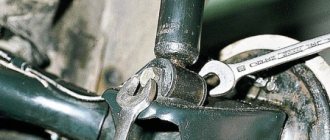
Unscrew the stabilizer link nut and disconnect the link (yellow arrow)
Remove the brake hose clamp and disconnect the hose (red arrow)
Unscrew the two nuts and remove the bolts securing the shock absorber strut (green arrows)
Unscrew the stabilizer link and remove the brake hose clamp
Move the brake hose to the side. It is convenient to place it behind the stabilizer bar
Using 17 mm wrenches, unscrew the nuts securing the shock absorber strut
We move the rack a little and take it out from under the car
We take the stand and clamp it in a vice or fix it in another way
Replacing stabilizer struts for Lacetti sedan, station wagon and hatchback
The procedure includes several steps, including additional ones.
Keys, jack and other work tools
To prepare, you will need tools from a car kit, WD-40 and a metal brush. For dismantling - wrenches “18” and “15”.
Before changing this part, the car must be raised using a hydraulic lift installed on the inspection channel. Then a brush is used to clean the fastening joints and threads from dust and (together with WD-40) rust.
How to disassemble a shock absorber strut
Attention! The rear strut does not have bearings, so it must be assembled strictly in the same position as it was before disassembly! If you are doing this for the first time, then it makes sense to put marks. In the video I talked about this in detail. But if you suddenly forgot to do this, then it’s okay - the video also has a way to check the correctness of the assembly.
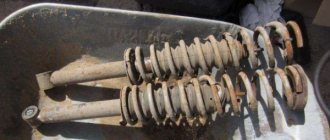
It all depends on what shock absorbers are installed. Let's start with the original original shock absorber. Its stock looks like this
We need to unscrew the nut and at the same time hold the rod. To do this, we put the already familiar 17 mm wrench on the nut.
And we hold the rod with the head at 9 mm
If you remove the nut while still on the car, as I described above, then it will be much easier now.
How to change a strut bearing
To carry out work on replacing the strut supports of a Chevrolet lacetti hatchback, station wagon or sedan, we will need a high-quality tool. During the work process it will be useful:
- jack;
- torque wrench;
- a set of standard car heads;
- ties for removing springs;
First of all, you should dismantle the rack:
- We jack up the car and place wheel chocks under the rear wheels;
- We dismantle the wheel and remove the ball pin. As a result, we gain access directly to the site of the lower fixation of the node;
- We open the hood and, using two keys - “9” and “17”, tear off the clamps;
- We dismantle the lateral stability stabilizer;
- Unscrew the nut securing it to the steering knuckle using the 17th key;
- We take out the fastening bolts, completely unscrew the upper part and disconnect the rack;
Do I need to tighten the springs on the rear struts?
By and large, springs in the rear struts do not require ties. It is quite possible to do without them, since the spring is practically in a decompressed state.
But I still recommend having zip ties for several reasons:
1. There is a groove on the rod into which the support should fit. If you compress the spring by tightening the nut without ties, the support may become slightly skewed and not fit into this groove. The nut will tighten and it will seem to you that everything is fine. But after a couple of hundred meters of driving, the support will sit in its place and the nut will not be tightened, which will lead to knocking, and can also break the support and the threads on the rod.
2. It may turn out that your car does not have original shock absorbers or springs. For example, Kayaba shock absorbers have a slightly shorter rod and without ties it will be more difficult to assemble the strut.
3. The price of screeds is not high. About 150 UAH. for a couple. This is about 6 usd or 400 rubles. Moreover, they will be useful to you in the future on the A-pillars. And there you can’t do without screeds.
In general, unscrew the nut...
...and remove the support
Removing the spring cup
Anther
Bumper
Remove the spring and rubber gasket.
Next, we proceed to troubleshooting the rack elements. Most often, only the support and its gasket require replacement. Everything else has gone through more than one shock absorber replacement.
Here is a worn out and specifically tired support
Which front and rear stabilizer struts are best installed on a Chevrolet Lacetti
Of all those presented on the car market, the most popular are products from CTR. They are quite reliable, provided they are purchased at official dealerships, since there are many counterfeits for products of this brand. The products of the Ukrainian company ATP are no less interesting. They were developed taking into account many years of driving experience on the roads of the post-Soviet space, therefore they are optimally suited for the role of replacement. At the same time, although they are slightly more expensive, in general these machine parts cannot be called expensive machine parts.
Regular
The ATP “Standard” stabilizer struts on the Chevrolet Lacetti (from 2003) are structurally similar to the factory ones and have the following mechanical qualities:
- made of tool steel;
- the ball pin has undergone heat treatment and “mirror” polishing;
- the base of the liner consists of shockproof polymer;
- higher percentage of rubber content in the anther.
Absolutely any standard Lacetti stabilizer struts (front, rear, right, left) manufactured by ATP (article - ATP 19-270-R152) will cost the buyer only 500 rubles.
Reinforced
The ATP “Long life” stabilizer struts on the Chevrolet Lacetti (also starting from the 2003 model range) have the same qualities described above, but are equipped with a ball pin increased in diameter, which determines an increase in service life and safety margin.
ATP "Long life" (article - ATP 20-217-180) are estimated at 600 rubles.
Assembling the shock absorber strut
Treating the spring cup with a rust converter
And then anticorrosive
We do the same with the place where the rack is attached to the body.
Selecting suitable replacement parts - part numbers and prices
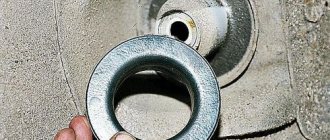
The factory article number for the support bearing of the Chevrolet Lacetti front strut is 94535236 , the front shock absorber support is 96549921 .
This part is offered on the market by many manufacturers. When purchasing, you should give preference to well-known companies or original spare parts. Thus, proven companies with a good reputation are such companies as:
Table of recommended manufacturers
| No. | Manufacturer/country | Catalog number | Price 2022, rub. | Equipment | |||
| Bearing | Support | Instructions | Guarantee | ||||
| 1 | DAEWOO Korea Original | 94535236 | 410 | + | — | — | 12 months |
| 2 | DAEWOO Korea Original | 96549921 | 650 | — | + | + | 12 months |
| 3 | ROSTECO Russia Analogue | 20211 | 650 | — | + | + | 12 months |
| 4 | SNR France Analog | M25302 | 270 | + | — | — | 18 months |
| 5 | GENERAL MOTORS USA Analog | 94535236 | 260 | + | — | — | 24 months |
| 6 | GENERAL MOTORS USA Analog | 96549921 | 820 | — | + | + | 24 months |
| 7 | LEMFOERDER Germany Analog | 3137301 | 220 | + | — | — | 18 months |
| 8 | LEMFOERDER Germany Analog | 3704601 | 630 | — | + | + | 24 months |
The price of support bearings for Lacetti, depending on the manufacturer, can fluctuate between 350-900 rubles. The spare part itself must not have visual defects, the packaging must be neat, and the seller must provide a quality certificate and certificates of conformity.
Photos of bearings:
Bleeding the shock absorber
Before assembling the strut, it is advisable to bleed the shock absorber. It is DESIRABLE, not mandatory. If you forgot to do this, then it is not a sin and you can survive it.
The shock absorber will self-pump during operation. And it is necessary to pump it for two reasons:
- To check its serviceability
- To avoid damaging the shock absorber when lowering the car from a jack or lift. If you lower it smoothly, nothing will happen. And if for some reason the car suddenly stands on its wheels, the unpumped shock absorber may deteriorate.
To bleed the shock absorber, it must be turned over and placed on the rod. It is better to tighten the nut first so as not to spoil the thread.
We press the shock absorber and smoothly retract the rod. Keep the rod pushed in and turn the shock absorber over. We release the rod and wait for it to come out completely.
Then gently press the rod and press it in all the way. In this case, the rod may move jerkily. At this stage there is nothing wrong with this.
Now let go of the rod and wait until it comes out completely.
We recess the rod again. Now he should walk without jerking. If there are jerks and dips, then the shock absorber is faulty.
If there are no dips, jerks or extraneous noises, then we retract/release the rod again.
The fourth time we recess the rod with jerks. There should be no failures or extraneous sounds. If this is the case, then let go of the rod and no longer turn the stand over! She should now always be in an upright position!
And let's start assembling the rack.
Installing the rubber gasket
And then the spring. We make sure that the beginning of the spring coil is in its place on the rack. (there is a characteristic protrusion there and it is very difficult to make a mistake)
Installing a bump stop
Anther
Spring cup
We test ourselves with a rod or electrode. There are holes in the spring cup and in the shock absorber itself. We thread an electrode through them and take a look. They must be strictly opposite each other
We coat with anticorrosive
And we put on the support:
- It must fit clearly into the groove on the rod!
- The support has the shape of a triangle. The sawed part should be installed to the hole where we inserted the electrode!
Now another important point. On Kayaba struts, there are no edges on the rod for a 9 mm head, like on the original struts. There's just a groove there
Therefore, for this rod it is convenient to use a special wrench for racks
Put the wrench on the nut
And insert the middle part of the key
Now it's not a tricky thing. We hold the middle part of the key (it is convenient to insert the knob into the cut and hold it), and rotate the outer part of the key with a pipe wrench, tightening the nut.
After this, our rack is ready to be installed on the car.
It is quite possible to install it yourself without any problems. It may seem difficult and inconvenient, but in fact the procedure goes without problems.
Note. It is better to tighten the three nuts securing the support in the trunk when the car is already on its wheels. It is therefore advisable to cover all rubber-metal components.
Here is the new rack installed. The thread is protected using Movili and autoplasticine. This is written and shown in detail on the page Thread protection from corrosion
On the opposite side, all procedures are similar
Dismantled rack from the opposite side
The finished result
ALL WITH YOUR OWN HANDS
02/22/2019 . . During the New Year holidays we got frosts of about 20 degrees. Northerners probably find it funny - for them it’s a thaw. Well, that's not the point. The snow just starts to crunch underfoot when the temperature drops below ten degrees. There are already snowdrifts in our garages and we can’t move in at once. You have to turn the steering wheel while standing still. But I really don’t like it - a large load is put on all the components - wear out faster. Well, in winter it’s okay - the wheels turn in the snow. It was here that I felt the snow crunching under the wheels when turning - almost like under my feet. But soon the thaw came, and the snow still crunched under the wheels when turning. This is what alarmed me. I drove out onto clean asphalt and turned the steering wheel - the same creaking sound as in the snow. That’s when I realized that I had been deceived by this frost and snow. I went to the pit to look for the cause of the “snow” crunch. I immediately went through the reasons in my head - ball joint, tie rod end, support bearing. But when I looked under the fender, I saw that it was the lower coil of the front strut spring on my driver’s side that had broken.
Well, no shit, I told myself. I had a dream this summer to replace both front struts with Kayaba, since the right one is a little snotty, but so far it’s working properly. And then this front left strut spring ruined my whole mood. I really wanted to go to the store, buy both racks assembled and install them on the car. But I sat, smoked, cooled down and decided for now to set the lower end into the place where the working spring would fit, so that it wouldn’t fly out by accident. I jacked up the car, turned the spring with the mounting tools and inserted it. It’s bad that the spring didn’t break off a whole coil, but 5 centimeters less. Therefore, after turning, the top-bottom alignment was disrupted, and the plastic boot stood crooked. Somehow I lowered the car, adjusting it with a mounting tool so that the boot did not rest against the rack body itself. I spent three hours poking around, my nerves were on edge. During this time, if there was a spring, I would have removed everything long ago, assembled it and put it in place.
In general, I decided to go to the store the next day and buy or order a spring, boot and support bearing. The store had everything in stock, although not something cheaper, like Kayaba, and Swedish cold-curled Lesjofors springs for 2,300 rubles. I didn't want to tempt fate and bought it. There was no boot separately, only included with bumpers for both racks for 900 rubles. And a support bearing for about 500 rubles. I didn’t drag it out and put it on the back burner. I replaced everything after work. In this video I showed how I increased the ground clearance by 4.5 centimeters and got 190 mm. instead of the factory 145. When I picked up the car, I didn’t yet have a blog or a YouTube channel, and I wasn’t very familiar with the Internet, so I only wrote an article. But it’s better to see it with your own eyes once. And how to correctly install the upper spring cup assembly with the protective casing relative to the rack itself. For some reason this is not written .
Kayaba shock absorber rod nut
Now about the nut. The fact is that there is a groove on the rod on which the support is installed. I have mentioned her several times.
But the fact is that the height of this groove is often greater than the thickness of the support body! Therefore, the original nut has a specific shape in order to level out this difference and reliably fix the support on the shock absorber rod. This is clearly visible in the photo. I showed this with arrows. I think the meaning is clear.
But the nut that comes with the Kayaba shock absorbers does not have such a groove. It's just an ordinary nut
Therefore, it will not be able to guarantee a reliable connection between the support and the rod. This is where the knocking feet begin to increase after installing the Kayaba shock absorbers. And, as a result, negative reviews about these shock absorbers are multiplying.
Therefore, keep this in mind and install the original original nut.
It is clear that you can get out of the situation with the help of pucks, but this is somehow collective farm.
What kind of rear struts are installed on the Chevrolet Lacetti from the factory?
The rear pillars for the station wagon are 3 mm longer.
Theoretically, all shock absorbers are divided into three types - oil, gas-oil and gas-filled.
Each of them copes with its task differently - converting kinetic energy into thermal energy, thereby damping vibrations and smoothing them out. According to General Motors engineers and their Korean colleagues, the best option for the Lacetti in sedan, hatchback and station wagon bodies would be gas-oil shock absorbers. They are installed at the factory.
Articles
The left post is preparing to take its place.
The catalog numbers of the rear shock absorbers for the hatchback and sedan are the same:
- Rear left: GM-96407821 .
- Rear right: GM-96407822 .
Differences in bodies
On a station wagon you will have to disassemble the trim.
The racks for the station wagon received the number GM-96408640 and their difference is that their rod diameter is 22 mm, while those of the sedan and hatch are 20 mm. Visually, they differ in the thickness of the glass - 49 versus 45 mm. Of course, this is not the only difference.
All this is done so that the shock absorber strut on the station wagon reacts more harshly to loads. And the springs on these bodies are different - on the Wagon the rod is thicker and the spring itself is stiffer.
However, third-party manufacturers do not favor rear struts for the Lacetti SW and produce them much less frequently than for the hatch and sedan.
Is it worth changing the shock absorber struts yourself?
Replacing rear shock absorber struts costs 300 UAH. for a couple. This is 12 usd or 850 rubles. Is this a lot or not enough for such work? There is no definite answer here, because situations vary. For example, one rack can be easily changed in 30-40 minutes. That is, in just one and a half hours of work you can save 300 UAH. Therefore, in this situation, it is better to replace the racks yourself.
But imagine if there is no garage? This is more difficult, but it is still possible to undertake the replacement yourself.
But this is only if all the nuts unscrew without problems. What if problems arise? We know how difficult it is sometimes to unscrew a stabilizer link, for example.
And it also happens that the shock-absorbing strut mounting nut is tightly stuck. A “heavy” tool is already needed here. For example, an angle grinder (grinder).
Here's another example. When trying to rip off the rod nut, the support fell apart - its rubber part separated from the metal
Then, when I tried to rip off the nut, part of the rod with the edges broke off
Therefore, we have to do something clever in the yews
In such situations, you don’t want any savings.
Therefore, if you are ready to overcome possible difficulties, then definitely do everything yourself. After all, at the service station no one will smear you with anticorrosion agent and protect the threads in order to avoid problems in the future. And no one will bother with the rod nut.
In general, if you want to do it well, do it yourself.
Front Strut Spring:
Hello Igor. Have you found out the cause of the spring failure? Or maybe you didn’t have frost-resistant springs.)) Here in Krasnoyarsk at the beginning of February the frost was -40 degrees. My springs are all intact, even the struts are not snotty. Looks like a northern car.)) Best regards.
The lower factory rubber is under a spring with beads; a stone can easily get in there, and the beads will prevent it from flying out. Then the spring sharply compresses in the ditch, rests on a stone and breaks. It just burst at the point where it rose above the lower platform. So I’m thinking, maybe I should cut off the collar of the elastic in this place?
This is a faulty spring. Metal fatigue, hardening defects, rod drawing defects, etc. and so on. ... I've seen a lot of broken springs like this. And I saw how pebbles and stones were crushed into dust by the coils of springs and how they jumped out of the coils when the spring was compressed, but I never saw a stone break a spring. The material of the stone is softer than metal, unless it is a diamond, you don’t have diamonds lying around on your roads)) or some kind of iron spike, in general something made of metal, has fallen between the coils of the spring. Something like that. Sincerely.
Have you heard about Drive 2? There is a log book there.
I am registered there, but I don’t have enough time or energy. Although maybe I’ll publish a couple of interesting videos.
Opel strut supports on Lacetti + Fenox condition after 25,000 km
In October 2022, I changed all the parts of the carriage suspension - Replacement of the ENTIRE Lacetti SW suspension with part numbers + useful information on parameters and substitutes
. Almost two years and 25,000 km have passed since then. Yesterday I had a reason to shake up the front suspension, and at the same time evaluate the condition of its parts.
And after such a period of time I can say: - Fenox A61200 / A61201 racks
— excellent, almost no complaints;
— Fenox 15039 springs
— any complaints;
— supports SACHS 803000
— I have some complaints (because of the supports I went into the front suspension).
— JustDrive JSL0002L / JSL0002R stabilizer bars
are just crap, I don’t even want to evaluate them, I replaced them exactly a year later (I installed reinforced
Meyle 29160600007HD / 29160600008HD
, which to this day work without complaints).
After less than two years, the supports sank a little. Unpleasant jolts/knocks appeared. So Niyaz received a legitimate opportunity to switch to Opel front shock absorber supports
))))) Now about everything in more detail.
A year ago, I started seeing records of the transition to miracle supports from Vectra B, Opel G, Zafira A and the like. The discoverer (at least on Drive before I recorded it) was Senya-pl - Front strut supports from OPEL
.
A few months later, interest was fueled by Pavka
pachyk -
Front strut supports from OPEL
.
Then Vinni303 - Opel + Lacheti.
Replacing front supports from Opel to Lacetti Indeed, Opel supports are made with a greater margin of safety and are free from the disadvantages of Lacetti supports: - a larger rubber section slows down or completely eliminates subsidence of the support; — the support bearing is pressed into the support body, which eliminates the mobility of the glass.
Anatoly for the visual photo of these spacer rings
tolik89rus
Niyaz grabbed his head and began to delve into the essence of the problem. But there were two problems: - there are soft and hard supports; - the guys were chasing savings (and took the “soft” LEMFORDER and similar slag).
Additional confirmation is provided by the records of Opelovodov (for example x16xel -
Shock absorber supports
).
So you shouldn’t say unequivocally that “Opel supports = feces” if you yourself installed the wrong parts.
SOFT AND HARD SUPPORTS OPEL
When I started digging into the topic, I found out that there are two types of supports - soft and hard.
I even wrote a post in the Opelovodov thread. Question about the soft and hard design of the Opel front strut support.
The difference is with a larger rubber collar (thickening of the section of the rubber casting). Hard ones were installed on diesel cars (they have more mass, soft supports would sag too quickly)
An attentive reader will probably see that only SWAG separates the article numbers for hard and soft supports; the rest of the manufacturers don’t care about the lantern. And indeed, until a certain year, SWAG packages contained exactly the original supports that were in Opel packages, but were much cheaper. But for about two years now, FEBI has been included in SWAG.
As a result, my list of parts turned out like this: - Opel 344525 / GM 90538936 - Opel 312510 / GM 90468618 - Teknorot ST20 - GM 94515420 and 94515070 2 pcs each
By the way, one of the suppliers still has an offer for two GM Opel supports 0344525 for 550 rubles. I ordered them, but instead of the original they brought out FEBI in a bag with an article number written in marker. Passed. Don't buy, don't waste your time. Current prices for original rigid supports Opel 344525 / GM 90538936 - 2000-2200 rubles. I have an extra pair of the original rigid supports. To anyone who wants to get rid of sagging supports forever, I’ll give them a pair for 2,800 rubles.
Source