The article is in the archive. 2001 - 2003
To connect the car to a personal computer, you need to purchase or create a communication interface between the COM port and the K-LINE diagnostic connector.
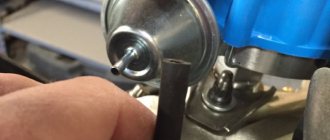
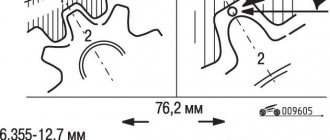
The first message on the screen of diagnostic equipment or a computer that causes panic among beginners is usually something like “No connection”, “No response from the controller” or something similar, but no less intriguing. For example, the motor tester starts offering options ranging from power failure to adapter hardware failure. It’s okay if a car with an immobilizer arrived for diagnostics first and you are sure that everything is in order with the adapter. The reason for the lack of communication on cars without immo is trivial and is possible only in the domestic auto industry: a break in the diagnostic line from the diagnostic connector to the ECU. The immobilizer uses line K to communicate with the ECU and is included in the diagnostic line break. If the immobilizer is not installed, the diagnostic line is suspended in the air and there is no connection with the ECU. Apparently, there was supposed to be a plug here, but... To restore communication, simply install a jumper between pins 9-1 and 18 of the immobilizer connector (or install the immobilizer) as shown in the figure. In practice, in order to preserve the gradual dimming function of the light and just to scare the first adopters, these two wires are cut and spliced, leaving the immo in the connector.
GAS diagnostic connector.
1 + 12V 2 + 12 V from battery 10 l - line 11 K - line 12 Weight
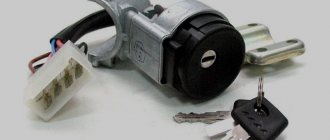
Diagnostic connector VAZ
| A - GND B - L - Line (may not exist) M - K - Line G - Fuel pump control. |
| H - 12 V. Constantly with the battery through a fuse. / may not be. |
Location of diagnostic electrodes
VOLGA - under the hood, on the wall of the engine compartment, on the passenger side VAZ 2110 - to the right of the driver, near the steering column of the VAZ 2109 Lower panel - on the shelf under the glove compartment, next to the VAZ 2109 ECU High panel - behind the center console. VAZ 2108 - 2115 “Europanel” - on the “dashboard”, closed with a hatch. Chevrolet Niva - OBD-II, next to the ignition switch, partially covered by the steering cover. VAZ 11183 “Kalina” - Under the niche for small items next to the gearshift knob. VAZ 21126 "Priora" - behind the glove compartment.
| Assignment of contacts of the diagnostic unit |
| 14 - CAN low (J - 2284) 15 - ISO 9141 - Line 2 L 16 - battery powered |
| Chevrolet Niva: The control unit is located in the front passenger's foot area. Access to the wiring is only possible with the glove box removed; To remove the unit, you need to remove the glove box (“glove compartment”) and unscrew the fuses from the unit. For rewriting, the drive can be left unscrewed if the cable is of sufficient length. |
| VAZ 21126 “Prioressa” |
Connector for connecting diagnostic equipment to VAZ cars (old type, analogue of GM)
To connect diagnostic equipment to the unit, you can use a pin contact of the appropriate diameter, but it is much more convenient to make a specialized connector.
This design was developed by NPP NTS for connecting diagnostic equipment. In a slightly modified form, these connectors can be found at car markets in Tolyatti. This design was developed and provided by © AIST
The connector shown in the photo can be bought in Togliatti at the Fiamma car market. It is quite well made and has an undoubted advantage - the presence of a sufficiently large amount of free space. For example, I easily connect a k-line adapter. The result is a compact laptop adapter.
But such a block for connecting to the Diaonostik connectors can be ordered online on the website of the Togliatti ZAPCHAST - SERVICE company. The block is a double-sided plastic connector, on one side of which it is connected to the standard VAZ diagnostic unit, on the other - OBD II. I have already ordered several times, delivery by parcel post (to Volgograd) within a week.
How to make connectors for connecting to diagnostic connectors yourself? Sany 77 shares its production experience - download detailed instructions
Now a little about the cable. NPP NTS, for example, completes KR-2 adapters with a three-wire harness 5 meters long, two power supplies (“+” and “-” from the battery, crocs) and an unshielded signal cable connected in the block to contact “M”. When making the cable yourself, it should be taken into account that when using a high-quality shielded cable, the length can be increased to 15 m and that a system with a separate power supply was chosen due to the fact that the older types of wiring were not supplied to the diagnostic unit - at the moment It is possible to connect everything directly to the block. The photographs show “replacement” cables for VAZ and GAZ, powered by an adapter from diagnostic sockets.
And, without a doubt, the most convenient operation when using a laptop is shoes with a built-in K-Line adapter. The adapter shown in the photo on the left is actively used for diagnostics and works with an engineering ECU J 5 On-line tuner in combination with an IBM Thinkpad P - II / 366 laptop. A diagnostic unit of this type is located in Togliatti, Togliatti market "Plamya" ", or you can do it yourself.
In conclusion, the pinout of the adapters:
1. The most popular K-line from chiptuner.ru - completely matches the pinout of the KR-2 adapter from NPP NTS: 2 -K-Line, 4, 5 + power, 8, 9 - GND.
2. Adapter K - Line v. 1. 7: 9-pin connector from Auto Electrician: 1 - K - Line, 4 - K - Line ground, 5 - power supply ground, 8 - power plus.
3. Adapter K - L-Line v. 2. 1 (and from USB K - L-Line) from Autoelettrico: 1, 14 - K - line; 13, 25 l - line; 17, 18 + 12 V; 21, 22 GND; 3 – Bus J 1850+
Instructions on how to check the K-line
Most often, the solution to the problem really lies in breaking the K-line wire. That is, the wire has simply moved slightly out of the block (the APS block of the immobilizer, or the BC block) and there is no longer any contact.
If you have checked all the contacts, but the on-board computer still does not see the K-line wire, then you can proceed as follows:
OBD1 pinout - 12 PIN (GM12)
Description:
OBD1 (GM12) connector is rectangular in shape, consists of 12 contacts.
Brands and years:
All injection models, except for some models after 2002, which have an OBD-II connector.
Access and location:
Open access. Located next to the ignition switch, partially covered by the steering column cover.
Pinout:
* Connector Keying - A design element of a removable connector that ensures the correct orientation of the plug and socket.
Example in the photo:
Conclusions and their purpose:
| Conclusion | Color | Purpose |
| A | Weight | |
| B | L-line diagnostics (not always routed) | |
| D | CO potentiometer (not always diluted) | |
| G | Fuel pump control | |
| H | Power supply +12V (not always wired) | |
| M | K-line diagnostics |
Stories from our readers
“Fucking basin. "
Hi all! My name is Mikhail, now I’ll tell you a story about how I managed to exchange my two-wheeler for a 2010 Camry. It all started with the fact that I began to be wildly irritated by the breakdowns of the two-wheeler, it seemed like nothing serious was broken, but damn it, there were so many little things that really started to irritate me. This is where the idea arose that it was time to change the car to a foreign car. The choice fell on the melting Camry of the tenth years.
Yes, I had matured morally, but financially I just couldn’t handle it. I’ll say right away that I am against loans and taking a car, especially not a new one, on credit is unreasonable. My salary is 24k a month, so collecting 600-700 thousand is almost impossible for me. I started looking for different ways to make money on the Internet. You can’t imagine how many scams there are, what I haven’t tried: sports betting, network marketing, and even the volcano casino, where I successfully lost about 10 thousand ((The only direction in which it seemed to me that I could make money was currency trading on the stock exchange, they call it Forex. But when I started delving into it, I realized that it was very difficult for me. I continued to dig further and came across binary options. The essence is the same as in Forex, but it’s much easier to understand. I started reading forums, studying trading strategies. I tried it on a demo account, then opened a real account. To be honest, I didn’t manage to start earning money right away, until I understood all the mechanics of options, I lost about 3,000 rubles, but as it turned out, it was a precious experience. Now I earn 5-7 thousand rubles a day. I managed to get the car buy after half a year, but in my opinion this is a good result, and it’s not about the car, my life has changed, I naturally quit my job, I have more free time for myself and my family. You’ll laugh, but I work directly on the phone)) If If you want to change your life like me, then here’s what I advise you to do right now: 1. Register on the site 2. Practice on a Demo account (it’s free). 3. As soon as you get something on the Demo account, top up your REAL ACCOUNT and go to REAL MONEY! I also advise you to download the application to your phone, it’s much more convenient to work from your phone. Download here.
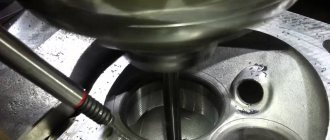
1) Check the voltage on the K-line. We set the multimeter to the mode for measuring constant voltage, connect the red probe to the K-line, and the black probe to ground to any point on the body. The readings on the device should be 12+-2V. You cannot use a lamp to check the voltage, because it has a load.
2) If on your VAZ the connector with the APS is disconnected, then check for the presence of a jumper in the APS block between pins 9 and 18.
| Those who have an on-board computer (OB) installed in their car know how useful this thing is. It happens that the message “broken K-line” appears on its screen, this means that the bookmaker is not working properly and it will no longer show some of the parameters. Do you know how to check k-line and find out the cause of the disease? |
3) The problem may be in the immobilizer (the K-line signal comes, but disappears after the immobilizer). Check for the presence of a K-line on pin 18 of the APS block. Using the same method, you can check whether there is a break between the APS block and the BC block.
4) Interference or broken wire. Try replacing the wire from the BC to the diagnostic connector with a new, shorter one.
You can also check the k-line in a service center using computer diagnostics, or by connecting a known working on-board computer to the car (see how to connect a BC). And if the k-line does not work and at the same time there are problems with starting the engine, then start checking the additional VAZ fuses.
Does your car have an on-board computer?
Lada 21099 › Logbook › Vag-com diagnostic cable for VAZ
Due to the fact that my car was shaking wildly when accelerating, I decided to buy a diagnostic cable to check the condition of the ECU, sensors and operating modes of the car itself. I have read quite a few reviews and forums about various diganotic cables for VAZ. Almost everyone wrote that diagnostic cables on the ILM 327 platform do not synchronize well with our machines. In this regard, it was decided to buy another diagnostic cable, namely Vag-com. If you believe the reviews, then this cable perfectly reads the VAZ ECU and works well with them. I know that you can buy diagnostic cables on Ebay for 200-300 wooden rubles, but I needed this cable URGENTLY and didn’t want to wait 1.5-3 months. Therefore, I found a seller of this miracle on Avito and I bought the KKL VAG-COM for 409.1 cable for as much as 1 thousand rubles. Since the VAZ 21099 has a GM12 diagnostic connector, and the diagnostic connector has an OBD II output, I also bought a GM12-OBD II adapter - 500 rubles. (Later I regretted buying it).
Here it is - the magic cable!
After purchasing the cable, I used a multimeter to check the diagnostic connector of the car using the following pinout
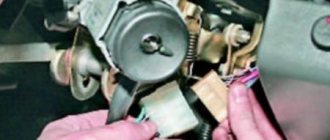
Due to the fact that there was no voltage at the M (K-line) connector, I started looking for an open circuit. Most likely, the break was somewhere in the immobolizer block, which is located in a very inconvenient place behind the dashboard and access to it is closed without disassembling the entire dashboard. I didn’t have this in my plans, so I connected the M connector (according to the diagram) directly to the 55 wire of the ECU braid. The result is a collective farm like this.
In the future, I will completely disassemble the panel and find an open circuit in the K-line and connect it according to the factory one. For now I'll go like this.
After that, I connected the adapter to the diagnostic connector of the car, and to it the cable itself and the laptop with the OpenDiagFree program. (Of all the programs I tried, this turned out to be the best and free).
The cable driver was installed on the laptop, but for some reason the ECU was not detected. For a long time I puzzled over what the problem could be. Turned out to be this:
My advice to everyone: do not buy any adapters. In my case, it turned out to not work (money down the drain). Therefore, I had to connect everything myself using ordinary wires using the OBDII pinout:
K Line connection problems
K - Line adapter ( VAG COM ) does not connect
When making a K-Line adapter yourself or purchasing it in a store, users in some cases encounter problems connecting the adapter.
This problem has two subtypes:
— Problem when connecting the adapter to a PC (with our K-Line 409 adapter, the kit includes a video instruction on how to use the device, we recommend that you read it if you have any questions)
— Problem connecting the K Line 409 (VAG COM) adapter to the car
To solve the first problem, you need to install the driver for the device located on the disk, then go to the device manager and see if your adapter is displayed correctly. If in the device manager you see your adapter in the COM ports and LPT section without any question marks, etc. then you can rest assured that the drivers are installed correctly. To be more confident, you can double-click on it to find an inscription stating that the device is working normally.
If your adapter is indicated with a question mark or is located in the other devices section, apparently you have not installed the driver and you need to reinstall it.
We select our device, select, update the driver and specify the folder with the drivers, then click next and see the installation process, otherwise select another folder and repeat the operation until we achieve success.
If you installed the driver correctly, but when connecting to the car the connection does not occur, first check the cable for functionality, to do this, install the Vasyadiagnostic program, then in the settings section select the port number on which your adapter is located and click the test button ( The car engine must be running or the ignition is on).
If you receive a message about successful detection of the adapter, the next step is to select a program for your car from the disk that comes with the adapter and diagnose it.
If you receive a message that the adapter was not found or the port is closed, then double-check the port number in Device Manager and that the device driver is installed correctly. If everything is done correctly, check the functionality of the cable on another car and another PC.
If, when connected via another PC on another car, the adapter works but refuses to work on your PC, then there may be a problem with the installed OS, antivirus, or computer components. Most often, if the cable on your PC works on another car, but refuses to work on your car, the problem is a broken K-line wire. Perhaps the wire has simply moved a little out of the block (the APS immobilizer block) and there is no normal contact. If you have checked the contacts on the car and everything is in order, but the cable still does not work, then you need to perform the following steps:
Signs of a downed UZ
If the ignition of the mixture is late or occurs ahead of schedule, then failures in the engine are guaranteed. Along with environmental requirements imposed by international organizations, car manufacturers began to reduce the power of spark-ignition engines and widely use turbocharging. CO2 emissions and combustion have been reduced, power and torque have increased, and the operating culture remains satisfactory. Contrary to popular belief, as Ford's early liter engines showed, the durability of small engines also leaves much to be desired. There are not many disadvantages to this solution.
However, over time, strange, serious piston defects began to appear in engines from different manufacturers: damaged rings, broken flanges, or even piston cracks. The problem, due to its irregularity, has proven difficult to diagnose. The only symptom that the driver observes is an unpleasant, irregular, loud knocking noise from under the hood that occurs only at idle.
Car manufacturers are analyzing the problem, but there are several factors behind the LSPI phenomenon. As with classic detonation combustion, one of the reasons is fuel with an octane rating lower than that recommended by the manufacturer. The second factor that contributes to pre-ignition is the accumulation of carbon deposits in the combustion chamber. Due to the high pressure and temperature in the cylinder, the carbon deposits spontaneously ignite. Another important factor is the phenomenon of washing off the oil film from the cylinder walls. As a result of direct fuel injection, the gasoline mist generated in the cylinder causes the oil film to condense on the piston head. During the compression stroke, high pressure and temperature cause uncontrolled spontaneous combustion even before the ignition spark occurs. The process, brutal in itself, is further aggravated by proper ignition (spark at the top of the cylinder), which increases the pressure and strength of the phenomenon.
You can determine that the optimal ignition timing is not set by the following signs:
1. Starting the engine is difficult.
2. The car consumes more fuel.
3. Motor power decreases.
4. Idling is quite unstable.
5. When the gas pressure is applied, the unit does not respond, overheating occurs.
6. Sometimes the driver hears strange sounds similar to popping noises.
All of the above signs indicate a downed OZ.
Lada 2110 Green Arrow › Logbook › Do-it-yourself diagnostics using the K-line, part 1
Aleksandr Matskovich, 29 years old I drive Lada 2110 Green Arrow Kryvyi Rih, Ukraine
Good day to everyone who is reading this entry! And so I’ll start with the fact that I don’t have an on-board computer, I have a desire to install it, but more on that later. There was an interest in identifying my car with my own hands. In one of the previous articles, I wrote that after a rainstorm I filled up the air flow sensor, the check light came on and I went for diagnostics: they charged me 100 UAH. Within 30 seconds, having discovered that the sensor does not work, it needs to be replaced. I don’t need professional diagnostics; if necessary, I’ll go to a diagnostician, and for easy diagnostics, I decided to buy a K-line scanner
VAG-Com 409.1 K – Line scanner
oh, and even though my car is from 2004, it is 1.5l and 8kl with EURO-2, and is equipped with an ODB-1 connector. I googled it: it turns out that ODB-2 was already installed but on 16kL cars with EURO-3 from earlier years. I also had to buy an adapter with
Adapter OBD-II 16pin to GM12
I ordered everything from the online store, along with the cords I received a disk with programs for diagnostics and a bunch of different information on diagnostics. I configured all the com ports on the laptop and went into the garage with the laptop to try. I plugged it in, turned on the ignition, bam, and the fuel pump immediately began to hum without stopping. Naturally, nothing happened and I abandoned the matter (and this was last year at the end of autumn). Well, it’s already warm - there is a desire to resume this business. When I rang the adapter, I didn’t really understand anything, one rings 3 at a time, some don’t ring at all, I decided to redo it all. As you know, for diagnostics via the K-line you only need 3 wires (channels): 1) potassium itself 2) +12V 3) -12V aka ground, ground
I would like to note that in the figure above the contacts on the adapter are drawn as they should be, and not on the adapter or block! So imagine applying the adapter and think about where the contacts on the adapter and block should be, here is the picture below
location of K-line contacts on the blocks
Lamaaat adapter! Well, what can you do, the design is not collapsible (breaking the connector turned out to be not an easy task))) the black body is very hard, everything inside is still filled with white plastic. 4 wires are soldered, everything is called where which goes to the adapter where is the K-line, +12 and ground, the fourth, judging by the continuity, is the L-line, which we do not need. I’ll connect these 3 wires directly to the diagnostic block and try to connect to the ECU again! Good luck for me! Read the continuation!
Price tag: 300 UAH
Those who have an on-board computer (OB) installed in their car know how useful this thing is. It happens that the message “broken K-line” appears on its screen, this means that the bookmaker is not working properly and it will no longer show some of the parameters. Do you know how to check k-line and find out the cause of the disease?
Most often, the solution to the problem really lies in breaking the K-line wire. That is, the wire has simply moved slightly out of the block (the APS block of the immobilizer, or the BC block) and there is no longer any contact. If you have checked all the contacts, but the on-board computer still does not see the K-line wire, then you can proceed as follows:
1) Check the voltage on the K-line. We set the multimeter to the mode for measuring constant voltage, connect the red probe to the K-line, and the black probe to ground to any point on the body. The readings on the device should be 12+-2V. You cannot use a lamp to check the voltage, because it has a load.
2) If on your VAZ the connector with the APS is disconnected, then check for the presence of a jumper in the APS block between pins 9 and 18.
3) The problem may be in the immobilizer (the K-line signal comes, but disappears after the immobilizer). Check for the presence of a K-line on pin 18 of the APS block. Using the same method, you can check whether there is a break between the APS block and the BC block.
4) Interference or broken wire. Try replacing the wire from the BC to the diagnostic connector with a new, shorter one.
Detonation combustion
During detonation combustion, a spark ignites the mixture near the spark plug, which simultaneously compresses the remaining mixture. The increase and increase in pressure and temperature cause spontaneous combustion and ignition of the mixture at the opposite end of the chamber. This is a chain reaction of detonation leading to high combustion speeds exceeding 1000 m/s. This causes a characteristic knocking sound, sometimes the sensation of a metal bell. This process exposes pistons, valves, connecting rods and other elements to thermal and mechanical stress. Ultimately, ignoring detonation causes the need for engine repair.
Back in the 80s of the last century, engineers dealt with this harmful phenomenon by installing a piezoelectric knock sensor. Thanks to this, the control computer detects a dangerous phenomenon and selects a normal ignition timing in real time, which eliminates this problem. However, today the phenomenon of detonation combustion is returning in the dangerous form of pre-ignition at low engine speeds. Let's analyze how technological advancement has brought back forgotten threats in the automobile industry.
break to the line VAZ 2110
Hello everyone. Auto VAZ 21102, late 2003. I've owned the car for exactly a year, the problems appeared about 2-3 months ago. The point of creating a topic is that I don’t want to immediately go to the service station, because maybe someone has encountered a problem and it can be solved simply.
First things first: 1. Three or four months ago, the check light started to light up from time to time, BC (State) gave the error K-line break. I worked closely on the car, changed a lot of things after the purchase, but I never got around to electrics, I confess.
2. Three months ago the error K-line break appeared very strangely - sometimes 10 times a day, sometimes I drove for a week without receipts. 3.
Two months ago, another error began to appear from time to time, I don’t remember the number, but according to the decoding - Broken line DD (Knock Sensor) 4. Around the same time, terrible confusion began to happen with the battery (it was very old) - I bought a new battery (not very expensive , but in any frost it turned well, did not bring it home). Here's the problem. I park the car in the evening, sound the alarm, everything is ok. When I come in the morning, the car beeps, indicating that the alarm has gone off. Pantera alarm.
The battery drains very badly, to the point that it is impossible to start the car in the morning, the relay clicks, but the starter does not turn. Sometimes it happens that the alarm does not go off, but the battery still goes to zero. So it goes.
The last few days I have been disconnecting the battery at night so that I am not late for work in the morning. I understand that I need to go to the station and carry out diagnostics. But work, time, money.
Naturally, if the problem is not solved by my efforts with the information support of Saratov residents, I will still go to the service station, then I will write down what the problem was. But it would be very cool if I found the reason and solved the problem myself. I bought a knock sensor (Boshevsky, for 600+ rubles), I’ll change it tomorrow, the error will most likely disappear. But I have no idea what to do with the rest. Taken from. https://www.autosaratov.ru.
Things are like this. Yesterday I stopped at a gas station, stood in line, and turned off the engine. When it was time to start - FUCK! I turn the key to the first position,
When converting foreign-made cars to an ECM with an ECU January 5.1, there is a need to install a knock sensor from the same
Hello everyone, a friend of mine has this problem, can anyone tell me what it is? Auto VAZ 2112 2002, 1.5 16V mileage at the time of purchase 91000, at the moment
Things are like this. Yesterday I stopped at a gas station, stood in line, and turned off the engine. When it was time to start - FUCK! I turn the key to the first position,
Hello, I bought a VAZ 21124 3 months ago, drove it for a month and decided to change the filter and oil. Consumables in general. The first thing I did was change the air
Consequences of incorrect management
By understanding what the OPD affects, the driver can learn about the consequences. It is clear that early and late ignition negatively affects the performance of the engine. And the fuel consumption and power of the power unit also depend on the fuel consumption here.
To determine the angle, you need to know the following factors:
1. The higher the engine speed, the earlier the ignition angle should be.
2. The lower the engine temperature, the slower the combustion will be.
The higher the engine speed, the earlier the OZ is required. This is necessary to prevent detonation.
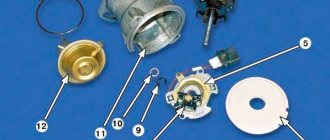
VAZ 2110 on-board computer block and self-installation
On-board computer block
Today, the era of high technology has fully arrived, which can greatly simplify the quality of life of each person, including motorists. The VAZ 2110 on-board computer block is an effective step in modernizing a car from the national automobile industry. The owners of the first VAZ 10s could not even dream that they would ever have the opportunity to equip their unit with a high-tech on-board computer. The on-board computer socket for the VAZ 2110 is a very convenient solution that allows you to independently install the control robot on the car.
Premature combustion
The LSPI (pre-ignition) phenomenon is a relatively new concept in the automotive industry. It is a derivative of detonation combustion, which the automobile industry finally addressed with the development of spark-ignition internal combustion engines. Paradoxically, technological developments and downsizing have seen knock combustion return to the dangerous form of LSPI (Low-Speed Pre-Ignition), which means pre-ignition at low engine speeds. Let us remind you what detonation combustion is in a spark ignition engine. During the correct combustion process, just before the end of the compression stroke (ignition timing), the fuel-air mixture is ignited by a spark from the spark plug and the flame spreads through the combustion chamber at a constant speed of 30-60 m/s. Exhaust gas is formed, as a result of which the pressure in the cylinder increases to 60 kgf/cm2, then the piston moves backward.
Algorithm for performing self-installation of an on-board computer
- first you need to free the central dashboard of the car from the plug;
Connection block for on-board computer VAZ 2110
- after which, on the central dashboard you will need to find a diagnostic block of 9 contact wires;
- A 9-pin block is found on all VAZ “tens”;
- then, you need to connect the car’s on-board computer to the block.
Note. You must remember to draw the so-called K line.
Algorithm for drawing line K
- It is imperative to use a pre-prepared meter wire in order to establish the appropriate connections;
Brake pads for VAZ 2110 included
- the prepared wire must be inserted into the block, and specifically into the second contact;
- the other end of the pre-prepared wire must be connected to the diagnostic block, having first pulled it under the dashboard.
Note. In order to easily install the wire, you need to temporarily turn the right side of the dashboard to one side.
- after the corresponding wire reaches the diagnostic block, it will need to be connected to the “M” socket;
- Now you can connect the on-board computer with complete confidence by installing it in the appropriate place;
- The final step is to conduct a full check of the functionality of the on-board computer.
Note. Before you begin installing any car computer, you should read the attached recommendations. Since there are many completely different models of car on-board computers, some of them require certain installation specifics.
What systems need to be adjusted?
The adjustment process depends on the design of the ignition system. In the contact system, a centrifugal and vacuum regulator is used to maintain the required SOP in all modes of engine operation. As for contactless ignition, its operation is no different from the contact type. In his classes, the driving instructor in Balashikha will explain that in electronic ignition, the formation and distribution of pulses is assigned to electronic devices. In this case, the ignition system is configured during design and testing at the production stage. To make changes later, you will need special equipment. In the first two cases, the installation of the SPD is achieved through the correct positioning of the distributor runner relative to the cylinders at the end of ignition.
| Tweet |
Practical recommendations regarding choosing an on-board computer
VAZ 2110 on-board computer block
Objectively, it is necessary to understand that the quality and efficiency of a car’s on-board computer directly depends on its market value. From a practical point of view, the best way to choose an on-board computer is the advice of friends of motorists who have previously purchased one.
ELM327
Separately, we will introduce you to the ELM327 adapter, with the help of which many VAZ 2110 owners perform full diagnostics on their own.
ELM327 is one of the latest OBD developments. This scanner is used to check cars using a computer. The key advantage is that the device supports all known OBD protocols and interacts with many diagnostic programs. A USB cable is used to connect the device to a computer.
ELM327
The software for the ELM327 is mostly free, although some software is available only for a fee.
The adapter can work on computers with different OS. Namely:
The full capabilities of the scanner can only be fully realized through properly selected software. For self-diagnosis, software for scanning the transmission and engine is available free of charge. Commercial versions of the programs allow you to additionally check other components of the car.
Key Features
Let's take a look at the capabilities that the ELM327 chip provides:
Many vehicle operating parameters must be checked while driving. Not all adapters are suitable for this, so it is important to choose equipment that suits your requirements.
Equipment
By purchasing this adapter, you get:
It is not necessary to have a powerful computer to operate the adapter and receive information. The parameters of the simplest laptops are quite enough to diagnose the VAZ 2110.
Self-diagnosis allows you to save a lot of money, get objective information about the condition of your car, and also save yourself from unnecessary financial costs that will certainly appear when you go to a service station.
Possible causes of malfunction of the on-board computer and the main ways to eliminate them
One of the most common reasons is a lack of communication with the controller or line-K. What does the current error indicate and what needs to be done:
- the appearance of this error directly indicates a broken contact, or a poor connection of line-K with the additional block;
- The first thing you need to do is check line K according to the diagram;
- in most cases, the cause of this malfunction is a contact break between line-K and the diagnostic block.
Where is the diagnostic connector for the VAZ-2114
VAZ 2108-2115 with a “European panel”, the diagnostic connector is located in front of the gearbox, directly under the cigarette lighter. The block is closed with a decorative cover. On injection models since 2002, a 12-pin rectangular connector has been used.
The location of the connector is indicated on the diagram in position No. 8 . The following are visual photos of the diagnostic block.
Photo of the block location:
Connector type No. 1—16-pin OBD-II connector in the shape of a trapezoid:
Brands and years: some models after 2002 with control systems BOSCH MP7.0 Euro-3, BOSCH M7.9.7, January-7.2, January-7.3.
Connector type No. 2 - 12-pin rectangular connector: Make and year: all injection models, except for some models after 2002 that have an OBD-II connector
K line VAZ 2110
Archival article. 2001 – 2003.
To connect the car to a personal computer, it is necessary to purchase or manufacture a communication interface between the COM port and the K‑LINE diagnostic connector.
The first message on the screen of diagnostic equipment or a computer that causes panic among beginners is usually something like “No connection”, “No controller response” or something similar, but no less intriguing. The motor tester, for example, begins to offer options - from unconnected power to a hardware malfunction of the adapter. It’s good if the car with the immobilizer was the first to arrive for diagnostics and you are sure that everything is in order with the adapter. The reason for the lack of communication on cars without immo is trivial and is possible only in the domestic auto industry - a break in the diagnostic line running from the diagnostic connector to the ECU. The immobilizer uses K‑Line to communicate with the ECU and is included in the diagnostic line break. If the immobilizer is not installed, then the diagnostic line hangs in the air and there is no connection with the computer. Apparently there was supposed to be a plug in this place, but... To restore communication, you just need to install a jumper between pins 9 - 1 and 18 of the immobilizer connector (or install the immobilizer) as shown in the figure. In practice, to preserve the functions of smooth dimming of light, and simply to scare away pioneers, these two wires are cut and spliced, leaving the immo in the connector.
GAS diagnostic connector.
1 + 12 V 2 + 12 V from battery 10 L‑Line 11 K‑Line 12 Weight
Diagnostic connector VAZ
| A – GND B – L‑Line (may not exist) M – K‑Line G – Fuel pump control. |
| H – 12 V. Constant with battery through fuse. /may not be. |
Location of diagnostic pads
VOLGA - under the hood, on the wall of the engine compartment, on the passenger side VAZ 2110 - to the right of the driver, next to the steering column of the VAZ 2109 Low panel - on the shelf under the glove compartment, next to the VAZ 2109 ECU High panel - behind the center console. VAZ 2108 – 2115 “Europanel” – on the “dashboard”, closed with a hatch. Chevrolet Niva - OBD-II, near the ignition switch, partially covered by the steering cover. VAZ 11183 “Kalina” – Under the niche for small items next to the gearshift knob. VAZ 21126 “Priora” - behind the “glove compartment”.
| Assignment of diagnostic block contacts |
| 14 – CAN Low (J‑2284) 15 – ISO 9141 – 2 L Line 16 – Battery Power |
| Chevrolet Niva - the control unit is located in the area of the front passenger's feet. Access to the harness is only possible with the glove box removed; to remove the unit, you need to dismantle the glove box (“glove box”) and unscrew the fuses from the unit. To rewrite, the unit does not need to be unscrewed if there is a cable of sufficient length. |
| VAZ 21126 "Priora" |
Connector for connecting diagnostic equipment to VAZ cars (old type, analogue GM)
To connect diagnostic equipment to the block, you can use a pin contact of the appropriate diameter, but it is much more convenient to make a specialized connector.
This design was developed by NPP NTS to connect its diagnostic equipment. In a slightly modified form, these connectors can be found at car markets in Togliatti. This drawing was produced and provided by ©AIST
The connector shown in the photo can be purchased in Togliatti at the “Plamya” car market. It is made quite well and has one undoubted advantage - the presence of a fairly large amount of free space. For example, I could easily fit the k-line adapter in it. The result is a compact adapter for a laptop.
But such a block for connecting to the dianostics connectors can be ordered online on the website of the Togliatti company ZAPCHAST - SERVICE. The block is a plastic double-sided connector, on one side of which there is a connection to the standard VAZ diagnostic block, on the other - OBD II. I have already ordered them several times, delivery by parcel post (to Volgograd) within a week.
How to make connectors for connecting to diagnostic connectors yourself? Sany 77 shares its manufacturing experience – download detailed instructions
Now a little about the cord. NPP NTS, for example, equips its KR-2 adapters with a 3-wire harness 5 meters long, two supply power (“+” and “-” from the battery, crocs) and one unshielded signal wire connected in the block to the “M” contact " When making the cord yourself, you need to keep in mind that when using high-quality shielded wire, the length can be increased to 15 m, and that a system with a separate power supply was chosen due to the fact that in older types of wiring power was not supplied to the diagnostic block - at present Now you can connect everything directly to the block. The photographs show “replacement” cords for VAZ and GAZ with power supply from the adapter from the diagnostic block.
And, undoubtedly, the most convenient to use when using a laptop is a block with a built-in K‑Line adapter. The adapter shown in the photo on the left is actively used for diagnostics and work with the engineering ECU J 5 On-line tuner together with an IBM Thinkpad P‑II/ 366 laptop. A diagnostic block of this type can be found in Tolyatti, the Flame market, or you can make it yourself.
In conclusion, here is the pinout of the adapters:
1 . The most popular K‑Line from chiptuner.ru - it fully corresponds to the pinout of the KR‑2 adapter from NPP NTS: 2‑K-Line, 4, 5 + power, 8, 9 – GND.
2. Adapter K‑Line v. 1 . 7: 9 ‑pin from Auto Electrician: 1 – K‑Line, 4 – K‑Line ground, 5 – power ground, 8 – power plus.
3. Adapter K‑L-Line v. 2. 1 (and from USB K‑L-Line) from Auto Electrician: 1, 14 – K‑line; 13, 25 L‑Line; 17, 18 + 12 V; 21, 22 GND; 3 – J 1850 Bus+
OBD 2 connector
OBD 2 is an international diagnostic standard. It regulates the requirements for diagnostic equipment, unifies error codes - in general, almost everything related to diagnostics.
The VAZ 21099, produced since 2002, began to install a diagnostic connector that complies with the OBD 2 standard. Externally, it differs from the VAZ one in its trapezoidal shape:
You can carry out diagnostics on the injection VAZ 21099 using a car scanner (for example, based on the elm 327 processor). This is done with the preliminary installation of an application sold with a licensed scanner, even using a smartphone. By logging into the installed application, you can easily set error codes and also delete them.
True, the market is flooded with Chinese products that “do not see” the ECU of domestic cars, so you have two options:
If you have an “old” GM12 block on your car, then the following adapter will help you connect to the scanner or cable:
However, in cases where you need to output errors to the computer, but there is no adapter, you can connect by independently connecting to any of the connectors for diagnostics, using the following correspondence diagram:
Source
Chevrolet Niva error codes. Carrying out diagnostics.
Every modern car owner knows about the existence of an on-board computer, which can not only indicate the basic parameters of the operating mode (speed, consumption, temperature), but also recognize errors caused by various malfunctions. Unfortunately, Chevrolet Niva error codes cannot be deciphered without additional tables, since there are too many of them. Let's consider various diagnostic methods.
We receive the first signal about the presence of a malfunction using the indicator on the “Check-Engene” panel.
After turning on the ignition, all systems are tested, and if no errors are detected, this indicator goes out. Otherwise it remains burning. Specialized centers will quickly identify the error and not for free, but the Chevrolet Niva has a built-in on-board computer that can allow you to deal with the problem yourself.
How to read fault codes in a VAZ 2109 car
When reading fault codes with a lamp, contact B, in the diagnostic block, is connected to the “ground” to which contact A is connected.
Marking of contacts in the diagnostic block of a VAZ 2109 car
The photo shows the markings of the contacts of the VAZ 2109 block, the same markings and the VAZ 21093 blocks. A - connects to ground; B – serves to supply a signal to the ECU; controls the electric fuel pump contact – G; information is provided by contact M. When connecting contacts A and B, the key in the ignition switch of the car must be turned to the ignition position - I, the engine should not be running. Under these conditions, the “CHECK ENGINE” lamp should flash code 12 three times in a row. The procedure is as follows:
Code “12” indicates the operation of the system, which indicates that there is a breakdown in the diagnostic system itself. After code “12” is displayed, the “CHECK ENGINE” lamp lights up the fault codes three times; if there are any, if there are no faults, code “12” is displayed. When several fault codes are stored in the computer's memory, each one should be displayed three times.
Tip: Upon completion of the diagnostics, contacts A and B on the device can be opened 10 seconds after turning off the ignition on the VAZ 2109 car.
The table shows the ECU error codes for the VAZ 2109 car
| Code | Fault name |
| 12 | Malfunction in the diagnostic circuit of the control lamp |
| 14 | Increased signal level of the sensor indicating the coolant temperature |
| 15 | Reduced signal level of the sensor indicating the coolant temperature |
| 16 | Increasing voltage in the on-board network |
| 17 | Reduced voltage in the on-board network |
| 19 | Incorrect signal in the crankshaft position sensor |
| 21 | Increased voltage in the throttle position sensor signal |
| 22 | Reduced voltage in the throttle position sensor signal |
| 24 | No signal from the vehicle speed sensor |
| 27 | Increased level in the CO potentiometer signal |
| 28 | Reduced level in the CO potentiometer signal |
| 33 | Incorrect signal in the mass air flow sensor (a high signal frequency appears at the sensor output) |
| 34 | Reduced signal frequency generated at the output of the sensor indicating mass air flow |
| 35 | Idle speed fluctuations |
| 43 | Faulty knock sensor signal |
| 51 | Error in the programmable read-only memory (PROM) |
| 52 | Error in the electronic control unit (ECU) |
| 53 | Error occurring in an electronic programmable memory device (EPROM) |
| 61 | Immobilizer error |
Unexpected codes may be found when reading codes. In this case, they are assumed to be caused by an intermittent failure and can help diagnose the system.
Diagnostic equipment
Before purchasing a scanner for diagnostics, you should clarify which ECU is installed on the car.
Existing diagnostic adapters can be divided into the following groups:
- USB scanners. They are based on a COM-USB (RS232) converter. Their main disadvantage is that they only work with PC software. In addition, they are large and limited by cable length.
USB scanner with disk Bluetooth scanners. They are based on the ELM327 microchip. They are small in size and do not require a cord to connect. Can be equipped with a power button. You can connect a large number of devices to them: tablet, laptop, smartphone, computer and other devices. If your computer does not have a Bluetooth module, you can buy a USB-Bluetooth adapter. The advantage of these scanners is that they do not require driver installation. Bluetooth adapter for cars Wi-Fi scanners are designed to connect iOS devices. These include iPhone, iPad or iPod. At the same time, they can work with devices that have a different platform: PC, Windows mobile/CE, Android, Windows mobile/CE. They can have different sizes, a power button. In addition, they have a longer range than Bluetooth scanners. Car Wi-Fi scanner Most VAZ models are equipped with control units with a K-line. Therefore, the best choice is the VAG-COM diagnostic adapter or the K-Line diagnostic adapter.
Chevrolet Niva error reset
The standard procedure for resetting the controller occurs only after all faults have been completely corrected, otherwise annoying encryption will appear again. The procedure is performed in two available ways.
- Disconnect the battery from the on-board network for 10-15 minutes. The controller will completely reboot and return to factory default settings.
- In the BC menu, enter the “errors” service, press the daily mileage reset button and wait for the sound signal from the car, and horizontal lines should appear on the display.
The most common Niva Chevrolet computer errors are found in 90% of car diagnostic cases. There are also a large number of rare failures that are not included in the list due to their low prevalence.