Sooner or later, any driver is faced with such a concept as ignition timing. It plays a big role in the operation of the engine and the engine as a whole. Many drivers are interested in what the ignition timing should be, why it goes astray, and whether it is possible to set it yourself. This is a really serious issue, since adjusting the angle helps to avoid various difficulties when starting the engine. Let's look at what the UOP is and why it is worth setting it correctly. But first you need to consider how the ignition system in a car as a whole works.
What is UOZ?
As already mentioned, the UOP is the moment of ignition of the fuel assembly in the combustion chamber when the piston approaches the dead top point. The angle must be set correctly, as it greatly affects the functioning of the power unit. The efficiency of the “engine” and overall efficiency also depend on the angle. Thus, it is the ignition timing that affects the operation of the internal combustion engine. After a small “explosion,” the gases expand and the piston continues to move. The process is quite fast, but very complex.
Checking for correct installation
After setting the angle is completed, it is necessary to check:
- Warm up the power unit to operating temperature and drive onto a flat, straight section of the highway.
- Accelerate with gear shifts up to a speed of 50 km/h.
- Stabilize the movement, and then sharply press the throttle pedal.
If the settings are correct, a brief knock will appear, indicating detonation combustion of the mixture. The absence of sound indicates a delay in the pulses, and prolonged detonation indicates an early spark. In this case, it is necessary to make additional adjustments and recheck the result.
Premature combustion
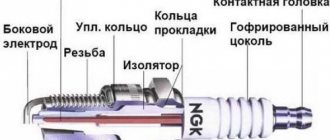
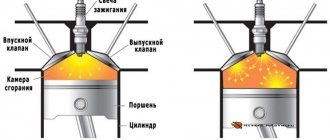
The LSPI (pre-ignition) phenomenon is a relatively new concept in the automotive industry. It is a derivative of detonation combustion, which the automobile industry finally addressed with the development of spark-ignition internal combustion engines. Paradoxically, technological developments and downsizing have seen knock combustion return to the dangerous form of LSPI (Low-Speed Pre-Ignition), which means pre-ignition at low engine speeds. Let us remind you what detonation combustion is in a spark ignition engine. During the correct combustion process, just before the end of the compression stroke (ignition timing), the fuel-air mixture is ignited by a spark from the spark plug and the flame spreads through the combustion chamber at a constant speed of 30-60 m/s. Exhaust gas is formed, as a result of which the pressure in the cylinder increases to 60 kgf/cm2, then the piston moves backward.
Doctrine of mixture combustion
Its ignition and combustion is more than just a chemical process. This is a whole section of theory. For example, if you delve a little deeper into this area of science, you will know that from a small spark discharge on a candle, a flame front begins and spreads into the combustion chambers. It is known that the duration of a spark is no more than one meter per second. During this time, temperatures can reach ten thousand degrees. The volume of the mixture that ignites is destroyed in an instant.
It has been proven that the burning rate is actually low. However, as the flame increases, the burning rate also increases by 70-80 times. Residues of the mixture, which are not completely removed due to the fact that they are located near the rather cold walls of the cylinder, burn more slowly. In this case, the crankshaft rotation angle is 30 degrees.
At different ignition timing positions, combustion is significantly different. With the correct OZ, the optimal pressure is supplied to where the piston is just passing TDC. This is approximately 10-12 degrees.
If the OZ is knocked down and installed in a later direction, then the most optimal gas pressure is in the 45 degree zone - the piston here is in an even lower position. The gases press on the already descending element. The efficiency of such an engine is reduced to zero.
With a late ignition timing, the fuel may burn out after the exhaust valves open. The gases produced after the explosion have a very high temperature. They can easily provoke the ignition of a new portion of the mixture that enters the cylinders. At this moment, you can hear characteristic popping sounds in the muffler.
Early ignition is not all good. In this case, the maximum pressure occurs already at the piston position at TDC or earlier. The combustion products put pressure on the piston, which has not yet reached the highest point. As a result, power drops, detonation and other unpleasant moments appear.
Detonation combustion
During detonation combustion, a spark ignites the mixture near the spark plug, which simultaneously compresses the remaining mixture. The increase and increase in pressure and temperature cause spontaneous combustion and ignition of the mixture at the opposite end of the chamber. This is a chain reaction of detonation leading to high combustion speeds exceeding 1000 m/s. This causes a characteristic knocking sound, sometimes the sensation of a metal bell. This process exposes pistons, valves, connecting rods and other elements to thermal and mechanical stress. Ultimately, ignoring detonation causes the need for engine repair.
Back in the 80s of the last century, engineers dealt with this harmful phenomenon by installing a piezoelectric knock sensor. Thanks to this, the control computer detects a dangerous phenomenon and selects a normal ignition timing in real time, which eliminates this problem. However, today the phenomenon of detonation combustion is returning in the dangerous form of pre-ignition at low engine speeds. Let's analyze how technological advancement has brought back forgotten threats in the automobile industry.
Contactless ignition
If there is a strobe, then it is connected to the device according to the instructions. Typically, most devices have three power wires that connect to the battery, and a signal wire. The latter is connected to the spark plug on the first cylinder.
The ignition timing is set at idle, but with the engine well warmed up. This is done as follows. A strobe light is connected, and its lamp is pointed at the flywheel - there are marks on it. It is better to find these marks in advance by turning the engine by the wheel with fifth gear engaged. The required mark is marked with a clerical proofreader. The strobe light will flash and the mark will appear motionless when shined on it. By rotating the distributor, ensure that the mark is in one place opposite the ebb on the flywheel housing. The VAZ ignition timing according to the passport is plus or minus one degree.
Often, after such tuning, the engine runs stably and well. Fuel consumption drops and dynamics improve. But this is not always the case. In this case, it is necessary to adjust the ignition for detonation.
Signs of a downed UZ
If the ignition of the mixture is late or occurs ahead of schedule, then failures in the engine are guaranteed. Along with environmental requirements imposed by international organizations, car manufacturers began to reduce the power of spark-ignition engines and widely use turbocharging. CO2 emissions and combustion have been reduced, power and torque have increased, and the operating culture remains satisfactory. Contrary to popular belief, as Ford's early liter engines showed, the durability of small engines also leaves much to be desired. There are not many disadvantages to this solution.
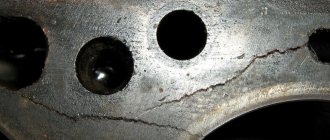
However, over time, strange, serious piston defects began to appear in engines from different manufacturers: damaged rings, broken flanges, or even piston cracks. The problem, due to its irregularity, has proven difficult to diagnose. The only symptom that the driver observes is an unpleasant, irregular, loud knocking noise from under the hood that occurs only at idle.
Car manufacturers are analyzing the problem, but there are several factors behind the LSPI phenomenon. As with classic detonation combustion, one of the reasons is fuel with an octane rating lower than that recommended by the manufacturer. The second factor that contributes to pre-ignition is the accumulation of carbon deposits in the combustion chamber. Due to the high pressure and temperature in the cylinder, the carbon deposits spontaneously ignite. Another important factor is the phenomenon of washing off the oil film from the cylinder walls. As a result of direct fuel injection, the gasoline mist generated in the cylinder causes the oil film to condense on the piston head. During the compression stroke, high pressure and temperature cause uncontrolled spontaneous combustion even before the ignition spark occurs. The process, brutal in itself, is further aggravated by proper ignition (spark at the top of the cylinder), which increases the pressure and strength of the phenomenon.
You can determine that the optimal ignition timing is not set by the following signs:
1. Starting the engine is difficult.
2. The car consumes more fuel.
3. Motor power decreases.
4. Idling is quite unstable.
5. When the gas pressure is applied, the unit does not respond, overheating occurs.
6. Sometimes the driver hears strange sounds similar to popping noises.
All of the above signs indicate a downed OZ.
Installing the correct OZ on the injector and diesel engine
With an injection engine everything is also extremely simple. In this case, you should turn on the ignition and look at the instrument panel. If a light comes on on it, indicating a malfunction, then we take a laptop with a special program, connect it to the on-board computer and carry out diagnostics.
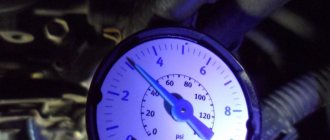
At the next stage, the throttle device is subjected to a thorough visual inspection. It is also recommended to check the voltage of the on-board network and the sensor that regulates the throttle position. They must comply with the standards. Thus, the optimal voltage for the sensor is considered to be in the range of 0.45–0.55 V, and for the network – 12 V. The damper opens only 1%. We sharply press the gas pedal. The throttle opening should exceed 90%, and the sensor voltage will drop to 0.45 V. Otherwise, it is necessary to urgently adjust the ignition timing.
Checking the throttle position sensor voltage
Carry out all work using non-conductive rubber gloves, as most elements are live.
Setting the angle begins with the fact that we disconnect the vacuum hose from the engine. Then we connect the positive clamp of the strobe to the positive terminal of the battery. The ignition is adjusted by switching the ground clamp, connecting it to the negative terminal and pulling the wire out of the cylindrical socket on the distributor cover. We insert the strobe sensor into the vacant space, simultaneously connecting it to the wire of the first cylinder of the power unit. Next, we start the engine and direct the beam from the strobe to a special hatch. A mark will appear on the flywheel; its optimal location is between the divisions. If this is not the case, then set the angle by slowly loosening the nuts securing the flywheel distributor.
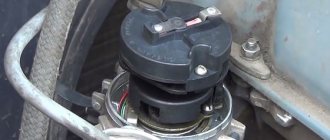
Strobe
Adjusting the ignition timing on a diesel engine is also not difficult. But this operation should not be underestimated, since a diesel engine can only operate when the fuel is completely burned. This will not happen with an incorrectly set ignition angle. The main difference of this system is the absence of candles. Basically, all actions are the same as for gasoline engines. Only in this case it is necessary to remove the decompression mechanism, the engine meter and the body of the neck through which the oil is poured. Be sure to check the fuel supply level. To do this, move the corresponding lever to the extreme position, install the torque scope and slowly turn the crankshaft.
Consequences of incorrect management
By understanding what the OPD affects, the driver can learn about the consequences. It is clear that early and late ignition negatively affects the performance of the engine. And the fuel consumption and power of the power unit also depend on the fuel consumption here.
To determine the angle, you need to know the following factors:
1. The higher the engine speed, the earlier the ignition angle should be.
2. The lower the engine temperature, the slower the combustion will be.
The higher the engine speed, the earlier the OZ is required. This is necessary to prevent detonation.
Consequences of an incorrectly set ignition
With early or late ignition, symptoms are observed:
- drop in engine power and vehicle acceleration dynamics;
- difficulty starting the engine (the problem progresses as the air temperature drops);
- increased fuel consumption;
- unstable operation in idle mode;
- overheating and combustion of the working mixture in the collectors;
- the appearance of engine detonation during fuel combustion, destroying pistons and rings.
Late or early ignition increases fuel consumption.
Why does it crash?
Failure of the OZ is a common problem. The parameters that have already been set are often not suitable for the conditions in which the machine is operated. Specific conditions require a specific angle. It can be set manually.
But before issuing a SOP, it is worth making sure that the interventions are really needed. It is better to conduct a hearing test yourself. For example, accelerate the car to 40 km/h and brake sharply in fourth gear.
Detonation sounds with normal acceleration indicate that there is no need to interfere with the work and change the angle. If the sound remains, the car does not accelerate, which means the ignition has failed. If the detonation still does not disappear, then the OZ is early, and the ignition is late.
You can set the advance angle yourself using a strobe device. For contactless ignition, you can set it up by ear and check the operation using the method described above.
ADDITIONAL PROGRAM FUNCTIONS
In addition to the above-described regulation of the ignition timing, the program has a number of additional functions that somehow improve engine performance.
Optimization of spark formation.
The program has a function to turn off the coil - if there is a constant low level at the input of the GP5 controller, after 2-3 seconds the output of GP1 is set to a high level. If GP5 is constantly high, the program generates multi-spark trigger pulses (see below).
In the range from 370 to 2000 rpm. the program generates an accumulation time of 12 ms; in the range above 2000 rpm. – maximum possible accumulation time. This allows you to obtain spark energy sufficient to reliably ignite the mixture in all engine operating modes and use the B117A ignition coil more efficiently. The heating of the coil at low speeds is reduced, and maximum speeds are easily achieved regardless of the gap in the breaker contacts.
Multi-spark start.
In the range from 0 to 370 rpm. Instead of one ignition pulse, the program generates a series of pulses with the following parameters: 2.3 ms is allocated for the spark, 12 ms for energy accumulation in the coil. The slower the starter rotates the crankshaft flywheel (CF), the more sparks occur each time the breaker contacts open (high level at the GP5 input). Multi-spark starting guarantees engine starting in severe frost, carbon deposits on spark plugs and flooded spark plugs.
Adjustment of OZ.
This version uses an additional ADC channel AN0, which can be used to shift the SCR by ±10 degrees relative to the original characteristic (Fig. 1).
The correction value is set by potentiometer R4. Instead of R4, in practice it is more convenient to use a switchable voltage divider. When the voltage at input AN0 changes from 0 to +5 V, the graph in Fig. 1 is shifted from –10 to +10 degrees relative to the original. At a voltage equal to 1/2 the microcontroller supply voltage (+2.3 V), the graph corresponds to Fig. 1. This channel can be used to regulate the SOP on a cold and warm engine - control from the choke button. Potentiometer R1 shifts the OZ by +5 degrees when the “suction” is extended on a cold engine (after setting R1, it is better to replace it with two constant resistors). Potentiometer R2 allows you to adjust the SOP manually with the air damper fully open (on a warm engine). The dependence of the voltage on the potentiometer sliders on the angle of rotation is nonlinear. R2 is located inside the car, which allows you to adjust the OZ on the go.
Maintaining XX speed.
This version of the program has a function for maintaining idle speed (idle speed) 930 rpm. To do this, on a warm engine (the headlights must be on), use the carburetor adjustments to set the speed to XX 900–930 rpm. When the idle speed deviates from 930 rpm. the program changes the SOP in the range from 7 to 14 degrees, setting the KV speed to 930 rpm. (correction along the AN0 channel is also taken into account and added to the range of 7–14 degrees). In practice, after appropriate adjustment, the speed remains constant when turning on/off the high beam headlights, heated glass and other consumers combined. Previously, you can turn off the “choke” when the engine warms up. You can get stable idle speeds with a lean fuel mixture. On a flat road, the engine “pulls” without jerking or jerking when the gas pedal is released in 1st, 2nd, 3rd and for a short time in 4th gear (this makes it easier to drive in icy conditions, in traffic jams, when driving over bumps - “riding tight”).
Adjustment for vacuum sensor.
The program has a function for automatically adjusting to the range of vacuum changes in the engine intake manifold, which simplifies the setup of a homemade vacuum sensor, and also allows you to use an industrial absolute pressure sensor (DAP 45.3829). The program independently determines the type of discharge sensor (by the maximum voltage at input AN2), therefore, in order not to mislead the program, do not configure the homemade sensor for a voltage greater than 2.3 V.
When using a homemade inductive vacuum sensor, the setting is reduced to setting the maximum voltage at the ADC input in the absence of vacuum and the minimum voltage at maximum vacuum (Fig. 2). To ensure greater accuracy in the formation of the SPD (in accordance with Fig. 1), the inductive sensor should be configured so that the maximum voltage at the ADC input is from 1.5 to 2.3 V, and the minimum is equal to or less than 0.9 V.
Rice. 2. Setting up a homemade inductive vacuum sensor.
The sensor is configured by selecting C3 and R10 before installing the unit on the car. Vacuum is simulated by moving the rod of the vacuum chamber from one extreme position to another.
How to counteract?
First, follow the manufacturer's recommendations for the minimum octane number of gasoline used. If the manufacturer recommends 98 octane fuel, be sure to use it. The apparent savings will quickly be offset by the need for a major overhaul immediately after the first few series of pre-ignition. You only need to refuel at certain stations. Using gasoline of unknown origin increases the risk that the fuel does not maintain the intended octane rating.
Another issue is regular oil changes, at intervals of 10-15 thousand kilometers. Oil producers have already adapted products in an attempt to counteract the LSPI phenomenon. There are oils on the market that promise to counteract the phenomenon of premature combustion within specifications. In laboratory tests, it was found that removing calcium particles from the oil contributes to this. Substitution with other chemicals has reduced the risk of this problem. Therefore, if the engine is of low power, anti-LSPI oil is used, while respecting the SAE and API specifications specified by the vehicle manufacturer.
How to set the OZ in a car with LPG or entrust this task to a CVT
Lately, gas equipment (GBO) has gained many fans. And all thanks to efficiency, because such fuel is much cheaper than gasoline or diesel fuel. It should be noted that gas consumption is somewhat higher, and the combustion of the fuel-air mixture lasts longer and occurs at the exhaust stage. You can adjust these parameters; you just need to adjust the ignition timing, and we’ll look at how this is done if the car is equipped with LPG.
It is not difficult to set the OZ, and the fuel will burn even before the exhaust valve opens, which means that the car parts will not be subject to negative thermal effects, and the engine efficiency will increase. The characteristics themselves for gasoline engines and LPG are somewhat different. True, there is an opinion that in modern cars equipped with an on-board computer, such adjustments are carried out automatically. However, this is not quite true. Indeed, in injection systems, the OZ is set in accordance with detonation, but for LPG this phenomenon is unusual.
Adjusting the OZ using the on-board computer of a car with LPG
Owners of cars with gas equipment have an assistant - a variator. This part can change the SOP on the fly without your participation. But this is not the basic equipment of the car, and you should buy a CVT. Actually, gas equipment is also installed at the initiative of the owner, and not the plant. Today, there are different ignition timing variators for gas equipment on sale. This device connects to the sensor responsible for the crankshaft position (CPCP) and corrects its readings to the desired value. Moreover, depending on the variator model, the displacement is carried out either by a fixed amount or depends on engine speed. This device is activated when the HBO is turned on.
Let's look at one of the connection diagrams for the variator for adjusting the gas pump. To begin, select the most convenient place where this element will be located. The far left corner of the engine compartment, not far from the gearbox, is perfect for mounting the variator. Now remove the cover from the device and make a direct connection in accordance with the attached instructions.
Connecting the variator for adjusting the UOZ to the gas equipment
One pin is responsible for supplying voltage to the sensor to which we will attach the variator. We attach the second one to the leg of the gas valve in the gas equipment. But the ground should be connected to the screen of the DPKV cable. Then we strip the sensor wires and connect the corresponding variator leads to each of them. Now all that’s left to do is set up the device and enjoy operating the vehicle. Experts claim that the presence of a variator in the LPG system saves fuel by almost 25%. Most likely, the figure is inflated by marketers, but there really is a benefit.
Self-adjustment of SOP
If the OZ is set correctly, then ignition of the mixture and combustion occurs before the piston reaches top dead center. This moment can be determined by the location of the crankshaft. The parameter is indicated in degrees, i.e. it shows the angle between the shaft and TDC. When the angle is shifted, ignition occurs later, and vice versa. To set up the OZ, you need to take several tools. The driver will need a flywheel wrench, a spark plug and a wrench.
If we consider setting the angle using the example of a domestic car, the algorithm of actions will be as follows:
1. First you need to turn off the engine, but do not leave the car in gear, but use the parking brake.
2. You need to find marks near the timing gear. In addition, you will need to set a mark on the flywheel.
3. The spark plug, which is located closer to the radiator, has a high-voltage wire. You need to insert the prepared candle into it and attach it to the mass.
4. Next, the distributor cover is removed, and the crankshaft key is put on the flywheel.
5. The crankshaft is rotated towards itself. Rotation in the opposite direction is not allowed, as this will cause the flywheel to unscrew. While working, you need to watch the slider and adjust it.
6. Timing marks are set depending on the car model.
7. The key is removed from the flywheel and the cover is returned to its original position.
8. At this stage, you are allowed to turn on the ignition.
After releasing the nut securing the distributor, the driver must turn it counterclockwise, and then clockwise. It is necessary to wait for the spark, and it is at this moment that the distributor is fixed. Next, the wire is returned to the spark plug of the first cylinder.
Ultimately, you need to check whether the OZ is set correctly. The test takes place while driving, but first the engine must be warmed up to operating values. Having accelerated the car to 50 km/h, the driver needs to turn on 4th gear and sharply accelerate. Detonation and its sudden disappearance during high acceleration indicate that the angle is set correctly.
DIY adjustment
Each driver can adjust the settings of the described system independently. To set the ignition timing you will need the following tools:
- Strobe. Moreover, it doesn’t have to be some kind of “sophisticated” one, maybe a simple one that doesn’t have a built-in tachometer and is inexpensive. A more advanced one, which is distinguished by the presence of a built-in tachometer, costs more accordingly.
- Tachometer. In this case, you can use the devices built into the dashboard, as well as connect external devices (for example, a multimeter or autotester in tachometer mode) and focus on sound signals. The latter is recommended to be carried out only if you have considerable experience in this matter.
- Open-end or socket wrench. An alternative option is an L-shaped wrench or a ratchet head. But the optimal size is about 10.
- Slotted screwdriver.
So, answering the question of how to set the ignition timing, first we should note the importance of the preparatory work. So, I advise first:
- Warm up the engine to about 90°, that is, to the optimal operating temperature, and set the idle speed to a minimum level (this is about 800 per minute). To carry out the last action, you need to rotate the screw responsible for the amount of fuel mixture and located on the carburetor.
- You can set this minimum number of revolutions by ear or using a tachometer - whichever is more convenient for you. If they comply with the norm, then this action does not need to be performed.
- Remove the silicone tube from the fitting located on the housing of the vacuum ignition timing regulator on the trembler.
- Check if there is a vacuum in it by placing your finger on its hole. Nothing like this should happen. If this is not the case, then the speed should be gradually reduced until the vacuum disappears. To do this, you need to smoothly rotate the previously mentioned screw.
- Turn off the engine and use a knot or small bolt to remove the hole in the pipe.
- Using a slotted screwdriver, turn the flywheel (before this, carefully unfasten the distributor body by loosening its fastening nuts with a wrench), as a result of which a long transverse alignment mark should become visible.
- Connect the strobe depending on the instructions for it.
To set the ignition timing close to ideal, I recommend following the following instructions:
- Start the engine, and once again check with the tachometer that the speed is minimal.
- Direct the flashing beam from the strobe into the hatch with the scale.
- As a result of this, the highlighted mark, which is placed on the flywheel, should be opposite the required division on the scale.
- Each division on the scale is the corresponding degree of ignition timing.
- To adjust the ignition timing, rotate the distributor housing.
- After the required value has been achieved, disconnect the strobe and securely fasten the distributor.
For a better understanding of the above steps, I recommend also familiarizing yourself with such concepts as ignition timing regulators, as well as its sensor, clutch and ignition timing variator.
So, there are two regulators: centrifugal and vacuum. The centrifugal ignition timing regulator is designed to change this indicator at an automatic level, and this depends on the number of revolutions produced by the crankshaft. The vacuum ignition timing regulator is used for the same purpose, but its activity only depends on the speed of the engine.
The ignition timing can be changed by also changing the crankshaft position sensor data. And a device such as an ignition timing variator can help with this. The use of an ignition timing variator is necessary due to the fact that the burning rate of gas is lower than that of gasoline .
The main feature of ignition timing variators is that they are able to be configured with computer programs and change this indicator with an accuracy of 1 degree. Also, this device does not need to be connected to the pedal and allows you to create a car acceleration schedule. Therefore, an ignition timing variator is a necessary mechanism, which, in addition, can be used as a generator.
We recommend: The best engine cleaners
The ignition timing sensor is also an important mechanism. There are two of them in the car (on top and on the right side), and if they are absent, the engine simply will not be able to start.
And the last mechanism, but not the last necessity, is the ignition advance clutch, the operating principle of which is, as a rule, mechanical. This ignition advance clutch is needed in order to provide better engine dynamics, as well as to advance the ignition of the fuel at higher speeds. As a result, the engine operates more powerfully and efficiently.
What systems need to be adjusted?
The adjustment process depends on the design of the ignition system. In the contact system, a centrifugal and vacuum regulator is used to maintain the required SOP in all modes of engine operation. As for contactless ignition, its operation is no different from the contact type. In his classes, the driving instructor in Balashikha will explain that in electronic ignition, the formation and distribution of pulses is assigned to electronic devices. In this case, the ignition system is configured during design and testing at the production stage. To make changes later, you will need special equipment. In the first two cases, the installation of the SPD is achieved through the correct positioning of the distributor runner relative to the cylinders at the end of ignition.
| Tweet |
Peugeot diesel engine ignition adjustment
Ignition adjustment is based on the sound and operation of the engine Published: April 20 d. Ignition adjustment takes place based on the sound and operation of the engine:) Category. People and blogs. Diesel injectors, don’t rush them ASTKRAS.RU injectors, do not rush to take them off — Duration: Mechanic M viewing. Adjusting valves on Renault Logan, Logan2, Simbol, Kangu, 8V - Duration: Renault repair viewing. How GAS kills YOUR ENGINE (LPG Pros and Cons) - Duration: AkerMehanik viewing. The best method for determining the "ignition" of a diesel engine.
Adjusting the ignition of a diesel engine. One of the main differences between a diesel engine and a gasoline engine is the principle of ignition of diesel fuel. Ignition of the fuel-air mixture in a diesel engine is realized through self-ignition of diesel fuel from contact with pre-compressed and heated air in the cylinders as a result of such compression. Setting the ignition on a diesel engine involves changing the advance angle of fuel injection, which is supplied at a clearly defined moment at the end of the compression stroke. If the angle is set differently from the optimal parameters, then the fuel injection will be incorrect.
History of the logo. The Peugeot logo emblem has changed several times throughout the company's history. However, the main symbol of the company, the lion, has never disappeared from it. Initially, when Peugeot produced saws and other cutting tools, the lion represented the strength of the product, just like the teeth of a lion.
How to adjust the ignition in a diesel engine? The first and main difference between a diesel unit and a gasoline unit is the ignition system or, in other words, how the fuel is ignited in the engine. In an engine that uses diesel fuel, ignition occurs when diesel fuel comes into contact with air heated by compression, which accumulates inside the engine cylinder. When they talk about adjusting the ignition system in a diesel engine, these words mean the process of changing the advance angle of the injection of fuel supplied at a specific moment - at the very end of compression.
Tighten the tension roller nut to 40 Nm. Reinstall the cylinder head cover. It is clear that you can turn the distributor back and forth until happiness comes: Topic closed Topic hot Topic hidden Complaint accepted.
How to set the ignition on a diesel engine
Registration File archive Help Calendar. Assistant Find the latest My messages Find the latest My topics.
How to set the injection angle in a diesel engine? Everything is correct for a mechanical Bosch injection pump or its clone Zixel Kiki, except that the high-pressure tubes must be loosened to the limit, or better yet, removed. The lift size of the Bosch injection pump plunger is usually the same for all and depends on the engine size, for example for 1.6 liters. Currently, on my second Hyundai H car, after the Cherokee, there is a Lucas fuel injection pump, a rotary one, which has a feature when adjusting the plunger lift height to ensure the correct initial moment of fuel injection, namely: My purely personal opinion - Lucas is better and according to my individual feeling engine performance, exhaust uniformity, torque, but Bosch wins in spare parts, so many prefer Bosch, and as for engine performance, as they say, it depends on how you feel.
But I repeat, all other things being equal, I would choose Lucas, both when replacing the fuel injection pump for a given engine, let’s say if it was Bosch, and when transferring an engine from one car to another. And lastly, it is not necessary to choose a micron indicator, it is very expensive, its cost is not reasonable for automotive purposes, it is used in particularly precise work, for example, for measuring and adjusting the backlash of spindle bearings of precision metalworking machines, and then they catch 0., mm, further problems arise difficulties from the interference of external factors, for example, temperature, in our case a division of 0.01 is suitable, which will provide a run-up of 0.03 mm.
DIAGRAMS OF DEVICE OPERATION IN DIFFERENT MODES
In Fig. 5, Fig. 6, Fig. Figure 7 shows the pulse shapes at the GP5 input and GP1 output of the microcontroller at different engine speeds.
Rice. 5. Formation of sparks when starting the engine.
Rice. 6. Formation of sparks at 900 rpm. (idling).
Rice. 7. Formation of sparks at 3300 rpm. (Work mode).
PLACE YOUR ORDER
Use the form below to submit an order for a microcontroller with the above firmware F675OK.HEX. Please fill it out as completely as possible.
Any details or questions can be written in the "Notes" field. When you click the “Submit” button, your order will be sent to our specialist, after which he will contact you.
By clicking the “Submit” button, you consent to the processing of your personal data in accordance with the personal data processing policy.