The malfunction is expressed in the fact that the speeds begin to engage poorly and you often have to move the clutch fork, adjusting the free play. It deviates more and more from the release bearing along the crack that has formed and adjustments last for several days, and sometimes even a day, depending on the condition of the fork crack.
Typically, such a replacement is performed by removing the gearbox from the car, which is both expensive and quite labor-intensive. However, there is a way to replace the clutch fork
without removing the gearbox, which seems more acceptable for car enthusiasts.
The operation of replacing the clutch fork is not extremely difficult and is quite within the capabilities of any car enthusiast, provided that he is not afraid of work and is confident in his abilities.
Preparing for work
To replace the clutch fork, you need to purchase a new fork and process it in a certain way, namely. The ends of the fork are processed on a grindstone at an angle (about 45˚) so that the fork can fit under the pressure spring on the release bearing hub. Also, for ease of operation, you need to make a hook for prying the wire spring under the release bearing when installing the fork.
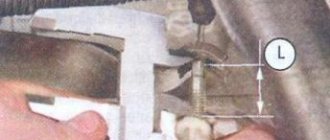
Before performing work, you must make sure that the clutch fork definitely has a defect in the form of a crack. To do this, you need to remove the clutch slave cylinder along with the rod and move it to the side on the hose. Then remove the protective cover of the plug and use a flashlight or carrier to look inside.
If the crack is not visible, then you need to press the fork leg with your hand in the direction it operates, which will immediately show where the crack is. Once you are sure that the fork is cracked, you can safely remove it from the clutch housing window.
Next, to consciously perform work with the clutch fork removed, look inside the clutch housing again. Having first turned the clutch fork over, you will see a strip of spring steel in the form of a rounded letter “P”, it serves to fix the fork to the clutch housing.
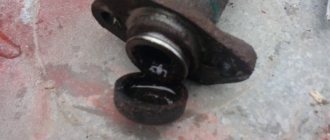
Now, looking inside the casing, you will see the fork support pin with a ball-shaped head. So your task is to get the fork locking petals under this ball.
Let's look further. On the gearbox input shaft guide we see the release bearing hub with a bearing and a wire spring. Your task is to get the sharpened ends of the fork under this spring so that the fork legs are between the spring and the hub. In this case, you first need to get the fork clamp under the head of the strut (ball), and only then place the fork under the wire spring of the release bearing hub.
If there is an old gearbox in the garage, then you can practice on it, where all your actions will be clearly visible.
This, of course, is an ideal option, but in reality you will have to make several attempts before you can get the fork into place.
It is more convenient when installing the fork, when you have put its internal lock on the ball of the strut and accurately brought both legs of the fork under the wire spring, hit the fork leg. Sometimes you can do this on the first try, but it depends on your luck.
In order for the insides to be clearly visible, you can use a flashlight, lowering it on a tie into the basket casing. Its light will be more than enough to get the job done. Then everything depends on your dexterity. The main thing is not to rush and everything will work out for you. This method has been tested many times and has always had a 100% positive result.
- Home
- Auto garage
- How to change the clutch fork on a VAZ 2106
Replacing the VAZ clutch fork
Clutch selection
The manufacturer installed carburetor (2103 with a volume of 1.5 l) and injection (2106 with a volume of 1.6 l) engines on different VAZ 2107 models. Despite the external similarity, the clutch of these models has certain differences. The diameter of the basket pressure plate in both cases is 200 mm. But for the basket for 2103 the width of the pressure plate is 29 mm, and for 2106 it is 35 mm. Accordingly, the diameter of the driven disk for 2103 is 140 mm, and for 2106 - 130 mm.
Some car owners install a VAZ 2121 clutch on their VAZ 2107, which is noticeably stiffer and more reliable than the original one.
Clutches for the VAZ 2107 are produced by both domestic and foreign manufacturers
All VAZ models with rear wheel drive are suitable for clutch kits from classic cars of famous brands.
Preparatory process for removing the clutch release fork
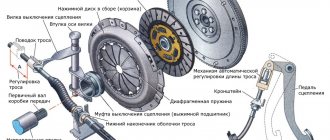
The functions of the clutch fork on all cars are the same; they are somewhat similar to a regular mechanical lever. By pressing your foot on the pedal using a hydraulic or cable drive, you create a force on the outer support of the fork.
According to the principle of a lever resting on bushings or a ball joint, the internal support through the coupling, if any, transmits force to the release bearing, and then the pressing force of the leaf spring is turned off. Under the influence of the applied force, the clutch disc moves away from the flywheel, disconnecting the transmission from the engine. The clutch is disengaged as long as you keep the pedal depressed. All this time, the release fork and release bearing are in a loaded state.
Important! Train yourself to depress the pedal for no more than 1-2 seconds, this will preserve the “health” of the clutch disc, release bearing and fork. The force applied to one end of the clutch fork can exceed 100 kg
Considering that the average driver can press the pedal more than 50 times in an hour in the urban driving cycle, the load on a stamped part 3 mm thick is quite considerable. Therefore, deformation and even breakage are possible, not to mention wear and tear of the support area.
The force applied to one end of the clutch fork can exceed 100 kg. Considering that the average driver can press the pedal more than 50 times in an hour in the urban driving cycle, the load on a stamped part 3 mm thick is quite considerable. Therefore, deformation and even breakage are possible, not to mention wear and tear of the support area.
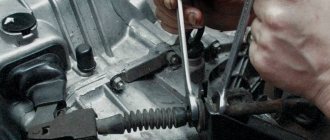
Structurally, most of the fork with support is located inside the clutch housing. From the outside you can only see the outer support of the clutch fork and the hydraulic cylinder of the drive. It can be removed by partially disassembling the unit. You will have to work under the machine, where even the simplest operations require considerable effort due to the small working space.
Before starting work, make sure that the problem with the clutch is a broken or bent fork geometry:
After releasing the outer part of the fork, check its free movement by hand. A bent or broken part will have too much free play to match the adjustments. If, with not very strong hand pressure, the free end of the fork moves with slight resistance in both one and the other direction, the part needs to be replaced.
Master disk resource
How long does this element last? Manufacturers do not provide exact data.
But as practice shows, the average life of the drive disk is from 100 to 150 thousand kilometers. Below we note several factors that significantly reduce its resource:
- Aggressive driving style. Constant movements at high speeds with a sharp release of the pedal have an adverse effect on the condition of the friction linings.
- Driving with a load. This is especially true for commercial vehicles. For example, let’s take the GAZelle, whose gearbox is no different from the Volgov’s. This kind of drive is simply not designed for high loads. Even when the pedal is released smoothly, the friction material will slip through the flywheel and simply burn due to friction. The resource of such a disk is not even 15 thousand kilometers. The same goes for the trailer. Do not overload the mechanisms - the clutch, master cylinder and much more will suffer.
- Incorrect towing. You should not pull a car that weighs one and a half or more times the weight of your car. This will quickly burn out the drive disk.
So, we have found out the main clutch malfunctions and methods for eliminating them.
Replacing the fork on 2106, 2107
On classics, a cracked fork is a fairly common occurrence, and car enthusiasts have gotten used to changing it without removing the box. To do this, the ends of the new fork are ground at an angle of 45 degrees so that it can fit under the pressure spring. A hook with the end bent 5 centimeters would also be useful; we will use it to hook the spring. We need to get under the fork support pin (bolt with a ball head), and the paws get between the release bearing hub and the spring. After a certain number of attempts, their number depends on your accuracy and patience, the clutch fork will fall into place.
It is worth noting that on GAZelle cars it is also possible to replace this part without removing the box, using the method described above. For a GAZelle with a 402 series engine, this is generally a weak point, and owners of these models constantly complain about a weak fork and its constant breakdown. One solution to this problem is to install a reinforced fork from another model (Valdai), but it also has its own subtleties and nuances that are undoubtedly worth studying before proceeding with the replacement procedure.
Replacing a faulty unit
Instructions VAZ-2110 2111, 2112. Replacing the clutch release cable
Replacing a VAZ 2110 clutch fork is usually accompanied by a troublesome and time-consuming process of removing the car’s gearbox. Although there is a more convenient way for drivers that eliminates this time-consuming procedure. The manipulations associated with replacing the VAZ 2110 clutch fork are, in principle, simple and uncomplicated. Therefore, a driver who has at least basic skills in the field of auto mechanics and is not afraid of the difficulties associated with auto mechanic work can begin repairs, which last on average 3-4 hours.
When planning to begin work on replacing the VAZ 2110 clutch fork, it is recommended to analyze it for the presence of a crack. To do this, the following activities are carried out:
- remove the clutch drum, counter rod and move them to the edge using a hose sleeve;
- remove the protective cover;
- inspect the middle with a flashlight.
If in this case the crack is not visible, you should press the base of the aircraft with your hand in the direction of its inclusion. This manipulation will immediately indicate the cracked area. Detection of a defect provides grounds for removing the clutch cover.
The next step with the VAZ 2110 clutch fork removed is an internal inspection of the clutch housing. When the aircraft turns, a spring steel track in the shape of a rounded capital letter “P” opens. Its function is to fix the aircraft on the casing. Then, looking in the middle, you can see the fork support pin with a rounded head. The driver’s task when repairing a breakdown is as follows: place the fastener petals under the head ball.
First, you should grind the ends of the sunshade at 45° so that it fits under the spring on the hub of the liner. It is necessary to carefully treat the metal and plastic bushings with grease and install the aircraft in its original position.
Next, you need to get the pointed ends of the aircraft under the wire spring of the thrust bearing hub so that the legs are in the middle of the spring and the hub. To perform this task faster, you first need to determine the stopper under the ball head, then place the BC down under the specified wire spring. Ideally, you can learn to perform these actions on an old gearbox, and only then apply the practiced actions in the new VAZ 2110. Most likely, not the first time, but the fork is installed in place.
For ease of installation, after putting on the lock located inside and placing both legs of the aircraft under the spring, you should hit the base of the fork. It is difficult to do this the first time; it requires a lot of experience.
The key to a thorough examination of the internal parts is the presence of a flashlight, which should be lowered into the basket casing. The resulting additional lighting will improve visibility and improve the quality of diagnosis. Upon completion of the repair, a control procedure is carried out to inspect the assembled clutch assembly to ensure that there are no defects.
.
Almost few people argue with the idea that it is necessary to respond in a timely manner to suspicious sounds or noises in the operation of the transmission engine or auxiliary mechanisms. For example, a slight whistle when operating the clutch pedal or a suspicious noise accompanying the inclusion of speed may indicate abnormal operation of the clutch release fork - release bearing pair. This pair ensures that the clutch disc is retracted from the flywheel, thanks to which we can easily engage the gear we need. What if the clutch doesn't disengage completely?
Consequences of improper operation of the clutch release fork:
- catastrophic wear of gearbox synchronizers;
- overheating of the release bearing;
- “burning” or increased wear of the clutch disc linings.
In addition, there is a chance of getting into an unpleasant situation on the road: when you press the pedal sharply, it suddenly softly falls to the floor without any reaction. It is impossible to change speed without turning off the engine.
Due to a breakdown of the clutch release fork, the car may stop at the most inopportune moment; in the best case, you will have to drive in one gear, with the emergency lights on, to the nearest safe stopping place. Further - only by tow truck.
In all engines with a manual gearbox, the functions and design of the transmission drive release fork are approximately the same, although the appearance of the devices may differ on different car models.
Replacing and repairing the clutch release fork
To pull out the old plug, do this:
:
❶
First, remove the cylinder from the clutch. Sometimes it is pulled out with a rod. Then we remove the component with hoses.
❷
We remove the cover on the fork and inspect the assembly.
❸
We check the condition of the casing. All contaminants must be removed.
❹
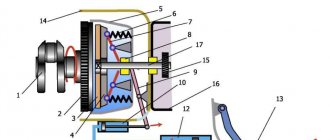
We install the plug. There is a spherical finger on the casing; petals from the part retainer are inserted here.
❺
Inspect the bearing hub with wire spring. The legs of the product are to be installed here.
This will position the fork at the spring and hub positions.
❻
We assemble the mechanism and restore all the parts.
That's all the instructions for replacing and repairing the clutch release fork. All that remains is to evaluate the operation of the mechanism by making a test drive.
This is one of the constituent elements of a complex car system, thanks to which the entire mechanism functions fully and efficiently.
Thanks to this element, the clutch is disengaged. When you press the pedal, this part moves the pressure clutch, as well as the release bearing, thus ensuring that the inner edge of the spring moves forward and directly turns off the device.
If there is any malfunction of this element, the driver is faced with problems turning off the system, so it may either not turn off at all or not turn off completely.
In any case, this subsequently leads to malfunction of the entire mechanism, as well as to its rapid wear.
To fix this kind of breakdown, you must first of all learn how to replace this element.
So, the answer to the question “How to change the clutch fork?” consists of performing the following series of actions.
- Initially, you need to remove the return spring, so next we expand the rod.
- Then you need to unscrew the working cylinder and remove the rod from the fork.
- Next, remove the protective cover of the plug.
- We take away the old part.
- We replace the broken element with a new one.
As you may have guessed, when replacing such a part it is not necessary to completely disassemble the gearbox. We use the fork hatch, which is used to perform the replacement.
Before replacing the clutch release fork, you must initially refine it on a grinder. If your new part cannot be filed, you should return it back to where you bought it because it is of poor quality.
Next, you need to grind the rivets down to about 1-1.5 mm; this is considered the optimal value. This result can be achieved by using a file. We also need to chamfer the ends of this element and then grind the hole between the forks (this is done in order to ensure passage for the ball-head bolt). This work must be done very carefully, the main thing is not to overdo it, since if the bolt goes in too loosely, problems may arise with the new element.
Our further actions should be to install the part in place through the hatch. To do this, we first need to orient the flat edges of the release bearing clutch horizontally and place the tip of the spring towards the hatch. Then you need to push the new element into the hatch; to do this, you can lightly hit it with a hammer. You need to make sure that it goes through the ball head bolt and is located on the bearing coupling
Preparing for repairs
Before putting the car in a pit and removing the box to replace the clutch, you need to visit the store and buy all the necessary spare parts:
- Clutch disc.
- Basket (drive disk).
- Release bearing.
- If necessary, clutch fork.
- If there is significant wear, the crown on the flywheel will also need to be replaced.
- Bolts securing the basket to the flywheel.
It is also important to have a good set of tools on hand, WD-40 penetrating lubricant, sometimes even a gas torch is necessary (if the bolts and nuts are very rusty).
It is advisable to carry out all the work in an inspection pit or overpass (it is unlikely that the average driver of a six will have a lift in the garage, so we do not mention it). If everything goes smoothly and the nuts unscrew well, you will complete all the work very quickly.
Place the car on the pit, fix it in one position by placing stops under the wheels. All work is divided into two stages: under the car and above it. Please note that there is no need to drain the oil, since if you dismantle it carefully, you will not spill a drop.
And don't forget about the alignment of the clutch disc. The price of a special device is quite high - about 500 rubles. but you can use a small piece of pipe without any problems, as long as the diameter is suitable.
Clutch release fork
The clutch fork performs the function of disengaging it (hence the name release fork, or clutch drive fork). This is a kind of lever, when acted upon, the pressure plate is retracted and the clutch is disengaged. It can also be called a clutch engagement fork, because with the reverse action, when you release the pedal, the fork engages it.
This part is usually found in manual transmissions, and much less often in hydraulically driven gearboxes. Let's look at the design of the clutch fork using the example of cars of the VAZ 2110-2112 and VAZ 2106-2107 families. The fork consists of a lever and two legs mounted on a metal rod.
The classic clutch fork looks a little different.
Symptoms of a faulty plug
Like any other part, it is subject to wear, and manufacturing defects are also possible (however, it is extremely rare due to the simplicity of the design). When the fork breaks right away, the pedal simply sinks and it is unlikely that you will be able to continue moving. But it happens that a crack appears in the fork, and then the clutch begins to grasp lower and lower, and adjustment helps only for a short time, and as the crack expands (increases), the pedal drops again.
Simplicity is simplicity, but replacing this part results in a rather troublesome task, since replacing the clutch fork entails removing the gearbox. If on a classic (VAZ 2016-07) you can try to carry out this procedure without removing the gearbox, as some sources claim, then with the front-wheel drive VAZ family this is completely excluded.
Replacing the fork on 2106, 2107
On classics, a cracked fork is a fairly common occurrence, and car enthusiasts have gotten used to changing it without removing the box. To do this, the ends of the new fork are ground at an angle of 45 degrees so that it can fit under the pressure spring. A hook with a bent end of 5 centimeters would also be useful; we will use it to pry the spring. We need to get under the fork support pin (a bolt with a ball-shaped head), and the paws get between the release bearing hub and the spring. After a certain number of attempts, their number depends on your accuracy and patience, the clutch fork will fall into place.
It is worth noting that on GAZelle cars it is also possible to replace this part without removing the box, using the method described above. For a GAZelle with a 402 series engine, this is generally a weak point, and owners of these models constantly complain about a weak fork and its constant breakdown. One solution to this problem is to install a reinforced fork from another model (Valdai), but it also has its own subtleties and nuances that are undoubtedly worth studying before proceeding with the replacement procedure.
Replacing the clutch fork on 2110, 2112
First of all, remove the clutch fork pressure spring. After this, remove the plastic shaft retaining sleeve and the fork boot. Now you can carefully remove it. Be sure to check the condition of the bushings, both the lower metal and upper plastic, and, if necessary, replace them if there is severe wear. The boot also does not interfere with inspection for breaks. We install the new fork in the reverse order, not forgetting to first lubricate the bushings.
What should you pay attention to to clarify the diagnosis of clutch failure?
Suzuki Grand Vitara 2.4 manual, color ZMA Logbook Replacing the steering rack oil seal, without removing the rack. And not only Part-1
When accelerating or braking the car to change gears in the gearbox, the crankshaft is constantly disconnected and connected to the power transmission. This operation is performed very often and intensively, so over time the signs of a clutch malfunction become more and more obvious. All clutch malfunctions are divided into two general types: incomplete engagement of the clutch (driving) and incomplete disengagement of the clutch (slips).
Any experienced car owner knows how to check the clutch for complete disengagement. To do this, start the engine at low speeds, fully depress the clutch pedal and engage first gear. If it engages easily, then the clutch has completely disengaged the drive - everything is in order.
When you hear the smell of burning while driving, on a steep climb the car suddenly loses speed, and in general, it accelerates poorly - “slipping” of the clutch is obvious. That is, the clutch does not disengage completely - both discs do not close tightly enough.
A very simple and at the same time very reliable way to independently diagnose clutch problems:
First, warm up the engine so that the cold, thick oil does not create additional resistance. Next, the car is put on the handbrake. This should be done on a flat surface, without steep slopes. After this, the engine is accelerated to 1500-1700 rpm, the clutch pedal is depressed, first gear is engaged, and then the pedal is smoothly released.
As a result, the engine should stall. The engine does not stall, or the engine stalls after some time - the clutch definitely requires repair or replacement.
Replacing and repairing the clutch release fork
To pull out the old plug, do this:
:
❶ First, remove the cylinder from the clutch. Sometimes it is pulled out with a rod. Then we remove the component with hoses.
❷ Remove the cover on the fork and inspect the assembly.
❸ Check the condition of the casing. All contaminants must be removed.
❹ We install the plug. There is a spherical finger on the casing; petals from the part retainer are inserted here.
❺ Inspect the bearing hub with wire spring. The legs of the product are to be installed here.
This will position the fork at the spring and hub positions.
❻ We assemble the mechanism and restore all the parts.
That's all the instructions for replacing and repairing the clutch release fork. All that remains is to evaluate the operation of the mechanism by making a test drive.
Troubleshooting the operating system of a vehicle, including clutch failures, first involves diagnostics. It is carried out in case of severe malfunctions of vehicle components. Detection of a malfunction in the clutch system most likely entails its complete replacement or individual components.
The presence of precise recommendations from auto developers and mechanical engineers provides information about the service life and timing of replacement of the clutch and its spare parts. However, regulated deadlines in real life depend more not on the recommendations of specialist developers, but on driving style, level of load during vehicle operation and other factors.
Diagnostics and maintenance of the clutch release fork
Finally, the transmission release fork can be removed by pulling it out, disengaging it from the release bearing clutch and removing it from the ball joint.
The following parts are subject to immediate rejection and replacement:
- having any cracks in the power part of the fork or the area of contact with the ball joint;
- wear of the support point on the ball joint has exceeded the permissible values;
- In the places where the fork engages with the release bearing, metal wear and large play are observed.
Causes of clutch failure
The most common causes of clutch failure:
• Wearing and oiling, as well as damage and wear of friction linings. • Lack of gaps, as well as too large gaps in the clutch release system. • Air in hydraulics. • Leak in hydraulic drive and master cylinder. • Damage and deformation of discs. • Weak rivets. • The splines in the hub of the driven disk, as well as the clutch drive mechanism, jam due to wear. • Production of bearings. • Broken vibration damper spring. • Defective fork or fork spring. • Worn o-rings, and, as a result, impaired sealing.
To eliminate all of the above troubles, you can replace individual parts, but it would be safer to change the entire system.
Symptoms of a faulty plug
Like any other part, it is subject to wear, and manufacturing defects are also possible (however, it is extremely rare due to the simplicity of the design). When the fork breaks right away, the pedal simply sinks and it is unlikely that you will be able to continue moving. But it happens that a crack appears in the fork, and then the clutch begins to grasp lower and lower, and adjustment helps only for a short time, and as the crack expands (increases), the pedal drops again.
Simplicity is simplicity, but replacing this part results in a rather troublesome task, since replacing the clutch fork entails removing the gearbox. If on a classic (VAZ 2016-07) you can try to carry out this procedure without removing the gearbox, as some sources claim, then with the front-wheel drive VAZ family this is completely excluded.
What's the result?
As you can see, during the operation of the car the clutch fork is subject to wear. Although a high-quality part lasts quite a long time, by 100 thousand km the fork may fail. Even if during the inspection it was not possible to find cracks or other defects, there is a high probability of wear of the paws. In any case, the part requires replacement.
At the same time, it is important to choose a spare part of good quality, since a non-original new clutch fork can last much less than the original. It is important that the product not only has no defects, but is also made of metal that is resistant to stress.. Finally, we note that quite often, along with the clutch fork, the clutch will also require replacement
The area where the fork contacts the surface is also where wear occurs. For this reason, you should make sure in advance that it is advisable to solve the clutch problem only by replacing one fork. Otherwise, you will need to re-disassemble the clutch mechanism, install a release bearing, etc.
Finally, we note that quite often, along with the clutch fork, the clutch will also require replacement. The area where the fork contacts the surface is also where wear occurs. For this reason, you should make sure in advance that it is advisable to solve the clutch problem only by replacing one fork. Otherwise, you will need to re-disassemble the clutch mechanism, install a release bearing, etc.
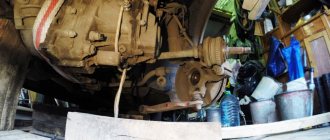
Remove the clutch release fork
After placing the car on the inspection hole and installing additional supports under the wheels, remove the gearbox and clutch assemblies in the following sequence.
Cars with rear wheel drive
We disconnect the cardan and reverse sensor from the gearbox, unscrew the fastenings of the box to the body and engine. For Lada cars, access to the clutch basket can be obtained after the gearbox has been pulled out of engagement with the engine, moved back 10-15 cm, and secured for safety on some kind of stand. For "Muscovites" and "Volgas" you will need to remove the gearbox completely and dismantle the clutch housing attached to the engine.
To remove the diaphragm spring pressure plate, we use a small pry bar to lock the flywheel in one position. We unscrew the basket fastening bolts located around the circumference of the disk with an open-end or spanner wrench. By removing the pressure plate and clutch plate, we gain direct access to the transmission release mechanism.
Car with front wheel drive
To replace the clutch release fork, you will also need to remove the gearbox and clutch pressure plate (basket). Removing the gearbox on front-wheel drive vehicles is a more labor-intensive procedure compared to the “classic” ones due to the need to carefully disconnect the gear selection mechanism, subframe and attaching the gearbox to the engine. To more accurately carry out the sequence of work, you should use the operating manual for a specific car model.
Advice! Before removing the clutch basket from the flywheel, mark their relative positions using paint. When reassembling, this will help restore the correct position and reduce possible imbalance of the assembly.
Installation
When installing the clutch basket and disc, it is necessary to use a simulator of the input shaft. This is necessary so that the parts fit straight. Such an alignment can be bought in a store for 100 rubles. It will also work for a penny.
When installing the box, it is important to get the pin that is on it into the engine hole. It is located in the right drive area. When we installed the gearbox, we didn’t take this fact into account and spent a long time trying to turn the gearbox.
When the box is engaged with the engine, tighten the mounting bolts, but not completely. They need to be stretched when the box sits on the pillows to prevent displacement.
There should be no problems in further stages of assembly.
Don't forget to tighten the hub nut, adjust the clutch pedal and rocker.
I hope this material will help someone when replacing a gearbox. There is practically no difference in repairing VAZ 2110 or 2114 cars. They are all fine)). Frankly, I thought it would be more difficult to change the clutch, but the main thing is to get started, and there’s nowhere to go). If possible, try to repair your car yourself. This is both saving money and gaining experience. Good luck to all.
[Hide]
After dismantling the gearbox and the clutch itself, it is advisable to check all components and carry out their maintenance. So, in particular:
- the surfaces of the flywheel and discs are degreased;
- the shaft (or rather, its splines), on the contrary, is lubricated.
Next, the installation of the basket begins. It is important here during installation to accurately align its centering holes with the pins located on the flywheel. It is necessary to tighten all the bolts correctly - they are evenly tightened one turn at a time. If everything is mounted as it should, the mandrel will come off very easily. The disc should be inserted into the basket with the protruding side.
Video Replacing the aircraft in a VAZ 2107 car
In this video, the author explains how to replace a broken element in a classic car.
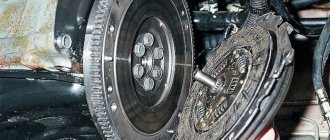
The clutch is an important component of the transmission system. In turn, the clutch fork is an indispensable element that allows the parts to slowly connect and turn off the torque
Each mechanism of the car is interconnected, the engine transmits torque to the gearbox, which in turn to the wheels. But it is worth remembering that there is a clutch mechanism between the engine and the gearbox. How quickly the gears will change and pick up speed will depend on its serviceability and quality of work.
The clutch fork is one of the mechanisms that helps change gears, but due to various circumstances, this part sometimes fails. Let's consider the principle of troubleshooting, the principle of replacement and the cost of work.
The concept and principle of operation of the clutch and its components
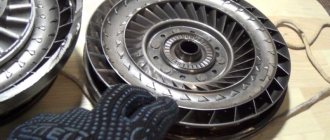
The clutch is a special system device that connects the engine and transmission. It performs important functions in a car. First of all, it transmits torque. However, in addition to this, it protects the engine and transmission from any damage or stress. Thus, it prolongs their performance.
There are several types of clutch mechanism. The most common type is friction. Its design is quite simple, and the principle is that it works due to friction. There is also a hydraulic mechanism, which is based on a special hydraulic fluid that powers the mechanism. And finally, the last type is the electromagnetic clutch. The essence of its work is that it uses an electromagnetic field to activate the entire clutch mechanism. There are cases when a combined type of clutch occurs, which combines two main types.
The process of replacing the clutch pedal fork on a VAZ 2107 photo and video review
The clutch fork (hereinafter referred to as BC) is an important component of the transmission system of any vehicle. Scientifically speaking, this element transmits pressure from the slave cylinder or clutch cable to the release bearing, ensuring the movement of the car. The bearing itself is the transmission component between the clutch and the drive, which is physically located on the release clutch. It is the clutch fork that ensures the movement of the clutch and bearing.
In most cases, VAZ 2107 cars are equipped with a single-plate clutch, the operation of which is ensured by a special drive. Double-disc clutches are usually installed on more powerful vehicles and trucks. But this does not mean at all that the VAZ 2107 cannot have a double-disc element.
In any case, when you press the clutch pedal, the drive ensures the movement of the aircraft, which, in turn, acts on the bearing. The latter, as a result of moving the fork, presses on the petals of the spring element of the pressure plate. The spring bends towards the flywheel, simultaneously disconnecting from the pressure plate, thereby freeing it.
When the driver releases the clutch pedal, the pressure plate begins to interact with the driven components as well as the flywheel. At this time, torque is transmitted from the engine to the gearbox, which occurs due to friction forces. This process of clutch functioning is in no way possible without a working fork. The BC for the “classics”, which is 2107, is shaped like a slingshot.
New and old forks for VAZ 2107
Replacing an element
Replacing the aircraft in a VAZ 2107 car can occur in several ways. In the first case, it is necessary to remove the gearbox, which is a rather labor-intensive process that cannot be accomplished by any driver. In the second case, you can change the element without removing the gearbox. Domestic motorists encountered this breakdown so often that they found a simpler way out of this situation.
Instructions for replacing the clutch fork on a VAZ 2107
A little about the device
It is difficult to understand the cause of the malfunction if you do not have a minimal understanding of the design and principle of operation of the clutch. It is enough to understand that pressing the pedal provokes movement of the fork and release bearing. The release lever, pressed by the fork, presses on the petals of the diaphragm spring, moving the pressure plate away from the driven disc. The latter, in turn, moves away from the flywheel, thereby stopping the transmission of torque from the crankshaft to the gearbox input shaft.
The shutdown drive can be mechanical or hydraulic. In the first case, the pedal and the release fork are connected by a cable drive. The second type of inclusion requires the presence of a clutch master cylinder. By pressing the pedal, you initiate the movement of the rod, which presses on the piston inside the clutch cylinder. The displaced brake fluid, moving in the lines, presses on the piston inside the working cylinder. The piston, moving, presses the shutdown rod.
What does "leading" mean?
They say that the clutch is engaged if the clutch does not disengage completely. In other words, after pressing the pedal, the driven disk and the engine flywheel are not completely disengaged, which leads to partial transmission of torque to the input shaft of the gearbox.
Symptoms
You can assume that the clutch is slipping based on one symptom - difficulty engaging and disengaging gears. Most often, problems begin with the inclusion of reverse and first gears. The term “difficult” means both the need to apply more force to the gearshift knob and the inclusion with a crunch.
Causes
- Incorrect adjustment of the switching drive. In this case, the useful range of movement of the clutch pedal is not enough to completely separate the flywheel and the friction lining of the driven disc. Often such a malfunction is the result of unqualified repairs. To fix the problem, you need to correctly adjust the pedal free play.
- Deformation of the driven disk. The bending leads to the fact that after the pressure plate is disconnected, the friction lining in the place of the bend continues to touch the flywheel. If there is excessive axial runout, only replacing the driven disk will help. In cases of such clutch malfunction, vibration should be observed when starting to move.
- Weakening or breaking of the diaphragm spring blades. In this case, the force when pressing the clutch release bearing onto the paddles is not enough to completely disconnect the pressure plate from the driven one. As a result, even after pressing the pedal, the clutch is in a partially engaged state. Both manufacturing defects and incorrect adjustment of the release drive (when the clutch is constantly half-squeezed) can lead to breakage of the petals. Natural metal fatigue leads to weakening over time.
- Malfunction of the hydraulic clutch release system. The reason why the crankshaft is not completely disconnected from the gearbox input shaft may be hidden in the working cylinder or hydraulic line. You should monitor the tightness of the system, as due to leakage of brake fluid, the clutch may not disengage completely.
- Cable drive jamming. Over time, the cable may become frayed, which, combined with contamination, leads to limited movement. Therefore, it may seem to the driver that the clutch pedal is depressed, but in fact, the driven disk has not been completely disconnected from the flywheel.
- Difficult movement of the driven disk on the splines. Lack of lubrication, contact with various types of contaminants on the working surface and uneven wear of the splines can lead to the fact that after disconnecting the pressure plate, the gap necessary for separation will not be created between the flywheel and the pressure plate.
- Flywheel malfunction. Severe scuffing and radial distortion will prevent the friction linings and flywheel from completely detaching. The imbalance causes not only poor gear engagement, but also vibrations when starting to move.
- Bending of the fork that moves the release bearing, due to which the stroke of the rod becomes insufficient to bring the release bearing to the petals of the diaphragm spring.
If, after adjustment, problems with gear shifting have not disappeared, it is necessary to disconnect the gearbox and fully diagnose the clutch mechanism. Replacing the clutch cannot be called an easy job, but with proper theoretical preparation and the availability of the necessary tools, you can do it yourself.
Signs of a faulty VAZ clutch fork
The main signs of a faulty VAZ 2107 clutch are:
- it is difficult to change gears;
- the driven disk slips;
- vibration appears;
- The pressure bearing whistles;
- the clutch is hard to disengage;
- The pedal does not return from the lower position.
Destruction of the pressure plate and basket casing can lead to very serious consequences