Replacing a VAZ 2115 clutch without pit and lift
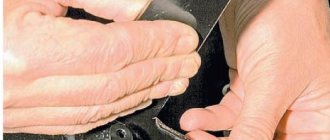
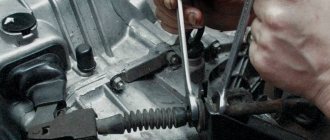
I’ll tell you about how I changed the clutch on my 15x. I’ve been driving with a dead clutch for about half a year. I’m pretty fed up with the fact that at 3rd speed, if you go to overtake, the car doesn’t listen. starts to accelerate. However, if you accelerate smoothly, 130 goes easily. Closer to the point: Repaired in the village, 2000 rubles. The toad made me give it to the guys at the service center. I changed everything at once, it’s calmer! )) I have an article about the release lever, and KraftTech bought the clutch for 3000 wooden ones. The release lever was included in the kit, but it didn’t inspire confidence. That’s why someone else installed it. I parked the car on level ground, with the handbrake on. I secured it with bricks under the rear wheels. INSTRUCTIONS: Ask your friends about the alignment or input shaft of the gearbox, you can even center the clutch disc from the “classics”. It’s better to do the work in 2m, especially after you throw off the box. I’ve already seen someone like this. Unscrew the hub nut (head 30, knob and pipe). There's a puck there, don't lose it! Let's jack it up. We unscrew the left wheel and remove it. We unscrew the ball joint (part 13). On the right side we unscrew only the hub nut, but not completely. We remove the engine protection, if there is also the left side of the engine boot (k-ch8). We remove the air filter, the battery. We jack up the car higher, put hemp, bricks or SCC blocks under the side members or sills, whichever is given what. I had these blocks. By 2 On each side. This height is enough to completely move under the car. Place a beam or piece of wood on a block or brick so as not to crush the box. We take a jack and a beam, jack up the engine. (This is how it should be!) Lay out an old blanket, climb under the car. Unscrew the rocker clamp (key 13), the gearbox cushion (17). There is also a stretcher from the engine, we also unscrew it. The key is 19. It took us a ton of effort, because it was apparently tightened with great force and without the right drive, but it will interfere. There is also a box boot, from the end of the pallet. There are 3 bolts per 10. Found it? Removed it? Let's continue. We disconnect the speed sensor on the top of the box and another one on the left. We unscrew the clutch cable with a key of 17. We remove it from the fork. We move it to the side. We unscrew the bracket for the front box cushion, on the left. There are 3 nuts. Remove the starter, wire + and red (3 nuts k-ch13). The left drive pulls out of the hub. We unscrew (k-ch13) the fastening of the ignition coil from the box. I removed the coil, for convenience. And one by one we twist the remaining bolts of the box itself, there are only 4, with a 19 head. Next, with an assistant, one from the side of the arch towards you, one from above using a mounting tool or a powerful Use a flat screwdriver to disconnect the box from the engine. It should hang on the drives. You can completely remove the gearbox because The clutch disc will still need to be centered. If you are working on asphalt, place boards and a rag so as not to damage the gearbox. When the box was detached, it hung on the drives and the left tripwire from the crab. To access the basket, pull the box and secure it with an assistant) or something. We see the basket (there are different bolts). Mine was 8. I twisted it with a cap and licked off the heads of 3. I unscrewed it with a hammer, a mat and a chisel. Then I replaced it with an M8 13x15 bolt. We take out the clutch. There should be no sagging petals on the basket, and there should be no severe abrasion in the center from the release bearing. The pressure part should not have chips, scratches, grooves and signs of overheating in the form of a purple-dark blue color. If there is one of these signs, the basket better for replacement. We look at the disk itself. It is very worn if the rivets have already begun to shine on the surface, as was the case with me, or there are no springs. Next, we check the release bearing. It is installed on the input shaft and is held by a spring. You need to bend the whiskers towards yourself and remove it. Check for torsion and play. Let’s not allow too much play in the bearing on the housing. Play in the bearing race is unacceptable! If it is not possible to replace it with a new one, put lithol-type lubricant in it, but do not overdo it. It is better to remove the excess. We put the release lever back. Check the clutch fork boot! Next, we install the disk with the basket, lean everything against the flywheel, place it on the guides and insert the centering device. We attach the basket. It is advisable to tighten it crosswise, but not critically. We screw it to the flywheel with force. Next, with an assistant, we lift the box and guide it, be careful, the gearbox is quite weighty. If the shaft does not immediately fit into the splines, turn the box a little. When the shaft is in, insert the box all the way and tighten the top bolt.
Continue in the reverse order of removal. Please note! the box may interfere with the installation of the clutch and you still have to remove it completely; to do this, unscrew the left crab and pull out the front suspension bolt so that the extension lowers and does not interfere. Unscrew the right hub nut completely, then remove the gearbox.
It took us about 9 hours with smoke breaks and lunch. We also drank beer in between)) There is nothing complicated, except if the basket bolts were torn off. Be careful there, turn the head. And to prevent the crankshaft from spinning, screw the bolt from the box into the hole next to mount the ignition module. And use a screwdriver or pry bar to stop the flywheel.
Tools you will need for your work
To perform the work you may need the following tools:
- two jacks;
- hub key;
- metal brush;
- a set of open-end and ring wrenches;
- set of heads;
- installation guide and other tools that every driver has.
For an experienced technician, replacing a VAZ 2113, 2114 or 2115 clutch with your own hands takes about 4 hours. A beginner will have to tinker longer. But the expenditure of effort and time will be fully justified, since in a car service center the price for replacing a VAZ 2113, 2114 or 2115 clutch is from 3 thousand rubles as of 12/01/2018. U
We replaced the clutch without removing the gearbox and pit. I'm telling you about the method
The procedure for replacing a clutch in a car is considered quite complicated. To perform this, as a rule, a lift or pit is used. You can gain access to the clutch system after removing the gearbox, but some craftsmen manage to avoid this stage of work. I will tell you about a way to change the clutch on a car without dismantling the gearbox, which will work on almost any car with a manual transmission.
We replaced the clutch without removing the gearbox and pit. I'm telling you about the method
Will the article be useful? Don't forget to give a thumbs up and subscribe to the channel!
There is no point in denying that it is easier and faster to change the clutch by removing the manual transmission and using a lift. But sometimes the cost of replacement services at a service station exceeds the price of the spare parts themselves. Not all car enthusiasts have the opportunity to pay for the work of specialists, so they change the parts themselves. This can be done even in the yard, if you have patience and auxiliary tools.
I will talk about how to change the clutch without removing the gearbox using the example of the “fourteenth”. In theory, this method, with minor changes, will work on foreign cars from various manufacturers. First you need to place the car on a flat surface and raise it. This can be done using a jack and then placing bricks. It is impossible to completely remove the gearbox without a hole and a lift, otherwise it will not be possible to put it back later.
We gain access to the gearbox. On the “fourteenth”, for this we had to dismantle the ball mount, the crab, a couple of gearbox supports and the hub nut, in general, everything that was on our way to the box. Before doing this, it is recommended to jack up the engine, otherwise it will dangle noticeably.
We replaced the clutch without removing the gearbox and pit. I'm telling you about the method
All that remains is to remove the manual transmission mounting bolts and replace them with similar, but longer ones. VAZs often use studs from the GAZelle engine block; other options can be found in specialized fastener stores. The gearbox is suspended and supported on studs, allowing access to the clutch system. It will not be difficult to change the discs, basket and even the release bearing. It is important to remember to center the discs.
We replaced the clutch without removing the gearbox and pit. I'm telling you about the method
This method requires more time and labor compared to the usual one. However, it allows you to replace the clutch without special equipment or even a pit. I would like to note that such work should be carried out in compliance with safety measures.
About the properties of the structure
Before you completely disassemble all the components, you need to understand how it all works when assembled.
The clutch system is required to perform two functions:
- Briefly disconnecting the car engine from the transmission.
- Smoothly connects the engine back to the transmission during gear changes.
The clutch on the VAZ-2109 also protects the transmission from damage and overload during operation, so this unit must be maintained in working order and damaged parts replaced as soon as damage is discovered.
The “nine” has the simplest single-disc friction system. It works according to this principle:
- While the pedal is not depressed, the driven disc is compressed by a spring mechanism between the flywheel and the drive (pressure) disc. In this state, the clutch is engaged and the speed is transmitted through the system to the gearbox.
- When you press the pedal, a mechanism is activated that disconnects the drive disk from the driven one, the connection between the system elements is lost, so the torque is no longer transmitted further.
In this scheme, we are most interested in several details:
- The driven and driving disks, which very often quickly wear out, causing them to lose the necessary performance properties.
- Drive is a device that drives the unit when the pedal is pressed. If it is faulty, you will experience jerking and vibration when trying to change gear.
- Clutch cable - connects the pedal to the system. Over time, its tension weakens, which causes the effect of incomplete activation of the mechanism.
https://www.youtube.com/watch?v=https://www.youtube.com/watch?v=1858lZXHZ-g
How to replace
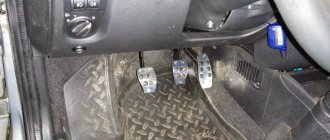
Replacing the clutch requires lifting the front part of the Lada Samara. First of all, it is necessary to block the movement of the rear wheels using stops.
- Loosen the wheel bolts and jack up the left side of the car. The distance between the front wheels and the ground must be at least 10 cm.
- Place the left side on a support. For safety reasons, it is prohibited to use bricks or blocks as support - they may not be able to withstand the weight of the machine and will collapse. The use of wooden stumps is permitted.
- Jack up the right side of the car and place it on a support.
- Remove the wheels.
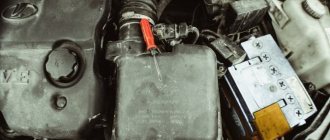
- Disconnect the battery and remove it from the engine compartment.
- Remove the air filter.
- Unscrew the starter fastenings using a 13mm wrench. The starter can be removed from the car by disconnecting the wires.
- Disconnect the “-” wire from the gearbox.
- Remove the motor protection.
- Disable the speed switch with the key at 13.
- Place supports under the gearbox and engine.
- Remove 2 cushions from the gearbox.
- Unscrew the bolt securing the box to the power unit.
- Unscrew the nut from the car interior using a 19mm socket wrench.
- Remove the flywheel protection with a 10mm wrench.
- Remove the pins from the tie rods and unscrew the nuts.
- Unscrew the two bolts from the ball joints. The racks will be released and will remain hanging on the drives.
- Drain ⅓ of the oil from the gearbox.
- Take out the right CV joint, which is located inside. You will need a crowbar or a hammer.
- Replace the bolts securing the gearbox to the power unit with the bolts of the lower suspension arm.
- Remove the gearbox and move it to the left wheel. The box should lie on the transverse rod. Through the resulting gap between the motor and the gearbox it is easy to reach and replace the clutch disc, basket, and bearing.
- Unscrew the bolts that connect the basket and the flywheel. For ease of removal, move the box towards the engine.
- Turn the flywheel and unscrew the bolts one by one. The basket should fall onto the shaft.
- Move the gearbox to the side.
- Remove the clutch disc and gearbox. The release bearing is located deeper. It also needs to be dismantled and replaced with a new one.
Place all disassembled parts into prepared boxes. After installation there should be no extra ones left.
First stage
The first question is: is it possible to replace the clutch on a VAZ 2109 without removing the gearbox? You can look through so many materials, videos and photos, but nowhere will you find a specific answer to this question. As a result, of course, you will come across some review in which the person directly points out that it is quite possible to do such a thing. And it will even give the basic requirements for carrying out such repairs. Then it will become clear that it’s enough to climb around in search of theory, it’s time to start practicing and repair or replace the clutch on a VAZ 2109 with your own hands. To do this, find two massive stumps, the height of which should be about 40 cm, as well as several bars. Of course, it’s scary that the car will fall during the repair process. Therefore, install two wheels nearby under the bottom for insurance.
Clutch disc VAZ 2109Until the last moment, you can doubt whether it is possible to replace the clutch without completely removing the box, because you don’t want the massive gearbox to fall to the ground. But lifting it is problematic, since it is impossible to crawl under the car with it. First, disconnect the battery by de-energizing the system. So the whole story begins - start preparing the car for repairs, removing all unnecessary elements. Namely:
- Twist the wheels and move them to the side so they don't get in the way.
- Remove the tie rod ends to free up the struts.
- Remove the two bolts that secure the ball joint.
- Remove the engine protection.
- Drain the oil from the box.
- Loosen the nut on the rocker and remove it.
- Remove all nuts from the bolts on the two pads.
- Place a support or jack under the engine.
- Disable the reverse sensor.
- Disconnect the wires from the starter and remove it by unscrewing the three nuts.
- Unscrew the nuts from the flywheel protection.
- Remove the inner CV joint on the right side, do not touch the left one.
- Unscrew the three bolts securing the gearbox to the block.
- Unscrew the nut above the right CV joint.
How to install
We change the clutch on a VAZ 2115.
First, a new clutch disc is installed. It is necessary to install the clutch basket on the flywheel on top of the disc. The holes for the bolts must match.
Place several bolts into the mounting holes of the box and move it towards the engine. After the input shaft hits the hole on the clutch driven disc, guide the last bolt using a screwdriver.
The clutch basket is tightened only after the input shaft enters the disc through the starter location.
Further assembly of the structure is carried out in the opposite order of disassembly.
Clutch adjustment is performed after complete assembly.
Tool
- supports for the engine and gearbox;
- wheel stops;
- keys for 10,13,19;
- crowbar or hammer;
- jack;
- 5 liter oil container.
Clutch kit for VAZ 2115.
Most car owners have all the necessary tools. If you don't have anything on the list, you can borrow from a neighbor.
Which clutch is better to install?
There are many clutch kits on the market from different manufacturers. Lada Samara is standardly equipped at the factory with a Vazinterservice (VIS) clutch. The cost of a clutch on the market is around 1,500 rubles - this is the cheapest option.
Experts recommend not saving on the clutch and buying foreign analogues. Clutch kits from Valeo and Kraft Tech are in great demand. The average cost of a Valeo unit is within 3,000 rubles.
Repair tool
You will need the following tools and supplies:
- Clutch kit - disc, release bearing, basket, bolts. The driven disk needs to be replaced. The leader (basket) is changed less often and has a much higher resource.
- A set of open-end wrenches, spanners, and sockets.
- Screwdrivers, pliers, chisels.
- Container for draining oil from the box. It will be required in any case, regardless of the replacement method you choose.
- Preferably two jacks. When removing the box, install the second one under its crankcase to keep it at the same level and prevent it from falling.
- Supports for the car and wheel chocks.
- The presence of an overpass, pit or lift is welcome.
How to replace the clutch on a VAZ 2115
Sometimes you don’t really want to pay fantastic prices to replace a VAZ 2115 clutch at an official service station when you can do everything yourself. In this article I will try to describe in detail the entire process of removing and installing the clutch and its drive on a VAZ 2115 car.
How to remove the clutch of a VAZ 2115
(click on the picture to enlarge the image of the VAZ 2115 clutch)
Clutch assembly:
1 – roller bearing of the input shaft; 2 – support sleeve for the clutch release fork; 3 – pressure spring; 4 – clutch casing; 5 – clutch release bearing; 6 – pressure disk; 7 – driven disk; 8 – flywheel; 9 – gearbox input shaft; 10 – scale; 11 – bolt securing the clutch to the flywheel; 12 – clutch release fork bushing; 13 – clutch housing; 14 – clutch release fork; 15 – clutch release fork lever
To remove the clutch cable, unscrew the lower adjusting nut 5 and remove the lower tip 4 of the cable sheath from the bracket socket 2. Then disconnect the guide 7 from the clutch release fork lever 8. Remove the locking bracket 13 from the pedal pin and disconnect the cable 10 from the pedal 1. Remove the cable 10 assembled with the buffer and clip 12 from the front panel of the body.
If it is necessary to remove the clutch pedal, remove the brake pedal release spring and the clutch pedal release spring 9, remove the locking bracket from the brake pedal pin and disconnect the brake pedal from the vacuum booster pushrod fork. Remove the locking bracket 13 from the pedal axle 14 and remove the pedal axle from the hole in the bracket 15, remove the clutch pedal 1 and brake pedal 18 as an assembly with bushings 17 and 16.
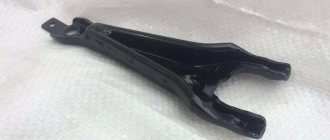
To remove the clutch release fork, remove bushing 12 from clutch housing 13, then remove the fork.
To remove the driven disk 7 of the clutch, first remove the gearbox, then unscrew the bolts 11 securing the clutch housing 4 to the flywheel 8 and remove the housing 4 as an assembly with the pressure disk 6; this releases the clutch driven disc.
Do-it-yourself clutch installation on a VAZ 2115
Installation of the clutch and its drive is carried out in the reverse order of removal, taking into account the following:
1. First of all, clean and rinse with white spirit the splines in the hub of the driven disk and on the input shaft of the gearbox, check the condition of the splines;
Attention.
Lubricant is not applied to the splines of the driven disk and the splines of the input shaft of the gearbox, because Coked lubricant during operation can lead to seizing of the driven disk.
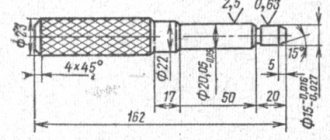
Centering the driven disk:
1 – flywheel; 2 – clutch assembly; 3 – mandrel A. 70081
2. Then install the clutch, placing the driven disc with the protruding part of the hub towards the pressure plate and center the disc relative to the flywheel using mandrel A.70081, replacing the splined end of the gearbox input shaft.
Clutch assembly:
1 – roller bearing of the input shaft; 2 – support sleeve for the clutch release fork; 3 – pressure spring; 4 – clutch casing; 5 – clutch release bearing; 6 – pressure disk; 7 – driven disk; 8 – flywheel; 9 – gearbox input shaft; 10 – scale; 11 – bolt securing the clutch to the flywheel; 12 – clutch release fork bushing; 13 – clutch housing; 14 – clutch release fork; 15 – clutch release fork lever
3. Now lubricate bushings 2 (see figure above) and 12 with CV joint-4 grease.
Clutch drive:
1 – clutch pedal; 2 – bracket for fastening the lower end of the cable sheath; 3 – cable sheath; 4 – lower tip of the cable sheath; 5 – nut; 6 – protective cover; 7 – cable lead; 8 – clutch release fork lever; 9 – clutch pedal release spring; 10 – cable; 11 – upper tip of the cable sheath; 12 – clip; 13 – locking brackets; 14 – pedal axis; 15 – bracket for clutch and brake pedals; 16 – spacer sleeve; 17 – clutch pedal bushings; 18 – brake pedal; A - cable guide element; X - clutch pedal travel
4. Lubricate the pedal bushings, fingers on the clutch and brake pedals and cable guide pin 7 with LSC-15 or Litol-24 grease.
5. Place element “A” of driver 7 towards the engine, as shown in the figure above.
Replacing the clutch on a VAZ 2115 with your own hands was successfully completed. Let me remind you that the previous article was about installing the front and rear bumpers on a VAZ 2115.
Symptoms of bearing failure
- When the input shaft bearing fails, a characteristic howling sound is heard. The breakdown can be diagnosed with the engine idling and releasing the clutch. A whistling or howling sound can also be heard while the car is moving. If partial destruction of the bearing occurs, the howling sound is replaced by a knock.
- Sometimes a sign of bearing failure is a failure of the clutch, which either does not engage or does not disengage. This usually happens if the bearing seizes due to partial failure. The most severe accidents are accompanied by damage to the input shaft on which the bearing is mounted.
- A whistling sound in the gearbox is a sign of lack of bearing lubrication. This problem is eliminated after applying fresh lubricant.
- A howling sound most often indicates the appearance of chips or cracks in the bearing housing, possibly the destruction of one or more rollers. If the bearing is seriously damaged, a knocking noise is heard when the engine is turned on. When these sounds appear, you should not leave the engine running for a long time, since the friction of the debris causes strong heating of the metal, and the bearing is literally welded to the shaft. If this happens, both parts will need to be completely replaced.
Removing the clutch
- First you need to remove the gearbox from the car.
- Then we install a mandrel into the hole in the bait disk. Important! Clutches can be removed without using a mandrel. In this case, you must then hold the clutch driven disc, since it may then fall out of the housing during removal.
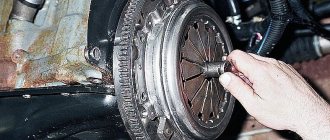
- Unscrews the six bolts that secure the clutch cover. Remove the casing along with the driven and pressure plate. Important! When unscrewing the bolts, do not forget to block the flywheel with a screwdriver.
Unscrewing the bolts on the clutch housing
- After the driven disk has been removed, it is necessary to inspect and evaluate its condition. Cracks on its parts are not allowed. Inspect the friction linings (number 1). If their surface is oily or the rivet joints are loose, the rivet heads (number 2) are recessed by less than 0.2 mm, or the damper springs (number 3) are broken, then it is imperative to replace the clutch driven disc.
- Then we check the disc runout. If it is higher than 0.5mm, then it also needs to be replaced.
- Then we inspect the friction surface of the pressure plate and flywheel. If any defects are found, replace the clutch basket.
Bottom line
Clutch replacement must be done in a timely manner. A successful replacement does not guarantee long-term clutch performance if the vehicle is not used properly. Therefore, it is better not to allow complete wear and tear.
Some tips for use:
- when starting the car, you must disengage the clutch and then engage it smoothly;
- adjust the clutch in a timely manner yourself or at a service center;
- do not use slippage to hold the car on the rise;
- Never press the clutch pedal while driving.
Final dismantling of the box
Finally, do the following:
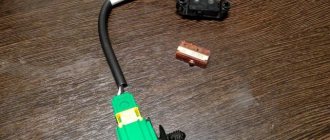
- Unscrew the nut securing the ground wire.
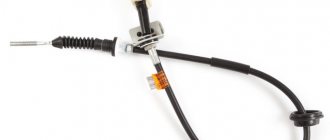
- Remove the clutch cable. If it is torn or damaged, be sure to replace the clutch cable on the VAZ-2115.
- Unscrew the bolts and nuts securing the side and rear airbags. In this case, it is advisable to install a jack or support under the crankcase so that the box does not sag too much.
- Loosen the clamp securing the rocker and remove it.
- Now all that remains is to unscrew the three bolts and nut that secure the gearbox and engine block.
- To separate the engine and transmission, you will need a spade and a lot of effort. If the assembly has not been disassembled for a very long time, removing the input shaft from the splines will be problematic.
- Carefully, trying not to damage the aluminum elements, move the box towards the left wheel. It is at this moment, when it begins to move away from the block, that you need to remove the inner right grenade.
Specifics
The release bearing is activated exclusively at those moments when the driver changes gears. At other times it remains unloaded.
A breakdown of the element in question in a VAZ, or even just significant wear, is the cause of failure of the entire clutch. Thus, it is not advisable to postpone the repair of the unit - the key part should be changed at the first opportunity.
The service life of the release bearing is exhausted relatively quickly, not so much because of the load as such, but because of its unevenness. That is why the manufacturer of the VAZ-2110 advises not to hold the clutch pedal in the lower position when the gear is engaged unless absolutely necessary.