Pedals on a Granta To remove the clutch pedal on a Lada Granta car, you must perform the following steps:
- Secure the car on a level surface, squeeze the parking brake lever, and install wheel chocks on the rear row of wheels.
- Using a “14” key, unscrew the three bolts and disconnect the steering shaft (interior of the car, at the base).
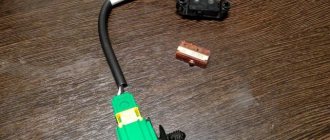
- Unscrew the plastic clamp from the clutch cable lead.
Plastic retainer
- Remove the protective bracket and remove the brake pedal vacuum booster pin.
Safety bracket
- We disconnect the block with wires from the dashboard with the sensors on the bracket.
- Using a key set to “13”, unscrew the four nuts and remove the vacuum brake booster.
- Using a “13” wrench, unscrew the five nuts and remove the clutch pedal bracket and brake assembly.
After troubleshooting, we replace the worn elements with new ones and assemble the structure in the reverse order.
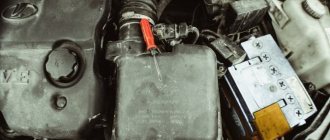
How is the cable constructed?
You can see the condition of the cable through the hood.
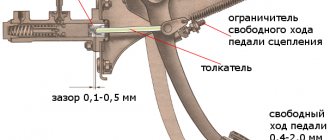
Despite the simplicity of the element, in fact it is a whole structure consisting of several elements. Moreover, it is equipped with automation. We need to bypass it in order to adjust the cable ourselves. What do we see? There is a coupling from which the shell comes out on one side and the leash on the other. A thin end of the cable, enclosed in a corrugated tube, is stretched to the leash. The tip going into the fork is hidden under it. We need to tighten it up or change it completely. It is the source of those very extraneous sounds.
By rotating the leash, you twist or twist it, correcting the gap. This is how manual length adjustment occurs. Note that the shorter the cable, the sharper the pedal will respond to pressure. Ideally, it should rise exactly to the level of the brake pedal. At the same time, we check whether it clicks when pressed.
Replacing the cable
Tips from experts on replacing the generator belt roller on a Lada Granta with your own hands.
To change the cable, you need to carry out a number of simple operations:
in the car interior (under the panel), the nut that secures the cable to the pedal assembly is unscrewed;
the braid stopper is removed from the pin;
- use pliers to remove the locking bracket;
- the pedal axle is removed;
- the pedal bracket spring is also dismantled;
- use pliers to pull it towards you and remove the tip stop;
- the pedal is released from the cable end;
- the cable sheath seal is removed (in the engine compartment);
- the tip of the cable connected to the plug must be pulled forward towards you and pulled out of the groove;
- dismantle the tip driver;
- remove the guide bushing;
- pull the Lada Granta clutch cable through the hole between the engine compartment and the car interior.
Before installing a new cable, it must be lubricated. To do this, a little machine oil is poured between it and its shell. Install the new cable in reverse order
It is impossible not to pay attention to the imperfection of the cable tension mechanism. The reason for its squeaking may be:
- plastic bushing on the pedal;
- plastic leash;
- cable (cable and its sheath);
- gearbox input shaft.
Most of the reasons can be eliminated very simply - you need to lubricate the rubbing parts, for example, with lithol. The same applies to the input shaft - creaking occurs due to lack of bearing lubrication. To lubricate it, you need to get to the fork boot and, pulling it back, generously pump graphite lubricant inside.
The clutch of the Lada Grant remains the same as before. Exactly the same single-disk mechanisms were installed on previous models - Priora, first-generation Kalina, VAZ 2110, 2109, 2108. The plant only partially modified the design, providing it with higher quality parts. Additionally, an automatic cable tensioner has appeared, which in itself is an additional source of malfunctions. This is a fairly old development, and during its use no measures have been taken to eliminate the most common problems. On the contrary, engineers complicated the design by adding additional elements. On the other hand, the Lada Granta clutch is inexpensive to maintain, and you can buy all the necessary spare parts in every car store. Any car owner can replace the Lada Granta clutch with his own hands. Availability and simplicity of design remain AvtoVAZ’s priorities, although quality is not in first place.
Many owners of Lada Granta, Kalina and Priora notice the creaking of the clutch pedal. Moreover, this problem may arise after the first kilometers of driving. We will tell you about the possible causes of this disease, as well as ways to solve it.
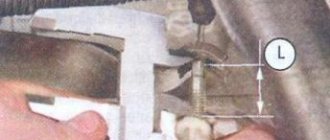
First, make sure your car's clutch is adjusted correctly. While holding the clutch cable end in an extended position, measure the size between the fork and the driver, it should be 27 mm. How to adjust the clutch cable is shown in the video:
About 11% claim that the causes of clutch squeaking were in the clutch cable
Pay attention to the presence of a spring in the tension mechanism; Lada Kalina 2 and Lada Granta may not have it. It is worth noting that this spring is present on the clutch cable of the Lada Priora and the owners of these cars practically do not encounter a squeaking clutch pedal
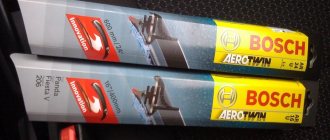
If there is no spring, then it should be installed. Also, it would be a good idea to lubricate the clutch cable using a thin tube, or, if suitable, install a clutch cable from Lada Priora (catalog number: 21700-1602210).
Release bearing Lada Granta
Multithumb errors found on this page:
There was a problem loading image https://mars.wb63.ru/upload/iblock/841/841ca9a759e5a47b28a3c3ae5fcc9f9b.jpeg There was a problem loading image https://mars.wb63.ru/upload/iblock/841/841ca9a759e5a47b28a3c3ae5fcc9f9b.jpeg
Release bearing Gearbox 2181, Clutch release clutch Gearbox 2181 - replacement in Lada Granta
Well, I was struck by the death of the release bearing with a mileage of 23 thousand km, also known as the clutch release clutch of the gearbox 2181. Judging by people's reviews, this bearing does not last more than 30 thousand km. In the evening everything was fine. The next day in the morning, while squeezing the clutch, I noticed that it was somehow not being pressed correctly, I thought, maybe it seemed, and after 20 - 30 km the clutch disappeared altogether.
With the car running, I could not turn on the first and rear, 3,4,5 turned on with difficulty, and after a while they did not turn on. But with the car turned off, all transmissions were switched on. Having opened the hood, I pulled the clutch fork, it dangled as desired in different directions, i.e. was not fixed. Having reached the garage under my own power (25 km), I began to find out the reason. I disassembled and removed everything unnecessary that interfered with removing the box. We unscrewed and separated the box from the engine and supports, hung it by the CV joints (in this position it is problematic to install it later, it is better to read a repair book). The problem became immediately clear - the release bearing had died. Among other release bearings, I chose a roughly similar one - the Priorov one, but it still needed to be installed somehow, and for it to still work. In the 2181 gearbox there is a release fork similar to a fork from a cornfield, based on this I decided to also buy a release bearing spring from a cornfield (or from a VAZ 2101) that secures the bearing to the fork.
Step-by-step instruction
Prior clutch adjustment: detailed description of settings
Now we will analyze the whole process step by step. Stock up on a caliper or at least a ruler in advance.
- Open the hood and disconnect the negative terminal on the battery. Now we need to remove the air filter, which hides the components we need
- We remove the mass air flow sensor connector, the adsorber coupler, the rubber supports and tilt the VF housing to the side
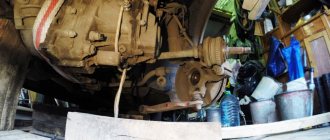
- Our clutch fork is located next to the crankcase. On some cars on the secondary market you can also find a sensor moved there by the driver
- Using a tool, say, pliers, we pull the tip towards ourselves in order to free up more space for work
- We take a caliper and measure the distance from the leash to the fork. According to Grant's technical documentation, it should be exactly 27 millimeters
- We adjust the leash according to the thread if the distance does not match
- Then we press the pedal a couple of times, look at the result, and repeat the setting
- Next is the travel of the pedal itself. It should be 14.6 centimeters (+ - centimeter). As already said, it is better if it is flush with the brake
- If even after several adjustments the pedal does not fall into place, then it would be logical to deal with the unit itself
All steps from start to finish
Open the hood and find the gearbox. The starter will be located nearby. All nodes are covered with a filter that needs to be removed:
- Disconnect the negative terminal of the battery (key “10”);
- We disconnect in turn: the mass air flow sensor connector (oval), the adsorber valve (we press the tongue from below). We also loosen and remove the fastening tie for the “thick wire”;
Getting rid of unnecessary details
A “fork” will be attached to the top of the crankcase - a bent plate with a slot. This is the clutch fork (see photo).
Found the most important detail
Using pliers wrapped in electrical tape, try to pull the tip forward.
Clutch adjustment on Lada Granta (first method)
Here we will look at how to adjust the clutch on a Lada Grant:
- Grasping the end of the cable, pull it forward as far as it will go.
- Using a caliper, measure the distance from the fork to the plastic leash. The distance should be exactly 27 mm.
If everything is set up and checked, measure the clutch pedal travel.
We measure the free movement distance
The distance from the “top point” to the “bottom” should not exceed 146 mm.
If at the last stage it turns out to be more than 146, then the cable needs to be replaced.
Alternative clutch adjustment method (second method)
No calipers are needed here:
- Carry out step 1 as indicated above - pull the tip forward.
- Let go of the tip and look: if the leash does not fit tightly to the fork, screw it onto the rod.
- Press and release the pedal (3 times), repeat steps 1 and 2.
Achieve the following: when the pedal is not pressed, the leash should be pressed tightly against the metal, at the same time, the displacement of the fork should not be noticeable. Let the displacement be equal to 1-2 mm.
Clutch adjustment on the Lada Grant is carried out using any of two methods. And according to reviews, the need arises every 15,000-20,000 km.
Clutch pedal squeaks
Many domestic motorists who operate cars produced by the Volzhsky Automobile Plant are well aware of the rather unpleasant problem associated with the occurrence of extraneous sounds (creaking, crackling, rather loud clicks) during operation of the clutch pedal. The second unpleasant aspect of this problem is the fact that its first manifestations begin after a couple of hundred kilometers of the new car.
Mechanical connections in the design of VAZ cars are quite a “problem” point, despite their high reliability and unpretentiousness. However, violations committed when aligning the clutch pedals, insufficient lubrication in the joints, violation of the requirements of technological assembly maps and similar “mistakes” of the manufacturer give rise to the above-mentioned extraneous noise during the operation of the product.
This article is intended not only to reveal the main reasons for the formation of these unpleasant sounds, but also to suggest to the domestic car enthusiast ways to eliminate the problem. As an example, let's look at the clutch mechanism of the most popular representative of the VAZ family among our compatriots - the Lada Granta.
Verdict
Substandard behavior of the Granta pedal assembly is a malfunction that should be eliminated as soon as possible. The issue may be either in the drive, which here is a cable drive, or directly in the unit connecting the engine and the gearbox.
Most often, the problem lies in an unraveled cable or its limited mobility in the jacket. This problem can be eliminated by replacing the cable and/or lubricating it with oil, silicone or WD-40. The fork shaft often needs lubrication.
Less commonly, the problem is caused by a deformed or cracked fork. Wear on the leaf spring can radically change the amount of force required to release the pedal. A new clutch can also cause it to feel stiff.
VAZ cars use a clutch cable with automatic adjustment. The machine itself is a separate unit, which is fixed near the pedals. Clicking or crackling noises when the machine operates can be considered normal. But if the pedal begins to sink and the clutch does not disengage completely, then the automatic system will no longer help - you need to forcibly reduce the length of the cable. A threaded tip is provided for these purposes. That is, clutch adjustment on the Lada Grant can be done manually. Let's look at all the steps in more detail.
How can the clutch pedal click? Find out in the video.
FakeHeader
Comments 14
I also wanted to get confused, bought the 10th cable, went to the service center, removed the old one and then surprise, the factory cable was 10 cm longer than the 10th (Kalina 1 ’13) and the bummer had to be replaced with a Kalinovsky one.
Like for your efforts. But. For example, I have a stock cable and am quite happy with it, sometimes it clicks once every now and then, but it doesn’t bother me because it happens very rarely. True, I myself re-adjusted it according to the manual and lubricated it, after the adjustment I pressed the pedal several times, the device tightened it and that’s it, I drive, nothing bothers me.
When I was working on getting rid of the squeak, I also wanted to do the same thing (although it can be cheaper to buy both the cable and the fastener at a disassembly) until half a year later nothing creaks. I installed it while there is a spring in the BZ. So far I’m happy with it and another option is to press in another loop and not change the entire cable.
and someone else had another option - remove the machine gun and weld a metal ring to the end of the cable.
you can't weld it to the cable. only if you fill it with tin. Separately solder the cable with acid and then pour it into the tube.
On the pedal side, the cable already has a metal tip with teeth. I saw someone had it welded to it.
I thoroughly lubricated the auto-tensioning mechanism and there was no squeaking or squeaking.
The only inconvenience of the standard clutch for you is clicking, and this is completely normal, does not affect the ride in any way, does not irritate me, an absolutely pointless idea, you will still change to the classic! There's also a gap you can adjust at the bottom, which is cool. Looks like the world has gone crazy! Sorry, I just can’t get my head around this alteration, you’re looking for problems for yourself! On the contrary, they did it well; there is no need to adjust anything during operation. For example, a friend of mine drove a two-wheeler with his leg stuck in the knee due to manual adjustment, until I adjusted everything properly for him, and one wonders why go against real improvement.
So everything started well and ruined everything with the last phrase. It's a pity, it's a pity.
The technique is not suitable for everyone. It won't work like that on a cable car.
The right thing to do! Good job!
Add to favorites, I've been wanting to do the same thing for a long time!
You have an old box with a short cable, on a new (cable) box 2181, there is a longer clutch cable, your method is only suitable for grants with black bumpers where the old box has a rocker.
Clutch pedal on grant creaking, clicking, adjustment
About the clutch pedal on the Lada Granta
Such a unit on any car is a transmission element, with the help of which, when the pedal is pressed, the transmission of torque from the engine to the gearbox, and then to the drive wheels, is interrupted. With its help, it is possible to smoothly start from a place after parking the car, or change gears while driving. On the Lada Granta, the clutch is installed from its predecessor, the Lada Kalina.
This transmission unit has a traditional, backlash-free classical design. This indicates that there is no play between the pressure spring and the bearing that releases the clutch. It is driven by pressing the pedal using a cable. This unit consists of a flywheel on which the basket is attached. It provides constant pressure on the pressure plate to transmit torque from the engine. This unit, like all mechanisms, sometimes requires adjustments and repairs. Let's talk about how the adjustment is performed in more detail.
Adjustment work
On this car, the drive is carried out using a cable that has an automatic tension system, or, as it is also called, a wear compensator. If everything is done and the adjustment is carried out correctly, then the owner of the car during operation does not need to adjust the gaps or make adjustments to the release pedal.
Be that as it may, problems still happen sometimes. A variety of reasons contribute to this. Various noises may appear during operation, the clutch clicks, the pedal creaks. There may be other unusual manifestations while driving the Lada Granta.
The correct gap is considered to be the case when its value between the power fork and the wing is 27 millimeters.
This is followed by mandatory lubrication of all elements in the pedal assembly. At the same time, we must not forget about the plastic of the compensator ratchet, clutch bushing, and the casing of its drive cable.
When this adjustment is made, there is usually no more clicking in the drive, and the pedal does not make unpleasant sounds.
Sometimes a squeaking sound can come from the engine compartment of a car. Its source may be the tip lead. To eliminate this squeak, it is enough to lubricate the contact point between the plastic nut and the clutch release fork.
In some cases, the cause of squeaks from the engine compartment may be a lack of lubrication on the gearbox input shaft. In such cases, graphite lubricant in a can comes to the rescue. To eliminate this malfunction, remove the engine protection and lubricate the rubbing parts.
When the source of extraneous noise is the clutch release cable, you should also try to lubricate it with graphite lubricant. Insert the canister tube between the cable and the casing and try to lubricate it. In cases where this does not help, change the drive cable.
If, after all the adjustment work, you still hear extraneous sounds from the clutch side, something clicks there and the pedal creaks. Then you need to contact a car service for a more complete check of this unit.
Clutch replacement work
Check the wear of the friction linings of the pressure plate. If wear exceeds the permissible limit, it is replaced with a new one.
Installation on the flywheel is carried out in the reverse order.
Symptoms of malfunction, diagnostics, solutions
| Sign | Cause and remedy |
| Short pedal stroke | Adjust the length of the cable. Check the integrity of metal fibers. Most likely delamination or bending. |
| The clutch drags at speed, it is difficult to shift into higher gears. | The flywheel is bent or damaged. The gripper teeth are worn. Replacing the flywheel and related consumables. |
| Slipping when activating first gear and increasing speed with the accelerator pedal. | Replace friction linings, disk, clean the drive from old grease |
| Sharp jerks when turning on / changing gears. | The pressure plate is damaged, replace the basket. |
| Whistle when activating first and subsequent speeds | Install a new release bearing |
| Crackling, knocking, crunching noise when shifting into up/down gears | Wear out the damper spring, replace it with a new one, lubricate the entire drive mechanism. |
| The lever falls, falls, rattles | Excessive stretch of tensioner. Replace with a new one, install bushings. |
Related link:
Experts' recommendations for replacing an automatic/manual transmission on a Lada Grant
Clutch squeak
It is problematic to independently adjust the Grant clutch, since the cable is equipped with automatic equipment. The clutch drive is cable driven and backlash-free. Here VAZ used a ratchet-type mechanism, the task of which is to compensate for the changed length of the cable during operation.
That is, over the course of its life, the length of the cable can decrease or, conversely, increase. After all, he is regularly under tension. Therefore, independent adjustment is difficult. But it is the cable that is the cause of many minor troubles that Lada Grant owners encounter. Note that these problems appear on both the sedan and the liftback body.
It follows from this:
- Clutch squeaks when the pedal is pressed
- Pedal clicks, buzzing sounds
You need to check the clutch. And if the box itself is in order (basket, disk), then the pedal is the discomfort factor. Here we need to check the cable, buy a new one if necessary and replace it.
If everything is perfect in the calculations, but the unpleasant sound does not leave you behind, then you need to look for other culprits:
- Plastic pedal bushing. It can “get used” to the bracket and make squeaks. Everything is quite simple here, we are looking for the attachment point, it is probably loose. Let's pull it up. Then be sure to repeat the procedure with the cable
- Tip lead. You will notice this at the first stage. If it squeaks, then it needs to be changed. Fortunately, there are plenty of such parts on sale, and the replacement process itself is not difficult. Unscrewed the old one and screwed on the new one. Then again measure and adjust according to the instructions above
- Loss of input shaft lubrication. This is already a problem with the box itself. Here the solution is clear: lubricant.
There can be several reasons for clutch pedal squeaks, so first you need to trace the source of the squeaks. If they come from the pedals, then the reason may be in the plastic pedal bushing, which, when you press the clutch pedal, presses the microswitch, there is a place where it rubs against the bracket.
If the squeaks come from the motor side, then the tip driver may be creaking; you need to lubricate the contact point between the plastic nut of the cable and the clutch fork. Another reason for squeaks in the clutch pedal may be the lack of lubricant on the input shaft in the box, where the pressure bearing goes, which is pressed on the clutch fork, and he, in turn, presses the clutch disc.
Another reason for squeaks may be in the clutch cable itself; you can try to lubricate it using the same grease and a thin tube, or replace the cable with a new one. If nothing helps, then try contacting an official dealer with your problem; they often remove the Grants checkpoint to solve the problem.
In what cases is it recommended to contact a service station?
Unfortunately, not only squeaking occurs, but also serious problems, among which the most unpleasant and difficult to fix is clutch slipping, which is not uncommon for this model. In such a situation, the only way out would be a visit to the service station. On average, a clutch kit will cost 5 thousand rubles, plus 1-2 thousand rubles. – installation fee.
A visit to a service station can be avoided if you properly care for the transmission and follow the recommendations of experts:
- If possible, do not overstress the clutch. Try to move off gently at a low crankshaft speed (watch the tachometer readings). Otherwise, due to natural inertia, slippage with accelerated wear will occur.
- Do not release the pedal too slowly, as if on a truck: do not be afraid - the car will not stall. Modern cars with synchronizer are equipped with systems that do not involve, for example, double squeezing with re-throttle. In general, feel free to take your foot off the pedal. What was useful in Soviet times is now harmful, and light pressure leads to unwanted slippage and a reduction in resource.
- Do not tow other vehicles when driving uphill. This is especially harmful on slippery, uneven roads.
- Do not hold the clutch in the depressed position, but remove your foot from the pedal, placing the lever in neutral. This loads the box, but spares the clutch.
Thus, how long the clutch will last and how often it will be disturbed during operation depends only on you. Remember: any malfunction can be easily fixed in a timely manner. And if you don’t have the appropriate skills, it’s better not to get down to business, but entrust the responsible mission to professionals.
Why the ECM detects error “P0830”, video explanation
Praise to the author! I am also a terrible car enthusiast, albeit with little experience... I also had right-hand drive ones, but unfortunately, they are not convenient with our traffic. I now have probably the most boring Toyota model. For almost 2 years of owning this car, I had no problems at all, it burned out once a light bulb in the foot, and I changed the brakes and oil according to plan, despite the fact that the car is 8 years old, the mileage is about 150 thousand. It accelerates quickly, drives smoothly, and is maneuverable. spacious trunk and for its size a very comfortable and spacious interior, dad feels completely comfortable in the back seat, and he is a large man. After a night in a windswept parking lot at minus 35, it started up and didn’t even sneeze once. The stove heats perfectly, the air conditioner cools quickly, the consumption is 6-7 liters of 92 in the city. engine 1.5. 106 horses, + with its size it will fit into any hole in the parking lot. In short, the car is just great. )))
I've been meaning to adjust the clutch on my Grant for a long time. I made a printout of your article. Tomorrow I’ll arm myself with the necessary tools and go to the garage to do everything with my own hands step by step, as described in the article.
Open the hood, under the air filter there is a clutch foot. It is equipped with a cable with a plastic screw. Lightly pressing the foot, remove the cable to the side. We adjust the cable screw and put it back on the foot.
When accelerating, the engine roars slightly when the leveler revs up
Clutch needs replacement! It's slipping!
When starting off there is jerking, what could be the problem?
The clutch is designed to connect and disconnect the gearbox and engine flywheel, smoothing out sudden changes in torque loads. The friction clutch allows the car to start and stop smoothly with the power unit running. If sudden braking is necessary with the clutch engaged, it slips, protecting the gearbox from possible overloads. In good condition, the mechanism should provide a reliable connection between the transmission and the power unit.
List of online stores selling parts (Moscow, St. Petersburg, Kyiv regions)
| № | Name | Address |
| 1. | "Autoall" | www.avtoall.ru |
| 2. | "Original part" | lada-original.ru/ |
| 3. | "Navigator" | www.navigator-63.ru/ |
| 4. | "TOTAX" | totax.com.ua |
| 5. | "Zakupka" | kiev.zakupka.com |
| 6. | "How much" | www.avtostore.spb.ru |
Step-by-step instruction
Now we will analyze the whole process step by step. Stock up on a caliper or at least a ruler in advance.
- Open the hood and disconnect the negative terminal on the battery. Now we need to remove the air filter, which hides the components we need
- We remove the mass air flow sensor connector, the adsorber coupler, the rubber supports and tilt the VF housing to the side
- Our clutch fork is located next to the crankcase. On some cars on the secondary market you can also find a sensor moved there by the driver
- Using a tool, say, pliers, we pull the tip towards ourselves in order to free up more space for work
- We take a caliper and measure the distance from the leash to the fork. According to Grant's technical documentation, it should be exactly 27 millimeters
- We adjust the leash according to the thread if the distance does not match
- Then we press the pedal a couple of times, look at the result, and repeat the setting
- Next is the travel of the pedal itself. It should be 14.6 centimeters (+ - centimeter). As already said, it is better if it is flush with the brake
- If even after several adjustments the pedal does not fall into place, then it would be logical to deal with the unit itself
Review of Manufacturer Prices
| Manufacturer | Price, rub.) | Resource (Thousand km) |
| LADA 21901-1602210 original | From 634 | 100 |
| ASPCC260210 | From 465 | 75 – 80 |
| BRAND 219011602210 | From 300 | 75 — 80 |
| Plastic cable lead 21901-1602266-00 | From 150 | 40 |
| 21901-1602210-00 clutch cable assembly | From 550 – 600 | 75 |
| 21901-1602210-00 clutch cable assembly | —/— | 75 |
| JSC "ProSport" 26594516 | From 500 | 80 – 85 |
| JSC Vortex 5465465 | From 550 | 80 — 85 |
*prices are current as of October 29, 2018.
Recommendations for the selection of parts and components
The vast majority of spare parts for the Lada Granta are domestically produced. Foreign analogues are not in demand due to their high cost. Compared to “our” products, imports are 10–15% more expensive. The workmanship is at the same level.
When purchasing spare parts and components, always give preference to high-quality, original parts. Check the correspondence of catalog items with the actual data specified in the operating instructions for the technical device.
If you have no experience in car maintenance, seek qualified assistance from service station specialists.
Reviews
| № | Positive |
| 1. | Gennady: This is my second year driving Grant, there are no special problems. I follow maintenance deadlines, fill with high-quality oils, and have a moderate driving style. I believe that these are the main factors that ensure the “longevity” of a car. |
| 2. | Vasily: after 35,000 km the cable creaked, I thought about replacing it with a new one, but the guys advised me to lubricate it with oil. Thanks for the recommendation, I’m driving, I don’t know any problems. |
| 3. | Vitaly: I heard from motorists about the problem of cable squeaking on Grant. I can’t confirm, since I drove 75,000, the unit is working properly. |
| 4. | Ivan: the total mileage of the car is over 110,000 km. I replaced the clutch cable at 80,000 km; this is a very good resource for the Lada Granta. Of course, the car is not perfect, but with timely maintenance, everything works properly. |
| 5. | Kirill: on a run of 90,000 km the cable flew, I didn’t think that Grant would last that long. The store recommended a number of manufacturers, and made a choice in favor of domestic ones. My recommendations to motorists. |
| 6. | Vladislav: the first creak of the tensioner appeared at 65,000 km, did not lubricate it, replaced it with a new one. I think that this is quite normal for Russian quality. |
| 7. | Igor: the clutch works properly, does not knock, does not stick, mileage is 95,000 km. Taking good care of the machine and quality parts are the main factors contributing to long service life. |
| Negative | |
| 1. | Victor: the first tensioner flew at around 30,000 km. The interval is too short. Manufacturer's warranty is 95-100 thousand km. In the store I chose a foreign-made tensioner. I've been using the machine for two months now and I'm happy with the quality. |
| 2. | Vasily: at the second technical inspection, the master recommended replacing the tensioner, since the pedal travel exceeded 146 mm at maximum tension. I think the resource is too small. |
| 3. | Gennady: the release bearing flew at 60,000 km, which was unexpected, because the replacement interval had not yet arrived. |
How to adjust the clutch on a Niva?
Conclusion
Although the adjustment work is not a difficult task, it requires some attention and patience. However, with the right approach, success will not keep you waiting. Good luck with the renovation.
During the operation of the car, sometimes it becomes necessary to adjust the clutch drive. This happens because over time, the pedal stroke changes as a result of natural operational wear of the rubbing parts of the clutch (driven and driven disks, flywheel surface) and (or) pulling of its cable.
In another case, the need to adjust the clutch drive may arise due to previous incorrect adjustment. It is possible to reduce or increase the working stroke of its pedal. As a result, malfunctions occur in the operation of the drive - the clutch begins to “slip” or “drive”, gear shifting becomes difficult, jerks appear when starting from a standstill, fuel consumption increases, etc.
Here we will consider a simple adjustment of the clutch drive (clutch pedal travel) on VAZ 2108, 21081, 21083, 2109, 21091, 21093, 21099.
Tools required for adjusting the clutch of VAZ 2108, 2109, 21099
— tape measure with a clearly readable scale
— two 17 mm open-end wrenches
open-end wrenches for 17 and a tape measure - all you need to adjust the clutch drive on eights, nines and ninety-nines
Preparatory work
— fix the car (put chocks under the wheels)
— remove the battery (you don’t have to remove it, but it’s easier to make adjustments with the battery removed)
- press the clutch pedal several times
Checking the working clutch pedal
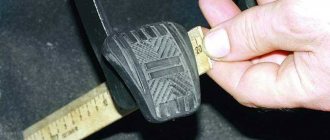
Let's measure the travel of the car's clutch pedal. Before doing this, we move the carpet on the floor of the car back so that the measurements are more accurate.
- use a tape measure to measure the distance from the floor of the car to the bottom edge of the clutch pedal
The image shows how best to do this.
the actual distance from the bottom edge of the clutch pedal to the floor under the driver’s feet, measured using a tape measure
It should be approximately 18-20 cm.
— press the clutch pedal all the way with your hand and measure the distance from the floor to the bottom edge of the pedal.
the distance from the floor under the driver’s feet to the bottom edge of the clutch pedal when it is pressed all the way - the clutch is “disengaged”
It should be 6-7 cm
- subtract from 18-20, 6-7, it turns out 13-14 cm
This is the norm for the full travel of the clutch pedal of VAZ 2108, 2109, 21099 cars and their modifications. Many repair manuals indicate a working stroke size of 12.5-13.5 cm, which is also very close to our measurement.
If the clutch pedal travel differs more or less, it is necessary to adjust the clutch drive.
Adjusting the clutch drive VAZ 2108, 2109, 21099
The clutch drive adjusting nut is located in the engine compartment of the car on the drive cable sheath, inserted into a special bracket mounted on the gearbox housing. It is protected from unscrewing by a lock nut located there.
clutch drive adjusting nut and its locknut on the bracket
— Holding the adjusting nut with one 17 mm wrench, use another 17 mm wrench to loosen the lock nut a few turns
loosening the locknut using two open-end wrenches 17
— We rotate the adjusting nut clockwise with one key, holding the locknut with the other - this is to increase the clutch pedal travel (the pedal will rise) or counterclockwise to decrease its travel (the pedal will lower to the floor)
rotation of the adjusting nut - adjustment of the clutch drive
How much to reduce or, conversely, increase the pedal stroke is determined based on the results of the check described above.
- Lightly tighten the locknut
— Press the clutch pedal several times and check again
If the resulting figure does not fit within the norm, we carry out the adjustment again. And so on until we achieve the required result.
— After completing the adjustment, tighten the locknut
Notes and additions
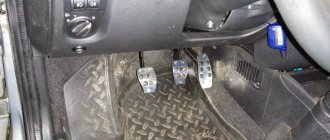
— When the clutch is correctly adjusted, its pedal should be approximately at the same level as the brake pedal.
The clutch pedal is approximately at the same level as the brake pedal - the drive is adjusted correctly
— The maximum permissible working stroke of the clutch pedal for VAZ 2108, 21081, 21083, 2109, 21091, 21093, 21099 cars is 16 cm.
Five more articles on VAZ cars