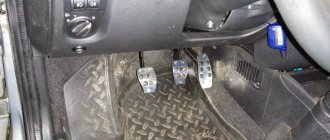
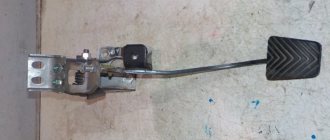
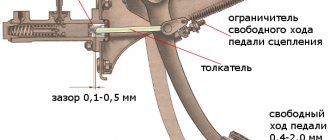
Correct and precise operation of the clutch on VAZ 2105, 2107 vehicles is ensured by certain adjustments to its drive. There are two of them: adjusting the gap between the pusher and the piston of the clutch master cylinder and adjusting the free play of the clutch pedal.
The gap between the pusher and the clutch master cylinder piston is 0.1 - 0.5 mm. It is regulated by rotating the clutch pedal free travel limiter. In this case, a certain free play of 0.4 - 2.0 mm is formed at the clutch pedal, which the driver selects when starting to press the pedal.
the gap between the pusher and the piston, free play of the clutch pedal of VAZ 2105, 2107 cars
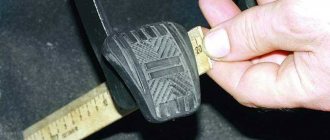
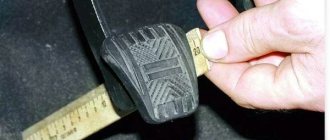
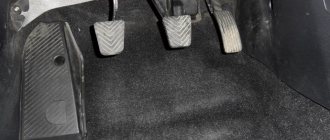
It is measured with a ruler or tape measure, which is installed from the floor to the middle of the lower part of the pedal platform. We move the platform with our hand relative to the ruler scale by pressing the pedal. If there is a gap, at first the pedal moves very easily, and then with difficulty. If there is no gap, turn the pedal travel limiter out a little. We ensure that the free movement along the ruler fits within the required two millimeters.
This gap is necessary for the clutch to disengage completely. If it is missing, then the piston will not be able to fully return to the rear position when the pedal is released and in the working cavity of the master cylinder, and excess pressure will remain in the entire drive. As a result, the clutch will not disengage completely, since the release bearing will press on the leafs of the pressure spring, and the discs will slip (not be fully pressed against the flywheel). Increasing this gap will lead to the fact that the clutch will not disengage completely and will “drive” (the discs do not fully move away from the flywheel).
Adjusting the clutch pedal free play (the gap between the release bearing and the plane of the pressure flange of the clutch “basket” pressure spring)
It is adjusted by a nut on the clutch slave cylinder pusher. With proper adjustment, the free play of the clutch release fork is 4–5 mm (checked by hand: the fork is pulled away from the stop against the adjusting nut on the pusher), and the free play of the clutch pedal is 25–35 mm. It is necessary to unscrew the lock nut on the pusher and rotate the adjusting nut to set the required free play of the fork. The pedal free play of 25 - 35 mm (until the clutch is disengaged) can be checked using a ruler. It is this value that means there is a gap between the release bearing and the plane of the pressure flange of the clutch “basket” pressure spring.
free movement of the clutch slave cylinder pusher for VAZ 2105, 2107 cars
In the absence of this gap, the release bearing presses on the pressure spring of the “basket” - the clutch “slips”. With an increased gap, it “leads.”
The clutch pedal free play of 0.4 – 2.0 mm is included in the pedal free play of 25 – 35 mm. That is, 25 - 35 mm is the total required size.
Notes and additions
— The clutch on VAZ 2105, 2107 cars is of a constantly closed type, that is, constantly on: when the pedal is released, the driven disk is pressed by the drive disk to the flywheel and rotates with it, as well as the release bearing and the input shaft of the gearbox. There is a gap of 1.5 - 2.0 mm between the release bearing and the lining of the thrust flange of the clutch basket pressure leaf spring. This gap is selected when the driver begins to press the pedal.
— The full travel of the clutch pedal on VAZ 2105, 2107 cars is 140 mm.
— After adjusting the clutch drive, check for smooth gear shifting. Particular attention to reverse gear. The smoothness of its activation is an indicator of successful adjustment.
More articles on VAZ 2105, 2107 cars
The design of the VAZ 2107 clutch mechanism
The seven uses a wet clutch mechanism. It consists of:
- directly the pedal, brought into the salon;
- master cylinder;
- pressure pipes;
- working cylinder;
- clutch fork;
- release bearing;
- clutch basket and disc.
Some car enthusiasts modify the mechanism by discarding the hydraulics and installing a dry drive. The process is justified by the greater accuracy of the modification and the absence of the need for frequent maintenance.
Adjustment Guide
The mechanical principle of the clutch is driven by a cable. By adjusting the cable, the pedal stroke length is adjusted. So:
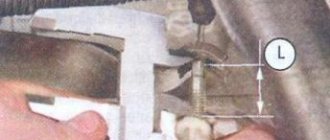
- We find the corresponding cable under the hood, at its end we see a bolt with lock nut 1. Turn the adjusting nut 2 and set the pedal free play distance to 13 cm.
To increase the length of the idle stroke of the pedal, the nut must be tightened, and, accordingly, to reduce the length of the idle stroke of the pedal, it must be unscrewed.
- After adjusting the pedal distance, you need to press and release the pedal three times. Then, again measure the distance from the floor to the pedal. If the distance has changed, we adjust it again so that the distance is 12-13 centimes.
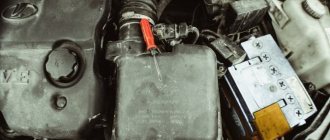
Setting the hydraulic clutch drive
The main problem in hydraulic systems is the formation of an air lock. The method for adjusting the clutch hydraulic drive is to set the required clearances between the rod and the piston of the master cylinder. The required distance between the friction ring of the pressure plate and the release bearing is also set.
- Remove the spring from the master cylinder bracket and fork.
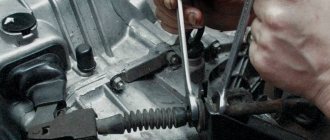
- Measure the gap between the pusher and the release fork. The normal distance is 5 mm.
- Turn the adjusting nut on the rod and set the gap to 5 mm. 5 mm is the gap, that is, it is the free play of the fork.
There are drives of a different principle of operation, but in cars either hydraulic or mechanical clutch drives are installed. On VAZ 2101, 2102, 2103, 2104, 2105, 2106, 2107 cars there is a hydraulic clutch drive. On VAZ 2108, 2109, 21099, 2110, 2111, 2112, 2113, 2114, 2115 cars there is a mechanical drive.
How does the clutch drive work?
The principle of operation of the mechanism is as follows.
- The driver presses the pedal.
- The piston of the master cylinder pumps pressure into the system, excess fluid goes into the expansion tank.
- The contents of the system move along the lines and enter the working cylinder.
- The piston of the working part pushes the fork and opens the bearing.
- The clutch disc moves away from the basket and the engine is disconnected from the gearbox.
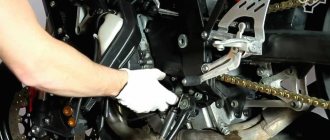
Replacing the clutch slave cylinder
First, we disconnect the cotter pin element, which drives the hydraulic drive mechanism itself, using pliers. We use them to remove the spring. We do not scroll the fitting hose completely.
Do-it-yourself engine repair - major restoration and maintenance of an internal combustion engine
DIY bumper: how to make a unique polymer bumper for a car at home (125 photos)
Do-it-yourself car painting - preparation for coating and the main stages of high-quality car painting (100 photos)
Using the 13th key, remove the 2 bolts from the crankcase. And only now we take out the pusher. Access to the cylinders is open. How to further replace the working clutch is shown in more detail in the video.
When to adjust the clutch drive
The standard adjustment procedure is required as routine maintenance or emergency repairs. Usually the reason for performing the operation is such problems.
- Gear shift violation - positions are engaged with knocking, crackling or extraneous sounds.
- The clutch switch response threshold has been violated. A dip of 25 to 35 mm is considered optimal.
- Increased fuel consumption. If the mechanism is faulty, excess gasoline consumption can be up to 20% of the reference value.
- Knocking out positions. During acceleration of the vehicle, the gears “fly out”.
- Dissonance when revving the engine. When you press the gas pedal, the internal combustion engine spins up, and the car lags behind.
- Clutch lever failures, this also includes an increase or absence of operating play in the system.
- Early or late operation of the mechanism when the pedal is pressed.
Diagnosis of clutch faults VAZ 2107
There are a number of breakdowns that indicate that the car requires urgent repairs.
Clutch slipping
This occurs during sudden acceleration. The engine steadily picks up speed, but the car is “late” in accelerating. The process may also be accompanied by jerking, jerking and extraneous noise.
The situation greatly wears out the friction disc and negatively affects fuel consumption.
Clutch leads
This is caused by improper adjustment or airing of the system. The friction linings do not move completely away from the basket and gears are difficult to engage.
Jerks when starting and changing gears
It requires pumping and adjustment of the mechanism, when the car jerks when you put it in gear. The disc may slip at the start or rapid acceleration due to its wear.
Noise when clutch is disengaged
When the car vibrates slightly and an extraneous sound comes out when the pedal is fully depressed, the clutch basket and clutch disc do not completely separate.
This occurs when the device settings fail.
Noise when clutch engaged
The cause and consequences are the same as above.
Pedal failure and lack of clutch
Here the matter is more serious. The pedal can only fail if the mechanism is severely damaged. In 90% of cases, the cause is hidden in the head cylinder or basket. Operating a car with such a problem is strictly prohibited.
The clutch disengages, but the pedal does not return to its original position
This malfunction is often solved in a trivially simple way - the return spring may fly off or burst. The hydraulic system in the VAZ 2107 is a design where there are no return devices, except for mechanical parts.
Everything is solved by replacing the damaged element.
Tight grip
Some car enthusiasts complain that the clutch pedal is pressed extremely hard. In addition to the hydraulic system, movement difficulties are caused by souring of the moving joints and jamming of the release bearing. To fix the problem, you must completely disassemble the entire system.
The clutch disengages at the beginning or end of the pedal stroke
In this case, everything is quite simple - the system requires adjustment. The procedure is primitive and is completed in 20-30 minutes. The only caveat is that you will need an assistant.
Most common breakdowns
Every car owner of domestic brands is familiar with the concept of slipping and dragging, this applies to the clutch.
- in the first case: when the pedal is fully lowered to the bottom position, the clutch disc itself slips a little, thereby not providing the transmission with the required amount of power;
- in the second: the clutch pedal, which is completely flooded down, cannot move the basket away from the flywheel, because of this the car moves even when the rocker is in the neutral position. This situation is extremely negatively reflected in the control process itself, since the speeds will turn on either too early or too late.
How to finally adjust the clutch on a VAZ 2107
After all manipulations, it is necessary to check the functionality of the system. To do this, you need to start the engine and let it warm up. Then, with the engine running, you need to depress the clutch and, without accelerating, engage the rear rocker position. In this case, the presence of extraneous sounds and rattles is not allowed. The position is turned on easily - without additional effort.
Next, you can start moving at first speed and then increase the position to maximum (5). When driving, the presence of extraneous sounds or grinding noises is strictly unacceptable; the pedal is pressed evenly, without dips or jerks.
The last stage is acceleration at each gearbox speed, while the set of engine speeds fully corresponds to the acceleration of the car. If there is dissonance, the clutch disc slips and recalibration is required.
Why and how to bleed the clutch on a VAZ 2107 in your garage
The reason for bleeding the clutch is air in the hydraulic system. Air bubbles tend to shrink, which reduces the performance of the device. It’s easy to bleed the clutch in a VAZ 2107 at home. To do this, it is enough to have a set of primitive tools and a little patience.
Motorists prefer to do their own repairs because the procedure is expensive, and performing the entire process on your own is not difficult.
Preparing to bleed the clutch system
To bleed the line and do it correctly, preparation must be done.
- Drive the car onto a viewing hole, overpass or lift, where you secure it.
- Clean the expansion tank cap and fitting from dirt. Garbage entering the system is unacceptable.
Stages of the clutch bleeding process
The procedure is performed in a certain sequence.
- The protective cap is removed from the fitting and the hose is put on it.
- The second end of the tube is lowered into a bottle with TJ previously poured into it.
- Brake fluid is also poured into the expansion tank to the maximum mark.
- Next, the assistant gets into the car and presses the pedal several times; during the last push, you should press the lever to the floor and hold it.
- After this, use wrench No. 8 to unscrew the fitting on the working cylinder and the waste with air bubbles is squeezed out into the bottle. After the pressure has dropped (the pedal has failed), the valve must be closed.
- The procedure is repeated until the air is completely removed from the system.
We make a replacement
If you decide to change the element yourself, but do not have enough knowledge and experience to do this, then it does not matter. Many motorists use the instructions on our website when carrying out certain repair work for the first time - and most of them are satisfied with the results. Even if you have never changed this element, just follow the instructions and you will succeed. But if you are not confident in your abilities and open the hood of the car only to add washer fluid to the expansion tank, then it is better to entrust this matter to specialists.
New DS for VAZ 2107
When do you need to change the DS? This may be needed in several cases:
- you notice that the clutch pedal does not engage or disengage completely;
- the coupling system does not work correctly: there is significant jerking when changing gears;
- When you press the pedal you hear new noises.
The process of replacing the DS involves dismantling the gearbox. However, we have a simpler option. We will look at the process of changing the clutch component without removing the transmission.
Sorry, there are no surveys available at this time.
What will you need?
Prepare everything you may need during the repair process, namely:
- set of wrenches;
- prybar or crowbar;
- jack;
- rags;
- some gasoline;
- mandrel for centering the disk.
We will need rags and gasoline to lubricate the DS, and a mandrel to center it. It is not expensive and is sold in any car store. When replacing the DS, this point is very important, since the new element necessarily requires alignment. Having collected everything you need, you can start working.
A set of wrenches for carrying out repair work on changing the DS of a VAZ 2107 A pry bar that will be needed during the repair process A jack for carrying out the work A little rag for lubricating the DS A little gasoline for lubricating the DS: this amount is quite enough A special mandrel for centering the DS: sold in any car store
Replacement instructions
If you decide to replace the DS yourself, then you will need the help of another person. You need to drive onto a hole or overpass, otherwise the repair will not be possible.
- Before you begin replacing the driveshaft, you need to disconnect the driveshaft. To do this, remove the brake drums and pads from the wheels. Take a 12mm wrench and unscrew the axle shaft mounts and then pull them out.
- Before unscrewing the fastening screws, the positions of the cardan flange and gearbox must be noted. This is done so that subsequent assembly will maintain their original position in order to prevent imbalance. So, unscrew the bolts and disconnect the driveshaft.
- Now you need to disconnect the wire contacts from the sensor that turns on the reversing headlights when reversing.
- There is a clutch mechanism casing on the cylinder head - they need to be unscrewed with a wrench, and the casing must be removed. In addition, you need to remove the cross member of the car's underbody.
- Now take a 13mm socket wrench and use it to unscrew the two bolts that hold the gearbox cushion. Take off this pillow.
- Next, take a crowbar or pry bar and move the gearbox power unit to the side opposite the engine. Here you will need the help of another person, since the unit must be moved very carefully, this can cause some difficulties. Do this until the shift lever is near the rear edge of the hole in the bottom of the vehicle.
- As a result, it should turn out that the transmission unit of your VAZ 2107 car will be located on the receiving tube. Here you will need a jack that will act as a support. It must be placed under the gearbox so that it does not slip and sag on the wires, thereby protecting the unit from damage.
- Next, you need to remove the clutch basket from the flywheel of the VAZ engine. To do this, you need to take a crowbar or pry bar and use it to fix the flywheel in place. When this is done, using a “13” wrench, unscrew the basket fastening bolts one by one.
- Having done this, carefully move the basket to the side with a crowbar and remove the DS that needs to be replaced. Remember which side the element is installed in order to place it the way you need it.
- At this point, the dismantling of the DS can be considered complete. Take the new disk and install it in place of the old one. Before installing the element, you need to wipe it with a clean rag, which must first be soaked in gasoline. All subsequent assembly must be carried out in reverse order. If necessary, replace other system elements.
1. Using a socket wrench, unscrew the nuts securing the casing 2. Take a pry bar and carefully move the gearbox away from the engine 3. Take a wrench at “13” and unscrew the nuts securing the mechanism basket 4. Dismantle the old DS, do not forget to pay attention to Which side is it installed 6. Center the new DS: the mandrel should freely enter and exit the hole 5. Place the new DS and insert a special centering mandrel into the hole
Important: do not forget to center the disk when it is already installed. To do this, use a special mandrel. If the DS is installed correctly on the mechanism, the mandrel will move freely into and out of the bearing when the basket mounting bolts are tightened. Don’t forget to also coat the gearbox input shaft splines with a thin layer of lubricant. Don't forget to also adjust the pedal free play.
Clutch check
To check the clutch bleeding, just follow a simple sequence.
- Raise the handbrake all the way.
- Depress the clutch and start the engine.
- Try to change gears, but no extraneous sounds or blockages should appear.
- Engage a random gear and smoothly release the pedal.
- Approximately halfway through the stroke, the engine should begin to twitch and stall. This indicates proper operation of the coupling device.
Important Tips and Recommendations
Experienced drivers and mechanics recommend following simple rules to extend the life of the device.
- Do not overpress the pedal. This causes the disc to heat up and can cause it to wear out quickly.
- Use only high-quality brake fluid.
- Check the functionality of the device in a timely manner.
- If extraneous sounds or plugging occur, it is necessary to diagnose the mechanism.