Has your “nine” increased gas and oil consumption? Is there dark smoke coming out of the exhaust pipe? These are symptoms of piston wear. In this case, the piston rings are replaced. Replacing VAZ 2109 rings is a simple process. Installation of new components can be done without even removing the engine. The main thing: disconnect the interfering parts.
Let's look at how to provide access to the piston group and replace the rings. When installing new parts, there are standards for permissible clearances that are important to comply with. After installation, be sure to run the car in. But first, let’s figure out what a piston group is and what are the signs of its wear.
Signs of piston wear
On average, a piston replacement on a VAZ 2109 is required every 150,000 km. The car owner should pay attention to warning signs that indicate the need to change the rings.
- The car began to require more fuel.
- Compression measurements showed a value of less than 10 atmospheres.
- There is less engine oil.
- Replacing oil seals does not help eliminate oil leaks.
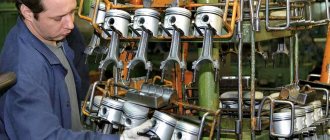
The VAZ 2109 piston group is a set consisting of a piston, piston rings mounted on it, a piston pin and its fasteners. There are three grooves on the surface of the piston for rings.
Two compression rings are responsible for the tightness of the space above the piston. They maintain normal compression and also prevent oil from entering the combustion chamber.
The oil scraper is responsible for removing excess oil from the cylinder walls, thereby reducing fuel consumption. Only a film a few microns thick is left inside the cylinder liner to lower the piston. Well, the pin, which is inserted transversely inside the piston cavity, attaches the connecting rod to the piston.
Removing the pistons from the cylinders
To carry out the work, we go to an inspection hole or overpass and prepare a set of tools:
- spanners;
- torque wrench (determines the degree of tightening of the bolt);
- mandrel for crimping rings;
- a set of feeler gauges for determining the gap.
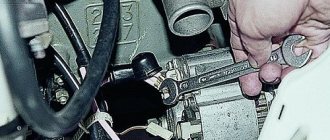
Replacing piston rings on a VAZ 2109 begins with disconnecting the negative terminal of the battery. To provide access to the crankshaft from the pit, remove the lower crankcase cover. There is a gasket at the junction, it will need to be replaced with a new one. Using a 10mm wrench, detach the oil receiver from the main shaft cover and the oil pump housing.
Next, we detach the exhaust pipe from the bracket under the bottom. Since the bracket is also attached to the body, unscrew the fastening bolts. We bend the ends of the locking plates of the nuts that secure the exhaust pipe and the intake manifold. We unscrew these nuts, as well as the nuts on the clamp, and remove the clamp. Next, the receiving pipe and the resonator pipe must be unfastened. Access is open from below; all that remains is to unscrew the nuts of the connecting rod screws and remove the connecting rod caps so that the connecting rod can be knocked out from below.
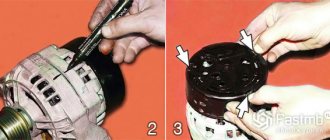
We move under the hood. After unscrewing the nut and washer that secure the air purification filter, and unfastening the 4 clips, remove the filter cover. We take out the filter element and its housing. Then you need to disconnect the air intake hose and the pipe on the valve cover. To remove the valve covers, it is necessary to unscrew the nut securing the accelerator drive cable.
Next, remove the front timing drive cover, loosen the tension roller and tighten the belt. You can dismantle the camshaft pulley by prying it up with a screwdriver. Now your goal is to bend the rear cover away from the cylinder head so that the cylinder head comes out from under the end of the camshaft. To do this, unscrew the fastenings of the cover and water pump.
We take out the tips of the high-voltage wire of the spark plugs, disconnect the wire block from the distributor. By unscrewing two screws we remove the distributor cover with wires. To completely remove the distributor, disconnect the interfering hose from the vacuum corrector, unscrew the nuts, and remove the bracket. Then disconnect the fuel pump and carburetor hose and remove the fuel pump. Next, disconnect the thermostat hose clamps and dismantle this device.
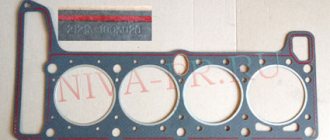
To unscrew 10 cylinder head bolts, use a 10mm hexagon. After pulling out the bolts and washers, finally disconnect the cylinder head. We remove the sealing gasket and always replace it. We clean the upper surface of the cylinder block from oil, dirt deposits and traces of the gasket.
We move into the pit. And, lightly tapping with a hammer, remove the piston assembly with connecting rod from the cylinder. We repeat the procedure with the three remaining pistons.
Removing the engine
The engine on a VAZ can be removed if you have the necessary tools. In addition, you need to have a special lifting device available that will help remove the engine from the compartment. You can, of course, do without it, but then you need additional workers. So, let's start:
- remove the hood;
- cover the front fenders of the car with soft blankets so as not to damage the paint when removing the engine;
- drain the radiator;
- disconnect all electrical wires from the distributor, as well as from the oil and temperature sensor and carburetor;
- remove the fuel supply hose;
- unscrew the exhaust manifold pipe (muffler);
- disconnect the battery terminals;
- remove the starter;
- the air filter housing is removed;
- disconnect the generator wires;
- unscrew the engine from the gearbox;
- use a screwdriver to loosen the clamps of the heater radiator pipes;
- remove the accelerator pedal linkage;
- remove the carburetor choke cable.
After carrying out the above work, you need to go down into the inspection hole or under the overpass:
- remove the clutch master cylinder;
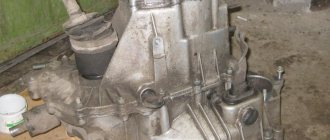
- unscrew the gearbox;
- remove the protective casing;
- unscrew the engine bolts;
- We hook the engine with belts and lift it up.
At this stage, engine removal is complete. Let's move on to its analysis.
When is it time to change rings?
There are three piston rings on the VAZ 2109. They are not closed rims that are located on the outer wall of the cylinder in special grooves. These parts serve to seal the combustion chamber, regulate oil flow and improve heat transfer through the cylinder wall. Two compression valves prevent gases from the combustion chamber from entering the crankcase, and an oil scraper valve removes oil from the cylinder walls and prevents it from entering the combustion chamber.
Wear of piston group parts occurs after approximately 150 thousand kilometers due to the action of gases and friction of metal parts. They need to be changed if the following symptoms are present:
- compression drop;
- increased fuel consumption;
- the appearance of bluish smoke in the exhaust gases;
- increased oil consumption.
The cause of deterioration in engine performance may be coking of the piston and stuck rings. This happens when using low-quality fuels and lubricants that do not meet the manufacturers’ recommendations. During long-term operation, carbon deposits form, which covers the combustion chamber and its parts. Piston rings covered with carbon deposits “stick” and cannot perform their functions properly. In this case, they should be changed or decarbonized.
Coked piston with traces of carbon deposits
How to install rings on a VAZ 2109 piston
How to correctly install piston rings on a VAZ 2109
With high mileage, the engines of our cars begin to smoke, eat oil and lose their power. One of the main causes of such symptoms is wear on the piston rings. First, you should resort to measuring engine compression. As a rule, for any car, the compression level is considered to be 10-11 kg/cm2, or 1-1.1 MPa. The ideal compression is within the range of 12-13 kg/cm2, equal to 1.2 to 1.3 MPa, but 10-11 kg is more than enough for normal operation of the unit. But if the compression gauge shows 7 kg or lower, then this may indicate wear on the rings.
And to finally make sure, you should unscrew the spark plug in the cylinder with low compression, drip a little engine oil inside and check the compression again. It turns out that what gets on the piston rings will fill all the gaps and make them sealed. If, after lubrication with oil, compression returns to normal, then this is definitely a problem in the rings. If not, then most likely the valve seats are leaking or the valve itself is burnt out, but that’s a completely different story. In the case of rings, I really don’t recommend changing them if the compression shows 8-9 kg - this is nothing more than “still good”. Because having replaced the rings, very little time will pass when the past symptoms will return again, because the new rings will still rub against the cylinder walls and wear them out so much that the question of boring the engine will arise. So it’s better to delay this as far as possible. So, we have identified the cause, made sure that the problem is in the rings, now we proceed directly to the replacement.
Step-by-step replacement instructions
Piston repair work must be performed on an inspection ditch, lift or overpass.
What will you need?
To repair a VAZ 2109 engine with your own hands, you need the following tools:
- a set of keys;
- set of heads;
- funnels;
- extension cords;
- torque wrench;
- set of probes;
Set of gap gauges
- mandrel for pressing products on the piston;
- hammer;
- needle file;
- new repair kit.
New consumables for piston VAZ 2109
Video “Installing piston rings”
This video shows the process of installing piston parts: how to install and what to pay attention to.
Piston rings
Piston rings form a seal between the cylinder wall and the piston. Must provide good sealing across the entire plane of the cylinder over a wide temperature range. In four-stroke engines, three rings are most often used, of which two are compression rings and a lower oil scraper ring.
- Compression rings provide a reliable seal between the cylinder and piston to seal the combustion chamber.
- Heat removal from the piston to the cylinder walls.
- Oil scraper rings remove excess oil from the cylinder walls, preventing it from entering the combustion chamber. However, they are not completely removed, but are adjusted, leaving the required amount of oil for the compression rings.
First compression ring
Designed solely to prevent breakthrough of expanding gases in the combustion chamber. During the power stroke cycle, increasing pressure in the combustion chamber forces the first compression ring to the bottom of the piston groove and presses it harder against the cylinder walls, thereby providing sufficient insulation of the combustion chamber. The pressure in the ring groove remains on subsequent strokes without having time to decrease. The gap between the ring and the groove is 0.04-0.08 mm
Protects the second ring from high combustion temperatures and reduces the load. It has the greatest heat transfer from the piston to the cylinder; approximately 50-60% of the heat removed from the piston to the cylinder occurs on the compression rings. Some of the gases break through, the second ring begins to perform its functions, more on that later.
The first compression ring is made of high-grade cast iron, capable of withstanding high temperatures and loads while having a low coefficient of thermal expansion. During engine operation, the temperature of the ring reaches 180-210°C; at top dead center, where there is practically no lubrication due to friction, an even higher temperature is reached. The outer working surface of the ring often has a special coating to reduce friction. This can be plasma surfacing of molybdenum, cermets, and ceramics. The most common type is chrome coating, which has a matte gray color (applied by electroplating) and a peculiar porous structure that allows it to retain oil to further reduce friction. The remaining surfaces are black as a result of phosphating. The coating provides anti-friction and anti-corrosion properties.
Engine disassembly
Replacing the piston on a VAZ 2108 is carried out only after complete disassembly of the engine. Started:
- remove the fuel pump;
- remove the ignition distributor;
- take out the generator;
- remove the water pump;
- remove the oil filter;
- remove the breather cap along with the dipstick to check the oil;
- remove the oil pressure sensors;
- remove the crankshaft pulley;
- remove the flywheel;
- remove the tin plate;
- unscrew the three engine cover bolts;
- remove it;
- take the key 10 and unscrew the cylinder head cover;
- remove the gasket;
- dismantle the chain drive;
- remove the sprockets and chain;
- remove the crankshaft gear;
- unscrew the nuts of the gas camshaft housing;
- remove the cylinder heads;
- remove the pan;
- remove the rear oil seal housing;
- remove the oil pump;
- remove the drive shaft along with the oil pump gear;
- remove the oil separator;
- dismantle the crank mechanism;
- remove the cover;
- remove the connecting rods with the piston;
- remove the main caps;
- remove the crankshaft;
- remove the spacer rings;
- remove old liners.
How to replace rings yourself
Attention: Replacement of piston rings on a VAZ 2108 is carried out after installing new crankshaft liners. As mentioned above, we remove the pistons and connecting rods. On the lower heads and connecting rod caps we see steel-aluminum type liners. They are threaded in such a way that they do not turn. They are kept from this by locks that fit into the slots of the beds.
So, replacing piston rings on a VAZ 2108 is carried out as follows:
- take the connecting rod and clamp it in a vice;
- after decompression, remove the old rings (upper and lower compression).
It should be remembered that when installing new rings, the top mark should be directed towards the bottom of the piston. The mark is often the name of a company or simply a car model, applied to the ring by the manufacturer. It also happens that instead of an inscription, an edge or chamfer is used. So, in this case, you need to install the ring with this chamfer down. Replacement of VAZ 2108 pistons continues:
- the old oil scraper ring is removed;
- The expander is also removed.
Attention: Replacing pistons on a VAZ 2108 involves knocking out the pin located in the piston. To do this, place the piston on some wooden support and knock out the pin with a hammer.
- we collect everything in the reverse order;
- We take a new piston, which we select by class (the class is marked with a letter, and the piston category with a number).
Now you need to be able to correctly adjust the gap between the cylinder and the piston.
- For completely new parts, the gap should be 0.05-0.07 mm. If any of the parts are worn out, the gap may be no more than 0.15 m.
- In addition, replacing the piston on a VAZ 2108 should be carried out so that the finger enters the hole with the force of only the thumb. Also, it should not fall out of the piston if it is in a vertical position.
- install rings;
- take a feeler gauge and check the gap (or rather, it is advisable to check the gap with a set of special feeler gauges).
Attention: The ring gap should be between 0.25 and 0.40 mm. If the gap is larger, the ring must be replaced. If the gap is smaller, we arm ourselves with a needle file. We carry out the following operation: we grind off the ends of the ring, but only very carefully.
This video shows everything thoroughly. It is recommended to watch it before starting the operation yourself.
- install the rings into the piston grooves;
- We begin the orientation process.
This operation consists of correctly positioning the rings at an angle to each other. The photo below clearly shows what angle they should have:
So, you need to install them yourself, as required by the instructions:
- the upper compression ring is oriented at an angle of 45 degrees (the angle should be directed towards the piston pin axis);
- the lower compression ring should be rotated relative to the upper one in the complete opposite direction;
- the oil scraper ring lock is adjusted to 90 degrees relative to the other rings (as for the joint of the expander, it should be located on the lock side of the ring itself);
- take the upper head of the connecting rod and heat it to 240 degrees (to do this, we clamp it in a vice and process it with a special tool);
- pre-cool the finger in ice water;
- the piston is put on the connecting rod;
- using a mandrel, the finger is pressed into the hole;
Mistakes made during installation
Oddly enough, even professionals often admit them. These include:
- installing new rings on a worn engine;
- installation of piston rings on one side, which leads to gas breakthrough.
It is worth noting that the numbers and letters on the connecting rod and cover must be located on the same side. The special mark “P”, which is located on the piston, should be directed towards the front of the cylinder block. This step-by-step instruction will help you master complex techniques for installing new piston rings on a VAZ 2108. Usually the price for such services from professionals is very high, since the process involves dismantling and disassembling the engine and a lot of complex steps. But armed with the necessary knowledge and a good tool, even motorists just starting repairs on their own can safely get to work.