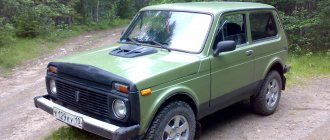
NIVA 21213, 21214. Design, maintenance, diagnostics, repair
Year of manufacture: 2005
Developer website: www.neotechsoft.ru
Publisher: Behind the Wheel
Interface language: Russian
Bit depth: 32 bit
Operating system: Windows 98, ME, 2000, XP, Vista, 7
Description: Multimedia manual for the design, maintenance, diagnostics and repair of NIVA 21213 21214 with 1.7 and 1.7i engines.
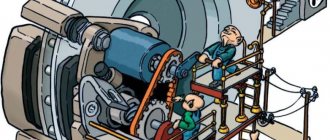
A full-color, illustrated guide to doing your own car repairs. The manual shows the design features of components and systems of VAZ-21213, -21214 vehicles, including the VAZ-21213 carburetor engine and the -21214 engine with a distributed fuel injection system. The main malfunctions, their causes and solutions are described in detail. The disassembly and repair process is illustrated and provided with detailed comments.
GTZ NIVA
Removing and installing the Niva brake master cylinder (instructions)
Remove the spare wheel support bracket for the VAZ 2131.
Using pliers, loosen the clamps securing the flexible hoses to the fittings of the master brake cylinder.
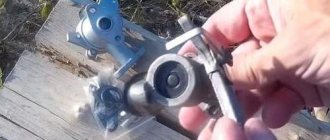
Carefully holding the fittings, remove the hoses. Drain the brake fluid from the reservoir into a substitute container. To replace the brake master cylinder fitting...
pry it off with a screwdriver...
and remove it from the brake master cylinder socket.
Use a screwdriver to pry up the rubber connecting sleeve...
and take it out. To remove a vehicle's brake master cylinder...
Using a special “10” wrench covering the five sides of the nut, unscrew the fittings of the four Niva 2121 brake pipes.
We remove the pipes from the brake cylinder Niva 2131.
Using a 17mm spanner, unscrew the two nuts securing the master brake cylinder to the vacuum booster...
and remove the main brake cylinder of the VAZ 2121. Install the main brake cylinder of the VAZ 2121 in the reverse order. We bleed the hydraulic drive system.
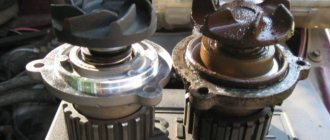
Repair of GTZ NIVA
Problem: the Main Brake Cylinder on the NIVA leaked directly into the Vacuum Booster.
I took out the main brake assembly with vacuum from a Peugeot 405 from old bins, and also bought two cylinder connectors for the front calipers and two front brake hoses from Shevik.
cylinder connector VAZ-2123
front brake hose VAZ-2123
GTZ and VUT from Peugeot 405 (front view)
GTZ and VUT from Peugeot 405 (rear view)
I started disassembling the old system. As it turned out, the old owner was wise here too. I threw out absolutely everything old, leaving only the pedal and the front cylinders, and began to assemble everything in a new way: 1. Put the cylinder connectors on the front calipers;
installed cylinder connector on brake cylinder
installed cylinder connector on brake cylinder
2. At first I took the hoses to the turners - they cut threads on the outside at the ends where the tube is screwed in, turned out two thin nuts and two thin washers - to attach one end of the hose to the body;
here we modify the brake hoses
3. Installed the hoses, connecting them at one end with the cylinder connectors, and securing the other end with the modified end to the body in the normal place; 4.Laid new copper pipes from the tee to the hoses. Then it came to the Chief with the vacuum cleaner. Having estimated approximately where it would stand, I began to split hairs: 1. Making an adapter bracket, because the vacuum itself is much larger than Nivovsky, we had to carry it some distance
plate for vacuum booster
plate to body
We weld the plates together with an angle of 25x25mm and a length of 120mm at 4 corners; 2. Manufacturing of an intermediate drive rod from the pedal to the vacuum itself with the possibility of adjusting its length;
transitional drive rod from pedal to amplifier with adjustable length
3. Because The main brake reservoir in Peugeot is not installed as it should be, we had to make adapters to connect the hoses from the fluid reservoir and lengthen the hoses themselves. Once all of this was done, the adapter bracket was painted and dried, and assembly began. Everything fell into place, as I had planned. All that remained was to run the pipelines from the main cylinder to the tees. It was then that I decided to check the vacuum cylinder that had been lying in the garage for about ten years - I plugged the outlet holes of the cylinder and tried to bleed it. To my surprise, everything turned out to be more than 100% working. Next, I ran the pipelines to the tees, only on the tee that placed one plug on the rear brakes. After all, now the brakes are like those of a normal car - rear/front.
plug on tee for rear brakes
We started bleeding the system - not an easy task, because there were still two bleeding fittings left on the front cylinders. But we still succeeded. I took it for a test drive and was more than pleased. The brakes are 100% clearer. Even when skidding, the car goes smoothly - without skidding, all wheels brake as they should, and not each on its own. The result exceeded my expectations. And under the hood it all looks like this.
everything is in place and looks like this
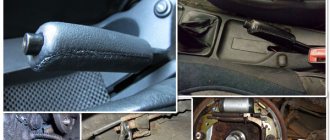
Video on GTZ repair - replacing cuffs
Replacing brake discs and pads NIVA
Replacing Niva brake discs and pads (step-by-step instructions) Video on replacing brake pads
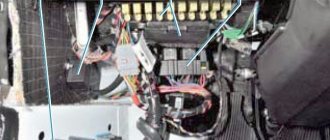
The Niva with fuel injection has today almost completely replaced the carburetor models of the family. With the transition to a new injection system, the manufacturer tried to minimize the inconvenience for the car owner and not radically change the location of the mounting blocks, as well as their filling with protective elements. Traditionally, there are two of them in the cabin. Another one, in the back, is responsible for controlling the engine.
Fuse box VAZ 21214 Niva with description
In the interior of the VAZ 21214 Niva with fuel injection there are two fuse blocks. One of them is located in the traditional place - to the left of the driver's hand and the dashboard. But the second one is located below, near the central tunnel, on the passenger side. In the updated models, it was in this block that the fuses responsible for various types of headlights were placed.
Both blocks are connected to each other. The total number of fuses in the upper one is ten, while at the bottom there are six, including reserve ones.
Current (amps)
Heater fan, rear window defroster, rear wiper and washer system, windshield washer pump
Steering column switch, windshield wipers, hazard warning lights, breaker relay (in turn signal mode), reverse light, instrument cluster (coolant temperature gauge, fuel level gauge, tachometer, indicator lamps: turn signals, differential lock, parking brake, emergency condition of the working brake system, insufficient oil pressure, fuel reserve, battery charge)
Left high beam, high beam warning lamp
Right high beam
Left low beam
Right low beam
Side light lamps in the left front and left rear lights, license plate lights, side light indicator lamp
Side light lamps in the right front and right rear lamps, backlight lamps for the instrument cluster, cigarette lighter, switches, heating and ventilation control unit
Hazard switch, breaker relay (in hazard mode), heated tailgate glass relay contacts
Sound signal, interior lamps, brake lamps in the rear lights
Fog light relay contacts in rear lights
Replacing the front brake pads of a VAZ 21214. How to choose brake pads for a Niva-Chevrolet
- AndroVid_join_5309.
- Comments on the topic Replacing front brake pads VAZ 21214
- Cyrus
The idea is correct, but why change it in the field? I answer, they usually do this to leave a puddle behind.
- Berde
- And how much does it cost to do just that?
- Aqua
- The seams are so cool, apparently they were welded by a pro!)))
- Davron Mamistov
You can stand on the bumper of the vehicle, this is a standard feature - if necessary. A body up to 100 kg is fine. Sometimes you need to load the front or back in the snow or mud, or put the junk on the top rack.
Karine
another piece of crap. looks...
- Umar
- If these are AUTOMATIC pistons, then these are excellent pistons
- Biryuch Taurine
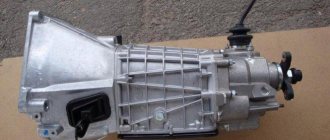
- am I looking at a Chevy niva gear box changed to fit a lada niva?
- Krak
I didn't have any vibrations. But... the way the maternity ward howled, that’s something.
Palmyra
HOW TO CHECK THE SHRINKAGE ON A REAR WHEEL WHEEL CAR WITH THE HANDBRAKE?!))
Walt
Hello! Can you answer? My speedometer stopped working. Mazda 626 gf 1.8 98 There is no speed sensor. On my left side there is another grenade with teeth on the outside, not my own, but on the right there is mine, also with teeth. Before that, on the right one there was no tooth.
I changed it today. And the internal teeth of both sides are different: on the left 23 and on the right 22. And accordingly, the shafts are different. And the width of the outer teeth does not match. the left is a little smaller and the right is a little thicker. It turns out that there are a lot of teeth on the left and fewer on the left.
These non-coincidences can affect the speedometer???
- Surik
- water and priest have nothing to do with it, tasol badyaga
- Dakar
- Very good and useful videos, thanks Otaka 2008, 105 thousand km)
- Ilir Karaichev
- 5-11 and put on fun music)))))
- Sikora
The old shock absorber is completely dead, apparently, the client is not at all aware of the matter, if he decided to only change the springs - there is no point in using such shock absorbers. Fortunately, the author had good used racks in stock. I’ll also add that not every manufacturer is suitable when choosing shock absorbers, because...
They, paired with a spring, work taking into account the weight of the motor. My original Sachs had a Volvo sticker, I installed one from a Swedish company, they turned out to be shit, they were too tight - the front end jumped like on a cart, they didn’t even handle the smooth curves of the road at all. I had to install the same new Sax.
If anyone has experience with the Monroe brand, please post.
- Curro
- Do you have a factory radio? It’s just that I have a push-button one, but it’s also factory-installed, I want to order a touch sensor from China, so I’m wondering how everything will fit and connect
- Harry
- God forbid you buy a car after such economists
- Maine
- I always wondered who puts dislikes and why
- Nadezhda
- Tell me, what if antifreeze oozes between the block and the head?
- Radice
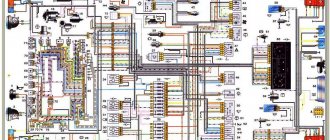
Summarizing
The need to understand the wiring diagram may arise if there are malfunctions in the operation of the system and they need to be eliminated. Of course, complex malfunctions associated with the operation of the generator unit and other devices that are not simple in terms of design will be problematic to solve in a garage without certain knowledge. However, even simple knowledge of the electrical circuit and the ability to decipher the symbols can greatly help the car enthusiast during repairs. In addition, the need to understand wiring may also arise if you decide to upgrade your speakers or install a more advanced audio system.
Differences between VAZ 2121 and VAZ 21213 from VAZ 21214 for dummies
Differences between VAZ 2121 and VAZ 21213 from VAZ 21214 for dummies
#1 Post by dperovsky » 08 Jan 2022, 16:33
Niva 2121 and the updated Niva 21213, let's look at their differences.
In 1994, the design of the ZHIGULI-2121 Niva underwent certain changes. We will try to note the main changes in the design of the degenerated modification based not only on official data, but also on the comments of the owners.
Main innovations of the 213th Niva
Re: Differences between VAZ 2121 and VAZ 21213 and VAZ 21214 for dummies
#2 Post by dperovsky » 23 Jan 2022, 21:00
The difference between VAZ 21213 and VAZ 21214
The production of the fuel-injected Niva VAZ-21214 (LADA 4×4) began in the mid-1990s, a modification of model 21213 with a VAZ-21214 engine (1.7 l, 82.8 hp, 127.5 Nm) equipped with central fuel injection. Since 2002, this model has been equipped with a VAZ-21214-10 (Euro-0) engine with distributed fuel injection, upgraded in 2006 to Euro-2 standards (21214-20), in 2008 to Euro-3 (21214- 30) and, finally, in 2011, to Euro-5 (for export) and Euro-4 (for domestic consumption) standards. Power steering was also installed on a small part of the model.
The only difference is the engine.
In 2009, production began of a restyled version of the injection version of the Lada 4x4 3-door, which was called Lada 4x4M or VAZ-21214m. (popularly called emki). A lot of good things appeared there, and since then, every year some innovations have appeared.
First of all, the designers paid attention to the long-term operating experience of the SUV and took a number of measures to eliminate “childhood” diseases and replace domestically produced components with imported ones. Also, most of the components and parts were unified with the components of the NIVA-Chevrolet car.
The power unit was left virtually unchanged - it is still the same 1.7-liter engine with distributed fuel injection, meeting the Euro-4 toxicity standard.
A new clutch from Valeo has been installed - the same one that is installed on NIVA-Chevrolet.
The most significant changes affected the suspension - it was optimized and almost completely unified with the well-proven NIVA-Chevrolet suspension: The rear shock absorber mounts were moved.
The rear and front shock absorbers 21214m also became different.
- New front suspension steering knuckles;
- The front suspension has lower control arms with modern silent blocks;
- Front wheel alignment angles have been changed;
- Front axle of increased diameter;
- Reinforced brackets;
- New ball joints with an increased swing angle, forged body and liner made of polymer materials;
- Modern gas-oil shock absorbers with increased travel and service life;
- Optimized layout of the lower rods and arms in the rear suspension.
Comfort
Installation of power steering and air conditioning.
In terms of all the indicators, Emka has become better, but there was a fly in the ointment. The “flat” floor has disappeared).
About wear of brake discs and its detection
Unfortunately, a car does not last forever and all parts fail sooner or later. Brake discs are no exception. And water and dust bring this part closer to unusability even faster.
The first sign of disc failure is problems with braking. You will feel it even without technical inspection. But it’s best if your fears are confirmed at the service station.
If you don’t want to go to specialists, you can try to identify the problems yourself by paying attention to the following signs of brake disc wear:
- When braking, extraneous noises are heard and the car moves jerkily;
- Cracks and grooves appeared on the part in the form of grooves around the disk;
- The detail shows severe wear.
If any of the above symptoms are present in your car, then you need to replace the front brake discs as soon as possible.
Fluid for refilling the hydraulic steering system
Material grade
Manufacturer
Regulatory document
Pentiosin Werke AG, Germany
List of products containing precious metals in LADA 4x4 cars
Fuel tank (carburetor gas tank) VAZ 21213-110101030.
By clicking on the button you will receive all the information on delivery and payment of the method convenient for you to receive the goods. Our employees will calculate for you the most profitable method of delivering the goods you have chosen.
Pickup for everyone who is convenient in Moscow to independently pick up and pay for the goods you have chosen.
Delivery by mail or EMS Post. It is preferable for buyers who live in areas where there are no branches of transport companies nearby. Some goods can be sent by mail (restrictions on weight and dimensions). We will advise you on a more convenient delivery method.
We deliver by courier only in Moscow and the Moscow region. The buyer provides the address and telephone number of the place of delivery of the goods, full name. person responsible for receiving the goods, his phone number. When transferring the goods to the Buyer (Representative), the quality, quantity, and completeness of the transferred goods are checked.
Delivery by transport companies is the most convenient and profitable and often the only way to receive the spare parts you ordered. We work with any Transport companies convenient for you. Which are located in Moscow.
Excerpt from “Warranty Conditions for Auto Parts”
1.1. The warranty period (except for electrical parts) for original spare parts is 6 (six) months or 30 (thirty) thousand km. mileage, and 3 (three) months or 5 (five) thousand km. mileage if the purchased Product belongs to the “non-original” category (whichever occurs earlier), unless otherwise determined by the Manufacturer or Seller of this spare part. You can familiarize yourself with the full terms of the warranty by following the link: Warranty terms for Auto Parts
What do the numbers in the Niva index mean?
To understand the features of the wiring and electrical equipment of a Niva 2131 car or another model with an injector or carburetor, let’s look at the index designations:
- VAZ 21213 - this is how a Niva with a carburetor is designated. In this case, the engine volume is 1.7 liters.
- VAZ 21214 is the same carburetor with the same engine size. Only in this case the car is characterized by a distributed fuel injection system.
- VAZ 21213 is also a carburetor, only Niva with such digital designations can have a 1.8-liter engine.
- VAZ 21073. This Niva can be equipped with either a Solex carburetor or an injector. The ignition system in these cars is contactless.
- As for the Niva 21215 models, this index designates export versions of vehicles equipped with a diesel engine from the manufacturer Citroen.
Officially, Niva vehicles equipped with diesel engines have never been sold in the Russian Federation and the countries of the former USSR. The cost of such a vehicle, of course, was higher. Those fans of domestic SUVs who were willing to pay such a price could only purchase a car abroad.
Below is a diagram of the VAZ 2121. If you are interested in the electrical diagram of another model, for example, 2131, then it will have certain differences from this modification. For example, in the case of a carburetor, the electrical circuit for charging the battery and ignition system is not protected, unlike injectors.
Generator wiring diagram 2121
Front and rear disc brake kits for UAZ “Autogur73”
The use of disc brakes in the braking system of a car, as opposed to drum brakes, is gaining popularity
And there are many reasons for this: - these are higher performance indicators during operation: a reduction in braking distance and a higher speed of operation of mechanisms, which increases the vehicle’s safety parameters significantly; — and, just as important, simple and economical content. Disc brakes "Autogur73" differ from the standard ones installed on the UAZ conveyor in that they are installed on axles designed for a drum brake system
The brake caliper, using a bracket made in the form of a faceplate, is installed in the mounting locations of the drum brake system. “Autogur73” is the only company in the country that officially supplies this product, has a patent and a certificate of conformity for this invention of disc brakes for UAZ cars. Sets of front and rear disc brakes for UAZ 2206, 3962, 3151, 3163, 2360, 2363, 3303, 3741, 3909 vehicles and their modifications are produced according to the manufacturer’s technological regulations. Buy UAZ disc brakes for Timken (civilian) front axle (set) “Autogur73”
Buy UAZ disc brakes for the Timken/Spicer universal rear axle (set) "Autogur73" Buy UAZ (civil) disc brakes for the Timken/Spicer rear axle with VAZ-2112 caliper "Autogur73" Buy UAZ disc brakes for the military rear axle (set) " Autogur73"
Buy UAZ disc brakes for a military front axle (set) "Autogur73" Buy UAZ disc brakes for a military rear axle with a VAZ 2112 caliper (set) "Autogur73" Buy UAZ disc brakes for a civilian front axle with a caliper UAZ 3160, 3163, Hunter (set) ) "Autogur73"
Buy UAZ disc brakes for the rear axle of a Spicer Patriot since 2013 under the handbrake with a VAZ caliper (set) “Autogur73” Buy UAZ disc brakes for a military front axle for a civilian hub with a GAZ caliper (set) “Autogur73” Buy UAZ disc brakes for a military one rear axle for a civilian hub with GAZ caliper (set) “Autogur73”
Buy UAZ disc brakes for a military rear axle under a civilian hub with a VAZ caliper (set) “Autogur73”
Buy disc brakes with perforated UAZ discs for the front axle “Timken” (civilian) “Autogur73”
Buy disc brakes with perforated discs UAZ rear axle Timken/Spicer (universal) “Autogur73”
Buy disc brakes with perforated discs UAZ rear axle Timken/Spicer with caliper VAZ 2112 “Autogur73”
Buy disc brakes with perforated discs UAZ military rear axle "Autogur73" Buy disc brakes with perforated discs UAZ military front axle "Autogur73" Buy disc brakes with perforated discs UAZ military rear axle with caliper VAZ 2112 "Autogur73"
Buy disc brakes with perforated discs UAZ civil front axle with caliper UAZ 3160 “Autogur73” Buy disc brakes with perforated discs UAZ rear axle Spicer Patriot from 2013 “Autogur73”
How to check and replace the vacuum booster on a Niva Chevrolet
Checking the vacuum booster
1. Press the brake pedal all the way several times with the engine not running and, holding the pedal pressed, start the engine.
In this case, due to the pressure difference in the cavities of the amplifier, the brake pedal should move forward.
If this does not happen, check the tightness of the vacuum booster hose connections and, if necessary, eliminate air leaks.
If this does not give a positive result, then the amplifier is faulty and must be replaced.
2. To check the tightness of the vacuum booster, you need to open the hood and start the engine for 1 minute. Approximately 30 seconds after the engine has been turned off, press the brake pedal 2 times, and you should hear a characteristic hiss of air entering the amplifier. Otherwise, replace the amplifier.
3. Blow out the hose with the check valve at both ends.
Air should only flow from the check valve side.
Otherwise, replace the check valve.
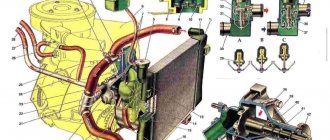
The design of the vacuum brake booster is shown in Fig. 1.
The vacuum amplifier is quite complex; repairing it requires some skills and special equipment, so if the amplifier fails, replace it as an assembly.
Removal and installation
You will need: keys “10”, “13”, “17”.
1. Disconnect the wire ends from the brake fluid level sensor.
2. Remove the bolt of the power steering reservoir mounting bracket
3. Remove the tank from the bracket and move it to the side.
4. Unscrew the two nuts securing the master cylinder to the vacuum booster.
5. Without bending or twisting the brake pipes, carefully move the master cylinder to the side.
Alternative way
This method is suitable when it is not possible to use the help of a partner. To do this, you will need to create excess pressure in the system using a simple bladder or spare tire. You'll have to be Kulibin a little to make an adapter between the chamber fittings and on the expansion tank cap (you need to use a spare cap).
Also interesting: Fuses Niva 21214 injector
The essence of the procedure is the same as in the first option. You should unscrew the bleeder fittings one by one to get rid of excess air. Experts recommend carefully monitoring the fluid level in the tank and, if necessary, adding it to the required volume.
Plus half a meter: development history and design features of the VAZ-2131
It would seem that everyone enjoys the good old three-door Niva, which has survived on the assembly line to this day. Cross-country ability, accessibility, low cost - these advantages of the “shorty” have carried it through more than four decades, in spite of environmental standards and EuroNCAP tests. However, many motorists back in Soviet times were forced to abandon the three-door car because of its, to put it mildly, not the most outstanding practicality. A short wheelbase, only one side door on each side, a frankly small trunk - the Niva was not an alternative to the Zhiguli, forcing the potential buyer to make a choice in an “either-or” format. After all, when choosing cross-country ability, it was necessary to obviously sacrifice the cargo-passenger qualities of the car. And that is why, over time, the traditional “twenty-first” was supplemented by a long-wheelbase five-door version, which many owners affectionately call the “crocodile”. Today we will recall the history of the development and design features of this model.
Start
In the nineties, VAZ was working on the “last hope” for a single-volume vehicle - that is, an all-wheel drive minivan based on the Niva, and this modification was not planned and, like many other things, appeared by accident. Rather, it was a research project, the purpose of which was to obtain an answer to the question of whether it was possible to make something completely new for the plant on the basis of a regular Niva - for example, a minivan. At the same time, the safety margin of a regular Niva was unknown. More precisely, after a number of victories and achievements of the VAZ-2121, it was clear that this is a successful and strong car, but will it withstand the one and a half times the load associated with turning into a seven-seater car with a monocoque body?
To answer the question posed, from a pair of serial three-door bodies, two frames of future five-doors, extended by 500 mm, were welded, and only half was taken from each of the “sources” (front and rear, respectively). Each of the prototypes received a very pretentious name - Consul and President. These running models differed in that the Consul had narrow rear doors that made it possible to load sandbags into the body to simulate the load, while the President did not have them.
In the photo: a prototype codenamed “Consul”, distinguished by the presence of a pair of narrow doors-leafs
The tests were successful, which surprised the factory workers themselves. After all, unexpected positive conclusions regarding the safety margin of the ordinary Niva allowed the Togliatti people to begin developing the VAZ-2120, known as Nadezhda.
At this time, pilot industrial production (EPP) was just launched at VAZ, but the “twentieth” model was still frankly crude - that is, it was at the stage of “plasticine” and modifications, being not even ready for small-scale production.
Twenty nine and other numbers
That is why VAZ came up with the idea of not only making a single-volume all-wheel drive with an original layout on a modernized chassis, but also launching production (albeit in small batches) of an elongated Niva, which could become a real dream for a summer resident. After all, an additional half meter in the base could make this car spacious and practical, and the very fact of the simultaneous existence of a “shorty” and a long-wheelbase version was a common occurrence for most SUVs, including such grandees as the Mitsubishi Pajero, Nissan Patrol, Land Rover Defender and even “His Majesty” Gelendvagen."
Five doors and a German license plate – why not a “cube”?
Thus, the search project gradually turned into a small-scale car under the index 2129. It differed from the familiar five-door “crocodile” by the absence of a pair of rear doors - that is, by lengthening the base and moving the rear seat, the designers retained the previous “low-door” body. Subsequently, modification 2130, distinguished by an enlarged gas tank, was added to the commercial copies of the “twenty-nine”.
Created in OPP: very interesting modifications were developed in the pilot industrial production of VAZ
To be fair, we note that it was not very convenient for rear passengers to get in and out (the front doors remained “short”), but in terms of interior space, this car was comparable to ordinary Zhigulis and even slightly superior to them, which is for an SUV with permanent all-wheel drive was a good achievement – especially compared to the “shorty” one.
“Twenty-Ninth” bore the unofficial name “Cedar” and was produced in small series at AvtoVAZ OPP in 1992-1994, and on its basis several copies of a commercial version called “Utility” were made.
The shortcomings of the three-door version gave rise to the development of a five-door version under the symbol 2131, where the standard front doors were supplemented by rear ones with a vertical window and a small window in the new sidewall. Another difference between the five-door and the regular Niva is the step on the roof that hid the welds.
Here the roof insert is particularly visible. Body torsional rigidity – 7400 Nm/deg. The “three-door” has 8900 Nm/deg, which is even more than the VAZ-2108!
Three quarters at the back: the five-door version seemed too long to many, although it was only that way compared to the “shorty” one
"Thirty-first" from Tolyatti
Unlike the “thirty-first” Volga from Gorky, the Tolyatti car received a long wheelbase compared to the original Niva, but retained the utilitarian essence of the VAZ-2121.
The base of the “crocodile” increased by half a meter, but otherwise this car remained true to itself
The production of the long Niva in OPP began back in 1995, and by 2009, over 100,000 copies of the “five-door” were produced. Having retained the supporting structure, the body received a number of original parts, but as before, to make a long-wheelbase car, the “short one” was simply sawn in half, after which additional body elements were welded into the central part. This seems surprising, but such a “semi-handicraft” method in the conditions of pilot industrial production was quite normal.
Their service is both dangerous and difficult: the long Niva was also a collector
Lengthening the body by 500 mm led to a change in the wheelbase from 2200 mm to 2700 mm, and the overall length of the car increased to 4220 mm - that is, the Niva still remained in the so-called C-class, but became “long” by SUV standards.
In order for the “sawed” and elongated car to be strong enough, a number of additional elements were still introduced into the design - for example, side member reinforcements in the area of the front suspension braces and floor linings at the mounting points of the gearbox and transfer case.
Since the steering wheel on the elongated car became heavier, a hydraulic booster appeared in the steering, which later began to be equipped with the regular “short” Niva. The previous engine, even if it had received “one hundred grams for courage” compared to the original, could no longer “carry” a car that had become heavier to 1350 kg, the total weight of which with cargo and passengers was already 1850 kg. That is why the OPP mastered the production of the 1.8-liter VAZ-2130 engine, which developed 84 hp. and 132 Nm of torque.
“Injector” has been the only option for the power supply system for 15 years
This version received the index 21312, and due to its dark green color and long body with a relatively squat silhouette, the car received the nickname “crocodile” or “croc”.
Most long Nivas were painted dark green or white
As a “heavy fuel alternative,” modification 21315 was developed, under the hood of which a 1.8-liter Barnaul vortex-chamber turbodiesel 3431 was supposed to appear, but this engine never became serial.
Self-pumping using the example of a VAZ-2110
On the Lada “Ten” everything is done in the same way as on the VAZ 2108-21099 models, since the design of the brake system is the same. Therefore, let’s look at how to bleed the brakes on models 2110-2112 yourself, without help.
Also interesting: How to check for signs of a faulty vacuum brake booster
To do this, you will need to use one additional element - an aerator, which you can buy or make, and a rubber hose with ends on both sides for connection to the nipple.
A homemade aerator is a lid from a “classic” brake reservoir (without a built-in sensor), into which a nipple from a tubeless wheel is installed.
The essence of pumping yourself is very simple and it is done like this:
- The car is immobilized. A bleeding hose is put on the fitting of the brake mechanism that is being pumped;
- The aerator is screwed onto the brake reservoir, and one end of the hose is connected to it. The second one is put on the nipple of an inflated car wheel (for example, a spare tire);
- Unscrew the fitting half a turn. In this case, the air pressure from the spare tire will begin to squeeze out the liquid. All that remains is to monitor when liquid flows through the tube without air bubbles, and tighten the fitting;
This way all mechanisms are pumped. The air pressure of one wheel is enough to completely bleed the system;
But there is one nuance in this - the pressure supplied to the tank should not be very high (no more than 1 atm). Otherwise, there is a risk of the lid falling off or the tank being damaged.
Bleeding the brakes using the described methods is also applicable for more modern VAZ models - 2114-2115, Priora, Kalina. And all because the design of the brakes is completely identical.
Power unit
The engine installed on the modern model of the Niva 21213 (214) car was inherited from its Soviet progenitor - the VAZ 2121, and in terms of fluid volumes they are almost identical:
- Liquid cooling system. Filled with antifreeze in an amount of 10.7 liters with a freezing point not higher than -40 ° C. The capacity of the interior heating radiator is also included in this volume.
- Crankcase. Motor oils are poured here, the brand of which depends on the operating conditions. Capacity: 3.75 liters, including oil filter filling.
The viscosity of the oil poured into the Niva engine must correspond to the outdoor temperature at which the car is operated. Possible modes and suitable oil brands are shown in the table:
| Lower limit of ambient temperature, °C | -20 | -25 | -25 | -30 | -30 | -15 | -35 | -30 |
| Upper limit of ambient temperature, °C | +45 | +35 | +45 | +35 | +45 | +45 | +25 | 30 |
| SAE lubricant viscosity grade | 15W-40 | 10W-30 | 10W-40 | 5W-30 | 5W-40 | 20W-40 | 0W-30 | 0W-40 |
When flushing the power unit during the process of replacing liquid lubricant, the same amount of flushing oil (3.75 l) is used, taking into account the size of the filter. Replacement is carried out after 8-12 thousand kilometers, depending on the quality of the oil. Flushing is usually performed after 3 engine lubricant changes. During operation, it is important to monitor the oil level in the engine crankcase using a special dipstick. If the level drops below the Min mark, it is urgent to add lubricant to the engine of the same viscosity as was previously filled.
Antifreeze needs to be updated at least once every 3 years or according to the degree of wear of the fluid. It is not recommended to dilute antifreeze with distilled water, either in winter or summer. In winter, the diluted liquid may freeze, and during the summer heat it may boil ahead of time, which will lead to overheating of the engine.
How to properly inflate wheels on various cars
Depending on the make, class, size and weight of the car, the technique for inflating wheels does not change, but nuances remain, each of which is characteristic of a specific type of vehicle.
So, inflation of tires for a car looks like this:
- How to pump up a wheel on a VAZ 21213 with a decompressor? If we are talking about the famous “Niva 4x4” or VAZ 21213, then the recommended tire pressure is 0.21 MPa for the front wheels and 0.19 MPa for the rear, which is equivalent to readings on the pressure gauge of 2.1 kgf/cm² and 1.9 kgf /cm² respectively. In order to pump up the wheels with a decompressor, the driver should take the following steps:
- You need to make sure that the car is on a flat, hard surface and that each wheel is under the same load. Otherwise, when driving, there will be an uneven distribution of pressure in the tires, which will lead to vibration.
- First, you need to unscrew the caps on absolutely each nipple in order to gain access to the valve.
- Next, you need to press the decompressor nipple on the nipple, while simultaneously observing the reading of the pressure gauge needle and recording the value for each tire.
- If any of the cylinders does not meet the required pressure, you need to turn on the switch on the hose handle or on the device body itself, depending on the type of its structure, after which air will begin to be automatically pumped into the cylinder.
- As you pump, you need to carefully monitor the readings of the device, and if the tire turns out to be overinflated, you need to urgently turn off the device and simply turn the screw on the compressor handle to bleed off excess air.
- Upon completion of the procedure, the plastic caps must be returned to their place, and the driver can continue driving.
- In cases where the length of the hose is not enough to reach all 4 wheels at once, craftsmen and car enthusiasts often use a special rubber, plastic or metal extension for inflating the inner wheel. It is a tube with a valve design and its own rotating nipple for ease of use on wheels.
You may be interested in this About low-profile tires
Wheel inflation point at a gas station
- Wheel inflation system for KamAZ 43118. When it is necessary to inflate a tire on a truck, for example, on KamAZ 43118, the algorithm of actions should consist of the following steps by the driver:
- On KamAZ trucks, the air pressure should differ depending on the type of terrain where the vehicle is operated and is 0.8 for a swampy road; for dense snow cover – 1.1; for sandy base – 2.0 and for all other types of hard surface – 2.0…2.1 kgf/cm².
- The wheel inflation system is controlled by the driver himself directly from the cab by turning a special switch, which activates the opening of special shut-off valves, and air under pressure is pumped into the truck cylinders through a system of cuffs and pipelines.
- If it is necessary to carry out tire fitting, personal valves are installed on each wheel of the equipment to stop the supply or intake of air. The driver can independently close each of them, thereby disconnecting the automation, which makes it possible to fully engage in replacing the wheel or repairing it.
Tire inflation tubes on KamAZ Important!
When pumping, there is no need to increase the pressure above the allotted maximum. And vice versa, do not pump an insufficient amount of air into the wheel, as all this will lead to premature wear of the tires and suspension. In addition, you need to ensure that each tire on one axle has strictly the same indicators so that in the future the driver does not experience vibration when driving and the car does not pull to the side.
Connection diagram for starter car Niva 21214 injector
Starters 21070-3708010-01, 21214-3708010-01, 5722.3708 and their analogues from different manufacturers can be installed on a Niva 21214 car with a 21214 1.7 liter injection engine.
Here is a diagram of their connection (they are all connected in the same way) with a description of the operating procedure (turning on and off).
Connection diagram for a starter on a Niva 21214 injector car
Description of the starter connection diagram
— The voltage in the electrical circuit for turning on the starter is supplied to the positive terminal of the battery through terminal “30” of the generator.
— The starter is turned on by turning the key in the ignition switch to position II (starter). In this case, voltage is supplied to terminal “D” of the starter retractor (traction) relay. The relay armature is pulled into the interior of the pull-in relay (the pull-in winding of the relay is activated), and the bendix associated with it moves forward. Its gear meshes with the teeth of the flywheel. The contacts inside the relay close and electric current from the battery is supplied to the starter motor, turning it along with the gear and flywheel. The engine starts.
After the key in the ignition switch returns to position I, the holding winding of the relay is de-energized, and the armature inside it returns to its original position under the action of the spring. The contacts inside the relay are disconnected, the starter is de-energized and stops.
— Power is supplied to the coils of the retractor relay through the starter interlock relay mounted on the mounting stud of the master cylinder reservoir. Controls the operation of the ECU (control unit) relay. It turns on the locking relay when the key is turned in the ignition switch and allows you to start the car engine and turns it off when it detects that the engine is idling, protects the starter from turning on while the engine is running.