Tightening the wheel bearing VAZ 2101 - 2107
If you notice that the front wheel is a little loose, you should definitely eliminate the play. In many cases, the culprit for a loose wheel is the wheel bearing. The problem can be detected when driving onto a curb or other obstacle. At the same time, you will feel a certain “emptiness in the wheel.” Quite often, a problem with play can be solved by tightening the wheel bearing. On cars of the classic Zhiguli family, the work of tightening the bearings is extremely simple. In order to check the play in the bearings, it is necessary to jack up the wheel so that it comes off the ground. Then you should grab the top and bottom edges of the wheel and swing it. If the wheel dangles in a vertical plane (up and down), these are probably bearings. If the wheel dangles along a horizontal axis, pay attention to the ball joints. So, you have already decided for yourself that the bearings should be tightened. What will you need for this? - the bare minimum of tools: a 19mm wrench for unscrewing the wheel bolts and a 27mm socket - this is necessary for tightening the adjusting nut. You will also need two hammers. One is larger and the second is smaller. A new shim and a straight screwdriver will come in handy. Now about everything in detail and in order! The front wheel bearing is adjusted as follows. 1. At the very beginning of work, it is necessary to put the car on the handbrake and gear. Place shoes under the wheels. This is necessary so that when hanging the car does not jump off the jack. 2. The second step is to prepare a wrench for the wheel bolts. On classic Lada models, a 19mm wrench is used for this. It must have a head, do not try to remove the wheel with a spanner! Use this key to loosen the tension on the wheels - the car is still standing with its wheel on the ground. 3. After the wheel bolts are loosened, the wheel should be jacked up. Pay attention to the surface on which the jack rests. It should be smooth and firm. If the ground under the car is soft, you can use a board to support the jack. When the car's wheel leaves the ground, you should place a spare tire under the lower arm of the front suspension - just in case. What if the jack doesn't hold up - unlikely, but possible. 4. When the wheel is hung, and there is already a spare tire under the lower arm, you should unscrew all four bolts on the wheel and remove the wheel. You will see the brake disc, as well as the so-called “cap” of the hub. The cap must be removed. After all, it is under it that the adjusting nut is hidden. To remove the cap you will need a medium sized straight screwdriver and a hammer. Use a screwdriver to rest against the cap, and then knock it out with gentle blows. The blows should be light, and they should be applied along the entire circumference of the cap. 5. When you have already removed the cap, you will easily see the nut; it is the one that regulates the tightening of the wheel bearing. Pay special attention to the “Tunion” - the element onto which the nut is screwed. The trunnion has two recessed channels, they serve to lock the nut. The flange of a new nut is “driven” into these channels - this is how the locking is done. 6. The old nut should be unscrewed. In this case, in many cases it is necessary to clean the old trunnion channel from the nut elements. Pieces of the nut may have remained in the trunnion after the last locking. You can use a small screwdriver for cleaning. 7. The old nut is unscrewed. And you start tightening the new nut. It is at this moment that the front wheel bearing is being tightened. Under no circumstances should you tighten the nut with all your might! While tightening the nut, you should shake the wheel in a vertical plane and turn it. The wheel should not wobble, but it should also spin easily. If you tighten the adjusting nut too much, the bearings will be clamped and will probably fail very soon in this position. Too loose a tightening will cause the wheel to become loose. The tightening torque of the adjusting nut is the most important in the entire operation. It is the tightening that determines how long the bearing will last and how well it will perform its function. 8. To determine the tightening torque at which the wheel does not loosen and at the same time rotates easily, you should put a wheel rim with a tire on the hub and tighten it with two bolts. While tightening the adjusting nut, the wheel should be loosened and rotated. Determine the moment when the wheel is loose, then tighten the nut little by little. Tightening should stop as soon as the wheel stops loosening; there is no need to tighten the nut any further. The wheel should rotate easily, but there should be no wheel chatter. 9. When you find the optimal position of the nut, it will be necessary to lock it. Despite tightening the nut quite tightly, it may well become loose or, on the contrary, tighten over time. Therefore, special flanged nuts are used for locking. The collar is punched with a hammer, through a screwdriver, chisel or the back of a second hammer and pressed into the groove of the trunnion. It is better to carry out locking with the wheel lowered to the ground. The wheel, tightened with two bolts, should be lowered from the jack. In this case, the blows from the hammer will be transmitted to the bearings less strongly. 10. The nut cap that was previously removed should be cleaned of old grease and new grease should be hammered into it. 11. After locking, the car should be raised again, the disk and tire should be removed, and the hub cap should be carefully driven into place with a hammer. 12. Then you can put the disc back on, tighten the bolts, lower the wheel and tighten it. 13. When driving out on the road after work, pay special attention to the sounds in the car. Not a note should be heard from the bearing! If the bearing is humming, the adjusting nut should be loosened. In this case, you will need another nut to re-lock. The work described above can be done by the most ordinary car enthusiast. The front wheel bearing is tightened within one hour, you will also need the desire to solve the problem yourself.
LOOK AT THIS too)
Removal and installation procedure
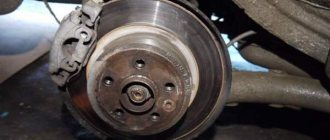
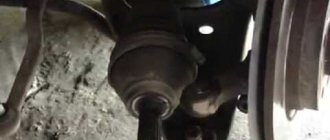
How to determine whether a wheel bearing is faulty?
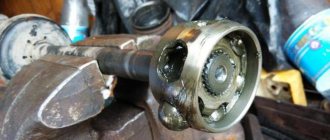
To do this, you need to drive at least 5 km, and rarely need to brake. After stopping, touch the hub with your hand and if you cannot hold your hand, it means that the bearing has become unusable and requires replacement. Another sure sign of a malfunction is the appearance of extraneous noise from the wheel.
You can cope with replacing the wheel bearing yourself:
- First, we install the wheel chocks. Next, we tear off the nut and loosen it a little, there is no need to unscrew it completely.
Now you have removed the bearing. Next, you need to check the presence of the dirt ring and clean the inner surface of the steering knuckle.
Apply a large amount of lubricant to the outer ring of the bearing. Now you need to place the bearing in the freezer and heat the steering knuckle using the same gas burner.
These operations will greatly simplify pressing the bearing into the steering knuckle.
We carry out further assembly in reverse order.
Replacing the wheel bearing on a VAZ 2101-VAZ 2107
Bearings can be of several types, namely rolling and sliding. They are also classified according to where they will be used, for example, rolling bearings are classified as "radial - take radial loads and are designed to operate in harsh conditions, their temperature can reach a maximum of 400 °C and relative surface motion speed. Can be up to 40 m/s or bearings about “support” classification, “swing” and others.
Attention! To replace a wheel bearing, you must purchase: a parts repair kit (there will be bearings and lubricants), as well as a supply with hammers, screwdrivers and all the necessary wrenches, and, of course, choose a free day and get to work!
Where is the hub bearing located? After reading the name, you can already understand that the bearing is connected to the hub, so it is in the inner part, usually when replacing this bearing, people remove the brake disc using the hub, because separating the brake disc is only to waste time, and to replace the bearings on The installed center will usually not work, so you will need to remove (without removing the brake rotor) and then deploy the exchange.
When should I replace my wheel bearing? When it starts to get experienced, but the whole point is that it is very difficult to determine when you are still on the machine, because many load-bearing bearings will only start whenever it actually breaks and falls into ruins, so check this is not feasible more precise research, you will need to remove the first wheel (first straight in front, then on the left, there is no difference how the wheel is checked) and then spin it by hand, it should turn without hesitation AND noise, there should be no noise (maybe just the pads against the brake discs that need to be cut, but this sound will be completely different, like the bearing noise and like the third block), for more details on how to check it, see the clip below, it will be said about this noise, as well as how to determine whether a bearing is in ruins or not yet.
Replacing the wheel bearing on a VAZ 2101-VAZ 2107
Welcome! Wheel bearing - why do we need a bearing at all, we think you know, but for those who don’t know, in a nutshell let’s say that in order for any parts to rotate, rotate, etc., there are several types of bearings, namely plain bearings and rolling bearings (This is based on the type of friction), bearings are also classified according to where they will be used, for example, take a sliding bearing, classification “Radial” - it takes a radial load and is designed to work in difficult conditions, its maximum temperature can reach as much as 400 °C, and the speed of relative movement of surfaces can be a maximum of 40 m/s,” there are also bearings classified as “Support”, “Self-aligning” and others.
Wheel bearing tightening VAZ 2101 - 2107: 5 comments
To hammer a groove on the nut, you do not need to lower the wheel to the ground, since the blow goes to the nut and does not put a load on the bearing, and if you lower it, you will just hit the bearing. And a new cap must be installed since it should not let water through and is almost disposable. And there is no need to remove the wheel when adjusting, since the cap can be removed even if there is no wild cap. Don’t write heresy - it is read by sheep who then prove that they are smart.
Denis Reply: October 15, 2016 at 11:56
and you apparently consider yourself very smart)) Everything here is written to the point, and not everyone has a new cap on hand, and sometimes there isn’t even a new nut. If you don't beat like crazy with a hammer, then in most cases you can use the old cap (there were no holes in it). Of course, a new nut is better, but you can also lock the old one (if the problem is discovered in the wilderness - there is nowhere to buy a new one) - simply lock it on another section of the shoulder.
Yes, I consider myself smart. And I have a diploma as a car mechanic. And the wheel is not removed when adjusting the bearing.
Denis Reply: October 17, 2016 at 12:57
Replacing VAZ front wheel bearings
So, today we’ll talk about replacing the front bearings on VAZ cars of the classic family, I’ll say right away that it’s not difficult to do, any car owner can do it without the use of special tools.
Replacing the front bearing of a VAZ
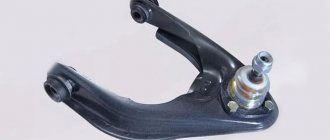
It is quite simple to determine if the front wheel bearings are unusable; the main signs of a malfunction are:
- Inability to adjust the axial clearance of the wheel, the nut is tightened, the wheel still wobbles
- The bearing hums, this usually occurs at certain speeds, then it can quiet down and also change its intensity during turns.
- The wheel turns in a click-like manner; you can check by jacking up the car and turning the wheel with your hand.
- Also various grinding, creaking, squealing, etc.
To replace the front wheel bearing of VAZ cars you will need:
- New bearings, preferably not the cheapest ones
- Front hub oil seal
- Solid oil
- Gasoline or solvent, washing brush
We start replacing the front wheel bearing by removing the wheel and placing the car on a support, I always do this, I don’t like leaving the car on a jack, it’s too unstable.
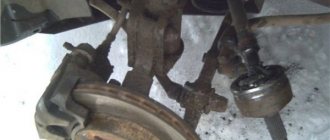
Next, you need to unscrew the two screws securing the brake caliper, for this you will need a socket wrench or a 17-mm socket, if everything is done as it should be, then these screws are secured with a washer; first you need to bend it. Now you need to carefully, without straining the brake hose too much, remove the caliper and place it on the lever.
Remove the caliper and place it on the lever
If the brake pads are in the way, you need to move them apart with a screwdriver or similar object.
Next we remove the cap that covers the adjusting nut and the front wheel bearings; in the photo above I have already removed it. Next, using a 27 wrench (I think, I don’t remember exactly) we unscrew the front hub nut, there are some nuances here:
These nuts have different threads on both sides, on the left wheel (near the driver's door) the thread is normal, on the right wheel there is a left-hand thread. It is also recommended that when removing the nut, replace it with a new one.
Unscrew the nut and remove the washer with the tooth that is located under it.
Unscrew the bearing adjustment nut
Remove the nut, washer, outer bearing, then remove the brake disc itself. I took everything off and laid it out on newspaper:
Removed the brake disc with hub and bearings
Next, I removed the front wheel hub oil seal, under it we can see the internal bearing, its dimensions are slightly larger than the external bearing.
Removed hub seal
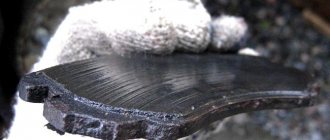
Bearings, dirty, solid oil mixed with sand.
Here I want to note that I will only wash the hub and bearings, since after inspection I did not see or hear the need for replacement. If you change the bearing, then all you have to do is use a tool to knock out the outer races of the bearings; you don’t need to throw them far, since with their help we will forget the new races.
You can see here that there is a mixture of grease and dirt
After removing the clips, you must thoroughly wash all the dirt and old grease from inside the hub. If this is not done, then the new bearings will not last long, because it is no secret that sand is an excellent abrasive. I don’t change the bearings, but I wash both the bearings themselves and the inside of the hub with the outer races.
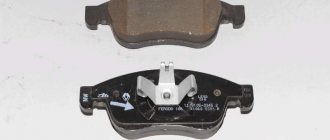
The bearings were washed in solvent and washed until the sand cracking disappeared.
All parts of the front wheel hub and the hub itself are washed
Next, you need to fill the bearing itself and the hub with new grease; it is important to coat the inner bearing well with grease.
Spread thickly with grease
Next, we install the new oil seal in place, hammer it in carefully, trying not to damage the oil seal body.
Oil seal in place
It is also necessary to wash the steering knuckle shaft, the one on which the bearings are fitted with an internal race.
Thanks for subscribing!
Don't forget to clear it here too
Next, install the brake disc with the internal bearing, then install the external bearing, then a washer with a tooth and screw on the nut, also do not forget to lubricate the bearing with grease.
The disk is installed, the outer bearing is also installed
Next, we make adjustments, it is necessary that a small axial play remains. After achieving the required clearance, it is necessary to tighten the nut, thereby fixing the adjustment.
All that remains is to fill the cap with grease and install it in place.
Everything is ready, the cap is in place
Next, install the brake caliper in place and screw it on.
How to replace the wheel bearing on a VAZ 2101-VAZ 2107?
1. Firstly, you need to align the front wheel if you need both and, most importantly, stop the vehicle back with hand brakes (for greater safety, still put under the rear brick or tower is possible), and then remove the wheel from the hub (how to do this, read the article: ") and taking a thin flat screwdriver, secure the protective cover, which protects the hub cover from dirt, more details about the picture below:
2. Move on as the hub combined with the brake disc will be removed (there is no other way to replace the bearing) and then remove the brake disc, clamp, otherwise it will interfere and the hub syndrome just won't remove after the clamp is removed , hangs it like a spring without disconnecting the brake pipe from the clamp, so that after installing everything back you will not need to pump the brakes, details on how to do all these steps can be found in the article entitled: “Replacing the brake caliper in a car.
3. Now we unscrew the center hub fixing nut, it is shown in the red arrow, it is better to unscrew it with a wrench because the flat wrench can tear it out, and Koey is larger, this nut is controlled, so before you start Unscrew, unscrew the screw with a screwdriver (it will bent places, you will immediately find them, here they will be bent, this will be necessary) and unscrew it with a key and, by the way, depending on which you will Unscrew the nut, depends on the direction of rotation, we will give an example if you unscrew the nut from the left( see. For example, if we unscrew the nut on the left side (see the direction of movement of the car), then we unscrew it in exactly the same way as all nuts; on the right side, the nut is screwed on and unscrewed in the opposite direction (it has a different thread) and to unscrew it, do not you will have to turn it counterclockwise, only clockwise, so remember this once and twice.The nut does not always need to be unscrewed, many times it happened that the nut simply broke because it was not known which way to turn.
Note: After unscrewing the nut, remove the washer behind it and the outer bearing retainer that comes with the rollers and inner race, as shown in the little photo above!
4. After these steps, grab the brake disc with your hands and pull it towards you, which will allow you to remove it along with the hub from the shaft on which it is installed, place the disc and hub assembly on the ground (so that the back of the disc faces you) and proceed to disassemble the bearing by first removing the upper oil seal packing, as in Figure 1. To remove it, you can use either expansion pliers or a thick-bladed screwdriver, and after removing the oil seal, proceed to remove the inner bearing basket with rollers, this is exactly the same screwdriver to lift or simply reverse the drive and remove it manually (see photo. After this, clean by hand, and then with a rag, the entire interior, where the race was, where the oil seal was, from dirt and old grease ( there should be no grease left), then use the same screwdriver to select the spacer sleeve, remove it (photo 3), and finally you will have to knock out the two rings that are in the center, knock them out with a hammer and knock them out (you can use a screwdriver instead of a punch) first knock out the inner ring bearing (If the brake disc does not turn and it does not matter which ring to knock out, the most important thing is to knock out both). As soon as the first ring is knocked out, you need to turn the brake disc in the hub assembly and knock out the second ring, the outer bearing ring. You can see these rings in more detail in the diagram that is in the second photo; if you look from above, there will be a photo of the hub and everything in it it goes in, and by the way, all the bearings and seals are in order (it's a little picture, click here and just jump to it).
5. Everything has been removed, now you need to reinstall everything back, but all the old parts will be replaced with new ones, so before installing, rinse all parts in kerosene or white spirit and apply the landing spots on the hub bearings. grease, which will most likely come in the box where you bought the wheel bearing and start assembling, first install the bearing rings as far as possible, and most importantly, install them in the same places where they should be (see diagram below). But to press the rings all the way you need to take some spacers, you can use a piece of pipe or something like that (see photo below), but until the ring collapses, push it through a wooden spacer, this is very convenient, or using old rings (see .small picture).
Note: Insufficient tightening of the rings or their distortion is unacceptable, in addition, they must fit clearly and well, the rings should not turn inward due to hand force, special attention should be paid to this!
6. Fill the inside of the hub with grease (Litol-24 liquid lubricant is usually used), apply grease to the pressed bearing rings, also apply grease to the separators that have not yet been mounted, and then reassemble the hub in the reverse order. , then reassemble the hub in reverse order, following all the instructions in the videos, Install the brake rotor and hub assembly onto the shaft, tighten the nut and finally adjust the hub bearing, use the nut and make sure it is tightened correctly, see the clamp below for more detailed information:
How to replace the wheel bearing on a VAZ 2101-VAZ 2107?
1. First, hang up the front wheel you need, if necessary, hang both and, most importantly, stop the rear of the car using the handbrake (For greater safety, you can also place bricks or heads under the rear), then remove the wheel from the hub (Read how to do this in the article: “Correctly replacing wheels on cars”) and using a thin flat-head screwdriver, pry out the protective cap that protects the hub nut from dirt, see the photo below for more details:
2. We go further, since the hub together with the brake disc will be removed (there is no other way to replace the bearing), in this case, remove the caliper from the brake disc, otherwise it will interfere with the hub assembly from the discs. You simply do not remove it, after After the caliper is removed, hang it by the spring without disconnecting the brake hose from the caliper, so there will be no need to bleed the brakes when you put everything back. For more details on how to perform all these operations, read the article entitled: “Replacing the brake caliper by car".
3. Now unscrew the central nut that secures the hub, it is indicated by a red arrow, it is better to unscrew it using a spanner, because you can rip it off with a wrench and something else, this nut is self-locking, so before you start unscrewing it, unscrew the nut using screwdrivers (there will be bent places there, you will immediately find them, you will need to straighten them) and turn it out with a wrench after that, by the way, depending on which side of the nut you turn out, the direction of rotation depends, let’s give an example if you unscrew the nut on the left side (see in the direction of travel of the car), then it is unscrewed in the same way as all nuts, on the right side the nut is screwed in and unscrewed in the opposite way (It has a different thread) and in order to unscrew it, you will need to not mind turn clockwise, but clockwise, remember this once and for all, there have already been many cases when the nut was simply torn off, due to the fact that they simply did not know which way to turn it.
Note! When the nut is unscrewed, remove the washer located behind it and the outer bearing cage, which comes complete with rollers and inner ring, as shown in the small photo just above!
4. After the completed operations, grab the brake disc with your hands and pull it towards you, due to which it, together with the hub, will be removed from the shaft on which it is installed, place the disc assembly with the hub on the ground (So that the back of the disc is facing you looked) and start removing the bearing, first remove the uppermost oil seal as shown in photo 1, for removal you can use either sliding pliers or a screwdriver with a thick base but a flat blade; however, as soon as the oil seal is removed, proceed to removal separator of the inner bearing with rollers, you will need to pick it up in the same way with a screwdriver or simply turn the disk over and remove it with your hands (see photo 2), then clean with your hand and then with a rag the entire internal part, where the separator stood, where the oil seal stood, from dirt and old grease (There shouldn’t be any grease left at all) and then prying up the spacer bushing with the same screwdriver, remove it (photo 3) and finally, you will need to knock out the two rings that are located inside, they are knocked out with a hammer and a drift (Instead of a drift, you can use screwdriver), first you will knock out the ring of the inner bearing (If the brake disc has not been turned over, and in fact it doesn’t matter which ring to knock out, the main thing is to knock out both of them), well, this ring is knocked out with light circular blows on it (see. photo 4), in the end it will rest against the asphalt, you will need to put something under the brake disc to make it higher or hold it in a vice, otherwise the ring will not be knocked out, as soon as the first ring is knocked out, turn it over brake disc assembly with hub and knock out the second ring, the outer bearing ring, you can see these rings in more detail in the diagram, which is located in the second photo if you look from above, there will be a photo of the hub and everything that goes inside it and by the way, all the bearings are there and the seals are laid out in order (This is a small photo, “click here” and you will go to it).
5. Everything has been removed, now you need to install everything back, but only all the old parts will be replaced with new ones, so before installing everything, wash all the parts in kerosene or white spirit and on the hub bearing seats, apply grease that most likely it will be included in the box in which the wheel bearing was purchased and proceed to assembly, the first to be installed are the bearing rings, they need to be seated all the way and the main thing is to install them in the same places where they should be (see the same diagram), but in order to press the rings all the way to the stop, you will have to take some kind of gaskets, you can use a piece of pipe, for example, or something like this (see photo below), but until the ring begins to sink inwards, you need to press it through a wooden for a simpleton, this is very convenient, or with the help of old rings (see small photo).
Note! Incomplete pressing of the rings or their distortion is not allowed, and they must fit clearly and well, the rings should not turn inside due to hand effort, be very careful about this!