We carry out the work on a flat area, inspection ditch or overpass.
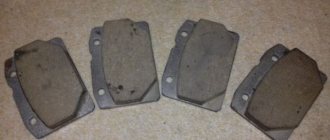
Attention! The brake pads of the front wheels must be replaced only as a set - all four pads. Replacing the pads of one brake mechanism can lead to the car pulling to the side when braking.
If the fluid level in the hydraulic brake reservoir is at the MAX mark, then before installing new pads, use a syringe or rubber bulb to pump out some of the fluid from the reservoir. This operation must be performed so that when the piston is pressed into the wheel cylinder of the brake mechanism while installing new pads, fluid does not flow out from under the reservoir cap.
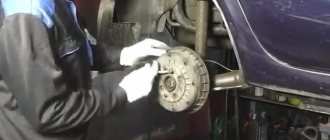
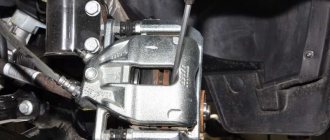
Remove the front wheel.
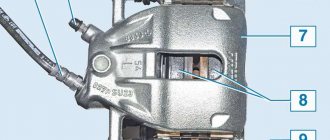
Before installing new pads, it is necessary to move the wheel cylinder piston as much as possible inside the cylinder. To do this, insert a wide-bladed screwdriver through the hole in the caliper between the base of the inner pad and the piston. Leaning a screwdriver on the block...
2278-21-02-12
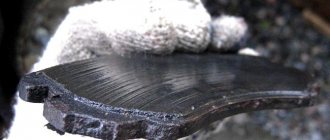
Front brake pads of the left wheel.
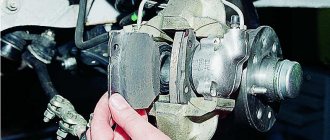
Attention! Before installing new pads, you must pay attention to the markings of the internal pads. They must be installed strictly in the direction of rotation of the wheel. This is indicated by an arrow marked on the base of the inner block. The direction of rotation of the wheel and the direction of the arrow must match.
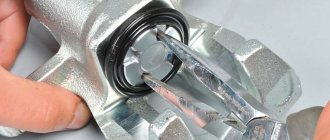
Install new brake pads into the pad guide and lower the caliper. We wrap the guide pins and install the caps of the guide pin bushings.
We similarly replace the pads on the other side of the car.
After replacing the pads, press the brake pedal several times to set the gaps between the pads and discs. We check the fluid level in the tank and, if necessary, bring it up to normal.
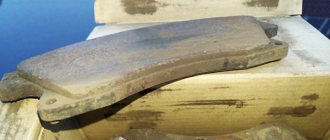
During operation, the surface of the brake disc becomes uneven, as a result of which the contact area of the new, unused pads with the disc decreases. Therefore, during the first 100 km after replacing the pads, until the new pads have broken in, be careful, as the car’s braking distance may increase.
[How to save money on Renault Duster maintenance] [Renault Duster maintenance at 15,000/45,000/75,000/105,000 km] [Renault Duster maintenance at 30 thousand km][Renault Duster maintenance at 60,000/120 000 km] [Maintenance of Renault Duster at 90 thousand km] [Carrying out maintenance yourself - general recommendations] [Safety rules for doing maintenance yourself] [Lamps used in a Renault Duster car] [Tools required for carrying out maintenance of Renault Duster ]
Replacing the brake pads of the front wheels of Renault Duster
What front pads are installed on Renault Duster
Let us immediately note that the front pads of Dusters with 2.0 and 1.6 liter engines are different. That is, brake pads from a two-liter Duster will not fit on a 1.6-liter one. Therefore, before you start replacing the pads, you first need to find out which pads you have.
Front pads for Duster with 2.0 liter and 1.5 dci engine
- Renault 440603905R set price from 3000 RUR original
- Sangsin Brake SP1390 set price from 1600 rubles Korea good quality for a quiet ride the best
- Sangsin Brake HP1390 hardron set price from RUB 3,000 Korea Excellent replacement for the original
- Hankook Frixa FPS05 set price from 1400 rubles good quality
- LYNXauto BD6317 price per set from 1600 rubles good quality
Front pads for Duster with 1.6 liter engine
- Renault 410608481R set price from 1300 RUR original
- Bosch 0986424795 set price from 1700 rubles good quality
- Fenox BP43018 set price from 600 rubles Belarus
- Sangsin BrakeGP1564 set price from 2000 rubles good quality
Brake discs installed on Renault Duster with 1.5dci engines; 1.6 and 2.0 liters
Now let's look at the brake discs. On Duster with a 1.6-liter engine, brake discs with a diameter of 269 mm are installed. The catalog number of the original wheels is 402066300R.
Price of the original Renault 402066300R from 5000 rubles
Replacement for the original Bosch 0986479779 price from 3000 rub.
Dusters with 1.5dci and 2.0 liter engines are equipped with brake discs with a diameter of 280 mm
Price of the original Renault 402064151R from 5500 rubles
Replacement for the original Bosch 0986479777 price from 2500 rubles, as well as other analogues
Overview of analogue brakes
List of ten best brake spare parts for the Renault Duster model (manufacturer, article number):
- Ferodo 44060-3905R - are able to provide the brake system with better performance.
- SANGSIN SP13-90 – excellent quality-price ratio.
- TRW GDB33-32 – works gently, and does not contain absinthe or copper in the composition.
- Renault 41060-8481R – manufacturer recommends.
- Girling 6133-321 – impressive technical parameters.
- ATE 607-266 – remain effective throughout the entire service life.
- Bosch 09864-24795 - perfectly protects brake discs from damage.
- ABS 377-60 - a special sound signal notifies about wear.
- Nipparts J3601-085 is an efficient packer.
- Fenox BP430-18 – low price.
Next, the top three brake pads for Renault Duster will be examined in detail.
Ferodo
The company is known in the Russian car market and in Europe. Offers Duster drivers exceptionally high quality products. The company makes pads for Duster and other models, for racing cars.
8200432336
SANGSIN
If you need to replace the front pads on a Renault Duster, it makes sense to take a closer look at this company. The brake parts they create not only meet all safety quality standards, but are also inexpensive. Leading automakers use the services of this company.
SANGSIN SP13-90
TRW
This manufacturer is known all over the world; spare parts from its assembly line are in demand, including in Russia. All factories are located in European cities, which guarantees absolute quality. High quality brake pads for Duster and other cars.
TRW GDB33-32
You will learn how to tighten the handbrake cable in this text.
How to remove a Renault Duster brake drum
The brake drum is one of the main spare parts responsible for smoothly reducing the speed of movement and braking the car. Today, in vehicles this type of brake is mainly installed either on small cars or on the rear axle. Almost always, brake drums are used on trucks or buses. The features and advantages of the drum brake system will be discussed below.
Pros and cons of a drum brake system
Let's consider the main advantages and disadvantages of the drum element in comparison with the disk system.
Pros:
- high degree of protection of elements from contamination, which increases the service life of the device;
- on large transport devices, due to the larger contact area with the surface, such a part allows for more effective braking.
Minuses:
- the efficiency of the device drops sharply when overheated, which has an extremely negative effect when driving a car at high speeds;
- there is no ventilation system, which leads to an increase in the amount of gas between the pads and drums and, as a result, interferes with the braking process.
Procedure for replacing rear pads on Renault Duster
To open the Duster brake drum and replace the corresponding rear wheel assembly, prepare:
- wheel bolt wrench,
- plain & sliding pliers,
- flat screwdriver.
It's time to change the rear pads when:
- thinning of the linings,
- oiliness of the linings,
- their poor connection with the base,
- chips or deep scratches.
For all-wheel drive or front-wheel drive Dusters, the compression springs in the mechanism are different, as is the release lever of the handbrake, but the internal minimum diameter of the drum is the same. For all-wheel drive Dusters, the springs are located outside the pads; it is better to remove them before starting work.
Removing the rear drum of an all-wheel drive crossover
Before replacing the rear pads, you must first remove the ratchet mechanism. It is pryed with a screwdriver through the hub hole, and the length of the spacer bar is reduced. Next, the adjusting screw at the handbrake cable tensioner is unscrewed. To do this, you need to lower the handbrake all the way and unscrew this fastener in its handle.
Link to photo source
The drum is attached to the hub with two screws. They are unscrewed with a TORX T-40 key. Where the pads separate along the perimeter of the drum, you need to tap with a hammer to remove scale and dirt. As soon as the drum moves away from the hub, pry it up with a flat screwdriver or mounting spatula and remove it.
Using a caliper, set the inner diameter of the Duster drum.
Changing the pads
The procedure for replacing rear brake pads is performed in the following order:
- 1st gear is engaged and the wheel chocks are placed at the front.
- The handbrake is pressed down all the way.
- The rear wheel is removed and the Renault Duster is supported.
- It is advisable to pump out the brake fluid a little from the reservoir.
- The drum is removed.
- A screwdriver moves the release lever of the handbrake drive, and at the same time the spring on the cable is compressed.
- The cable is disconnected from the lever.
- The stand adheres, the spring cup rotates after pressing 1/4 turn.
- The cup with a spring and the support stand are removed.
- The second support post of the next lining is also removed.
- The tension spring on top stretches a little, the toes of the pads are pulled out of the thrust slots in the pistons.
- The tightening spiral from below is stretched a little, the toe of the linings is pulled out from behind the restrictive plate, the pads with springs and spacer are removed.
- As soon as the Duster pads are removed, the cylinder pistons must be temporarily fixed in any way (with wire, etc.) so that they are not pushed out and brake fluid does not leak out.
- The ends of the tension spring are unhooked from the linings and removed.
- The spacer fork is removed from the groove of the block in front.
- The end of the clearance adjuster earring is detached from the front trim.
- The ends of the tensioning spiral are unhooked from the pads, and the linings are separated.
- Having stretched the spiral of the spacer, the fork of the bar is removed from the groove of the rear column and disconnected from the release lever.
- The end of the release spring is unhooked from the spacer bar, and the bar is removed.
- The tension spring of the spacer bar is removed from the rear block.
- The brake mechanism is inspected and cleaned of dirt.
- Deformed rusty parts are replaced with new ones.
- Springs, racks, cups must be replaced every time the mechanism is disassembled. When working, you need to make sure that the right and left parts are not mixed up.
- In places where the pads contact the shields, you need to apply a refractory lubricant. The same lubricant must be used to treat the spacer rod at the thread location.
- After releasing the pistons of the rear brake cylinder from the retainers (wire, etc.), they are supported with sliding pliers and new ones are installed.
- The drum is put in place.
- The gap between it and the linings is adjusted by squeezing the brake pedal 10-15 times. Each press should be accompanied by a click of the regulator. When the sound stops, the adjustment is complete.
- The wheel is put in place and checked how easily it rotates.
- The pads of the second wheel of the Duster are changed in the same way. Next, the parking brake is adjusted.
Signs you need to replace your brake pads
The main signs of friction lining wear:
- reduction in the volume of working fluid in the compensation tank in the absence of leaks;
- reduction in the efficiency of mechanisms when the pedal is suddenly applied;
- presence of extraneous sounds when using the brakes.
The manufacturer does not regulate the service life of brake linings, since the wear rate of the material depends on operating conditions and driving style. Some cars are equipped with an ESP system that stabilizes the trajectory by braking the wheels.
The operation of electronics additionally loads the mechanisms and accelerates wear of the pads. The machine manufacturer recommends installing new parts with a remaining friction layer thickness of 2 mm. The service life of parts, according to owners, ranges from 40 to 80 thousand km.