2272-6-12-04-10
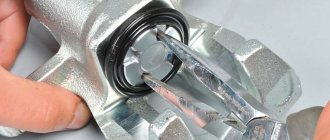
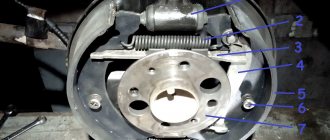
The upper and lower guide pins are different from each other. In order to distinguish them, they are painted in different colors: the upper one is yellow, the lower one is silver .
Before installing new brake pads, it is necessary to move the piston as far as possible into the cylinder.
We offer two methods for this.
First way
You can use the screw and strip from a two-legged screw puller, as well as a nut of a suitable size.
Selection of rear brake pads for Solaris
Driving style plays a key role in the selection of new components.
Since not all car owners know how to change this or that part of the brake system, the selection is not always carried out in accordance with driving style. For example, if you drive aggressively, buying cheap parts will be a pointless waste of money: they will wear out too quickly and leave the impression of a low-quality product. Of course, many start from the extremely simple assumption that original components are the best option. But if Solaris is not planned to be used under conditions of increased load, then it is quite possible to resort to purchasing proven analogues. In this case, it will be possible to save money without losses, and the newly installed parts will last quite a long time. In this case, you should make sure that we are talking about certified products that meet the manufacturer’s standards.
2272-6-12-04-12
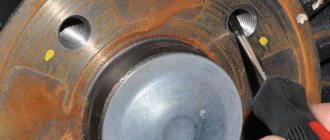
We insert the pliers into the piston sockets and turn it, while simultaneously pressing on the piston.
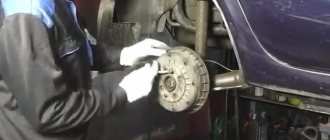
We clean the brake mechanism parts from dirt and corrosion, especially the brake pad guide seats.
If the protective covers of the guide pins are torn, replace them with new ones.
We install new brake pads and fasten the caliper.
Similarly, we replace the brake pads on the right rear wheel.
After replacing the pads on both rear wheels, press the brake pedal several times to set the gaps between the pads and discs.
[We save up to 5,000 rubles on Hyundai Solaris maintenance] [Hyundai Solaris maintenance for 15 thousand kilometers] [Hyundai Solaris maintenance for 45 thousand kilometers] [Hyundai Solaris maintenance for 60 thousand kilometers] [Do it yourself Maintenance - general recommendations] [Safety rules for carrying out vehicle maintenance yourself] [ Tools required for maintenance of Hyundai Solaris]
Replacing brake pads for the rear wheels of Hyundai Solaris
Features of choice
Before buying Hyundai Solaris rear brakes, you need to evaluate the driver’s driving style. Well, for example, if the owner loves aggressive driving, then there is no particular point in spending money on a cheap organic gasket.
You will only throw money away and keep a negative opinion about the product to yourself, spreading it among friends and acquaintances. In turn, the pads are divided into conveyor, non-original or aftermarket flow, in other words, original, non-original, non-departmental copy. There is no point in resorting to the illusory opinion that the original is the best option.
The best consumables are stock ones, however, what to do if the stock has already used up?
Yes, nothing lasts forever and sooner or later car owners are faced with a similar problem, but some unfortunately get lost. Rear brake pads for Solaris from official dealers are, to put it mildly, not the cheapest. But you shouldn’t despair, there are alternative ways out of the situation. In the service market, you can encounter a lot of components and their manufacturers that are similar to the original.
The fear of non-original brake pads manifested itself due to their critically low quality. Due to the fact that they repeat the original, but do not have the proper quality, their reputation is spoiled. In any case, there is no need to worry, and buying an original or a duplicate is entirely your decision.
If finances allow, then it is better to buy original products from the manufacturer. However, if you are still limited in their availability, want to save a little money and have already encountered copies of good quality, then you can buy them. But still, the purchase is purely your decision and no one has the right to make it for you.
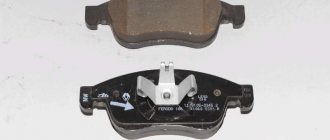
Solaris rear brake pads If you need to replace the protective cover of the guide pin, remove the lower guide pin from the hole in the pad guide...
Having pressed the plate, remove it from the pad guide.
We remove the inner block in the same way.
Tools
In order to replace the rear brake pads on a VAZ-2114 quickly and successfully, we need a set of wrenches, a hammer with a handle, a slotted screwdriver, a jack, a brake pad and pliers. Since system elements can sour or rust, we use a watery wrench like VD-40 or its analogues. So, how is replacing the rear brake pads on a VAZ-2114 done? A detailed summary will be given below.
Use a screwdriver to move the outer brake pad along the guide plates.
Replacement timing
Depending on your driving style, replacing the pads may be necessary after 5 thousand kilometers. They are enough for the average driver for 15,000-20,000 km. For comparison, on domestic cars the mileage from replacement to replacement is no more than 15,000 km.
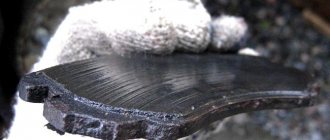
A specific sound reminds the driver of the need for replacement. Those who have heard it once have no questions about when to change the pads on Solaris. The replacement signal cannot be confused with any other. It occurs when a metal plate comes into contact with the brake disc. The warning light is installed on the inner brake pad. It wears out faster than the one located on the outside.
Maintenance and repair of Hyundai Solaris
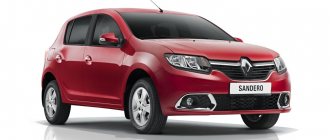
The Hyundai Solaris, despite its low cost, is a diamond of success for the Koreans in the Russian market, being one of the best-selling cars here. Hyundai Solaris replaced the fourth generation Hyundai Accent model on the market. And in Russia it became an independent model along with the TagAZ Accent. The car is equipped with petrol engines of 1.4 and 1.6 liters with a power of 107 and 123 hp. respectively. The buyer has a choice of 2 transmissions: a 5-speed manual transmission and a 4-speed automatic. Hyundai Solaris shows good dynamics and rather modest fuel consumption: 6 l/100 km with a manual transmission and 6.5 l/100 km with an automatic transmission (combined cycle).
With regular maintenance and timely repairs of the Hyundai Solaris, the engine can easily live up to a mileage of 300 thousand km or more, without serious intervention. It is important to follow the recommendations and instructions of the manufacturer so that the components and parts of the vehicle can withstand operating loads.
You can view the list of mandatory maintenance work for the Hyundai Solaris and the timing of their implementation in the service book, and you can also download the routine maintenance work for the Hyundai Solaris.
Scheduled maintenance work includes regular replacement of oil and technical fluids, replacement of Hyundai Solaris filters, replacement of Hyundai Solaris spark plugs, replacement of the Hyundai Solaris drive belt.
Cost of maintenance work Hyundai Solaris
| Name of works | Cost, rub |
| Crankcase protection - removal/installation (if equipped) | 250 |
| Changing the oil and oil filter | 450 |
| Replacing the air filter | 200 |
| Replacing the cabin filter (air conditioning) | 350 |
| Replacing the fuel filter | 2 500 |
| Replacing spark plugs | 600 |
| Manual transmission oil change | 400 |
| Automatic transmission oil change (partial replacement) | 1 500 |
| Coolant replacement | 700 |
| Brake fluid replacement (full) | 1 000 |
| Replacing the drive belt and roller | 1 200 |
Even if the car is serviced regularly and in full, over time it is necessary to carry out work to replace parts that fail as a result of natural wear and tear or damage during operation.
Hyundai Solaris repair cost
| Name of works | Cost, rub |
| Replacing front brake pads | 700 |
| Replacement of front brake discs (including replacement of pads) | 1 000 |
| Replacing rear brake pads (drum) | 1 200 |
| Maintenance of rear drum brakes (cleaning, lubrication) | 950 |
| Replacing the front shock absorber/spring | 1 450 |
| Replacing the rear shock absorber/spring | 750 |
| Replacing the front arm | 900 |
| Replacement of front stabilizer bushings (2 pcs) | 1 000 |
| Replacing the front hub bearing/front hub | 1 600 |
| Replacing the tie rod end (wheel alignment separately) | 650 |
| Replacement of steering rod, including replacement of NRT (wheel alignment separately) | 1 000 |
| Clutch kit replacement | 5 500 |
| Replacing the rear oil seal | 6 500 |
| Manual transmission - removal/installation | 5 000 |
| Manual transmission - disassembly/assembly with replacement of parts | 6 000 |
| Replacing the +AC/ -AC generator | 2 000 |
| Starter replacement | 1 400 |
| Comprehensive diagnostics of all vehicle systems (including error removal) | 800 |
The offer is not an offer and is for informational purposes only. To clarify the cost of work not presented in this list, please contact:
Auto-Mig
Club car service
repair, painting, diagnostics
installation of additional equipment
- Repair K5
- Repair Rio
- LED repair
- Repair Soul
- Repair Weng
- Bongo repair
- Repair Mojave
- Repair Seltos
- Repair Karens
- Repair Quoris
- Repair of Cerato
- Repair Opirus
- Repair Optima
- Stinger Repair
- Spectra repair
- Sorento repair
- Picanto repair
- Repair Carnival
- Sportage Repair
- Repair Magentis
- Repair I20
- Repair I30
- i40 repair
- Repair IX35
- Repair IX55
- Goetz Repair
- Repair Crete
- Repair Verna
- Repair Tussan
- Repair Accent
- Repair Porter
- Sonata repair
- Repair Starex
- Repair Grander
- Elantra repair
- Solaris repair
- Repair Matrix
- Renovation Santa Fe
- Repair Genesis
We accept for payment:
- Online cameras
Repair of other brands
- Changing the oil in a Volkswagen engine
AutoMig car service » Hyundai repair » Replacement of brake pads and discs Hyundai Solaris
Replacing brake pads and discs Hyundai Solaris
Repair Hyundai Solaris
- Model: Hyundai Solaris RB
- Body type: sedan
- Year, mileage: 2012, 90,000 km
- Gearbox, drive: automatic, front
- Engine: 1.6 petrol
Reason for contacting the Hyundai Solaris "Auto-Mig" car service:
- replacing brake discs Hyundai Solaris
- the braking distance has increased, the brake pedal has become “soft”, braking is not effective, the brake fluid level has decreased
Diagnostics revealed the following:
- severe and uneven wear of the front brake discs. Most likely this was caused by the fact that the owner used non-original brake pads on the Hyundai Solaris made of “hard” material. Yes, they slightly increase braking efficiency, but at the same time they wear out less and cause more damage to the brake disc. We would advise installing pads (even if not the original ones) from the so-called “soft” material. They wear out a little faster, but in this case the brake disc will not wear out much and quickly.
Completed work:
- replacing front brake discs Hyundai Solaris
- replacing front brake pads
replacing brake discs Hyundai Solaris
Parts used:
- 51712-0U000 — front brake disc Solaris
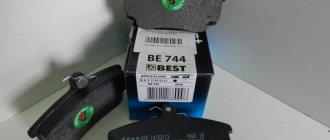
- 58101-1RA00 — Solaris brake pads
- Model: Hyundai Solaris RB
- Body type: hatchback
- Year, mileage: 2015, 45,000 km
- Gearbox, drive: automatic, front
- Engine: 1.6 petrol
Reason for contacting the Hyundai Solaris "Auto-Mig" car service:
- replacing brake pads Hyundai Solaris
- The parking brake warning light is on and a grinding noise is heard.
Diagnostics revealed the following:
- The brake fluid level has dropped because the front and rear pads are very worn. The grinding and squeaking noise was made by special metal “squeaker” antennae located on the blocks. When the pads wear out, the antennae come into contact with the brake disc and make this very “reminder” sound that the pads need to be changed. There can be many reasons for “squeaking or grinding” (sand, damage to the brake disc, misalignment of the brake pads, etc.), but in this case it is simply severe wear of the pads.
Completed work:
- replacing front and rear disc brake pads
replacing brake pads Hyundai Solaris
Parts used:
- 58101-4LA00 — front disc brake pads
- 58302-1RA30 — rear disc brake pads
The cost (price) of replacing the brake pads and discs of the Hyundai Solaris can be clarified by the auto repair center technician or in the QUESTIONS AND ANSWERS section
Car service Service-ASP
Sign up for repairs
- (916) 648-18-30
- (495) 649-33-91
- (926) 630-97-66
- home
- About company
- Services
- Prices
- Reviews
- Stock
- Contacts
- Maintenance
- Locksmith repair
- Body repair
- Tire service
- Wheel alignment
- Additional services
- Fiat Ducato repair
- Citroen Jumper repair
- Hyundai Solaris repair
- WV Polo sedan repair
- Cooperation
- Helpful information
Symptoms of malfunction, resource
With front pads, it’s very easy to find their wear visually by removing the stamped disc. And if the car has a casting, then without removing the wheel at all. With drum pads it's even more complicated. They are hidden under the lid. Not every car enthusiast will remove it in the hope of detecting early wear. As for the resource, no one gives definite figures. It all depends purely on driving style. But in any case, the rear pads last longer than the front ones. The service life of these parts is usually from one hundred to one hundred seventy thousand km.
The manufacturer notes that the small thickness of the pads on the rear drums should be 1.5 mm.
It should be noted that the design of the brakes on the 14th Lada is similar to eights and nines.
Setting the parking brake on a VAZ-2114. step-by-step instruction
Replacing the rear brake pads requires the inevitable adjustment of the handbrake. To do this, we need two keys for 13. We make the adjustment on the cable equalizer, which is hidden under the muffler can. So, we unscrew the locknut with one key, and with the other we secure the bolt from turning. Next, we turn the nut in one direction or another (depending on what we need to tighten or loosen the cable). When tightened, the stroke of the handbrake and, accordingly, the cable is miniaturized.
What should the norm be? When setting, you should control the travel of the parking brake lever. The pads should lock after 3-4 clicks. A maximum of six clicks is allowed. Anything that indicates increased lever travel. With all this, the car must remain on a slope of sixteen degrees.
Let's get started
To perform this operation, we do not necessarily need a pit or a lift. Quite smooth and hard surface. So, loosen the wheel bolts on one of the wheels and jack up the rear of the car. Beforehand, we put stops under the front tires, or put the car in first gear (so that the car does not roll spontaneously). Next, remove the wheel and remove the muffler from the cushions. We leave the outermost one, which is located under the bumper, so that the exhaust does not hang in the air.
Why do we need a muffler? Next to it are the handbrake tensioner nuts that need to be loosened. This is done so that you do not experience additional problems during installation. Loosen the nuts as much as possible. To do this, we will need a key for 13. How do we continue to replace the rear brake pads on a VAZ-2114? Then we move on to the drum itself. We unscrew the guide bolts on it and rotate the cover 30-40 degrees. This way we can get it out.