Although the process of replacing drum brake pads is somewhat more complicated than replacing disc brake pads, even an inexperienced car owner can change rear drum brake pads. An experienced auto mechanic can complete this procedure in 30 minutes, depending on the car model and the condition of the brake system. A beginner may need up to 2 hours of work, but he will gain valuable experience in servicing the car, and also save some money.
As a rule, you have to change the rear brake pads less often than the front ones, but still, there comes a time when it needs to be done. To do this you will need a minimal set of tools. It is also advisable to look at the repair manual for your car to clarify the specific points inherent in this model.
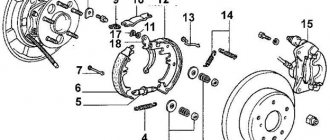
Drum brake device
1 – brake cylinder 2 – upper tension spring 3 – expansion bar 4 – parking brake drive lever 5 – brake pad 6 – brake shoe retainer 7 – wheel hub 8 – lower tension spring.
To replace brake pads you will need:
- gloves
- jack (for raising a car)
- wheel wrench (to unscrew the wheel nuts)
- screwdriver
- pliers
- long nose pliers
- wrench (as a rule, you may need 10,12,13 or 14)
- anti-roll device (placed under the rear wheel, front and rear, to prevent the car from rolling)
- a lifting support or log (to help the jack, as the car can jump off it)
- new brake pads.
You may also need a hammer.
The importance of timely changeover
Brake pads serve as the main component of the vehicle's braking system. They slow down the rotation speed of the wheels, causing the car to stop.
It is very important to maintain this element in good condition. The life of the driver and his passengers often depends on this.
Brake bars wear out quickly. The car owner has two options: go to a service center or replace the part himself.
The price for changing brake pads at a service station depends on their type (rear/front) and varies from 300 to 600 rubles. Plus, you will need to leave your iron horse in the workshop for some time.
To avoid wasting time and money, it is better to carry out this operation yourself. Moreover, the Internet is full of videos on how to change brake pads correctly.
When to change drum brake pads
In the operating manual for each car model you can find the necessary parameters and signs indicating the need to replace the brake pads. Also, the frequency of replacement will be influenced by: driving style, road and operating conditions, vehicle weight, quality of the brake pad material and the “correctness” of the last replacement.
On average, rear drum brake pads last : on domestic cars - 70-80 thousand km, and on imported ones - more than 100 thousand km. The difference is due to the quality of the brake pad material. You can also measure the thickness of the friction lining, and if it is less than 1.5-2 mm, then the brake pads must be replaced. On some models, it is not necessary to remove the brake drum to do this: just pull out the plug in the brake flap and look at the brake pad.
Determining the time, conditions and moment for replacing pads
The general level of wear of the rear brake pads simultaneously depends on several main factors. Among which are such criteria as the general driving style of the car, its operating conditions, the quality of parts and the initial condition of the brake pads.
If you had to buy counterfeit parts, regardless of the presence of a conscious choice or out of ignorance, the car is driven on poor-quality road surfaces, there is frequent and sudden braking of the car, then you should not expect good results and consequences. In the presence of such factors, the overall trouble-free service life of the brake pads will be much shorter than under more favorable operating conditions.
For a thrifty and careful driver who does not crave the dubious fame of a car hooligan and self-realization through aggressive driving of his own car, the pads will last much longer.
The average trouble-free mileage of rear brake pads is about 50,000 kilometers or even more, while the front ones can only last between 10,000 and 15,000 kilometers. Rear pads, in practice, have proven to be more durable, especially if they are installed on drum brakes. But still, everything here depends on the general technical condition of the car and all of the above factors that have a significant impact on these indicators. Regardless of the presence or absence of any reasons, there will definitely come a time when replacing the rear brake pads with your own hands becomes simply necessary. The most important thing to do in this case is not to miss this moment, since new difficulties may arise.
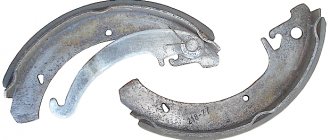
Worn and new brake pads
There is a very big difference between the situation when a pebble just hit under the car while driving at high speed, the brakes “creaked” and went quiet, and between another moment when there is a fairly stable creaking noise when braking, which only becomes even stronger and more unpleasant. In such a situation, it is urgent to take some action, for example, visit a car parts store, if you have the desire and ability to replace the rear brake pads yourself.
Signs of wear on drum brake pads
- increased brake pedal travel
- increased braking distance or the car pulls to the side when braking
- mechanical damage (cracks, chips), oiliness and uneven wear of the pads
- drop in brake fluid level
- The parking brake is ineffective or does not function
- activation of the parking brake indicator or pad wear sensor
- squeaking, grinding and other unpleasant sounds during braking.
If the wheel has brake fluid, it is necessary to urgently inspect the brake system and make repairs. On some car models, due to wear on the brake pads and drum, the piston falls out of the brake cylinder and the brake fluid flows out of the circuit, leaving the car without a working brake system.
Cost of rear pads and article number
When purchasing a set of rear pads, it is best to give preference to original parts. Car owners recommend them for purchase, rather than analog brands, because they have a better price-quality ratio.
You should look for the part by article number: 21080-3502090-55 . This will help you avoid running into a fake in packaging similar to the original.
It is worth noting that when replacing the rear pads on a VAZ 2114, most often a failed brake cylinder is also discovered. It becomes sour in certain positions and when the brake is pressed and does not provide a proper seal.
Procedure for replacing rear drum brake pads
1. Raise the car and remove the wheel, to do this:
- place the car on a flat surface
- put the car in gear
- put a wheel chock (or bricks) under the wheels to prevent the car from rolling
- tear off the nuts (or bolts) securing the wheel
- put a jack on and lift the car until the wheel rotates freely
- place a lifting support or log under the machine. Don't rely on the jack alone!
- unscrew the nuts (or bolts) and remove the wheel.
2. Removing the brake pads:
- unscrew the brake fluid reservoir cap
- remove the brake drum (if the drum does not give in, gently tap it with a hammer, on some models there are special holes in the drum into which 2 bolts are screwed in and thereby push the brake drum out)
- disconnect the upper and lower tension springs, and the expansion plate (on some models there is an automatic feed mechanism, which also needs to be dismantled)
- loosen the brake pad clamps, disconnect the parking brake drive and remove the old brake pads
- disconnect the parking brake lever from the block.
Perform a visual inspection of the brake system elements for damage and leaks. Replace unsuitable parts if necessary. Wipe the drum thoroughly and remove excess dirt.
3. Install new brake pads in reverse order:
- attach the parking brake drive lever to the new block, and then the drive itself
- we put the springs and the expansion plate in place (if there is one, then the auto-adjustment mechanism), and the brake pad displacement clamps
- put the brake drum and wheel in place, and lower the car (if the drum does not sit in place, you need to loosen the tension on the handbrake)
- If necessary, add brake fluid to the level.
After replacing the rear brake pads, you need to check the effectiveness of the braking system. It may take some time for the pads to break in and achieve maximum braking performance. The rear and parking brakes may also need to be bled and adjusted.
Tips for replacing brake pads
- Pads must be replaced on both wheels
- Do not unscrew the brake hose from the brake cylinder, otherwise air will enter the brake system
- You cannot change the pads between the left and right wheels.
How to change rear brake pads yourself
Before you start replacing worn parts, you need to carefully inspect other mechanisms to make sure that there are no other “surprises”. Together with the drum system, they often break down: the drum, the cylinder leaks, the handbrake cable gets jammed.
Video
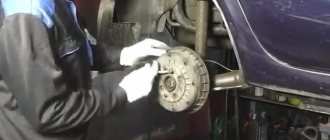
For effective repairs, the car must be driven into a hole or jacked up. Regardless of the brand and features of the mechanism, the process of replacing brakes is carried out in several phased steps:
- The wheel is dismantled.
- Inside the hood, the brake tank cover is removed;
- Parts are cleaned of dirt.
- The guide bolts are unscrewed.
- The pads are removed with a screwdriver and replaced in pairs.
- The system is checked upon ignition.
Working with a drum system is much more difficult than working with discs. However, if you follow the rules and take your time, this experience will become a useful skill that will help you deal with similar problems on your own in the future.
Interesting to know!
Note! The rear brakes have an average mileage of about 50 thousand km, the front brakes last much less - from 10 to 15 thousand km. The check is carried out every 10 thousand kilometers.
Required tools and materials
To perform repairs yourself, you need to purchase special tools. Buying at the market or second hand increases the chances of getting low-quality products. Counterfeits, although they look like the original, will not last long.
Price issue
There is no point in buying expensive imported rear brake pads for your VAZ 2114. This will not allow them to be used longer. But, of course, it is not recommended to purchase cheap parts.
High-quality and reliable rear pads today cost between 300-500 rubles. The price depends on the manufacturer and the store where you purchase the parts.
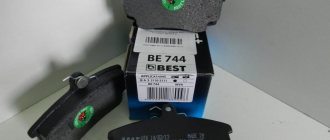
Rear brake lining kit
What pads should I install?
The Volkswagen Polo sedan is equipped with two types of drums and pads:
- With a collar.
- Without collar.
It is recommended to install original parts indicated in the table.
| Name | Articles |
| Pads PR-1KC (with collar) | 1J0 698 525 B |
| Drum (with collar) | 1J0 609 617 B |
| Rem. set (with collar) | 1J0 698 545 |
| Pads PR-1KH (without collar) | 6RU 698 525 A |
| Drum (without collar) | 6RU 609 617 A |
| Rem. set (without collar) | 6RU 698 545 A |
Now you can get to work, having previously prepared the tools.
Auto repair school - Do-it-yourself car repair
Jan 18, 2016 Daewoo Lanos, Nexia, Matiz, Sens by admin
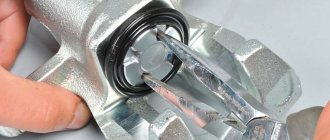
It's time to remember our loved ones, I think not only me, Lanos and Nexia. This time we will talk about replacing the rear brake pads on Daewoo Nexia, Daewoo Lanos, Daewoo Sens, Chevrolet Lanos . The brake pads for Nexia and Lanos are the same, but the replacement process itself is slightly different. The differences are small, but they are definitely worth mentioning. This will be discussed below. In the meantime, I can remind you of several reasons, the appearance of which is associated with an early (if not emergency) replacement of the rear brake pads. The first reason, quite common and requiring quick replacement (often on the road), is a break in the brake pad lining. If this happens, the rear wheels will either jam when moving or completely jam. Naturally, in this case, something will have to be decided quickly. The second reason is wear of the rear brake pad lining. The minimum permissible thickness of the lining is 1.5 mm. Here, however, there are slight difficulties with controlling the wear of the rear pad linings. Yes, the design engineers have provided a special window for inspection in the support disk for this purpose. But the size and location of this window does not make it possible to properly and 100% determine the degree of wear of the linings. In the photographs below you can see the location of the control window on the support disk. In the first photo, a rubber plug covers the inspection window. Let's take it out. And in the second photo, attempts to examine the condition of the brake pads. Agree, it is very difficult to discern anything specific in such a situation.
Therefore, many people control the size of the pads by sound! That is, if, when braking a car, a characteristic sound is heard from the rear axle, metal-on-metal friction, it means that the linings on the pads have worn off more than the permissible minimum ;). Third, the brake pads are oily, that is, they contain traces of lubricants or brake fluid. I agree, the third reason for replacement is controversial (for some) and offensive (for most). It’s a pity, for example, to change almost new pads because of a leaking brake cylinder. But, rules are rules. This means that when replacing the pads, we take a more serious look at the condition of the brake cylinder (with a thin screwdriver, you can pry and lift the cylinder boot and if a couple of drops of brake fluid come out from under it, then it’s time to replace it) and the rear wheel bearing seal. Next, it will be even more interesting...
I’ll immediately say a few words about the tools that you will need to replace the rear brake pads on Daewoo Nexia, Daewoo Lanos, Daewoo Sens, Chevrolet Lanos , because you will have to buy spare parts talk in more detail. I didn’t even expect it to be so detailed! And so, choosing a place to carry out the work and a list of the necessary tools. It is better to replace the rear pads on a Nexia in an inspection pit or a lift; this is necessary due to the poor location of the handbrake cable tension. On Lanos, the pads can be replaced from the ground. Tools: flat screwdriver, Phillips screwdriver (Nexia), pliers or round nose pliers, metal brush, 24mm wrench (Lanos), hammer (preferably made of soft metal), wrench for unscrewing the handbrake tension nut (Nexia, see photo 1), copper or graphite lubricant (not necessary, but desirable), VD-40 liquid, a “hook” device for removing and installing tension springs (you can get by with a screwdriver or pliers, but with the device it will be more convenient and faster, see photo 2).
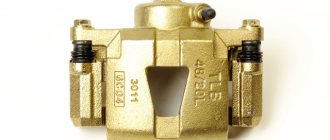
And for spare parts! This is where the fun begins. with rear brake pads for Daewoo Nexia, Daewoo Lanos, Daewoo Sens, Chevrolet Lanos . The best and correct choice in this matter will be the HI-Q (photo 3). They are affordable, and it’s not a problem to find them on the market.
But difficulties arose with the selection and purchase of small parts ( compression and compression springs, flags, adjustable slats ). Yes, I agree, there is no need to change the springs every time you replace the pads. But, at a certain time, this need appears. For example, the spring cups are quite often destroyed when the brake drum is removed, and naturally they should be replaced. The rest of the springs, flags, and bars also do not last forever. And the time comes to buy them. I don’t know about you, but at our favorite Kharkov car market Losk, I managed to buy two pairs of sets (two left and two right) of springs from different manufacturers. Look at photo 4. On the left is a production kit (made for KOREA cars). Solid, right? On the right is a kit with the inscription “Made in PRC” . Well, at least everything here is fair – branded China!!! And another set was purchased from a car store, which, according to them, sells high-quality spare parts. Their set was in a simple bag, in bulk, without any authoritative inscriptions. And what surprised me later was that this set (photo 5) was the best! True, the set is incomplete compared to the others, but I still insist that it is the best!)).
Next, just look at the photographs comparing the parts of these kits with the old, original spare parts that were installed on the car and I think you will have a couple of non-literary words to describe the quality of these parts. It's like the children's game "Find the 10 Differences." Found it? If not, I will help you. Let's look at photos number 6 and 7, it shows the details of the “Genuine” kit. What can I say, you can safely take and install from this kit, probably only the preload springs with cups and the regulator lever spring (they are indicated in the photo as numbers 1 and 2). Everything else - the upper tension spring (3), the lower tension spring (4), the spacer bar (5), the flag or regulator lever (6), the shackle (7) - is not credible. How could this be put on!!! With the kit from “Made in PRC” things are a little better (photo 8). I didn’t like the enlarged flag, the bent earring and the upper tension spring!!! I don’t understand why it was bent in the other direction (more detailed photo 9)!!! Is this done to make it easier to install? Probably not. Most likely this is a sabotage by China, the purpose of which is to disturb the mental balance of all auto mechanics in the CIS countries)))). I hope that I have prepared you for going to the car market. And you, if necessary, will make the right choice and will not help hacks from China)).
Next, we move on to the description of the work on replacing the rear brake pads on Daewoo Nexia, Daewoo Lanos, Daewoo Sens, Chevrolet Lanos cars with your own hands:
1. First of all, release the handbrake cable tension nut, almost all the way. For Lanosovods, the location of the handbrake tension nut can be found in the article on replacing the handbrake cable on Daewoo Lanos, Daewoo Sens, for owners of Daewoo Nexia , photo 10, below. And a photo of a tool for quick and comfortable unscrewing, a high 13 socket, an extension and a ratchet. Also, in this case, a special wrench for unscrewing the handbrake nut on VAZ 2108-2115 cars will be convenient; it can be seen in this article, photo 1a. Without these keys, it will be more difficult to release the handbrake cable on the Nexia; you will have to remove the heat shield, move it to the side and twist the nut for a long time and tediously with an open-end or ring wrench. So, think about this point in advance. And I almost forgot, before unscrewing the nut, moisten the thread with WD-40 and let it sit for a while.
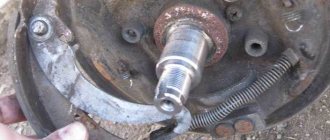
2. After the handbrake has been dealt with. Loosen the wheel bolts, jack up the car and remove the wheel. After this, on the Lanos, remove the cap from the hub, take out the cotter pin and unscrew the rear wheel hub nut (photo 11, 12,13). On the Nexia, take a strong Phillips screwdriver in your hands (you can use an impact screwdriver) and unscrew the screw securing the rear brake drum (photo 14).
3. In most cases, it will not be possible to remove the drum right away. Since there will be internal wear on it, its sides will cling to the brake pads. On Nexia, in addition to what was said above, the brake drum may stick to the rear wheel hub. Which makes the job a little more difficult. But, no problem. Take a hammer, preferably made of soft metal, and lightly tap the drum. Once again, tap frequently, but not too much. Photo 15 for Lanos, photo 16 for Nexia. On Daewoo Nexia, we spill WD-40 or brake fluid at the contact point between the drum and the hub. Perhaps after these steps the drum can be safely removed. If not, it will wobble, but refuse to get off, then in this case you will have to use force. Before doing this, make sure that the car is firmly on a jack and supported under the body, wooden ingots or bricks. On a Lanos, we screw the wheel to the drum and forcefully pull it towards ourselves, tearing the drum off the blocks. In my case, I used a special impact puller (photo 17). It is useless to resist the drum))). On Nexia, the fight against a stubborn brake drum is carried out a little differently. We take a wooden guide and a hammer. We rest the attachment against the side of the drum and hit it with a hammer (an example can be seen in this article, photo 1).
4. The drum, I hope, has been removed))). We are preparing to remove the rear brake pads, but before that we look and remember the location of all the parts and springs, especially if you are doing this work for the first time (photo 18). Using a specially made or purchased hook, you can simply use pliers or a screwdriver to remove the upper tension spring. Remove the earring, flag and its spring. Using round-nose pliers, press the release spring washer and turn it until the slot of the washer coincides with the shank of the stand (this is important if these washers and springs withstood the forceful removal of the drum). After this, all the pads will fall apart on their own and you won’t have to mess with the lower spring.
5. After the rear pads are removed, we begin to prepare to install new ones. We check the condition of the brake cylinders (the importance of this action was mentioned above); if necessary, we replace the rear brake cylinder; you will learn more about this procedure here. Next, if you install new adjustable bars, lubricate the threaded part. In old ones, you often have to first clean the threads, and only then treat them with graphite or copper lubricant. In any case, the nut on the adjusting bar should turn easily, this is important. It is equally important not to confuse the sides of the planks. We look at the marks on the bar (photo 19). Flags too, everyone goes to their own side. Next, use a metal brush and a knife to clean the support disk from traces of dirt and rust. Lubricate the contact points of the pads on the support disk with copper or graphite grease (photo 20).
6. Let's move on to installing the rear brake pads . We hook the handbrake cable to the release lever on the block. We fix the block with a spring (photo 21). We also install the second block. We install the adjustable bar (the nut on it must be completely twisted towards the fork), the earring and the flag (photo 22, 23). We tighten the pads with the upper tension spring (photo 24, 25). Install the lower tension spring (photo 26). And the final touch in this operation is to install the flag spring, tucking its lower end behind the block (see photos 27, 28). That's it, let's admire what happened (photo 29).
7. Pick up the rear brake drum. On Lanos, we check the integrity of the hub seal and the presence of lubricant in it. We pay attention to the wear of the rear brake drum, measure the diameter of the working surface of the drum with a caliper. It should not exceed 201 mm . If the output is greater, then it is better to replace such a drum with a new one. And also, if you decide to replace, then replace the rear brake drums on Daewoo Nexia, Daewoo Lanos, Daewoo Sens, Chevrolet Lanos in pairs.
8. But, if the output is quite significant, and it is not possible to replace the drums with new ones, for example, due to financial difficulties (by the way, drums for Nexia are more expensive than for Lanos! This surprised me too))), then the old rams will have to be prepared for installation . To do this, you need to use a knife (photo 30, this will only reduce the edge a little), but it’s better to use a grinder with a grinding wheel to remove the edge along the diameter of the drum (photo 31). This side, which appeared due to the exhaustion of the drum and made it difficult to remove it from the car. And if you can’t get rid of it, then you won’t be able to install it correctly and easily, remove the drum and adjust the handbrake.
9. And the final part, installing the rear brake drum, adjusting the handbrake bar and handbrake tension . We try to put on the drum. If it fits easily, use a screwdriver to turn the adjusting nut on the bar (photo 32) until the drum fits snugly but still rotates easily. In general, we turned the nut, tried to put the drum on, and so on several times (usually). Yes, on Nexia, I also advise lubricating the rear wheel hub with copper or graphite grease (photo 33) so that the brake drum does not have the opportunity to stick to it))). After the pads have been changed on both sides, everything has been adjusted, the brake drums have been lubricated and put on, we begin adjusting the handbrake. To do this, first press the brake pedal 10 times, the pads will fall into place. After this, we begin to twist the handbrake cable tension nut, the wheels should be hanging out. We raise the handbrake lever and count the clicks, on Nexia the norm at which the wheels should be locked is 3-5 clicks, on Lanos 6-8 clicks. With the handbrake lever lowered, the wheels should rotate freely.
Look like that's it! Replacement of rear brake pads on Daewoo Nexia, Daewoo Lanos, Daewoo Sens, Chevrolet Lanos was successful. If you notice any inaccuracy, error or have any questions, please use the comments.
When using an article or photographs, an active direct hyperlink to the website www.avtorem.info is required!
Did you like the article? Share it on your page!