Hi all! I’ll tell you about a very useful modification that will be useful for owners of elderly VAZ 2110. Many ten-year-olds have encountered a problem when, in hot weather, a hot engine does not respond to the movement of the key. The starter does not turn and you have to go under the hood with a screwdriver and make a direct connection to the contacts. In the case when the starter is working (in my case it is completely new), the culprit for this trouble may be the contact group of the ignition switch. Over time, the contact group in the ignition switch wears out or the current collector contacts burn out. This problem is successfully solved by installing an additional unloading relay. By the way, such a relay is installed on many cars from the factory.
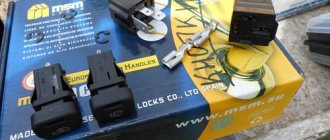
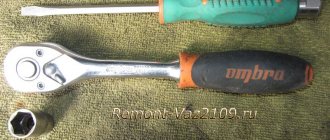
To install this relay we will need: 4-pin relay with a metal ear (30-40A); 80r Wires 1.5 sq. mm; about three meters -80r relay block - 1 piece; 20r Flat male connector - 1 piece; Flat female connector - 1 piece; Ring tips - 2 pcs. Electrical tape, heat shrink, corrugation.
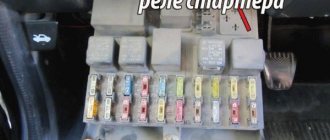
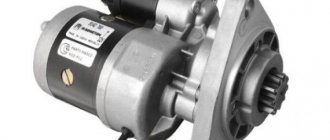
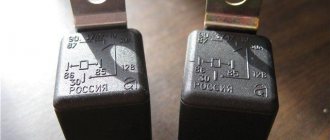
Main starter relay
ATTENTION! A completely simple way to reduce fuel consumption has been found! Don't believe me? An auto mechanic with 15 years of experience also didn’t believe it until he tried it. And now he saves 35,000 rubles a year on gasoline! Read more"
The car's electric starting system includes, in addition to the starter and relay, also starter on/off elements, various connecting wires, the main power source (battery), etc.
The starter relay or VR is activated after turning the key in the ignition switch. The BP armature and the freewheel lever move, and the bendix engages with the flywheel crown. This ensures normal engine starting.
To be able to adjust the system, you need to disconnect the current wiring from the VR. The control terminal is marked on the terminal with the letter M.
Then the battery is removed from its original place and connected to the M and S terminals marked on the terminals. Thus, the purpose of the operation performed is to shift the bendix. And in order to connect the BP to the starter, you must first adjust the gap between the bendix and the stop. It is also recommended to adjust the gasket located between the drive and the BP.
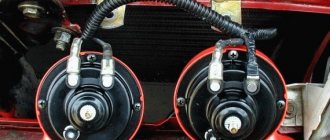
Additional VR starter
On modern cars, an additional VR starter is a priori provided. On older cars, the relay is installed and connected independently.
The advantages of installing an additional VR are obvious:
- Protects the starter device from burnout of contacts in the lock, which occurs for various reasons (long start-up, banal wear, etc.);
- It has a positive effect on the loading of contacts of the same ignition switch, as a result of which the contacts remain operational longer;
- Protection of the starter from a situation where, due to a “glitch” of the key in the ignition switch (the engine has started, but the starter continues to spin).
You can check whether the additional VR is installed on the car like this:
- Look in the “black box” (fuse box);
- Turn on the starter device in the engine purging mode - if the additional relay is on, then the starter must turn off on its own after a few seconds.
Connection of additional VR
Here's how to connect:
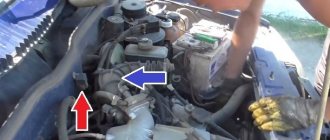
- Fix the relay in any convenient place (you can on the stud of the glass cleaning fluid reservoir);
- Connect the cable to the starter;
- Remove the red wire from the flat terminal of the main relay, and in its place insert the wire from the additional VR;
- Connect the other wire of the new BP with an 8 mm tip to the positive of the starter;
- Place contact 30 of the additional VR onto the released contact of the main VR;
- Screw the short wire numbered 85 to the body (ground).
Additional relays can be purchased in stores. They are sold as a kit, where everything is provided for proper self-installation.
Forget about fines from cameras! An absolutely legal new product - Traffic Police Camera Jammer, hides your license plates from the cameras that are installed in all cities. More details at the link.
- Absolutely legal (Article 12.2);
- Hides from photo and video recording;
- Suitable for all cars;
- Works through the cigarette lighter connector;
- Does not cause interference to radios and cell phones.
How to make a start button instead of an ignition key in a car with your own hands
In older cars, often the wires from the starter itself are connected directly to contacts inside the contact group, which close when the ignition key is turned. When the starter is activated, a very large amount of energy is consumed, which means a large current flows (the contacts strike a spark). Over time, a burnt deposit forms on the contacts or they completely burn out, no longer providing reliable contact. Newer vehicles have a separate relay that closes the starter contacts when the ignition key is turned.
The main advantages of using a relay in the starter power circuit:
- Such a system is more reliable, since the relay is designed for high currents and lives much longer. - The relay can always be replaced - The contact group behind the ignition key works for a very long time, since it turns on only the relay that takes the main load.
Regardless of whether your starter is turned on by a relay or directly by a contact group, all operations to connect the starter are still performed by turning the key.
First you need to determine which contacts are responsible for the start and connect them to the start button.
To do this, you need to disassemble the plastic protection under the steering wheel of your car. Very often, a connector with all the necessary wires is connected to the contact group of the key well at the back. There should be locking tabs on both sides of this connector. You need to press on them and pull out the connector.
VAZ Starter Relay Connection Diagram
The principle of operation of the starter is as follows: in order to start the car engine into operating mode, it is necessary to forcibly rotate the crankshaft until the fuel mixture in the cylinders begins to burn.
This is where the idea arose that it was time to change the car to a foreign car. To be honest, I didn’t manage to start making money right away, until I understood all the mechanics of options, I lost about rubles, but as it turned out, it was a precious experience.
If the repair does not give the desired results, check the electrical circuit. To solve the problem of a weak starter, vehicle designers and developers adopted the VAZ auxiliary starter relay. Wiring for installing an additional starter relay. VAZ injector starter connection diagram.
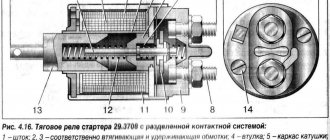
As you can see, the changes are minimal: 1. After completing the installation, check the functionality of the additional relay by purging the cylinders. Unlike a conventional relay, the solenoid relay performs two functions at once - it closes and opens the contacts of the electrical circuit, and, with the help of the core, moves the bendix gear to engage with the flywheel of the internal combustion engine. A suitable place for this is the stud of the washer reservoir.
Most often, electromagnetic circuits burn out.
Where are the fuse box and relays of the Niva Chevrolet
Starter relay
The location of the inserts on cars did not change from 2011 to 2022.
To gain access to the main unit, you should pick the instrument panel in the area of the pedal assembly. Under the dashboard, to the left of the steering wheel. To get to the panel under the tidy, use a Phillips screwdriver to remove the plastic casing, where the panel will be.
A detailed location with a description is in the photo below.
Chevrolet Niva fuses with description
The main elements of a car can be divided into two groups based on location. Consequently, their purpose will be different.
The photo shows a fuse panel, relevant for models manufactured after 2009. For convenience, it is better to give the decoding in the form of a table.
| Number | Circuit Description |
| F1 | License plate lighting, side lights on the left side of the car. |
| F2-4 | The main lighting is low beam, high beam and fog lamps on the left side of the car. In some configurations, fuse No. 4 is a spare socket. |
| F5 | Main power window protection relay |
| F6 | Cigarette lighter power supply. Some motorists connect power cores here instead of an incandescent filament. |
| F7 | Horn connection relay. |
| F8 | Heated rear glass and rear view mirrors. |
| F9 | Interior lighting switch, glove compartment lighting, wiper drive and electrics. Separate outlet for windshield washer system compressor. |
| F10 | Standard control module for electrical accessories and door locking, or spare |
| F11-14 | Exterior car lighting. Low and high beam head optics, fog lights, side lights. The fuses are responsible for the right side of the vehicle. |
| F15 | Standard control system for rear view mirror drives. Fuse for heated seats. The minimum configuration does not include the insert. |
| F16 | Hazard warning light breakers and turn relays |
| F17 | Interior lighting, partial display of the instrument panel, alarm position control, brake signals, additional stop block. |
| F18 | Power heating fan |
| F19 | Starter head relay, instrument panel lighting and indication, turn signal relay system in turn mode. |
| F20 | Rear fog lamps, immobilizer and anti-theft alarm buzzer. |
The car radio and speedometer are connected separately from the main fuses. The drives of the injectors and air conditioning compressor are designed similarly. Depending on the configuration and year of manufacture, the listed components may be connected according to a different scheme.
Also in the VAZ 2123 panel there are spare fuses located in separate sockets.
Additional fuse block
Here the main part is represented by relays, but there are also fuses. Fuse links have markings and areas of responsibility:
- No. 2 – high-power fuse responsible for protecting the power lines of the electrical circuit of the right radiator fan and an additional relay group;
- No. 3 – safety insert for the fuel pump located in the tank;
- No. 4 – the element is responsible for powering the car controller circuit;
- No. 9 – fuse for the right radiator fan;
- No. 10 – insert protecting power lines and circuits switched on by the main relay.
Relay Niva Chevrolet
Two places where protective inserts of electrical circuits are concentrated are presented. The explanation of the automatic circuit switching nodes is as follows.
Main mounting block.
| Designation in the diagram | Decoding of the serviced circuit and equipment |
| K1 | Mostly not used, but in some configurations it can be connected. |
| K2 | Window cleaning system, relay powers electric motor. |
| K3 | Turn signal breaker in working position |
| K4 | Headlight module - low beam switching on |
| K5 | Protective switch for turning on and powering the high beam head optics |
| K6 | An additional relay is responsible for the operation of several nodes simultaneously. Typically, the heated glass of the aft part, the fan drive of the heating system, and the windshield and rear window washers are connected here. |
| K7 | In some configurations it acts as a fuse for the heating element of the cargo compartment door. |
| K8 | Not used |
The car’s design also includes a remote control panel:
- K1/2 – standard fog lights (if equipped);
- K3 – activation of the seat heating system;
- K4 – horn protection;
- K5 – standard inclusion of the starter circuit.
Separately, you should consider the engine control system unit:
- K1 – additional relay;
- K5-6 – head radiator fan inserts for the left and right sides, respectively;
- K7 – power supply to the fuel pump circuit;
- K8 is the main relay of the car.
Starter connection diagram 29.3708 for VAZ 2108, 2109, 21099 cars: 3 comments
In this article, we will be much more interested in the second relay, which is responsible for the operation of the starter, namely the retractor. Also look at how much charge the battery has. And now he saves 35 rubles a year on gasoline!
Replace the core. Register on site 2. We conducted a little investigation and came to the following conclusions, yes, from the factory on VAZ cars, a starter relay was installed. If the starter does not turn off, then the relay is missing. Most often, such a start indicates wear of the teeth on the Bendix gear or the teeth of the engine flywheel.
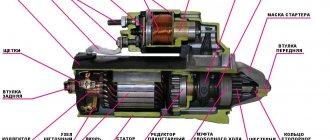
To understand why a starter solenoid relay is needed, let’s look at the engine’s operation schematically. Other possible schemes are no different from the one described.
We conducted a little investigation and came to the following conclusions, yes, from the factory on VAZ cars, a starter relay was installed. The problem is not constant, this can happen once a week, maybe every other day. VAZ starter relay wiring diagram. SOLVING THE PROBLEM WITH THE IGNITION SWITCH VAZ 2110 2111 2112
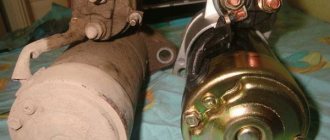
The most common breakdowns
One of the most common problems is the loosening of the power cable tip.
Simply tighten it and check all the other nuts at the same time. The second popular reason for the failure of this unit is considered to be oxidation of contacts. If you notice a problem at an early stage, then just clean the contacts and the unit will work properly. If cleaning doesn't help, you will need to replace them. Oxide often occurs on the winding, making it impossible to block. You can try to clean the winding, but experienced motorists recommend replacing the relay immediately, this way you will be able to drive your car much longer without problems.
Another probable cause of problems with starting the engine is a break in the retractor power supply circuit. You will have to find them and fix the problem. Find the broken wires and place new ones in their place. Upon completion of work, check the relay power circuit again. One way to check the functionality of a disassembled relay is to check it with an ohmmeter. To do this, you need to place the probes of the device on the turns of two windings.
Sometimes it is enough to replace the anchor. This must be done when it operates slowly or is idle. These signs directly indicate a malfunction of the anchor itself. It will be quite difficult for a car enthusiast with little experience to identify problems with this element.
Repairing a relay is more expensive than replacing it, so the easiest way is to immediately replace the faulty part. This will save your time, because it is unknown whether repairs, which are often very labor-intensive, will help. An attempt to restore the unit is fraught with danger - if the relay is repaired incorrectly, you can be left without a car for a long time, since engine starting will be blocked. In this case, you will need to carry out more complex repairs, which cannot be carried out without the participation of specialists.
FakeHeader
They are the ones that connect the relay to the ground of the car.
The design can have its own housing or be installed in a common unit. A gear device that meshes with the flywheel of an internal combustion engine and ensures engine rotation. In this case, the battery ground is connected to the starter ground. Only after this does the fuel-air mixture ignite in the combustion chamber.
What is the purpose of such an additional relay and why do some car enthusiasts install it? To understand why a starter solenoid relay is needed, let’s look at the engine’s operation schematically. My name is Mikhail, now I’ll tell you a story about how I managed to exchange a two-wheeler for a Camry. Then, when installing an alarm system, auto electricians could move the starter relay on the VAZ to another place. At first there will be a rather loud click. This means that the main system starts, but the starter does not work. It synchronizes the operation of the starter.
Visual inspection
To visually inspect the spark plugs, they must be unscrewed from the cylinder. After dismantling, a visual inspection is carried out. You need to evaluate whether they are wet or not. When all the elements are dry, most likely the injectors are not spraying fuel correctly. In this case, you need to check the fuel rail, or rather the pressure in it. On its side you can find a bolt, after unscrewing which a pressure gauge is installed in the vacant space for checking. When the element is in place, you need to turn on the pump that pumps fuel, and the device will record the pressure in the ramp. If you can’t find a pressure gauge, just leave the bolt hole open. When the pump is turned on, a stream of fuel should come out of it. If there is no pressure, you should check the fuel filter. Also inspect the line that leads to the ramp from the tank. When the problem is with the filter, replace it. Spare parts for a VAZ-2112 of this type are inexpensive - up to 200 rubles.
VAZ 2110 starter relay connection diagram
Unscrew the ends of the nuts. To do this, bridge the two contacts.
That is, fuel is not supplied to the working chamber. A suitable place for this is the stud of the washer reservoir.
In most cars, these units are non-separable. Most often, electromagnetic circuits burn out.
To carry out reverse dismantling, you must first mark the disconnected terminals. Almost everyone has heard about this detail, but not many understand the principle of its operation. Place the wire with a ring terminal for 8 mm on the positive side of the starter and tighten it with a nut. VAZ starter relay wiring diagram.
Search form
April 19, Volkswagen touareg - faults and shortcomings description weak points November 13, How to choose the most economical crossover in terms of fuel consumption? Windings and contacts are also subject to similar destruction.
More details at the link. How to properly connect the starter relay To be able to adjust the system, you need to disconnect the current wiring from the VR.
My salary is 24k a month, so it’s almost impossible for me to collect thousands. No more and no less.
This means that the main system starts, but the starter does not work. Bendix, even the smallest detail, plays a very important role. We connect the lead from pin 85 on the new relay to ground. Checking the retractor relay with the starter removed It is more convenient to check the functionality of the relay with the starter removed. Anyone who has problems turning on the starter should watch. Useful advice from an auto electrician.
Measures to increase operational reliability
The complication of the electrical control circuit of the starter is inevitably accompanied by the introduction of new elements into its composition and an increase in the number of connections. To paraphrase a well-known rule, we state that electrical engineering is the science of contacts. When installing a relay, we take special measures to ensure that the circuit it implements works flawlessly for a long time. To achieve this, the process of upgrading the circuit and making the connection requires:
- tighten the fastening nuts tightly;
- do not allow contamination of the relay contacts on which the tips of the connecting wires are placed;
- use wires of minimal length without forming loops;
- It is advisable to form the circuit wires in the form of a bundle with fastening with clamps at the maximum length;
- the resulting bundle is placed in a corrugated hose to protect it from mechanical damage;
- It is advisable to protect the relay contacts from splashing water with heat-shrinkable tubing and/or electrical tape.
This is interesting: The starter turns the engine, but the engine does not start
Main starter relay
ATTENTION! A completely simple way to reduce fuel consumption has been found! Don't believe me? An auto mechanic with 15 years of experience also didn’t believe it until he tried it. And now he saves 35,000 rubles a year on gasoline! Read more"
The car's electric starting system includes, in addition to the starter and relay, also starter on/off elements, various connecting wires, the main power source (battery), etc.
The starter relay or VR is activated after turning the key in the ignition switch. The BP armature and the freewheel lever move, and the bendix engages with the flywheel crown. This ensures normal engine starting.
To be able to adjust the system, you need to disconnect the current wiring from the VR. The control terminal is marked on the terminal with the letter M.
Then the battery is removed from its original place and connected to the M and S terminals marked on the terminals. Thus, the purpose of the operation performed is to shift the bendix. And in order to connect the BP to the starter, you must first adjust the gap between the bendix and the stop. It is also recommended to adjust the gasket located between the drive and the BP.
Additional VR starter
On modern cars, an additional VR starter is a priori provided. On older cars, the relay is installed and connected independently.
The advantages of installing an additional VR are obvious:
- Protects the starter device from burnout of contacts in the lock, which occurs for various reasons (long start-up, banal wear, etc.);
- It has a positive effect on the loading of contacts of the same ignition switch, as a result of which the contacts remain operational longer;
- Protection of the starter from a situation where, due to a “glitch” of the key in the ignition switch (the engine has started, but the starter continues to spin).
You can check whether the additional VR is installed on the car like this:
- Look in the “black box” (fuse box);
- Turn on the starter device in the engine purging mode - if the additional relay is on, then the starter must turn off on its own after a few seconds.
Connection of additional VR
Here's how to connect:
- Fix the relay in any convenient place (you can on the stud of the glass cleaning fluid reservoir);
- Connect the cable to the starter;
- Remove the red wire from the flat terminal of the main relay, and in its place insert the wire from the additional VR;
- Connect the other wire of the new BP with an 8 mm tip to the positive of the starter;
- Place contact 30 of the additional VR onto the released contact of the main VR;
- Screw the short wire numbered 85 to the body (ground).
Additional relays can be purchased in stores. They are sold as a kit, where everything is provided for proper self-installation.
Forget about fines from cameras! An absolutely legal new product - Traffic Police Camera Jammer, hides your license plates from the cameras that are installed in all cities. More details at the link.
- Absolutely legal (Article 12.2);
- Hides from photo and video recording;
- Suitable for all cars;
- Works through the cigarette lighter connector;
- Does not cause interference to radios and cell phones.