A faulty starter relay is often the reason why the car refuses to start when the key is turned in the ignition. Perhaps these are not the most pleasant moments in the life of any driver. Therefore, in such cases, it is important to know how to check the starter solenoid relay, and how to start the car if it does not work.
We will tell you about the purpose of the starter solenoid relay and its structure, how you can check it and perform simple repairs yourself.
At the end of this article, watch the video that shows how to start your car if the starter solenoid relay is not working.
Also on our website you can find information about other common causes of starter malfunction with step-by-step instructions on what to do if the starter does not work.
When, when you turn the key in the ignition switch, you can clearly hear that the starter is idling, then the cause of this malfunction may be the solenoid relay. But before you start diagnosing it, you should know the purpose of this electrical unit.
Purpose of the starter retractor relay
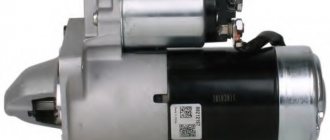
As you know, a starter is an electric motor that is powered by a battery. When starting the engine, the starter gear must quickly engage with the flywheel ring of the engine crankshaft. At the same time, the starter electric motor is turned on, which rotates the crankshaft - this process in action is clearly visible in the animation below.
The starter solenoid relay is responsible for quickly connecting two toothed parts: the flywheel and the overrunning clutch gear (Bendix). The retractor relay is installed on the starter housing, connecting to the clutch in the front using a lever. If the relay does not push the gear forward, then the starter rotates on its own.
However, the culprit of such a malfunction may be not only the retractor relay, but also the overrunning clutch (read more about Bendix repair). If the clutch is jammed, then the force of the retractor relay is not enough to extend it.
WHAT IS A STARTER RELAY
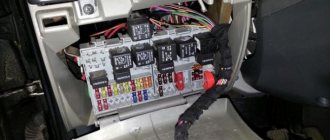
So, let's start with the basics. Two relays are responsible for the starter. The first is installed in the engine compartment. The design can have its own housing or be installed in a common unit.
In this article, we will be much more interested in the second relay, which is responsible for the operation of the starter, namely the retractor. It performs the following functions:
- redistributes energy between the starter and the electromagnetic relay;
- feeds Bendix gears;
- synchronizes the starter components,
- returns the gears to their original position after you turn off the engine.
In the automotive world, this unit has two names: traction and retraction. The first is most often used in specialized literature, the second is popular.
To understand why a starter solenoid relay is needed, let’s look at the engine’s operation schematically. To start the engine, the crankshaft must begin to rotate. Only after this does the fuel-air mixture ignite in the combustion chamber.
Usually the engine starting process takes place within a second. The role of the relay in it is quite simple. Thanks to it, the gear elements engage with each other. It synchronizes the operation of the starter. This unit also removes the bendix from the flywheel.
Checking the starter retractor relay
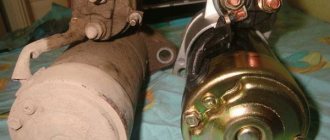
To determine the reason for the lack of connection between the gear elements of the starter and the engine, you should check the functionality of the solenoid relay. For ease of diagnosis, most often it is necessary to dismantle the entire starter.
However, before you begin dismantling the starter, it is advisable to carry out several simple operations that will help identify the problem:
- Check the condition of the battery, the reliability of the terminals, remove oxides from the battery terminals;
- Make sure that the electrical wiring is securely attached to the starter with nuts. If there is corrosion, clean the contacts with fine-grained sandpaper;
- Find the starter switch relay in the car and check its condition.
Starter removal procedure
To remove the starter, you need to disconnect the wires that go to it, and then unscrew the mounting bolts (usually two or three).
Often, to perform these seemingly simple operations, the motorist has to spend a lot of time and effort.
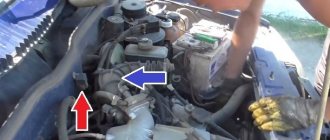
This is explained by the fact that the starter in many car models is well hidden in the engine compartment, and in order to get to it, it is necessary to remove many interfering components and mechanisms from under the hood. And in some cars, such as the Volkswagen Golf or Passat, engine support will be required to remove it.
It is best to carry out this work in a viewing hole or on an overpass.
How to check the starter solenoid relay
When the starter has been successfully removed from the engine compartment, it should be cleaned of dirt, and the oxidized contacts should be treated with sandpaper.
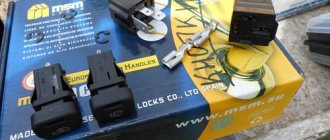
- Now the starter needs to be placed next to the battery and two electrical wires of sufficient length must be prepared. It is best to use wires for “lighting” that are equipped with “crocodiles”.
- The first step is to connect the positive terminal of the battery with one electrical wire to the corresponding terminal of the solenoid relay.
- After this, the other wire is connected to the negative terminal of the battery.
- All that remains is to touch the free end of the negative electrical wire to the starter housing and find out the result:
- if upon connection there is a quick and distinct click in the area of the solenoid relay, then it is working;
- if there are no signs of “life”, then the solenoid relay needs to be repaired or replaced.
If the solenoid relay is operational, the cause of the malfunction should be sought in the power circuit. Well, you can try to repair the faulty unit yourself or replace it with a new one.
The main advantages of using a relay in the starter power circuit:
— Such a system is more reliable, since the relay is designed for high currents and lives much longer. — The relay can always be replaced — The contact group behind the ignition key works for a very long time, since it only turns on the relay that takes the main load.
Regardless of whether your starter is turned on by a relay or directly by a contact group, all operations to connect the starter are still performed by turning the key.
First you need to determine which contacts are responsible for the start and connect them to the start button.
To do this, you need to disassemble the plastic protection under the steering wheel of your car. Very often, a connector with all the necessary wires is connected to the contact group of the key well at the back. There should be locking tabs on both sides of this connector. You need to press on them and pull out the connector.
If you have an old car, inspecting the contact group connector you will most likely find the two thickest wires. Very often one of them is red - these wires are directly connected to the starter. If you connect them with the ignition key turned, your starter will most likely start spinning.
Then you can go the simple way. You can simply install the button and connect these two wires to it, placing the button in a place convenient for you. The button should be non-latching, that is, when pressed, it should close the contacts, and immediately after you release it, open it.
Do not forget that you will operate the button in the same way as a key. We press the button, wait until the starter spins, and as soon as the engine starts, release the button.
But do not forget that very large currents will pass through the button and most likely such a button will burn out.
We used a vandal-proof chrome button - it failed after about half a year.
If you have a newer car and the starter in it is connected using a relay, you will need to find among the many wires exactly those that are responsible for controlling the relay.
To do this, you can ring the tester in resistance measurement mode on all the wires on the car body. All wires that ring are marked as ground (or minus), since they are all shorted to the body.
Next, touch each of the remaining wires with one tester probe and the other probe to the body in voltage measurement mode.
We need to find the wire on which 12 Volts appears exactly at the moment you turn the key, that is, when your starter starts spinning.
If you find this contact, you need to check how the system works.
— Find some kind of contact on which, relative to ground, there is always 12 Volts.
— Turn the ignition key to ignition mode (the starter must be turned off)
— Check again the wire you found:
* check that it is not connected to ground and is not short-circuited to the body,
* check that voltage appears on it when you turn the key to the starter mode
- Now try using a separate wire to connect the wire that you found in the paragraph above to the wire that always has 12 Volts.
If after connecting your starter turns over, then you have found the wires that connect when you turn the key so that the starter turns over.
Your work is finished here. You just need to bring these wires to a convenient location on the dashboard and connect the button to them.
If your car is an old model, it is best for you to install a separate relay to turn on the starter and close only the relay contacts, which in turn will connect the starter contacts.
You can see which contacts are responsible for what on the relay body, or you can open it and see how it works.
Oddly enough, it makes absolutely no difference where to connect + (plus) and where - (minus) on the contacts of the relay coil - in any case, it attracts the desired contact and connects the line.
That is why you can use the positive contact with 12 Volts already connected to the relay. It can be connected to the coil contact. Accordingly, the second contact is connected to ground through the button.
It is these two wires - minus (ground) - the second contact of the coil that must be brought out in a place convenient for you and the button connected to them.
The remaining relay contacts for the main line must be connected to the wires on the contact group that connect the starter.
Don't forget about high power when connecting these wires. The wires must be very thick and the connections very secure.
The wires can be directly soldered to the relay contacts, but most likely this will be a mistake, since it will be quite difficult to replace it later. In our case, when heating the contacts with a soldering iron, they melted the plastic body of the relay and moved, closing the contacts inside the relay.
It is best to find a remote connector for such relays, which is sold separately. Unfortunately, it does not please with its reliability or quality of workmanship.
The wires on the connector pins are very thin and very difficult to hold on to. We recommend that you remove each pin and solder secure thick wires to them.
For convenient connection, you can attach screw terminals to the wires.
It is best to place the relay in a place where it will be convenient for you to reach it later to replace or check the operation of the system.
Remember that you do all the above actions at your own peril and risk; we do not recommend that you undertake such complex electrical work if you do not have skills in electrical engineering. We wish you good luck in all your endeavors.
Repair of starter retractor relay
First, we suggest watching a video instruction on how to replace the solenoid relay yourself, and then we will tell you how to repair it.
Depending on the manufacturer, starters are equipped with a collapsible or non-demountable solenoid relay. To fix a problem with a non-separable element, you just need to buy a new part. All that remains is to unscrew the two mounting bolts, remove the faulty relay and install a new one in its place (see the video above).
In the case of a detachable solenoid relay, you can try to repair it. The repair is as follows:
- Unscrew the screws securing the housing cover.
- Sometimes it is necessary to additionally solder the ends of the winding.
- Removing the cover opens up access to find a possible problem - these are power contacts that may be worn out or burnt:
- in the first case, replacing contacts will help,
- in the second case, the problem can be solved with the help of sanding paper.
Checking with the starter removed using a multimeter
This test of the solenoid relay allows you to very accurately perform internal diagnostics and determine the condition of the windings and contacts. Dismantling the starter, depending on the make of the car, is carried out in various ways. For VAZ 2110, this procedure is carried out from below from the pit. Before unscrewing the fasteners, remove the wires (it is better to mark the terminals so as not to confuse them during assembly); you may need to remove the crankcase protection.
To begin with, voltage is applied from the battery to the body and terminals of the relay; operation is accompanied by a characteristic click and visible movement of the rod. Further checks are carried out using a multimeter, which is switched to resistance measurement mode and the range of 200 Ohms is selected.
Video: Checking the starter removed from the car
First, check the serviceability of the retractor and retention coils. To do this, one of the probes is connected to ground, the second touches the contacts in succession. The device readings are 2 ohms. Deviation of the device readings from the specified value is a sign of a break or short circuit. To check the power contacts, remove the core from the relay body and remove the return spring, after which the core is inserted back. The core rod is pressed against the table with a certain force and the resistance between the contacts is replaced. The resistance is approximately 1.5 ohms.
How to start a car if the starter solenoid relay does not work
In this article we will tell you how to test the starter solenoid relay to identify faults and look at ways to eliminate them.
The car starter is a traction motor, which spins the crankshaft to further start the power plant.
Unwinding is carried out by means of a gear mounted on the starter rotor, which at the time of starting has a gear engagement with the flywheel ring.
But the engagement between the starter gear and the flywheel is only necessary until the power plant starts.
If the engagement were constant, the starter would fail very quickly.
Therefore, the design of the latter includes a solenoid relay, through which the starter gear is brought into engagement with the flywheel during engine starting and disengaged after starting.
The retractor relay is combined with the starter relay, and the design of this device is not complicated, which ensures its operational reliability.
But nothing is eternal, therefore, and it can also fail, although this happens infrequently.
There are not so many malfunctions that can arise with this element, but if they do occur, it is often either impossible or very difficult to start the engine.
Malfunctions that may occur with the solenoid relay are:
The occurrence of these malfunctions may result in:
- The starter fails to operate when starting;
- Weak starter speeds, which are unable to sufficiently spin the flywheel;
- It continues to work even after the engine starts.
Main components and operating principle of the engine starting system
To understand the operation of the starting system, it is worth first considering the design of the car starter. The purpose of the starter is to start the engine. The starter device for all cars is identical, they differ only in size or parameters. So, the design consists of the following required elements:
- Electric DC motor;
- Bendix;
- Starter solenoid relay.
The main role here is played by the electric motor, and the bendix and starter relay are auxiliary elements. The electric motor includes standard elements such as a stator, a rotor, and a starter brush assembly. Bendix, even the smallest detail, plays a very important role. It is necessary to transmit rotation from the electric motor to the gear ring of the engine flywheel, thereby ensuring starting.
Until 2000, the bendix was located on the same shaft as the rotor, and then a new arrangement appeared, where the bendix began to have its own separate shaft and rotate through a gearbox.
That’s why we sometimes hear the name “gear starter”. The starter retractor relay is a more complex element and performs several functions at once:
- Redistribution of electricity supplied from the battery between the electric magnet of the starter relay and the electric motor;
- Synchronization of the operation of all components when starting the engine;
- Feeding the Bendix gear until it engages with the flywheel ring gear;
- Returning the working gear to its original position after starting the engine.
The principle of operation of the starter is as follows: in order to start the car engine into operating mode, it is necessary to forcibly rotate the crankshaft until the fuel mixture in the cylinders begins to burn.
Typically, it takes quite a bit of time to start a working engine. The task of the starter retractor relay is to maintain the engagement of the Bendix gear with the flywheel and rotate the crankshaft equally until the start occurs. No more and no less. If you hold it longer, you can break parts, and if you hold it longer, the engine won’t start.
Solenoid relay design
To understand how to identify a malfunction, you first need to understand the design and operating principle of the retractor relay, as well as the starter relay, since they are located in the same housing.
So, there is a housing, inside of which two coils are installed - retracting and holding.
On the one hand, the body is covered with an ebonite or plastic cover. Three terminals for connecting wiring are installed on the outside of this cover.
One of the terminals is intended for connecting the “positive” wire from the battery, the second is for supplying electricity to the starter motor, and the third is for connecting the relay to the ignition switch.
On the inside of the cover there are two contact plates of the “positive” terminals.
Schematic diagram.
Inside the housing with the coils there is an armature, spring-loaded on one side, and a starter relay rod.
On the outside of the armature there is an eyelet, with which it engages with the Bendix fork and gear.
How it works
Now a little about the nuances of interaction between the armature, bendix and retractor relay, as well as other components. In fact, there are conditionally three stages of starter operation:
- First, the drive gear and starter ring of the flywheel used are connected;
- Next, the starter itself starts;
- At the third stage, disconnection occurs.
The starter has a very short cycle of operation, since in the future it does not take any part in the process of driving the car. This is not cruise control. The starter has one job - to start the engine. After that, it is free until the next launch.
But let's look at the work in more detail, as we did when we examined the principle of operation of the clutch. Everything looks like this step by step:
- We turn the key in our car ignition;
- The ignition is turned to the starting position;
- The current follows an electrical circuit from the battery to the lock;
- Next, the current is transferred to the traction solution;
- It is at this stage that our bendix engages with our flywheel;
- In parallel with the movement and engagement of the gear, the chain is closed;
- The voltage goes to the electric motor;
- The engine starts;
- The revolutions of the motor itself exceed the revolutions of our starter;
- The clutch separates the electric motor shaft and the drive gear.
All. This completes the operation of the device. The starter is needed literally for a few seconds if everything is working properly in the car. But this fact does not in any way diminish the value of such a device.
Kinds
I think the scheme is clear to you. But it is also worth noting the fact that certain varieties of this element exist. Starters can be divided into 2 types:
- gear;
- gearless.
If these are diesel internal combustion engines or high-power motors, the use of a gear starter is relevant here. It is not planetary. Such an element is capable of several times increasing the voltage that passes through it, thereby increasing the torque.
Geared devices have their advantages:
- high level of efficiency;
- increased efficiency;
- less current consumption during cold start;
- modest size;
- excellent performance;
- best operating parameters;
- effective starting even when the battery charge drops.
And gearless ones differ in that they make direct contact with rotating gears.
A starter without a gearbox has the following advantages:
- simplified design;
- better repairability;
- resistance to increased loads;
- quick engine start.
Everyone can draw the appropriate conclusions for themselves. You decide. Although in many respects the car manufacturer itself has decided for you by installing one or another type of starter on the car.
It’s not like with gearboxes, where when purchasing a car owner decides whether to buy a CVT, a classic manual, or an advanced sequential gearbox.
Principle of operation
It all works like this: when the engine is not running, the armature of the retractor relay is pulled out of the housing due to the action of the spring on it. The same spring holds the Bendix and gear through the fork in a position where there is no engagement.
When the ignition key is turned to the start position, the solenoid relay is first activated.
The electrical energy supplied to the coils of the solenoid relay ensures the appearance of a magnetic field inside the housing.
This field acts on the armature, and it, overcoming the force of the spring, enters the body, after which the retracting coil is turned off and ceases to create a magnetic field, but in the retracted position the armature is held by the holding coil with its magnetic field.
In this case, the armature pulls the fork, which in turn moves the bendix forward along the rotor shaft, and its gear engages with the flywheel ring.
The armature, entering the housing, pushes the starter relay rod, and, moving, closes the contact plates of the positive terminals with each other.
Electricity from the battery is supplied to the brushes of the starter motor, and its rotor begins to rotate. And since the gear has already engaged, the rotor begins to rotate the flywheel.
After starting the power plant and turning the ignition key back, the power to the holding coil stops, its magnetic field disappears and the armature comes out of the housing under the influence of a spring.
At the same time, it disengages the bendix through the fork and stops acting on the relay rod. He, in turn, moving away, opens the contact plates, and the starter is completely turned off.
What kind of problems are there?
Now it’s worth talking about the malfunctions that occur when using car starters. Although we are talking about car starters, you should understand that even chainsaws have them. Not long ago I found out about this myself when I was watching a video about repairing this instrument.
Malfunctions are really different. But, depending on the reasons, they can be divided into electrical and mechanical.
If there is an electrical problem, you should check:
- Traction relay. It sometimes fails. Repair is unlikely to help. It is possible that there was a gradual break in the existing winding, or a short circuit between different turns. The element or the entire starter needs to be replaced. Decide for yourself here;
- Brushes. We are interested in the entire brush assembly. Quite often it happens that the brushes simply no longer adhere properly to the commutator. Hence the starter failure;
- Anchor collector. Usually it wears out, which creates the need for repairs or a complete replacement.
The starter can turn the engine, but it does so slowly or does not function at all. Try checking the electrical circuit. It's not that difficult to do if you work carefully.
To check the electrical circuit you need:
- make sure the car battery is well charged;
- check the fastening of the ground contacts;
- look at the integrity and quality of contact of the wiring from our retractor;
- make sure there is no damage or poor contact on the wire running from the battery to the starter;
- make sure that the contact group of the lock itself works well.
There is nothing particularly complicated here. Therefore, you should easily be able to do it yourself. But if you are not sure, it is better to contact a car service.
As for mechanical problems, they are indicated by a working starter, in which the engine does not start or the crankshaft does not rotate.
Here's what you should check:
- Coupling. It slips and therefore cannot fulfill its function;
- Buffer spring;
- Starter flywheel crown. More precisely, its teeth. This problem is indicated by a grinding noise that occurs during startup;
- Clutch rings. These elements sometimes wear out ahead of time, and therefore the operation of the entire system is disrupted;
- overrunning clutch lever.
The presence of uncharacteristic noise should be a reason to look into the starter through the engine compartment or using a hole.
Noise usually occurs due to:
- wear of starter bearings;
- wear of the journals on the armature shaft;
- damage to teeth;
- your starter's mounting bolts are loose;
- loose pole attachment.
There is another situation when the starter has done its job, but does not stop, but continues to turn even after the car engine has started. Here the levers are probably stuck, the soured contacts on the starter relay are stuck together, the traction is stuck, or the spring of the switch is seriously worn out.
The starter is a rather serious thing, the problems of which should be approached very carefully. Any symptoms of malfunctions tell you that you need to promptly check the device and take appropriate measures.
Thanks to all! Subscribe, leave comments and tell your friends about us!
Malfunctions
Troubleshooting a traction relay is not that difficult. It should be noted that its operation is accompanied by a click - this is the result of the armature being retracted and the gear being engaged.
When you turn the key, this click is clearly audible. Thus, the absence of a click may indicate a break in the coils, lack of power, or the armature being stuck in one position.
If, when you turn the ignition key, a click is heard, but the starter itself does not start or starts but spins very slowly, this may indicate that the contact plates are burning.
Continued operation of the starter after starting the power plant will be accompanied by a characteristic buzzing sound.
It is possible that the armature is stuck in the retracted position and cannot return back, so it keeps the bendix gear engaged and continues to close the contact plates.
Signs and causes of relay failure
Two signs indicate a breakdown in the solenoid relay:
- when you turn on the ignition, you hear a click of the relay being activated, but the starter does not work, sometimes it can turn on, but only after several attempts;
- The starter turns on at high speed, but the bendix does not engage with the flywheel.
There can be several reasons for a relay malfunction:
- One of the windings has burned out, an interturn short circuit or breakdown to ground has occurred;
- the contact plates are stuck or their surface is burnt and does not provide reliable contact;
- the return spring is weakened or deformed;
- The plug has slipped out of place or is deformed.
If any of the above breakdowns occur, the relay must be repaired or replaced with a new one.
Replacing the solenoid relay
The solenoid relay is not repairable, and in the event of a malfunction, it is simply replaced.
The only thing that can be changed is the anchor. Replacing this element on a VAZ-2110 is a simple operation; it is more difficult to remove the starter itself from the car.
To replace, you will need to remove the starter from the car. To do this, the car is driven into a pit, since it can only be reached from below. If the car has a crankcase protection, then it is removed first.
Next you need to disconnect all the wiring going to the starter. To remove it, you need to unscrew the two nuts that secure it, after which it is carefully pulled out of its seat.
With the starter already removed, the two bolts securing the retractor relay are unscrewed and it is removed, while the armature along with the spring remains on the starter, since it is hooked onto the fork with its eye.
Before installing a new element, the old anchor is removed from the fork and a new one is installed in its place.
Next, the new relay is placed on the starter and tightened with mounting bolts. To consolidate the material covered, we recommend that you watch a training video on how to repair and troubleshoot the starter solenoid relay.
Schematic electrical diagrams, connecting devices and pinouts of connectors
VAZ cars use starters, which are a DC electric motor with an electromagnetic two-winding traction relay and a roller freewheel clutch (overrunning clutch). Starters are used to provide the minimum crankshaft speed required to start the engine. The starter is powered in starting mode from the battery.
The starter relay is connected to the power circuit, thereby closing and opening the circuit, depending on how fast the crankshaft rotates. The starter design on all cars is the same, with only minor design differences. If you understand how the starter works in one car, you can easily figure it out in another.
To prevent a starter failure from taking you by surprise, let’s look at how to replace it yourself. But first, read the theory and study all the options for starter connection diagrams for different models of VAZ cars, collected by the editors of 2 Schemes.ru from familiar auto electricians.
Main signs of starter malfunction
Despite the fact that the starter is a fairly reliable device, it can also break. Some breakdowns may have symptoms identical to other faults, but there is still something in common when the electric motor malfunctions.
The main symptoms of starter malfunctions:
The solenoid relay does not click (does not operate) and the armature does not rotate.
- Battery discharge (complete or partial) or failure;
- Oxidation of battery terminals and tips connected to it;
- The terminals or tips connected to both the starter itself and the battery have come loose;
- Lack of contact on the terminal bolts, caused by a break in the wires connecting the ignition switch and starter;
- Short circuit, break or breakdown of the solenoid relay windings to ground.
When the electric motor starts and the solenoid relay is operational, the armature rotates slowly or does not rotate at all.
- The contact on the terminal bolts of the solenoid relay is broken;
- High wear of brushes or their jamming;
- Burning or overheating of the collector plates;
- Breakdown of the stator winding caused by insulation failure or interturn short circuit;
- Damage to the insulating layer of the positive brush holder;
- Short circuit of collector plates caused by insulation failure;
The armature of a running starter rotates, but the crankshaft does not spin.
- Overrunning clutch slipping;
- Mechanical damage to the freewheel (buffer spring, underwater ring);
- The starter drive fork is flying out or damaged;
- Difficulty in moving the drive along the thread on the anchor shaft.
After starting the engine, the starter continues to operate.
- Drive fork jamming;
- Damage to the ignition switch spring;
- Jamming of the solenoid relay or starter drive contacts on the anchor shaft;
- Damage or stretching of the springs that return the solenoid relay or overrunning clutch;
- Solenoid relay jammed;
- Warping of the electromagnetic motor caused by unscrewing its fastenings to the internal combustion engine.
Increased noise when the starter is running.
- Increased wear of individual parts of the armature (necks and bushings);
- Violation of the integrity of the starter housing at the drive location;
- Mechanical damage to the teeth of the flywheel or bendix;
- Insufficiently tightened motor mounts;
- Contact of the armature with the pole during rotation due to the weakened fastening of the latter inside the unit.
VAZ 2101 starter connection diagram
- starter;
- holding winding of traction relay;
- ignition switch;
- generator VAZ 2101;
- fuse box;
- pull-in winding of the traction relay;
- accumulator battery.
Under normal loads, the current generated by the starter is 150 A. When heavy loads occur, for example in winter, the resulting current can reach 500 A. This is a serious test for this electrical unit, so it is not recommended to keep the key on the start for more than 10 seconds, and repeated starting attempts must be made with a break of at least a minute.
How to connect the starter directly through the battery and using the short circuit method
Russian motorists and owners of old used cars often have problems starting their cars. The culprit turns out to be not so much the starter as the elements of its inclusion and switching. The question automatically arises regarding how to connect the starter directly from the battery or something else. I wonder if this is possible to do?
VAZ 2106 starter connection diagram
- starter;
- generator;
- accumulator battery;
- pull-in winding of the traction relay;
- ignition switch;
- traction relay holding coil
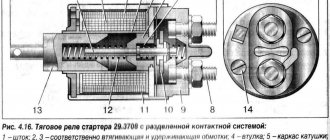
| 1 – drive side cover; | 14 – relay cover; |
| 2 – retaining ring; | 15 – contact bolts; |
| 3 – restrictive ring; | 16 – collector; |
| 4 – drive gear; | 17 – brush; |
| 5 – overrunning clutch; | 18 – armature shaft bushing; |
| 6 – drive ring; | 19 – cover from the collector side; |
| 7 – rubber plug; | 20 – casing; |
| 8 – drive lever; | 21 – shunt coil of the stator winding; |
| 9 – relay anchor 2106; | 22 – body; |
| 10 – holding winding of the traction relay; | 23 – stator pole fastening screw; |
| 11 – pull-in winding of the traction relay; | 24 – anchor; |
| 12 – relay coupling bolt; | 25 – armature winding; |
| 13 – contact plate; | 26 – intermediate ring. |
Starter diagram VAZ 2108, 2109, 21099
Electric current enters the starter circuit from terminal “30” of the generator. Next, through block Ш8 (Х8) of the mounting block (pins 5,6), block Ш1 (Х1) - pink wire, to the ignition switch. The driver turns the key in the ignition to turn on the starter (position 2) and closes the contacts (50, 30). After which the ignition switch, through the red wire, current flows to block Ш1 (X1) of the mounting block (pin 8), then block Ш5 (Х5) (pin 4), starter switch relay (pin 85). The relay is activated. From terminal “30” of the start relay, current flows to terminal “50” of the starter traction relay, energizing its winding. The traction relay is activated, activating the starter.
The starter electrical circuit uses a switching relay 111.3747-10.
- Screw securing the protective cap.
- Protective cap.
- Retaining half ring.
- Rear cover fastening nut.
- Back cover.
- Brush springs.
- Brush guides (outer part).
- Brushes.
- Stator.
- Anchor.
- Drive lever.
- Drive unit.
- Restriction ring.
- Retaining ring.
- Drive lever axis.
- Screws for securing the traction relay.
- Front cover.
- Plastic sealing ring for the lid.
- Tie rods.
- Rubber plug.
- Traction relay core.
- Return spring.
- O-ring for traction relay.
- Traction relay.
- Sealing washer.
- Adjusting washers.
Forced closure of starter terminals
The starter can be connected directly not only using the battery. For example, if problems arise with the switching routed from the ignition switch, then you can turn on the starter by closing the contacts on the relay with a long screwdriver.
Now let's learn more about how to do this. Below is a diagram with 3 starter control contacts and 1 negative contact number 8 (it is connected to the housing).
The control terminal S is a petal-shaped terminal. First you need to find this contact. He is responsible for the start.
Then we deal with the other two contacts: a potential of plus 12 is marked on B. A thick wire goes to it. You will need to close contacts B and S. This is done using a long screwdriver.
Contact M is responsible for the electric motor.
Attention. You cannot hold the screwdriver for a long time - only for a short time and always after the car’s gearbox is set to idle! Under no circumstances should contacts M and B be closed!
The control terminal B, as a rule, is closed with a rubber cap, and the spade contact S is hidden with a plastic plug, which is removed before carrying out the manipulation.
- Before closing the starter, set the gearbox to neutral speed so that when starting the engine the car does not move forward or backward.
- Do not touch the metal pin of the screwdriver to the relay housing, otherwise a short circuit will occur.
- Do not close contacts M and B.
The starter is accessible from under the bottom of the car. In some cases, standard protection may be installed. Then it will need to be dismantled.
On some cars, it is easier to reach the starter from the engine compartment. On other models, the starter is closed either by a filter, as on VAZs, or by a battery.
You should also be aware that on some cars, terminal S looks like a threaded outlet. The nut is screwed onto the bolt. For example, such conclusions occur in French Renaults. As for our VAZs, the S terminal is hidden, as mentioned above, by a plug. The terminal itself is made in the form of a petal.
Despite the effectiveness of starting the starter by shorting the terminals with a screwdriver, this method is considered by experts as not the best.
For example, the traction on a VAZ-2110 consumes a voltage of 30-50A. On foreign cars this figure is much higher. It turns out that during a short circuit, a current of at least 30 A will flow from terminal B to S. This threatens to “stick” the connection points along which the voltage will flow.
A few important points:
- Normally, terminal S should be activated if the ignition key is turned a full turn. In other cases, this control pin is "sleeping". This circuit is provided in any car model, even in cars with an additional relay. This means that when making a short circuit with a screwdriver, it is not necessary to remove the wire from terminal S.
- It is advisable to close the contacts not with a screwdriver, but with a wrench with a handle on which the insulation is wound;
- After the operation is completed, it is recommended to check the condition of the fuses. They may burn out as a result of an error.
Video: how to close the starter with a screwdriver
Thus, the answer to the question of how to start the starter directly can be solved in these two ways. However, car owners need to “cure” the starting system as soon as possible, since connecting the starter is directly considered as a forced solution, used in extreme cases.
Starter circuit for VAZ 2110, 2111, 2112
Starters of type 57.3708 were installed on VAZ-2110 cars and had the following technical characteristics:
- Rated power 1.55 kW
- Current consumption at maximum power no more than 375 Amperes
- Current consumption in the inhibited state is no more than 700 Amperes
- Current consumption in idle mode no more than 80 Amperes
The connection diagram for the starter for the ten is shown above, here is its explanation:
- battery
- generator
- the starter itself
- egnition lock
| 1 – drive shaft; | 20 – contact bolts; |
| 2 – front cover bushing; | 21 – output of “positive” brushes; |
| 3 – restrictive ring; | 22 – bracket; |
| 4 – gear with the inner ring of the overrunning clutch; | 23 – brush holder; |
| 5 – overrunning clutch roller; | 24 – “positive” brush; |
| 6 – drive shaft support with liner; | 25 – armature shaft; |
| 7 – planetary gear axis; | 26 – tie rod; |
| 8 – gasket; | 27 – back cover with bushing; |
| 9 – lever bracket; | 28 – collector; |
| 10 – drive lever; | 29 – body; |
| 11 – front cover; | 30 – permanent magnet; |
| 12 – relay anchor; | 31 – armature core; |
| 13 – holding winding; | 32 – armature shaft support with liner; |
| 14 – retractor winding; | 33 – planetary gear; |
| 15 – traction relay; | 34 – central (drive) gear; |
| 16 – traction relay rod; | 35 – carrier; |
| 17 – traction relay core; | 36 – gear with internal teeth; |
| 18 – contact plate; | 37 – layering ring; |
| 19 – traction relay cover; | 38 – hub with the outer ring of the overrunning clutch. |
Installing an additional starter relay on a VAZ 2110
Until the year 2003, the ignition system of VAZ cars was one of the weakest points in the on-board electrical network. This is due to the generation of high voltage and the inability to unload the starter unit. To solve the problem of a weak starter, vehicle designers and developers adopted the VAZ 2110 auxiliary starter relay.
Contents of the material
Starter solenoid relay
The starter relay is called a pull-in relay. This is due to the principle of its operation - it performs the function of connecting the starting device to the electrical circuit and connecting its armature to the crankshaft. It happens like this: when no current is supplied to the windings of the device, its armature, under the action of the return spring, remains in the forward position. The same spring, through a special fork, holds the Bendix gear, preventing it from engaging with the crankshaft flywheel ring.
By turning the key in the ignition, we supply current to the winding of the device. Under the influence of an electromagnetic field, the armature is fed back (pulled into the housing), closing the starter power contacts. The Bendix gear also moves, engaging with the flywheel. At the same moment, the retracting winding is turned off, and the holding winding comes into play. The force from the starter shaft is transmitted through the gear to the flywheel, causing the crankshaft to rotate until we no longer hold the ignition key in the start position.
What functions does the solenoid relay perform:
- Protects the starter from shorting contacts in the ignition.
- In order to turn off the power to the starter in a situation where the engine is running and the key shows the “starter” mode.
- Provides relief of contacts in the ignition switch.
When the engine starts, voltage from the generator goes to the relay coil. Then the gears of the drive system begin to work, due to which a magnetic field is created. The flywheel of the propulsion system is working. The gear begins its work thanks to the holding winding, while the bolts are closed. When the key is returned to the ignition switch, the winding is de-energized, thus disconnecting the gear and flywheel. This scheme applies to modern cars, including VAZ models.
If the starter makes a loud noise, the pole or starter could be loose. In the first situation, strengthen the fastening by tightening the screw, and in the second, secure the starter. If you disassemble the starter and see that the clutch is starting to slip, then the only thing you need to do is replace the starter drive.
avtoexperts.ru
A situation familiar to many car enthusiasts is when, after 2-3 unsuccessful attempts to start the engine, a crackling sound from the solenoid relay is heard under the hood and the starter refuses to crank the engine. This is especially true in winter, when the battery capacity drops and it quickly discharges.
In order to better understand the cause of the malfunction of the retractor relay (SR), let's briefly recall the design of the starter itself and how it works on a car.
Let us remind you
The car starter is a short-term electric motor. If the power unit does not start after three to five attempts, then you need to look for the reason and not turn it in vain, since in most cases this affects its further existence. In simple terms, you shouldn’t “rape” him.
Car starter device
The starter consists of a housing (within which the stator winding is located) and a rotor rotating on two bearings, as well as a solenoid relay.
At the end of the rotor shaft there is an overrunning clutch (bendex) equipped with a toothed gear, which, when starting, engages with the crankshaft flywheel.
Starter circuit
The relay's job is to turn on the starter and provide a connection to the flywheel to start the engine.
Relay device
The relay consists of a housing in which the windings are located, a core, a return spring, a central contact, a cover with two power contacts, made in the form of bolts, the threads of which protrude from the cover. The cover also has a connector where power comes from the ignition switch when the engine starts.
One of the bolts receives a permanent “plus” from the battery, and the second contact is connected to the stator winding.
Solenoid relay circuit
The relay core is connected via a plug to the bendex. The fork, in turn, works on the principle of a rocker arm. When the core is retracted, it pushes the overrunning clutch to meet the engine flywheel, and when the core is released, the bendex is retracted.
Scheme of work
When the ignition key is turned to the “start” position, power is supplied to the relay winding, a magnetic field is created in the retractor winding, which draws in the coil core, which closes the power contacts. At the same time, the core pushes the overrunning clutch through the fork to the crankshaft flywheel, causing the latter to rotate.
Structurally, the VR has two windings: retracting and holding.
The retractor winding draws in the core, which, through the central contact, connects the power connectors of the relay, transferring power from the battery to the starter motor, causing the latter to work.
All this time, the holding winding holds the core, providing power to the starter motor.
When the battery is discharged, its strength is enough to activate the retracting winding, but there is not enough voltage for the holding winding. The core moves back under the force of the return spring, and the retracting winding again tries to pull it into the coil, but the holding winding cannot hold it, and it moves back again.
It is precisely these attempts by the relay to force the transfer of power from the battery to the stator winding that the driver hears in the form of frequent clicks (crackling sounds) when the relay core is repeatedly drawn in and released when power is supplied to the relay.
Solenoid relay malfunctions:
• Burning of power and central contacts
Here one wire is shorter than the other. It needs to be cleaned and expanded by soldering.
• Broken return spring
The retractor bolts have fallen off
• Interturn closure
• Short circuit in one of the windings
• Break
• Loosening of fastenings
Causes of malfunctions:
• Burning of connectors is caused in most cases by poor contact in the connections or long-term operation of the starter, when the engine “refuses” to start for a long time;
• Spring breakage can be caused either by mechanical damage or by prolonged voltage supply, when the spring coils simply burn out;
• Interturn short circuit in the windings also occurs from prolonged exposure to voltage during poor engine starting. The bakelite with which the wires are coated for protection heats up, begins to melt and the turns are connected to each other;
• When the protective coating is melted, one of the turns may begin to contact the “ground” of the housing, which will cause a short circuit;
• A break may be caused by the burnout of one of the winding turns;
• When the BP fastening is loosened, distortion occurs and the core cannot be completely retracted into the body to close the power contacts.
Signs of malfunction:
• Single or frequent clicks, the starter does not turn
• Strong heating of the case
• The starter does not turn off
How to check if the relay is working properly
If you hear frequent clicks and the starter does not turn, the cause may be a discharged battery or a weak ground connection.
When one clear click is heard, but the starter does not turn, this “indicates” either that the power connectors are burning, or that there are problems in the starter itself.
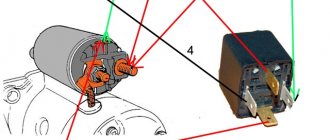
In order to make sure that the fault is in the relay itself, you need to bridge its power contacts with a screwdriver (engine in neutral) and if the starter starts working, then the relay itself is “to blame.” It must be removed and tested with a tester.
Checking with a multimeter
If the starter does not respond, then the problems may be both in it and in the relay. It requires dismantling, disassembling and troubleshooting all elements.
When the relay does not respond at all to turning the ignition key to the “start” position, you need to check whether power is coming to the control connector at this time (the terminal is located on its cover).
If power does not come, then it is necessary to check the serviceability of the ignition switch and the power circuit from it to the control contact.
When there is power at the control contact, you need to check with a tester how many volts are coming to the power contact from the battery, and then (you need an assistant) when starting the starter, check with a tester how many volts are coming to the second contact.
If, for example, 12.8V comes to the contact from the battery, and 6-7V is transferred, then the power contacts are burnt and must either be cleaned or replaced.
If the relay is dismountable, then you need to loosen the cover and clean the power and central contacts; if the relay is not dismountable, then it must be replaced.
What to do in case of breakdown
If the relay fails, you need, as mentioned above, to put the gearbox in neutral, turn on the ignition and bridge the power contact from the battery and the control connector. The engine will start and you can get to the garage or the nearest service station.
Finally
Periodically check the battery charging and the operation of the generator to ensure that the battery is always in a charged state, capable of delivering the necessary voltage to operate the starter.
Starter with retractor for VAZ 2107
Connecting wires to the starter
Connecting a starter to a VAZ - instructions. Attach the relay in a convenient place (for example, a washer reservoir). Connect the wires to the starter. Then remove the red wire located on the flat terminal of the relay, and you need to make a connection with the connector of the male wire and the wire from the new relay.
Place the wire with a ring terminal for 8 mm on the positive side of the starter and tighten it with a nut. Place the wire of the new “female” type relay onto the contact that was released at the traction relay. This wire will transmit the positive to the coil. Using a clamp, tighten the new wire and the stock one together. Screw a small length of wire from the coil. Now you can turn on the new relay.
How to connect a button to the starter
However, the topic of this article is connecting the starter via a button connected to the same relay. How can this be accomplished?
Connecting a button in a car where there is no additional relay
First of all, you should find the contacts responsible for turning on the starter. Then integrate them with the button.
The modernization algorithm generally looks like this:
- The plastic trim under the steering wheel is disassembled;
- There is a connector connected to the ignition switch contacts (as a rule, this connector has locking tabs);
- Press the tabs to release the connector and pull it out.
As a rule, on older cars, after inspecting the connector, two cables with a large cross-section are found. The red one is responsible for controlling the starter.
Note. You can check whether the wiring is really responsible for controlling the starter like this. Turn the ignition key all the way, short-circuit both wires from the removed connector. If the starter turns on, then that's what they are.
- The button is placed in a place convenient for the driver;
- The found wires are connected to it.
Connecting a button via a relay
In this case, finding the wires responsible for controlling the starter will be much more difficult, because you need to calculate those that are connected to the additional relay.
Experts recommend first ringing all the wires going to the car body with a tester. The identified wires are marked as negative, since they are connected to ground.
Then you need to connect the tester with one end to each of the positive wires, and the other - connect the measuring device to ground. The device itself must be put into a current measurement operating cycle. Test tasks: find a cable that produces 12V when the key is turned all the way.