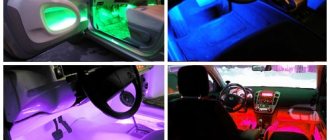
What car enthusiasts don’t do to make their car more convenient and unusual. Some car owners spend a lot of money on professional dashboard tuning. And some craftsmen prefer to do it themselves. This kind of tuning is quite easy to do. In order to replace conventional light bulbs with light-emitting diodes (LEDs), you do not need to have special knowledge or skills. We’ll tell you how to make LED backlighting for the instrument panel in a car with your own hands.
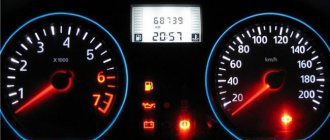
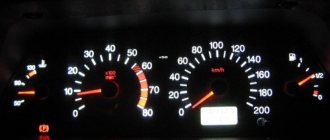
A well-lit dashboard is not only more informative at night, but also has a better view
How to make your own dashboard lighting in a car with LEDs
What car enthusiasts don’t do to make their car more convenient and unusual.
Some car owners spend a lot of money on professional dashboard tuning. And some craftsmen prefer to do it themselves. This kind of tuning is quite easy to do. In order to replace conventional light bulbs with light-emitting diodes (LEDs), you do not need to have special knowledge or skills. We’ll tell you how to make LED backlighting for the instrument panel in a car with your own hands. A well-lit dashboard is not only more informative at night, but also has a better view
Bumper tuning
Tuning the bumper is the simplest option for modifying the Gazelle. At the same time, bumper tuning provides the following additional benefits: Reduced aerodynamic drag and fuel consumption.
- Possibility of “beautiful” installation of fog lights;
- Improved airflow of the water cooling radiator;
- Changing the car's exterior design.
A new bumper costs very little - about 3 thousand rubles. For this money you can get a model made of high-quality plastic, painted to suit every taste. Tuning the Gazelle Next can also be done with an unpainted original bumper, which already has places for mounting fog lights.
As we can see, tuning the Gazelle is more of a necessity than a simple whim of its owner. Properly carried out modernization can not only increase comfort for passengers and the driver, raise the aesthetics of appearance to a new level, but also significantly improve the driving characteristics of the car. Gazelle is the brainchild of the domestic automobile industry, but with properly selected operating conditions and skillful tuning, this car will be able to “compete” with its more famous foreign competitors. Despite the fact that the operation of the Gazelle is several times cheaper.
Source
Disassembling the console
Initially, you need to disassemble the dashboard: remove the protective glass, then the arrows, but keep in mind that they are very fragile, and in order not to damage them, it is better to slip thick paper under the screwdriver; it does not require much effort.
And to remove the dashboard backing you will need a knife, with its help you need to cut through the layer of sealant around the entire perimeter.
After removing the “cover”, use a knife to carefully scratch the filter; it is a special paint. Then degrease this area with acetone or alcohol.
How to make dashboard arrows backlit
The color of the speedometer and tachometer needles is important. If they are white, then you can leave them as they are. But if not, then you need to remove the old paint with a knife and treat them with alcohol, then paint them with white varnish or regular paint.
The color of the arrow should be white, because only it conveys the entire gamut of LEDs.
You can try and highlight the arrows separately. This requires LEDs with a diameter of 3 mm at 12 V.
Important! In the car network, the voltage is 12 V; if the LEDs are designed for a lower value, then they cannot be connected directly. They should be connected through a stabilizer.
If the diameter of the LEDs is larger, you will have to make additional holes for them.
It is recommended to place LEDs either along the entire scale or opposite those values near which the arrow is most often located.
Power plant modernization
In order to reduce fuel costs, many drivers switch their cars to gas. Installing HBO on a Gazelle will cost from 30 thousand rubles.
Many drivers experience the engine overheating. This happens especially often in the summer heat when driving slowly around the city or while stuck in a traffic jam. To solve the problem of overheating of the power plant, owners install an additional fan on the radiator.
One of the cardinal options for tuning a power unit is installing a motor from another car. The most popular engines for these purposes are from Japanese minibuses and SUVs. The cost of the alteration is from 150 thousand rubles. At the same time, it is also possible to improve the original engine by replacing the air filter with a zero filter or installing a turbine.
Schemes for smooth switching on of the backlight
To smoothly turn on the backlight of the scale and arrows, you need to spend a little effort, and more specifically, re-solder the circuit.
Below are two diagrams, in the first case - the dashboard, and then - the arrows. The circuits can be implemented on small pieces of a circuit board, which are sold in radio parts stores.
Consider one important factor: if the LEDs differ in power, they will not light up at the same time, some ahead of time, others late, but in general the backlight will turn on smoothly. This also applies to the LEDs on the scale.
Roof spoiler
There are car enthusiasts who believe that the fairing on the roof of the GAZ 3302 is installed for beauty. The spoiler may be a decoration, but first of all it is intended to improve the technical characteristics of the car. With the fairing, 5-10% of fuel is saved, and the car becomes more stable on the highway. And this is not an advertisement for a product at all - the spoiler is actually a useful improvement for the Gazelle.
It is especially effective on vans or tall Gazelles, where the resistance to oncoming air flow is quite high. It is the fairing that reduces resistance to headwinds.
We collect
When everything is ready, we begin to slowly assemble the console. First of all, we install the substrate. Apply sealant to the back side and glue it to the panel.
Then we put the arrows and protective glass in place. After modernization, the instrument panel looks bright and unusual.
LED lighting not only looks unusual and bright, but is also a good addition to the car in terms of economy, which helps save battery power, since LEDs consume 80% less energy than a regular light bulb.
Source
How to make dashboard lighting with diodes
Many car enthusiasts are not happy with the lighting of their dashboard in the evening and at night. But poor-quality lighting or its complete absence has a negative impact on road safety. Therefore, many craftsmen do auto tuning with their own hands, making additional lighting for their car. And first of all, the dashboard lighting is done.
Very often, LEDs are used for these purposes, which have many advantages and allow you to create high-quality lighting inside the car with your own hands. This article will tell you how you can install this type of lighting in the dashboard and the nuances that should be observed in this situation.
Why do you need additional lighting?
Today, car tuning is carried out not only outside, but also inside its interior, and there is no better place than the dashboard. Diodes built into the panel will allow you to achieve the following positive aspects:
- give the dashboard a new unusual look;
- High-quality illumination of important elements of the dashboard;
- make additional lighting for the vehicle interior;
- make your car ride more comfortable;
- improve road safety. When the instrument panel is well lit, all the indicators are clearly visible on it, which allows you to correctly assess the position of the car on the road and not violate the rules of the road with your driving.
The easiest way to illuminate such an element of a car as the dashboard is to install diodes in it. The following types of LED products can be used here:
- separate diodes. Using them as backlight, you can create full or decorative lighting for the dashboard. It is worth noting that LEDs can glow in different colors. Therefore, such LED lighting can beautifully complement external tuning, glowing with it in the same color scheme;
Note! Additional lighting of the dashboard created with the help of such diodes allows them to be built into almost any part of the board. As a result, the lighting will fully meet the car owner’s requirements and provide illumination where it is really needed.
- LED Strip Light. This tape is very often used as decorative lighting not only for a car, but also for home premises or street elements. It can be easily replaced with another, which will allow you to change the boring color scheme to a new one. The LED strip has a self-adhesive base, with the help of which its installation by hand is quite easy and quite quick.
Despite the ease of working with LED strip, diodes are most often used to illuminate a car dashboard. This choice is associated with certain advantages of using this type of lighting.
Installation
To install the panel, you must remove the old shield. To do this, you need to dismantle the steering wheel using a special puller and unscrew a couple of screws of the decorative lining of the dashboard. You should also unscrew the bolts securing the tidy itself.
To do this you will need a 8" head. After this, you can remove the old panel and put a new one in its place. But as we said earlier, simply switching the connectors will not work. You need a pinout for the Gazelle Business instrument panel. There are four pads in total - XP1, 2, 3 and 4. Let's look at how to connect each:
- XP1. The first, fifth, sixth, seventh contacts are connected to ground. As for the rest, they connect to the sensor signals. The first contact is the air damper closing relay, the third is the DTOZH, the ninth and eleventh are the oil pressure and fuel level sensors in the tank, respectively. The remaining contacts are “Reserve”. We do not touch them and do not connect anything to them.
- XP2. Contacts number two, four, nine are connected to ground. The “plus” terminals are all from the fifth to the thirteenth.
- HRZ. Terminals two and thirteen are connected to the +12V positive contact. The first, eighth and twelfth terminals are connected to ground. The sixth connector is the speedometer speed sensor, the ninth is the ignition coil, the eleventh goes to the engine control unit.
- XP4. Here, almost all contacts need to be connected to ground. This applies to connectors from the first to the seventh inclusive. Only the sensor for the presence of water in the fuel filter (if there is one) and the glow plug switch are positive. These are connectors number eight and nine respectively.
By the way, if the car does not have an ABS and EBD system, the outputs to these sensors must be plugged. How? It is enough to connect them to ground.
So, we found out what the Gazelle instrument panel is, what types it comes in and how it is connected.
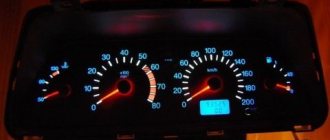
Many car owners of a gazelle or Volga car with an old-style instrument panel strive to replace it with a new-style instrument panel, in which most of the indicators have been replaced with modern LED ones, and such an instrument panel looks much more attractive and brighter. But there’s just one problem: you won’t be able to change the instrument panel one-on-one. Either half of the indicators will not light up, or, on the contrary, extra indicators will light up. Let's figure out how to install a new type of instrument cluster (panel) 385.3801-10 instead of the old panel with light bulbs 384.3801-10, which has served for many years. To begin with, let us present to your attention a combination of instruments of the old and new models.
Why LED lighting is preferable
At the moment, there are a variety of products on the lighting market that can be used to illuminate any brand of car.
Note! Not every make of car actually needs this type of lighting. Some manufacturers include high-quality LED lighting in the dashboard already at the production stage. This situation is usually typical for expensive foreign cars.
Industrial dashboard lighting
Features of organizing LED lighting
LED light bulb for car
Using LED lighting for a car, you can use diode bulbs with a standard base. This way you can illuminate the instrument buttons on the panel. In a situation where several devices need to be illuminated at once, for high-quality lighting you should use an LED bulb placed in a special socket. This requires a special re-soldering. But you can simply buy it in a store or market.
In addition, to illuminate the car’s dashboard and its alarm system, you can use light bulbs that produce a narrow luminous flux. It can be obtained from a regular light bulb by using a special diffuser (lenses) for lighting. Thus, in the first situation, the lighting will be point-like, and in the second, the luminous flux will fall at a certain angle. When organizing button illumination, you can use light sources with a directional luminous flux. But to illuminate the speedometer and alarm panels, preference should be given to bulbs that provide a large scattering angle. Although this can already be left to the individual choice of the car owner.
Block in the cabin
It is located under the panel on the left side, behind the protective cover.
Old style block
| 1 | 16A Electric heater motor, electric heating pump (vehicles with two rows of seats) |
| 2 | 8A Reserve for the electric motor of the additional heater (vehicles with two rows of seats), relay for the electric fan of the engine cooling system (installed on parts of vehicles) |
| 3 | 8A Direction indicators |
| 4 | 8A Instrument cluster, parking brake warning lamp switch, EPH system, windshield wiper relay, reverse light, diagnostic warning lamp |
| 5 | 8A Hazard alarm |
| 6 | 8A Buzzer and lamp for onboard platform lighting, brake signal |
| 7 | 8A Radio equipment, remote battery switch, |
| 8 | 8A Electric motors for windshield wiper and washer |
| 9 | 16A Cigarette lighter, horn, portable lamp sockets |
| 10 | 16A Reserve |
Fuse number 9 at 16A is responsible for the cigarette lighter.
| 1 | 16A Fog lights |
| 2 | 8A Cabin lighting lamp(s), cargo compartment lamp (GAZ-2705, -27057), engine compartment lamp, lamps for the left row of passenger compartment seats and footrest lighting |
| 3 | 8A Instrument cluster illumination |
| 4 | 8A Rear fog lights |
| 5 | 8A Right front side light, left rear side light, license plate lights, side light warning lamp |
| 6 | 8A Left front side light, right rear side light, fog light relay |
| 7 | 8A Left headlight (low beam), electric headlight range control |
| 8 | 8A Right headlight (low beam), electric headlight range control |
| 9 | 16A Left headlight (high beam), high beam indicator lamp |
| 10 | 16A Right headlight (high beam) |
New sample block
| 1 | 25A Engine control system (ZMZ-40522, UMZ-4216) |
| 2 | 15A Hazard warning lights |
| 3 | 15A Ground switch (on buses), radio |
| 4 | 10A Electric motors for windshield wiper and washer, right row of bus interior lamps |
| 5 | 10A Headlight relay, ABS (for buses) |
| 6 | 10A Brake lights |
| 7 | 20A Horns, cigarette lighter |
| 8 | 20A Heater motor, additional heater electric pump |
| 9 | 15A Additional heater motor |
| 10 | 10A Instrument cluster, reverse light, speed sensor, parking brake warning light switch, wiper relay |
| 11 | 5A Oxygen concentration sensor (ZMZ-40522, UMZ-4216) |
| 12 | 15A Engine management system and fuel pump |
| 13 | 10A Direction indicators |
Fuse number 7 at 20A is responsible for the operation of the cigarette lighter.
| 1 | 25A Reserve |
| 2 | 15A Main beam of the right headlight, high beam indicator |
| 3 | 15A High beam left headlight |
| 4 | 10A Low beam right headlight |
| 5 | 10A Low beam left headlight |
| 6 | 10A Fog lights, fog light indicator |
| 7 | 20A Reserve |
| 8 | 20A Reserve |
| 9 | 15A Cabin lamp, lampshade (or lampshades on GAZ-2705, -27057 vehicles with one row of seats) of the cargo compartment, lampshade for lighting the bus steps, engine compartment lamp, left row of lampshades for lighting the passenger compartment of the bus |
| 10 | 10A Illumination of instruments, switches and cigarette lighter |
| 11 | 5A Reserve |
| 12 | 15A Side light on the right side, headlight range control, glove compartment lamp |
| 13 | 10A Side light on the left side, side light indicator, license plate light |
A relay is installed separately under the instrument panel on the left side - a turn signal switch.
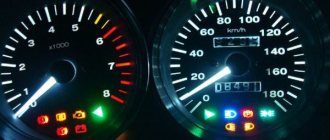
How the arrows are illuminated
Very often, a car needs backlighting of the dashboard arrows.
Instrument needle illumination
In a situation where it is necessary to install diode lighting of the arrows on the dashboard, the following manipulations must be performed:
- We clean the paint of the arrow on three sides. The paint is stripped from the bottom of the arrow and on its sides;
- After this, the cleaned surfaces should be painted over with a white clerical touch or white nail polish. You can also use regular white paint, but it will be a little more fiddly;
Note! Painting the arrow white will help increase the lighting effect.
Filled speedometer needles
- after that we take three LEDs. They need to be soldered together in series;
- The soldered LEDs should be placed in the dashboard. You first need to drill holes in it for installing diodes and masking wires.
Organization of backlighting of stove control buttons
The second most popular situation in organizing the lighting of the dashboard in a car is the illumination of the stove control buttons.
The organization of the backlight of the console buttons intended for controlling the stove is carried out as follows:
- First, remove the handles, as well as the glass from the control unit;
- We make a reflector out of foil. It will need to be secured under the removed glass;
- then carefully unscrew the lower part of the console. Under it there will be a cartridge with an old light source, which must be replaced;
- replace the old light bulb with an LED;
Note! You can install an LED strip under the bottom of the console. Thanks to its self-adhesive base, it will easily take the required position. In this situation, it will be connected with its wires through the cartridge. The main thing here is to maintain the polarity of the wires, otherwise the LED strip will not light up.
- After installing the LED, return all parts of the console to their original place in the reverse order.
Ready-made console lighting
The simplest way to create backlighting involves the following manipulations:
- take the button out of the console;
- we disassemble it into its component elements;
- inside such a button there should be a light bulb that changes to an LED;
- if necessary, you can remove the light filter from the button or combine it with a new diode glow. As a result, you can get a new beautiful and unique shade.
As you can see, illuminating the console designed to control the stove in a car is quite easy.
Simple and fast upgrade
In principle, with your own hands you can either completely replace the instrument panel of a VAZ 2110 or tuning the existing one.
One of the quite popular options is replacing light bulbs with LEDs. Moreover, there is no difficulty in this - you need to remove the light bulbs and insert LEDs in their place.
However, there is one small trick: they work well only if the polarity is observed! If the LED does not light up immediately when connected, you need to remove it, turn it 180 degrees, then reinsert it into the socket.
Even such a simple replacement will increase the brightness of the dashboard, but this is not enough, it is hardly worth completing the tuning with your own hands.
Combined instrument lighting
To implement this type of lighting, you need to stock up on the following materials:
- double sided tape;
- LED in a socket (three pieces);
- foil.
In order to remove the dashboard, it is necessary to clarify the removal steps with the instructions that came with the vehicle. The algorithm of actions here is as follows:
- removing the instrument cluster;
- carefully unscrew the speedometer cable and disconnect all existing plugs;
- illumination sources should be located in the upper part of the instrument panel - three light bulbs. There will also be a green filter here. It can be removed or left;
- The light bulb is being replaced with LEDs and a foil diffuser is being installed. We secure it with double-sided tape.
Ready-made dashboard lighting
After this, all that remains is to assemble all the panel parts and install them in their original places.
Note! In any case, you can safely experiment with the colors of the LEDs in order to get the most beautiful type of glow.
Setting up the ESP-8266
Before connecting the ESP8266 Module to the circuit, it must be flashed and configured in Tcp2uart (tcp to uart) transparent bridge mode so that it transmits the received data from the com port to the tablet via Wi-Fi.
It is better to flash via a USB-UART converter, which must have a 3.3V source output to power the ESP8266. Also, this source must provide the required current of at least 200mA.
The CPIO0 contact determines the operating mode of the module. When the contact is not connected, the module operates in normal mode and executes AT commands. When the contact is closed to ground, the module is switched to firmware update mode. Switching the module to firmware mode requires that the CPIO0 pin be connected to ground when power is supplied to the module. If you close the contact while the module is running, the module will not switch to firmware update mode. Now you need to start Register the COM port of your converter and select the firmware itself fullflash_tcp2uart.bin (). Click Download and wait until the completion process reaches 99%. At this point it will stop and you can turn off the module. Next, you need to supply power to the ESP8266, or directly connect it to the Arduino controller according to the diagram. Once it appears on the power module, run a search for wifi networks on your computer. The ESP8266 network should appear. Connect to it. After this, you need to go to https://192.168.4.1/fsupload in your browser (Enter Name: ESP8266 Password: 0123456789) and download the WEBFiles.bin file to the device (it is in the archive with the firmware). All that remains is to configure the Tcp-Uart bridge. To do this, go to https://192.168.4.1 in your browser. Go to the TCP-UART Settings tab and set the settings as in the screenshot below:
Ready! Now, when the ESP-8266 module is connected to the Arduino, it operates in transparent bridge mode and transmits the necessary data via Wi-Fi.